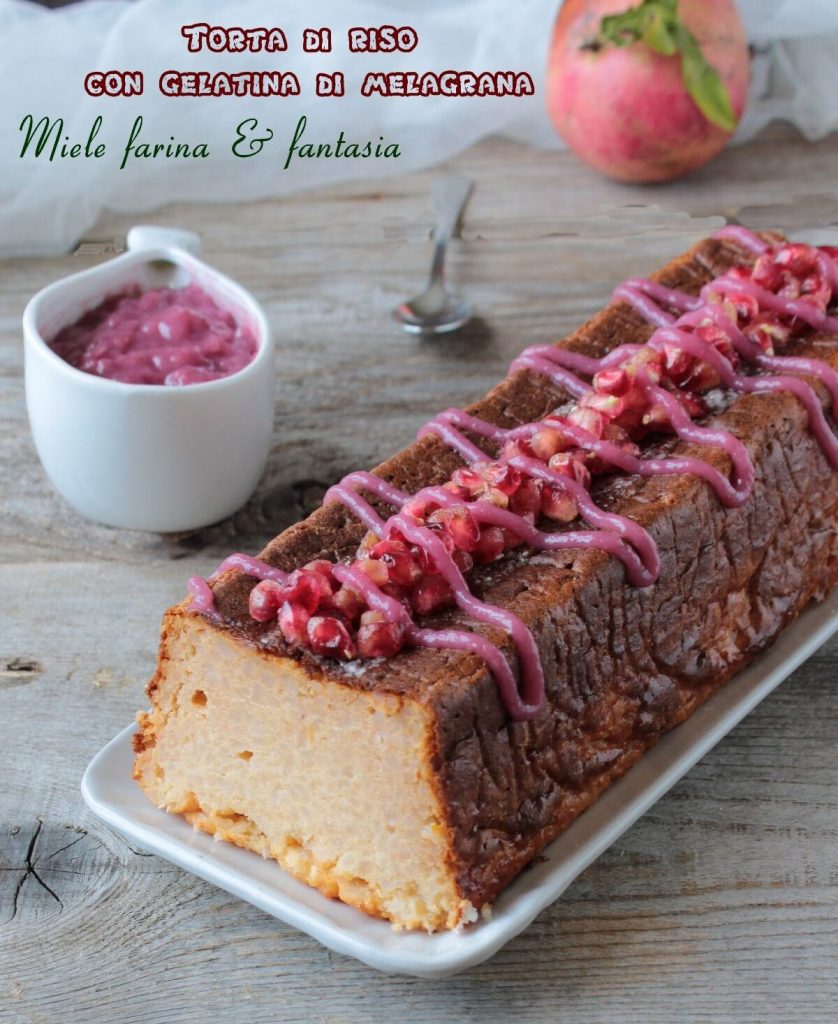
Let’s start thinking about Christmas, particularly about the desserts to bring to the table, which should be beautiful, scenic, but above all delicious and tasty. Today I propose an easy rice cake with pomegranate jelly, a dessert completely gluten-free and lactose-free that will be appreciated for its fragrances and flavors even by those without specific dietary needs. I have been very detailed so that everyone can reproduce it at home without problems or doubts. As with all my recipes, you can obviously customize it according to your tastes; for example, the pomegranate jelly can be replaced with chocolate cream, coffee, orange, and so on.
- Cost: Medium
- Rest time: 12 Hours
- Preparation time: 2 Hours
- Portions: 12
- Cooking methods: Stovetop, Oven, Slow cooking
- Cuisine: Italian
- Seasonality: Fall, Winter
Ingredients
- 1 1/3 cups Originario rice
- 3/4 cup granulated sugar
- 1/2 tsp fine salt
- 1/4 cup butter (also lactose-free)
- 1 orange
- 1 lemon
- 5 cups milk at room temperature (also lactose-free)
- 3 medium eggs (at room temperature)
- 1 tsp liqueur (orange, limoncello, Strega, etc.)
- 3 large pomegranates (about 1.3 lbs in weight)
- 1 1/2 tbsp rice or corn starch (2 tbsps for a slightly thicker jelly)
- 3 tbsp granulated sugar
- 1 tsp lemon juice
- to taste finely grated lemon zest
- 1/4 tsp fine salt
Tools
- 1 Juicer
- 1 Potato Masher
- 1 Loaf Pan
Steps
Some tips before starting to prepare our rice cake.
-My 3 pomegranates weighed a total of 1.23 lbs, from which I extracted 9 oz of seeds and 1 cup of juice.
-To extract juice from the pomegranate seeds, I use a cold press juicer, practical and quick to use. If you don’t own one or don’t need it, you can also use a classic potato masher (as I did until some time ago).
-If the juice is sweet, the amount of sugar I indicated for the jelly is more than enough; otherwise, add a little more according to your taste.
-The amount of starch (rice or cornstarch) I indicated is for a fluid jelly, almost a “coulis”. If you want it a bit less liquid, use 2 tbsps of starch.
-The amount of sugar in the cake is based on the fact that I used lactose-free milk and butter, which are sweeter than traditional ones. If you use traditional milk and butter, the perfect amount of sugar for this cake is 1 cup.
-This cake gets better with time, so I recommend preparing it at least a day in advance and storing it in the fridge, well sealed in a cake container.
Prepare all the ingredients for the cake in front of us.
In a large, thick-bottomed pot, pour the Originario rice, add the sugar, salt, cold butter in pieces, the finely grated zest of a lemon and an orange (already washed and dried), 5 cups of milk at room temperature, mix just enough and onto the smallest burner at medium heat, with a lid, checking often until it comes to a boil, as it may overflow from the pot.
As soon as the milk starts boiling, immediately lower the heat and let it cook until the rice has completely absorbed all the milk. During this time, you can stir only a couple of times (it will take about 30 to 40 minutes, depending on the quality of the rice). The final appearance will be like a dry risotto (I personally prefer to coarsely blend the mixture to make it a bit creamier).
Immediately transfer it to a soup plate and let it cool for 20/30 minutes at most, stirring it from time to time.
While the rice cools, line a 12-inch loaf pan with parchment paper, or you can butter and flour it (a solution I highly recommend, as parchment paper promotes and retains condensation).
When the rice is well warm, separate the yolks from the whites and beat the whites until stiff peaks form (it will take about a couple of minutes).
In the meantime, add the yolks to the rice mixture and mix to soften it (if the yolks are a bit too small, you can add another one).
Then add the liqueur (if you don’t like it, you can add the juice of half an orange and a little more grated zest of your preferred citrus).
Preheat the oven to 180* static or fan forced.
Add a spoonful of beaten egg whites at a time to the rice mixture and, with the help of a spatula, mix with a gentle motion from the bottom, that is, from the bottom of the bowl, upwards, to avoid deflating the egg whites. Continue this way until all the egg whites are finished.
Pour the mixture into the pan, level it with the back of a spoon, gently tap the pan on the table to distribute the content evenly, and into the oven it goes, at mid-height for about 60 minutes. The cooking time varies depending on the type of oven, the type of cooking (if it cooks simultaneously above and below, electric, gas, steam, and so on), so I recommend checking it carefully.
When it seems done, pierce it in the center with a skewer, which should come out perfectly dry.
Remove the pan from the oven and do not touch it for at least three hours. We will notice that as it cools, the cake tends to decrease a bit in volume and lower at the center; it’s normal.
After three hours, carefully flip the rice cake directly onto the serving plate, remove the parchment paper and pan, and let it settle.
Now let’s dedicate ourselves to the pomegranate jelly.
Clean the pomegranates, extract the seeds, and juice them. Weigh it and pour it into a saucepan, together with the sugar, lemon juice, salt, grated citrus zest of your choice, and cook it on a small burner over low heat, stirring continuously until it starts to thicken.
As soon as we notice it is thickening, turn it off immediately and transfer it to a steel or heat-resistant glass container and let it cool completely, uncovered, to avoid condensation. Don’t be fooled by the fact that warm jelly appears semi-liquid. It will reach the right consistency when cold.
The next day we can cut the rice cake into slices and accompany it with a teaspoon of pomegranate jelly.
The extra idea. If you want to decorate the rice cake with pomegranate jelly as I did, leave a small amount (about a coffee cup) of cooked jelly but still boiling. Add a heaping teaspoon of cornstarch and another couple of grams of granulated sugar and mix very well to avoid lumps. Cook it again for 5/7 minutes at most on very low heat, then let it cool, turning off the heat and moving the saucepan away from the burner. The next day it will be perfect for making small decorations that won’t fall off.
Bon appétit