If you are looking for an original and adorable idea for a birthday party or to impress a cat-loving friend with a delicious and beautiful dessert, the cat-shaped cake is the recipe you’ve been searching for. The charm of this cat-shaped cake lies in its accessibility. No special molds or professional pastry skills are required. All you need is a simple round baking pan and two square cookies to simulate the ears, a piping bag for decorations, and you’re set!
This article also includes various recipes for making the base, soaking syrup, filling, and topping, but today I mainly want to show you the simple decoration of this cat-shaped cake, which makes it 100% customizable. For example, instead of using cocoa for the decorative frosting, you can color the icing with food coloring to represent a pink, blue, orange kitten… depending on your tastes and those of the celebrant. Are you ready to surprise your friends and family with a dessert that exceeds expectations? Get ready to discover the fun world of cat-shaped cakes and let your culinary creativity soar!
You might also be interested in:

- Difficulty: Easy
- Cost: Economic
- Preparation time: 1 Hour 30 Minutes
- Portions: 10 people
- Cooking methods: Oven
- Cuisine: International
- Seasonality: All seasons
Ingredients for a 22 cm (9 inches) diameter cat-shaped cake
If you are celiac, you can make the entire cake gluten-free using this gluten-free cocoa sponge cake recipe. Ensure that the following ingredients have the “gluten-free” label: unsweetened cocoa, powdered sugar, Nutella, plain cookies, chocolate.
- 1 sponge cake (cocoa-flavored, 22 cm (9 inches) in diameter)
- 500 g mascarpone
- 1 cup heavy cream (unsweetened)
- 3/4 cup vanilla powdered sugar
- 1 tbsp unsweetened cocoa powder
- 1/2 cup Nutella®
- 2 plain cookies (square)
- 2.5 oz 55% dark chocolate
- 2/3 cup milk
- 1/3 cup water
- 1/3 cup sugar
- 2 tbsps unsweetened cocoa powder
Tools
- 1 Knife long serrated blade
- 2 Bowls
- 1 Spatula
- 1 Piping bag with star nozzle
- Parchment paper
- 1 decorating pen
How to make an easy cat-shaped cake
To prepare this cat-shaped cake, as mentioned, you don’t need a cat-shaped mold: you just need to bake the sponge cake in a 22 cm round cake pan to simulate the face, while the ears will be made of 2 square plain cookies (e.g., oro saiwa). You will draw the actual face with melted chocolate.
Prepare the cocoa sponge cake – ideally the day before so it has time to cool completely – following this recipe if you want to make it gluten-free, otherwise use your preferred recipe. Also prepare the cocoa soaking syrup and let it cool.
When the sponge cake is cold, cut it in half using a long serrated knife, like a bread knife (1). Place each half on a plate, with the cut side facing up (2). Soak each sponge cake disc with the cocoa syrup, using a spoon or a squirt bottle (3).

Prepare the mascarpone frosting using this recipe (4). Take about one-third of it and transfer it to another bowl, then add the cocoa powder (5). Mix carefully to incorporate it into the frosting, resulting in a smooth and homogeneous mixture (6).

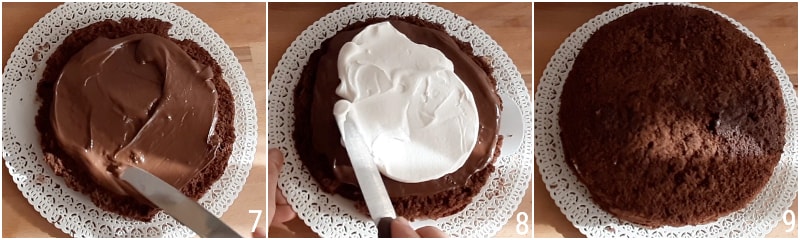
Now fill your cat-shaped cake: spread one of the sponge cake discs with Nutella (7), trying to form an even layer. Then add two generous tablespoons of white frosting and carefully spread it over the Nutella layer (8); finally, cover the cake with the other sponge cake disc, making sure to place the soaked side in contact with the cream (9).
Now for the fun part: decorating your cat-shaped cake! Melt the dark chocolate using a double boiler or in the microwave. Now, if you feel confident, you can draw the face directly on the cake. Since I’m prone to making mistakes, I prefer to do this kind of decoration on parchment paper, let it solidify in the fridge, and then place it on the cake.
To draw the cat’s face, I used a decorating pen, consisting of a sort of tank where you put the melted chocolate and a thin nozzle. If you don’t have such a tool, you can use a piping bag with a very thin nozzle or a sheet of parchment paper folded into a cone.
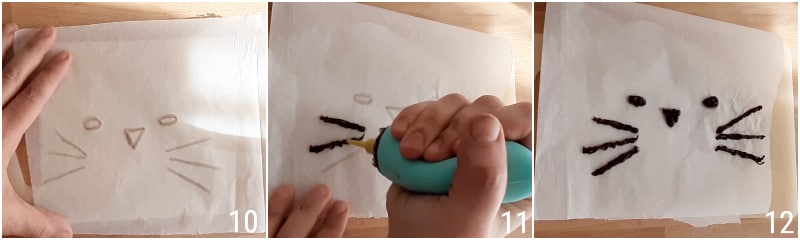
Draw the eyes, nose, and whiskers on parchment paper with a marker (10). Turn it over so that the marker drawings are visible only in transparency, and trace over the drawing using the melted chocolate (11).
Since the lines, especially the whiskers, are quite thin, I recommend going over them two or three times, to form a fairly thick layer of chocolate, otherwise, when you remove it from the parchment paper, it may break. Once the drawing is done (12), put the parchment paper in the refrigerator to dry.
Take the cake and start covering it with the white frosting; first, pour a generous amount on top (13), spread it well, and then cover the sides (14). With a spatula, try to level the glaze as much as possible (15).

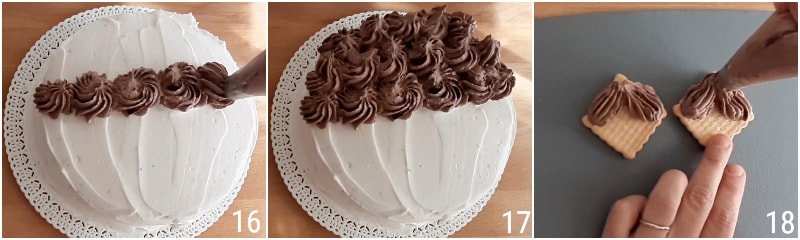
Once the cake is covered with white frosting, put the cocoa frosting prepared earlier in a piping bag with star nozzle. Starting from an imaginary line just above the center of the cake, form rather large tufts (16).
Continue this way until the entire upper half of the cake is covered (17). Now for the ears: take two square cookies and, rotating them slightly to form a sort of rhombus, decorate two sides to simulate the cat’s ear pavilion (18).
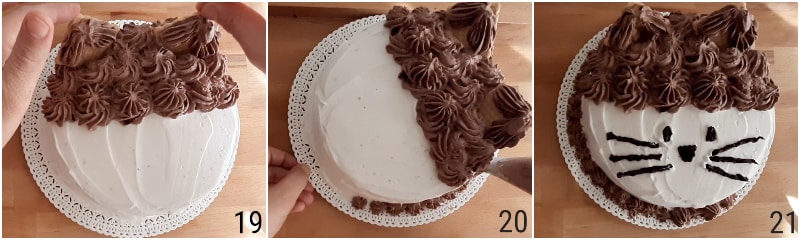
Place the ears on the top of the cake, inserting the undecorated part of the cookies directly into the glaze and pressing firmly to keep them in place (19). With the leftover cocoa frosting, form small tufts at the base of the cake, following its entire circumference (20).
Take the chocolate decorations from the fridge, which should now be hardened. Gently detach them from the parchment paper, using a spatula, and place them on the cake, arranging them on the remaining white part (21).
Your cat-shaped cake is ready! You can serve it immediately, but like all filled cakes, if it rests in the refrigerator for a few hours – even a whole day – it will be tastier. Don’t worry about the decorations: the mascarpone frosting holds up perfectly even for several days without collapsing, and the same applies to the chocolate decorations.

Storage
If you used fresh ingredients and those far from expiration (I’m referring in particular to the cream and mascarpone), this decorated cake will keep in the refrigerator – closed in a cake container – even for 4 days without spoiling.
Tips and Variations
As mentioned, the example shown is just one way to decorate a cat-shaped cake simply and without special tools, but the cake base and filling are completely customizable. You can, for example, use a white sponge cake base, a yogurt cake, or a rainbow cake. To soak the base, if the cake is not for children, you can enrich the cocoa soaking syrup with a tablespoon or two of rum, to be added after it has cooked on the stove. For the filling, you can opt for an Italian-style chantilly, maybe enriched with chocolate chips, or chocolate pastry cream or orange pastry cream. If you prefer a more colorful cake, you can tint the glaze with gel or powder food coloring (not liquid ones, which would dilute the frosting too much), playing with tone-on-tone shades: lightly color the topping glaze and add more for the decorations made with the piping bag.