Quick Pandoro, an alternative to the classic pandoro, made with yeast and quick to prepare. Who said you can’t make one of the classic Christmas desserts at home? So, let’s clarify right away that by quick recipe, it means that you can prepare it in half a day with a single dough. Did you know that to create the classic version, a long rising time is required, as well as a rather laborious process. But if you are looking for a recipe without big demands, but with a pandoro that is shredded and similar to the traditional one, then this is the recipe for you.
To facilitate rising and give a boost to the dough, the recipe involves preparing a biga, which is a pre-dough made with flour, water, yeast, and sugar. After letting this pre-dough rise, you can use it to prepare the pandoro.
Of course, a stand mixer is necessary for this recipe to achieve a well-strung and elastic dough. The result, given the quicker process than the classic pandoro, is exceptional! Very fragrant, soft, a true festive pandoro! But now let’s get to work and head to the kitchen together, because the quick pandoro will be ready in a click!
If you are looking for other Christmas dessert recipes, also read:
- Difficulty: Very easy
- Cost: Very cheap
- Rest time: 4 Hours
- Preparation time: 1 Hour
- Portions: 6People
- Cooking methods: Oven
- Cuisine: Italian
- Seasonality: Christmas, New Year's Eve
- Energy 406.87 (Kcal)
- Carbohydrates 56.51 (g) of which sugars 18.92 (g)
- Proteins 10.33 (g)
- Fat 15.76 (g) of which saturated 9.23 (g)of which unsaturated 5.84 (g)
- Fibers 1.39 (g)
- Sodium 211.08 (mg)
Indicative values for a portion of 107 g processed in an automated way starting from the nutritional information available on the CREA* and FoodData Central** databases. It is not food and / or nutritional advice.
* CREATES Food and Nutrition Research Center: https://www.crea.gov.it/alimenti-e-nutrizione https://www.alimentinutrizione.it ** U.S. Department of Agriculture, Agricultural Research Service. FoodData Central, 2019. https://fdc.nal.usda.gov
Ingredients
- 2/3 cup Manitoba flour
- 3 tbsp water
- 1 tbsp dry yeast
- 1 tbsp sugar
- 2 1/8 cups Manitoba flour
- 1/2 cup sugar
- 2 tbsp water
- 2 oz eggs
- 1 1/4 oz egg yolks
- 3 1/4 oz butter
- 1 packet vanillin
- orange zest (to taste)
- lemon zest (to taste)
- 1/2 tsp salt
Tools
- Stand Mixer
- Pandoro Mold
- Bowl
Steps
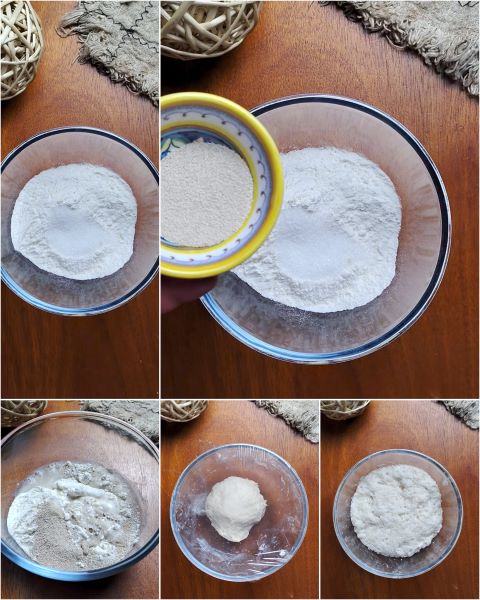
First, prepare the biga, which will have to rise for about a couple of hours. Also remove the butter at least a couple of hours before, as it should be soft when used. So put the flour with the yeast, sugar, and water in a bowl and start kneading until you get a smooth and homogeneous dough ball. Cover the bowl with some plastic wrap and let it rise until doubled. It took me a couple of hours. If you want to facilitate this step, you can put the bowl in the oven with the light on.
After the rising time, transfer the biga into the stand mixer’s bowl with the flour, half the water, and 1/3 of the sugar taken from the total. Start kneading with the hook for a few minutes until the flour has absorbed all the ingredients added before.
Now add the egg, the remaining water, and another part of the sugar. Start the stand mixer again and knead all the ingredients until they are well combined. At this point, also add the yolks and the remaining sugar and continue kneading until the dough is well-strung. What does it mean? The dough will be perfectly strung when it stays attached to the hook, and by pulling a part of it, it stretches without breaking. This operation will take about 15 minutes.
A small note on the quantity of eggs. I gave you the doses by weight because eggs are not all the same size. In any case, the egg doses correspond to 1 egg and 2 yolks. However, I advise you, precisely for the reasons I mentioned above, to take the doses expressed in grams as a reference.
Let’s get back to the preparation of the pandoro. While the stand mixer is running, put the butter in a small bowl and add the lemon zest, orange zest (better if untreated), and vanillin. Mix with a spoon until you get a cream.
Then add the flavored butter cream to the dough. Please, add one teaspoon at a time and add the next one only when the previous one is well combined and strung. At times it will seem like the dough is tearing apart, and you might be tempted to throw everything away. Don’t lose heart! You will need to be patient, but you will see that the final result will be rewarding!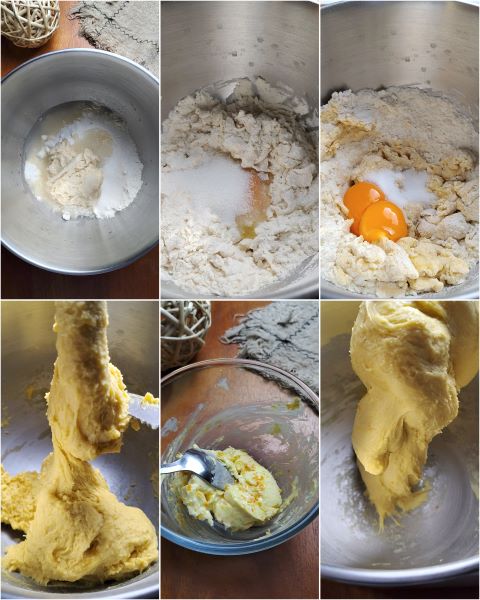
Next, stretch the dough with your hands (not with the rolling pin, but with your hands), to form a large rectangle of 12×16 inches. You will see that the dough will be very elastic and will not break. This is because a perfect gluten network has formed.
Fold one side towards the center and overlap it with the second. Then roll the dough onto itself, pinching the edges well. Form a ball and place it with the seam side up, in a 500 g pandoro mold, previously buttered and floured.
Cover with plastic wrap and let it rise in the turned-off oven with the light on for at least 4 hours or until the dough has reached the edge of the mold. It took me 4 hours, but it might be necessary to wait up to 5 or 6 hours. To facilitate this operation, you can put a bowl with hot water inside the oven.
Finally, bake the pandoro in a preheated static oven at 293°F for 55 minutes, in the middle part of the oven. To understand if the pandoro is cooked, you will need to measure the internal temperature with a kitchen thermometer, which should be 198°F.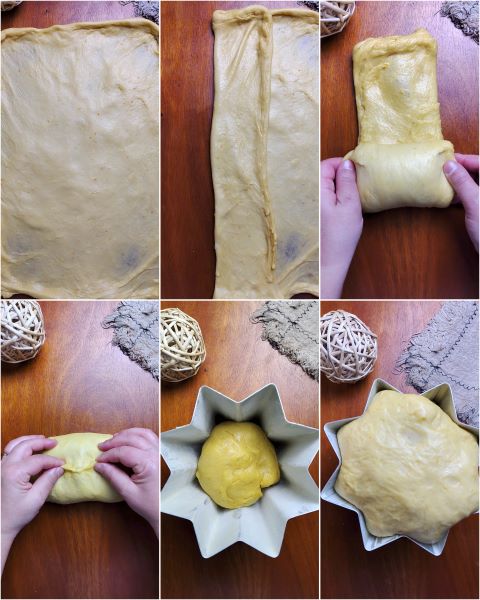
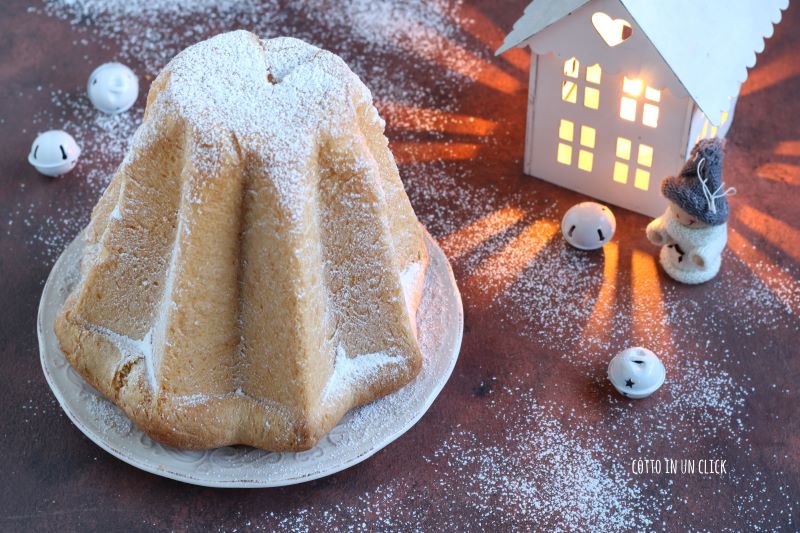
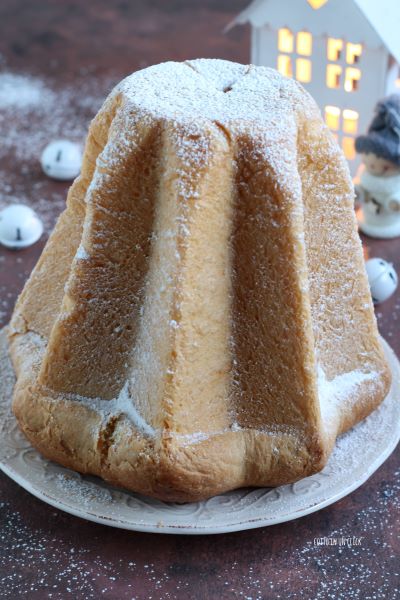
Then remove the pandoro from the oven and let it cool. Afterward, take it out of the mold and serve it with powdered sugar. Merry Christmas to all!
Storage and Tips for Quick Pandoro
The quick pandoro can be stored for 1 to 2 days in a cool and dry place, in a food bag, or covered with a glass dome
FAQ Questions and Answers for Quick Pandoro
Why does the top part become too dark?
It’s normal. To prevent it from coloring too much, you can cover the surface with aluminum foil.
Is it normal for the dough to tear when I add the butter?
Yes, it’s completely normal. You need to be patient and continue kneading with the mixer until it becomes strung again. The important thing is not to rush to add the butter but to add the next piece only after the previous one is well incorporated into the dough.
This content also contains one or more affiliate links, on which I may earn a small commission at no extra cost to you.