Who wouldn’t want to have breakfast every day with a cappuccino and homemade croissants? Delicious French pastries, famous worldwide and highly appreciated in the morning. Ideal enjoyed plain, or with custard, jam, or hazelnut spread, these French rolls are loved by everyone.
I must confess right away that the recipe is not quick to make, but it will bring you great satisfaction! Different from Italian rolls, croissants have a puff pastry dough, without eggs and without butter, which is instead found in the lamination. The most important part of the preparation, which makes these rolls special both visually and in taste.
Characterized by a strong butter note, yet as light as clouds and very delicate. Crunchy on the outside and airy inside, these croissants will win you over at first bite. I had wanted to try replicating them for a long time, but just the thought of doing all the lamination steps with accompanying waits didn’t thrill me much. However, in this recipe, you will find some tricks and tips to circumvent the long resting times in the fridge, but I’ll talk about that later.
And so one Saturday afternoon, while browsing social media, I came across a video of these French laminated rolls and got curious besides having a crazy craving to eat one immediately. They’re not the simplest, but believe me, by following all the steps and advice, I’m sure it will be easier than you think, as it happened to me.
Well, what else can I say? I think we can get to work, what do you say? Then let’s go into the kitchen together, because the homemade croissants will be ready in a click!
If you’re interested in more breakfast pastry recipes, also read:

- Difficulty: Very easy
- Cost: Very economical
- Rest time: 2 Hours
- Preparation time: 3 Hours
- Portions: 8 Pieces
- Cooking methods: Oven
- Cuisine: French
- Seasonality: All seasons
- Energy 283.72 (Kcal)
- Carbohydrates 31.89 (g) of which sugars 6.18 (g)
- Proteins 4.02 (g)
- Fat 16.55 (g) of which saturated 10.45 (g)of which unsaturated 6.06 (g)
- Fibers 4.22 (g)
- Sodium 292.66 (mg)
Indicative values for a portion of 48 g processed in an automated way starting from the nutritional information available on the CREA* and FoodData Central** databases. It is not food and / or nutritional advice.
* CREATES Food and Nutrition Research Center: https://www.crea.gov.it/alimenti-e-nutrizione https://www.alimentinutrizione.it ** U.S. Department of Agriculture, Agricultural Research Service. FoodData Central, 2019. https://fdc.nal.usda.gov
Ingredients
- 2 cups flour (W 260 or with at least 12% protein)
- 1/4 cup water (at room temperature)
- 1/4 cup milk (at room temperature)
- 3 tbsp sugar
- 1 1/2 tsp dry yeast
- 1 tsp salt
- 5 oz butter (softened)
- 1/4 cup all-purpose flour
Tools
- Stand Mixer
- Mixing Bowl
- Rolling Pin
- Baking Sheet
- Parchment Paper
Steps
First of all, let’s talk about the type of flour. For this type of dough, you will need to use flour with at least 12% protein. You can find these indications on the package, in the table indicating all the nutritional parameters. I used W260 flour.
You can also make this dough using a stand mixer, which will certainly be faster and more practical, or as I did, kneading by hand. In this latter case, you will need a little more patience to work the dough until it is smooth and homogeneous. Another tip I leave you is to take the butter out of the refrigerator at least a couple of hours before to work it more easily. Also, cut it into chunks, it will be easier for you.
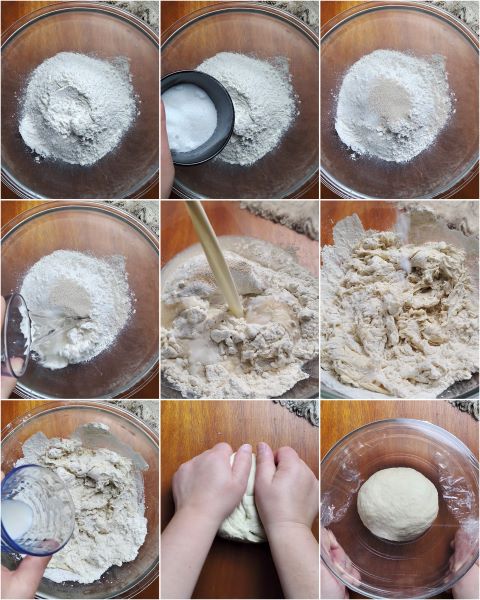
Now let’s start with the recipe steps. Put the flour with the yeast, sugar, water, and part of the milk in the mixing bowl. Start mixing with a spoon, then when the liquids have absorbed the powders, add the salt and the remaining milk. Knead either by hand or with the stand mixer using the hook, for at least 10 minutes, or until you obtain a smooth and homogeneous dough.
Subsequently, cover it with cling film and let it rise for 2 hours or until doubled.
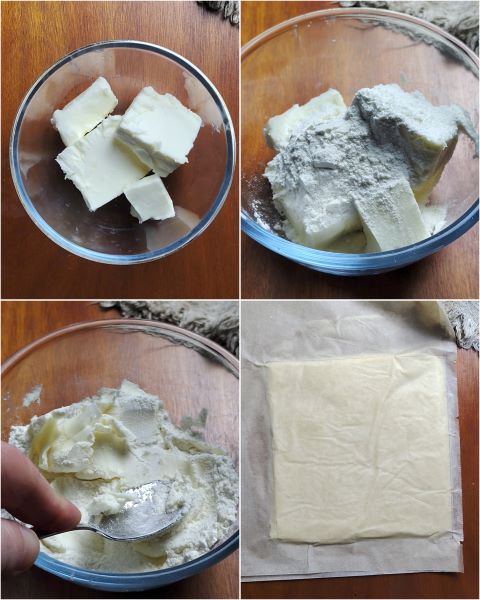
In the meantime, as the dough rises, prepare the butter for lamination. Put the butter in a bowl with the flour and mix the two ingredients well. The addition of flour will help absorb the water content in the butter and thus prevent it from breaking during lamination. In fact, this way, the butter will become more pliable.
Then spread it between two sheets of parchment paper, in which you have drawn a square of 8 inches on each side. Cover well and leave to rest in the fridge. The butter must be at a temperature of 39°F to be incorporated during lamination. If it is too warm, let it rest in the refrigerator; otherwise, you risk the butter oozing out during lamination. Don’t rush! Rushing in these preparations is a bad companion.
After the dough has risen, take it and turn it over onto a floured surface. Roll it out to form a rectangle 1/2 inch thick and 14 x 8 inches. Place the butter pat in the center, bring the two empty sides of dough towards the center to cover the butter without overlapping them. Seal the edges well and let it rest in the fridge for at least an hour, covering the dough with plastic wrap.
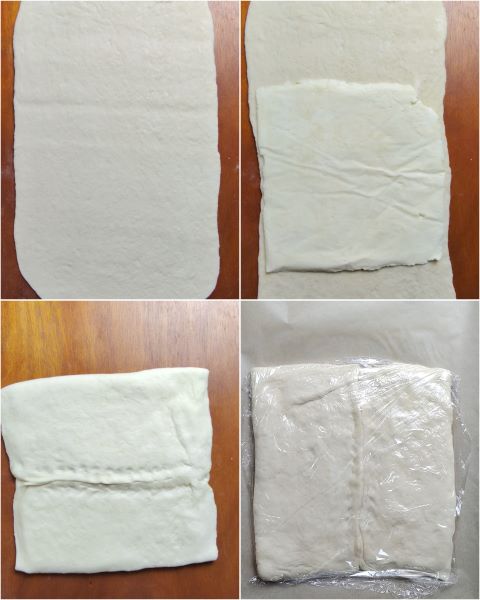
After this essential rest so that the dough also reaches a temperature suitable for not warming the butter, take the dough and roll it out in the direction of the folds, forming a rectangle 1/4 inch thick. To help you, you can give a few taps to the dough with the rolling pin and roll it out more easily. The butter must not ooze out! If it happens, let the dough rest in the refrigerator again.
Now form the first 4-fold: fold the dough 3/4 and 1/4. Then fold the dough over itself, wrap it in plastic wrap and let it rest in the freezer for 25 minutes. Here’s the trick to not wait another hour of rest in the refrigerator and speed up the time. Remember, the dough must not freeze, but simply cool down again after being rolled out with a rolling pin, so the butter does not melt and ooze out during handling and rolling.
Retrieve the puff pastry again and roll it out in the direction of the folds, until forming a rectangle 1/4 inch thick. Then fold one flap of dough by 1/3 and overlap the other. That’s the 3-fold done. Wrap the puff pastry again in plastic wrap and let it rest in the freezer for 15 minutes.
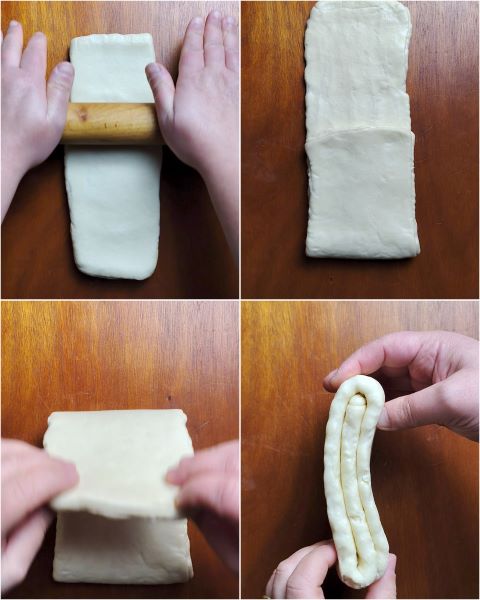
And now, after all the folding rounds are done, it’s time to carve out the croissants. Roll out the dough one last time to form a rectangle 1/4 inch thick and with the dimensions of 16 x 8 inches. Cut into 8 triangles and form the croissants by slightly pulling the tip. The longer the triangle is, the more turns you will be able to make and the better the result will be.
Place the croissants, spacing them apart, on a baking sheet lined with parchment paper and let them rise again for 1 or 2 hours, until doubled. Then brush the surface with egg yolk beaten with a little milk.
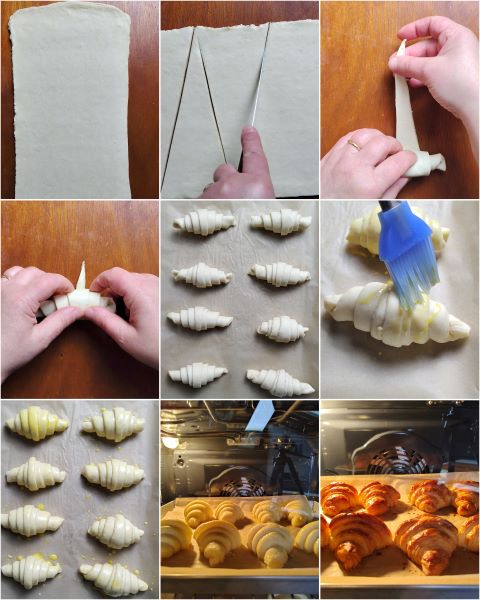
Bake the French laminated rolls in a preheated oven at 356°F with static function for 30 minutes or until the surface is golden.

Storage and Tips for Homemade Croissants
The laminated brioches can be stored in a cool, dry place for 1 or 2 days, covered with a glass dome.
Please, do not rush! It’s easy to waste hours of work and have to start all over. Respect the indicated rest times and if necessary extend them, evaluating the consistency and temperature of the dough each time, to avoid the butter melting during rolling and oozing out, thus compromising the work done
This content also contains one or more affiliate links, on which I may earn a small commission without changing the price.
FAQ Questions and Answers for Homemade Croissants
Can they be frozen?
Yes, of course, once the rolls are formed, you can freeze them by placing them on a tray for 1 hour. Then you can put them in freezer bags. This way, you can store them for 1 or 2 months. When needed, take them out of the freezer and let them defrost in the refrigerator, covered. Then let them sit at room temperature until doubled for a couple of hours and bake them as indicated above in the recipe.
Can they be prepared the day before?
Yes, you can form the rolls the day before and leave them in the refrigerator overnight, covered with plastic wrap. The next day (the following morning) leave them at room temperature for a couple of hours until doubled and proceed as indicated in the recipe