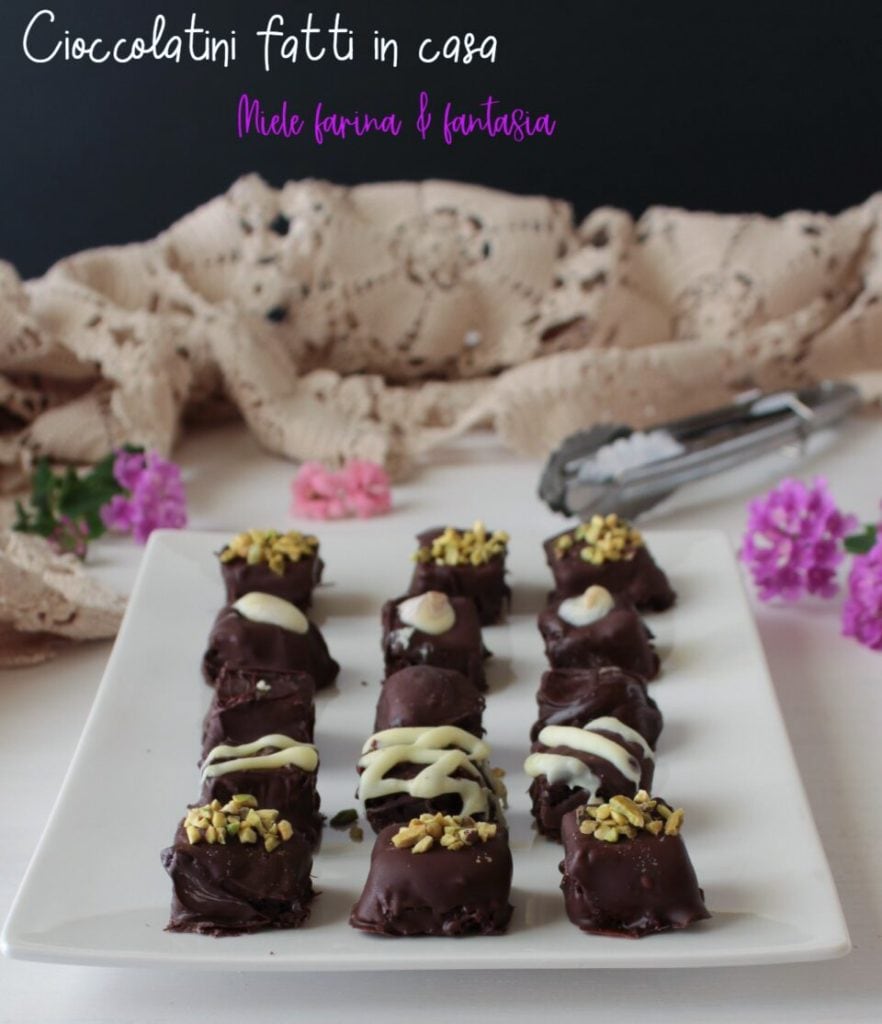
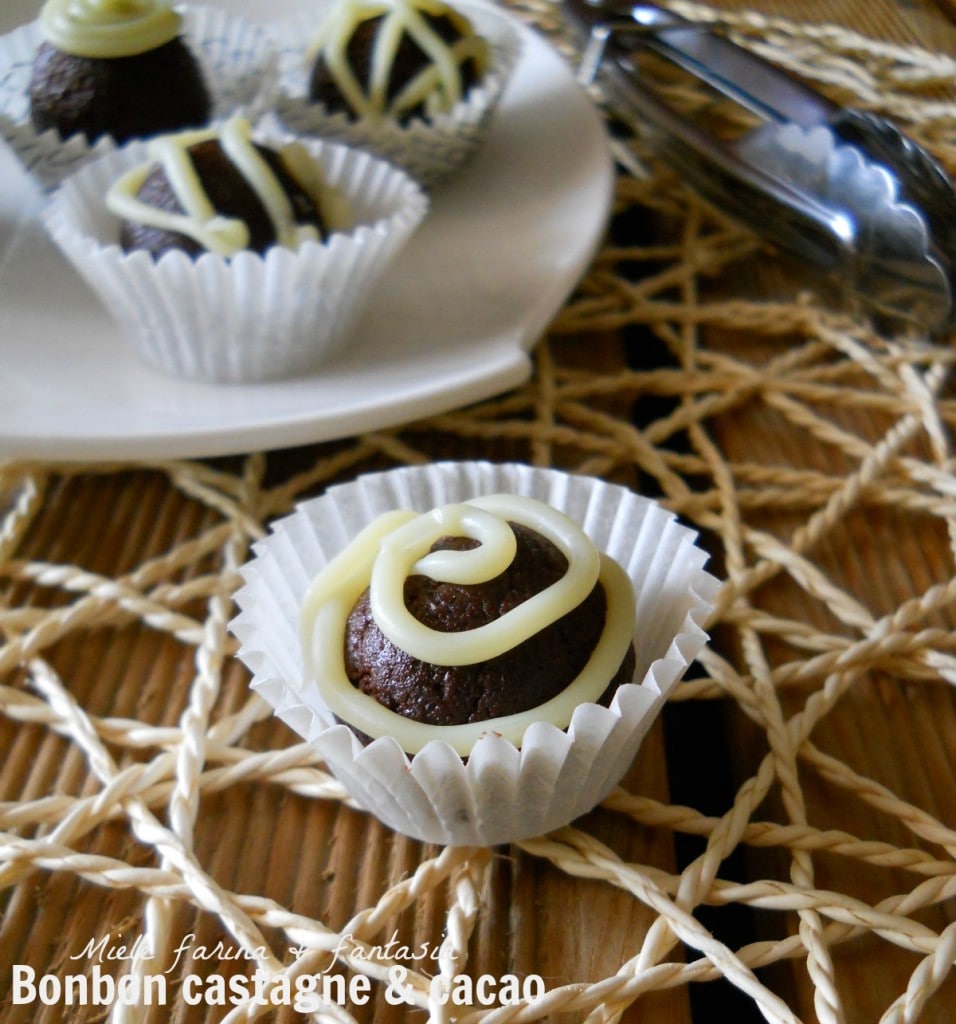
Would you like to make delicious homemade chocolates with your own hands, customizing them as you like, depending on the occasion and taste? I propose a really easy recipe, where you don’t need to have any specific utensils or tools. These are small chocolates that do not require cooking, do not contain gluten or eggs. They are quick to prepare, perfect as a gift idea or as an end of meal accompanied by good coffee or tea. The main ingredient will be your choice, and if you make chocolates with different flavors, you can distinguish them by giving them different shapes, as I did; in fact, the chocolates in the cover photo, rectangular in shape, are flavored with coffee and anise; while the spherical ones, more properly “bonbons”, contain chestnut flour in the mixture. Besides chestnut flour and coffee, you can characterize them with almond flour, peanut flour, coconut, orange paste, and so on. These delicious chocolates, once formed, can be left “naked” or rolled in cocoa powder, almond granules, pistachios, coconut, etc. We can also cover them with dark or white chocolate to make them even more elegant, refined, and delicious.
- Difficulty: Very easy
- Cost: Medium
- Rest time: 1 Hour
- Preparation time: 10 Minutes
- Portions: 45
- Cooking methods: No cooking
- Cuisine: Italian
- Seasonality: Autumn, Winter, and Spring
Ingredients
- 2/3 cup unsweetened cocoa powder gluten-free
- 4 oz cold butter in chunks (also lactose-free)
- 1/3 cup granulated sugar
- 1 pinch fine salt
- 4 tbsp cold milk from the fridge
- 1 cup chestnut flour gluten-free
- 1 packet vanillin
- 1 tsp liqueur (Amaretto, Strega, Rum, etc…)
- to taste grated orange zest
- 1 tbsp instant coffee powder
- 1 tbsp anise liqueur (level)
- 1/2 packet vanillin
- 9 oz 50% dark chocolate
- 7 oz white chocolate
Steps
Chestnut flour chocolates.
We can prepare the mixture either by hand or with a mixer; I used the latter for my convenience.
Cut the butter into cubes.
In the bowl of a mixer, put all the ingredients (except milk and liqueur) that make up the base of the chocolates, to which we will add the chestnut flour (which can be sifted with the cocoa), vanillin, orange zest, the pinch of salt and start mixing the ingredients at speed 1 until the butter is reduced to crumbs (it took me about 20 seconds).
Add milk and possible liqueur, turn the mixer back on and knead until a firm and uniform mixture is obtained (it takes a few seconds). Butter chunks will still be visible; this is normal.
-This step can also be done differently: put all the ingredients in a bowl and, with the help of a fork, crush the butter and mix it with the other ingredients, using cold milk from the fridge (be sure) and liqueur (if desired). It will take a few more minutes, but the result will not change-
If we want to prepare spherical bonbons: cover the obtained mixture, leaving it in the bowl where we worked it and put it in the fridge to firm up for an hour. After resting in the fridge, take a small amount of mixture, slightly larger than a shelled hazelnut, and shape it into a ball, working it with the palms of your hands without crushing it.
Once we have our chocolates, put them back in the fridge for at least 1 hour, to allow the butter to firm up and the chocolates to flavor. I recommend leaving them in the fridge overnight, in a container with a lid.
For decoration (to be done after the fridge step). Melt the chocolate in a bain-marie, making sure the water does not boil and that any splashes of cold or boiling water do not fall into the melted chocolate, making it seize and unusable.
Coat our bonbons (or cuboids) with the melted chocolate and immediately place them on parchment paper to dry. In this step, it will be useful to use a fork, which will allow us to glaze the chocolates without ruining them and to let the excess chocolate drip off. Put the glazed chocolates in the fridge, well-closed in a cake holder, until ready to serve them, if the room temperature is too high.
If you wish to decorate the bonbons as in the picture below, you will need a parchment paper cone or a small “piping bag” and a nozzle with a very small circular opening, such as Wilton number 4. After melting the white chocolate in a bain-marie, let it cool at room temperature for about 10 minutes; then put it in the piping bag and decorate using your imagination.
Coffee and anise chocolates
In a bowl, put a heaping tablespoon of instant coffee powder (I like to taste the coffee; you can also put less if you desire), a level tablespoon of anise liqueur, vanillin, and all the other base recipe ingredients, making sure to add only 3 tablespoons of cold milk from the fridge unless the mixture requires more because it’s too hard. Mix all the ingredients until you get a firm mixture, as described above.
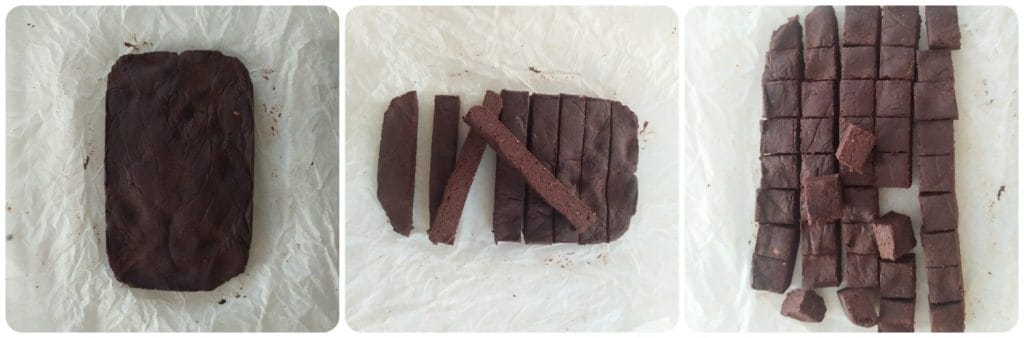
Now prepare a 8-inch tray covered with parchment paper and pour the mixture into it. Level it well, cover it with more parchment paper or plastic wrap, and put it in the fridge to firm up for at least an hour.
After an hour, take our parallelepiped-shaped block and place it on a cutting board. Cut it from the short side into finger-width strips; then, from the long side, cut the strips again, obtaining small chocolate cubes to be covered with melted chocolate and, if desired, decorated with chopped nuts (almonds, hazelnuts, walnuts, pistachios).