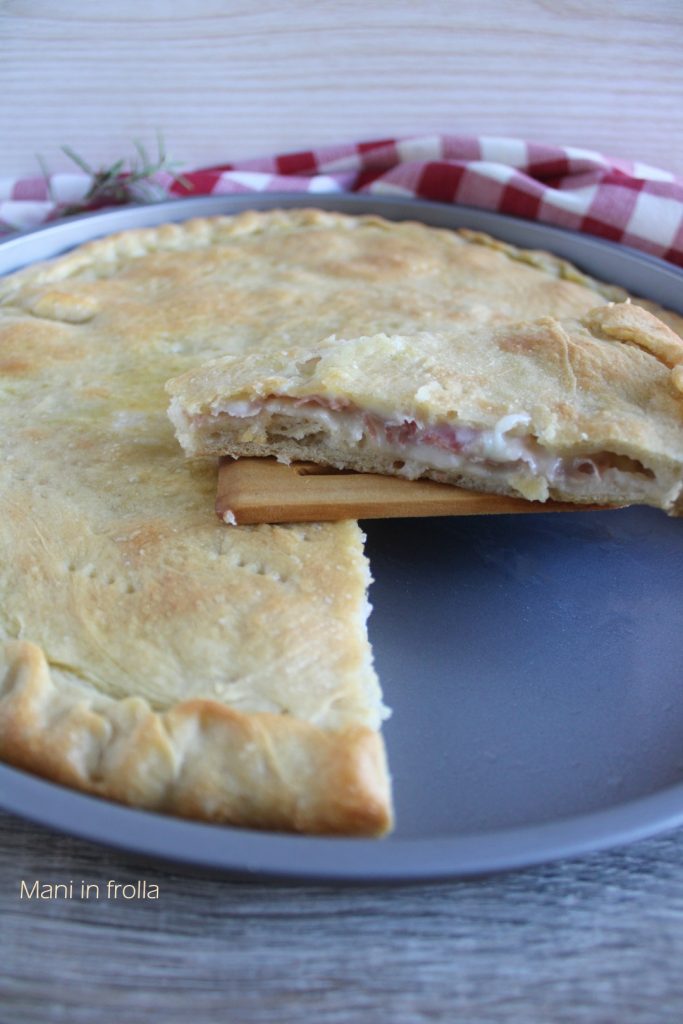
Stuffed Focaccia with Ham and Cheese, a classic that everyone always loves. Crispy on the outside and melty inside, it’s the ideal solution not only as a quick dinner fix but also to enhance an aperitif with friends or to make a family Sunday special.
This focaccia is the ideal choice for those looking for a tasty idea without spending hours in the kitchen. As I said, it’s great not only for dinner but it’s also perfect for a wholesome snack or to slip into your bag for a quick lunch at the office or school.
In addition to being very versatile, this recipe is perfect for preparing in advance. If you want to serve it for lunch, for example, you can opt for a slow rise. Prepare the dough the night before, using half the amount of yeast, and place it in the fridge; the next day, it will be ready to roll out and bake.
Try it now following all my tips: I’m sure you’ll love it too.
A little off-topic confession: photographing this focaccia was a real challenge! My family didn’t even give me time to set it up before a slice disappeared. In fact, if you look closely at the photos, you’ll notice the focaccia mysteriously shrank after each shot… the ultimate proof of how irresistible it is!
Let’s see together how to make the recipe for Stuffed Focaccia with Ham and Cheese. Gather the ingredients and let’s get started!
And if you try it, don’t forget to let me know in the comments on my Facebook page HERE. If you like, give the page a Like: it would make me really happy. I’ll be waiting for you.
Gabriella
Other tasty recipes to try:
- Difficulty: Easy
- Cost: Cheap
- Rest time: 2 Hours 15 Minutes
- Preparation time: 15 Minutes
- Portions: 4 People
- Cooking methods: Oven
- Cuisine: Italian
- Seasonality: All seasons
Ingredients
For a 28 cm (11-inch) round pan
- 2 1/2 cups flour
- 1 tsp dry yeast (or 6g of fresh yeast)
- 3/4 cup water (at room temperature – not cold)
- 1 1/2 tbsp extra virgin olive oil
- 1 tsp salt (about 7 g)
- 5 oz ham
- 2 mozzarella (or 200g of pizza mozzarella)
Tools
- 1 Stand Mixer
- 1 Pastry Board
- 1 Rolling Pin
- 1 Baking Pan
Steps
First, pour the flour and the yeast into the stand mixer’s bowl and start working the mixture at low speed. This step helps to oxygenate the flour and evenly distribute the yeast, ensuring an even rise without lumps.
If you use fresh yeast, remember to crumble it very well with your fingers into the flour.
Next, gradually pour the water in a thin stream while keeping the stand mixer at a constant speed. Continue to work the dough until it is smooth and starts detaching from the sides of the bowl.
It is essential not to add all the water at once: by pouring it slowly, you allow the flour’s proteins to properly absorb the liquids, beginning the formation of the gluten network.
Once the water is completely absorbed, add the extra virgin olive oil in several batches. Pour a little, let the dough incorporate it completely, and only then proceed with the next dose.
Only at this point, add the salt. Continue kneading until the dough is shiny, elastic, and perfectly combined, meaning completely detached from the sides of the bowl and wrapped around the hook.
Transfer the dough into a greased bowl, cover with plastic wrap, and let it double in a warm place, like the oven with the light on, for about 1 1/2 to 2 hours.
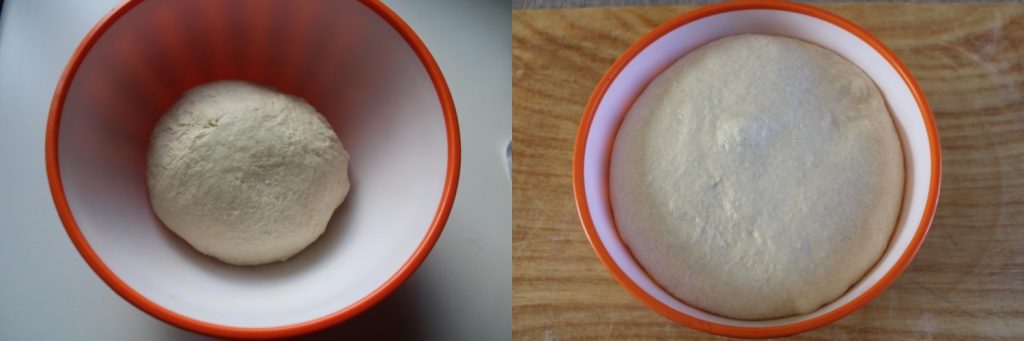
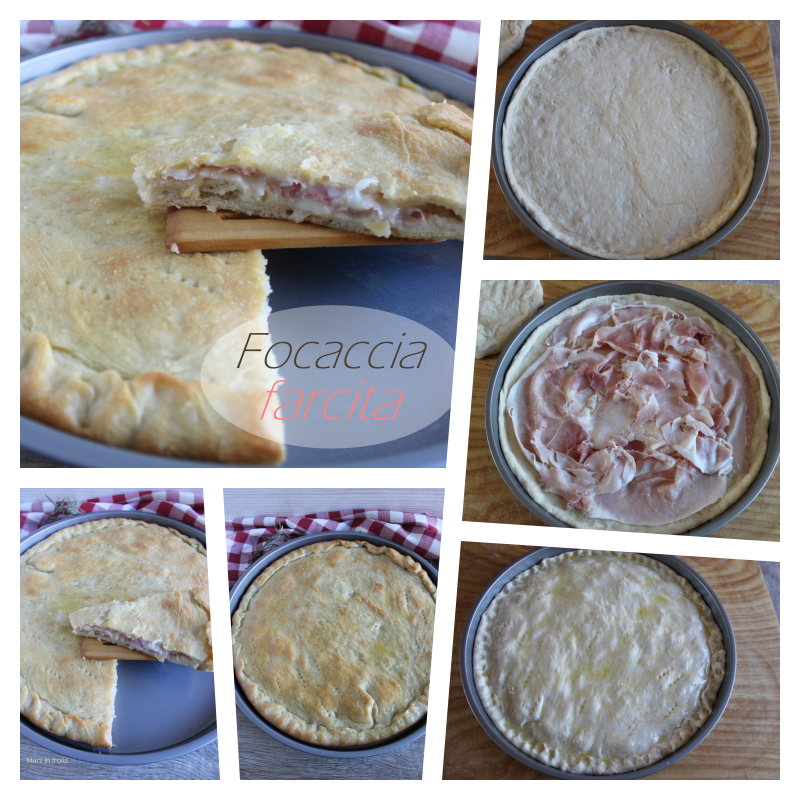
Divide the dough into two parts: one slightly larger (about 300g for the base) and a smaller one (about 200g for the top). Let them rest for about 15 minutes on the pastry board.
Roll out the larger dough ball on a lightly floured pastry board and lay it inside a baking pan (well-oiled), molding it so it slightly rises along the side walls.
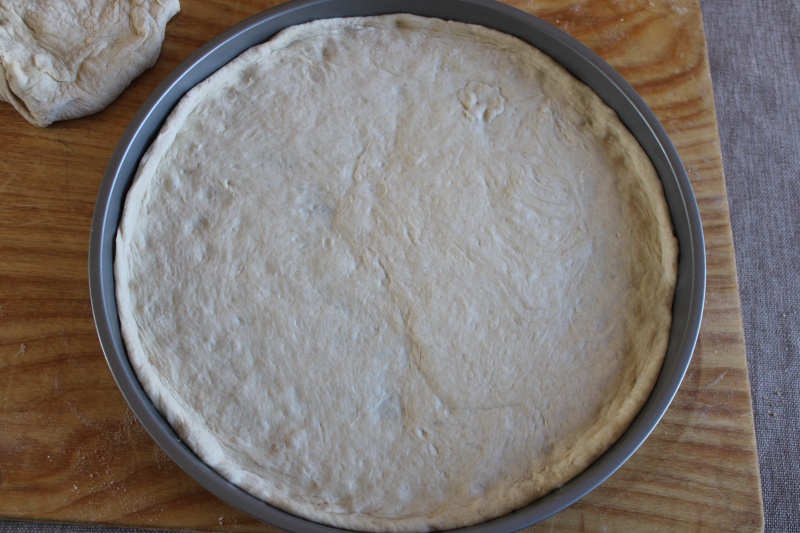
Small tip: if the dough is very elastic and tends to “shrink” while you’re rolling it out, let it rest for 5 minutes in the pan and then resume. The gluten will relax, making the rolling much easier.
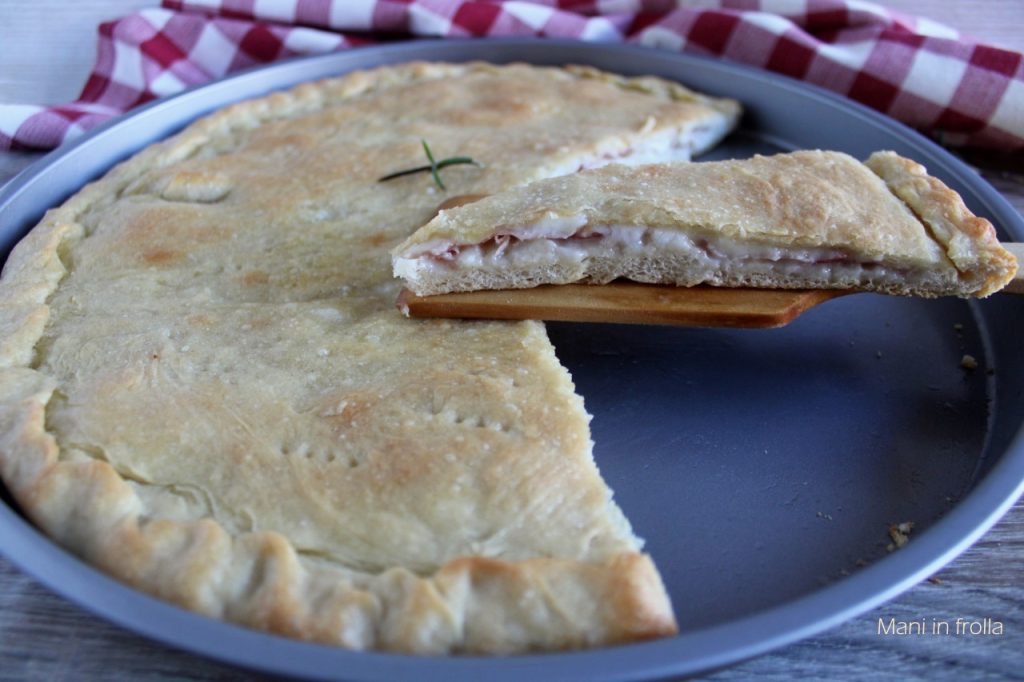
At this point, evenly distribute the slices of cooked ham over the base, then add the mozzarella previously cut and well-drained, making sure to leave a centimeter free from the edge.

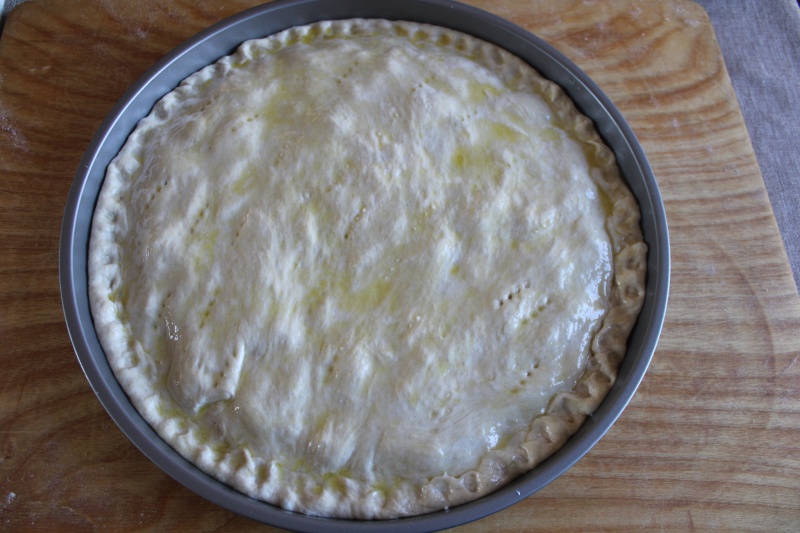
Roll out the second part of the dough very thinly and place it over the filling. Seal the two layers by pressing firmly along the edges, then fold them inward to form a uniform rope.
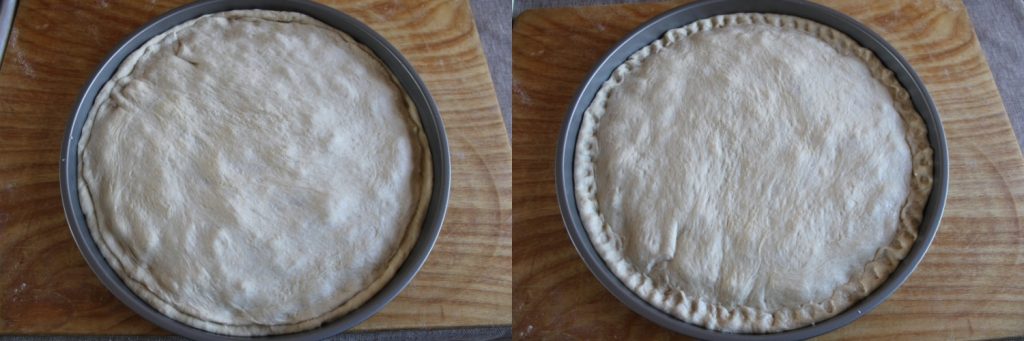
With the tines of a fork, prick the surface: this will allow steam to escape during baking, preventing the focaccia from puffing up. Finally, brush with a mix of water and oil and sprinkle with a pinch of salt.
Transfer the pan to a preheated static oven at 428°F (220°C) and bake for about 18-22 minutes.
Tip for a crispy base: for the first 8-10 minutes, place the pan directly on the oven floor, then move it to mid-height to finish browning.
The focaccia will be ready when the surface is evenly golden and the edges appear crispy and slightly detached from the pan walls. Brush it again with a drizzle of olive oil.
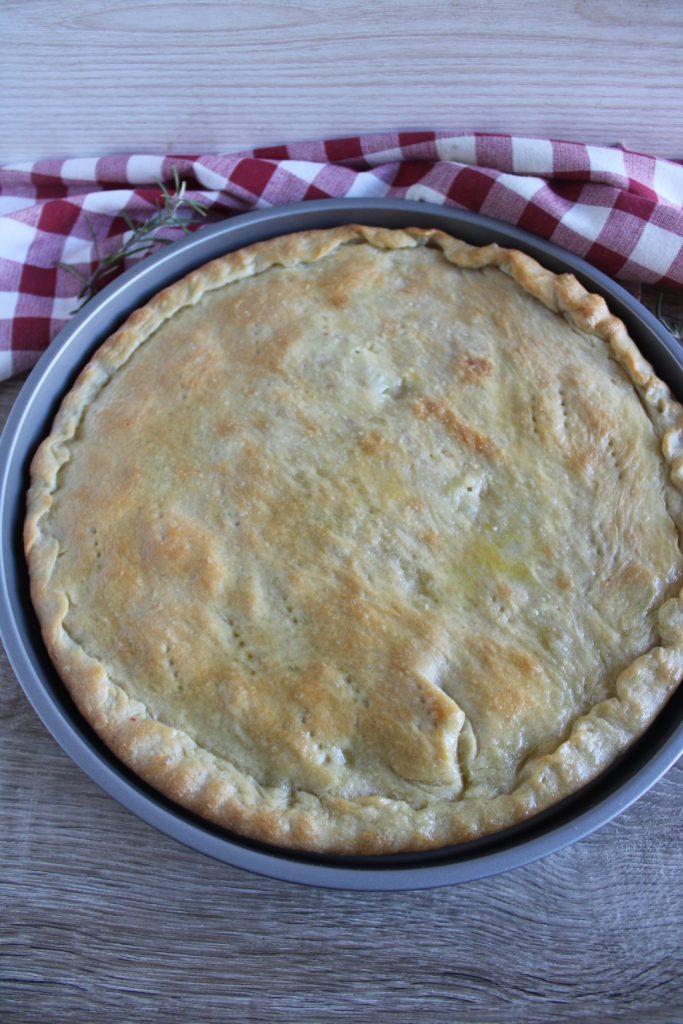
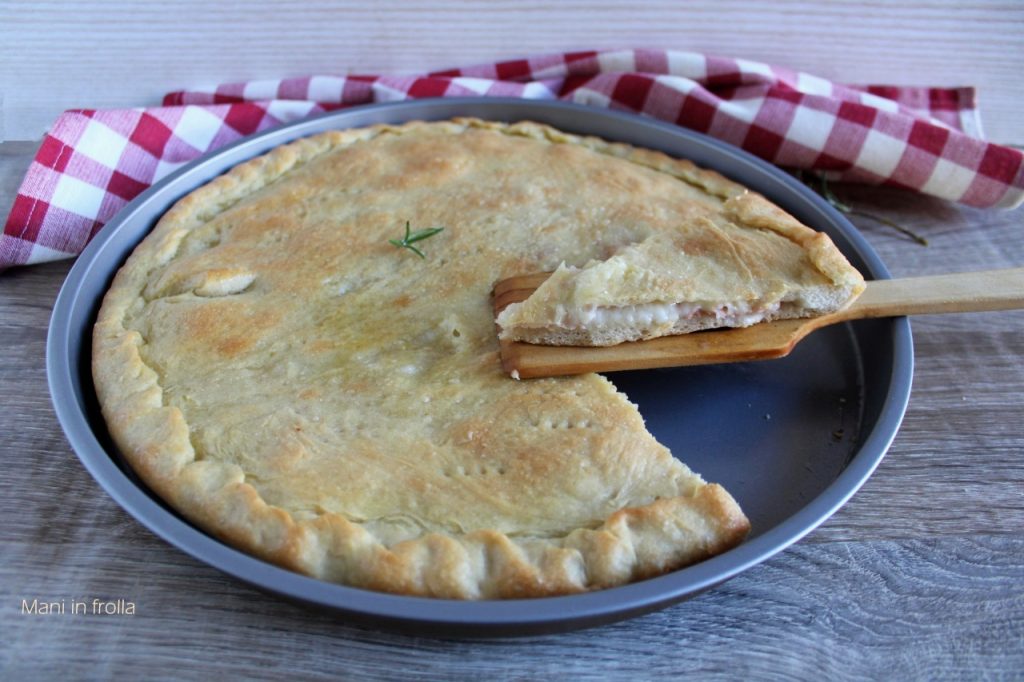
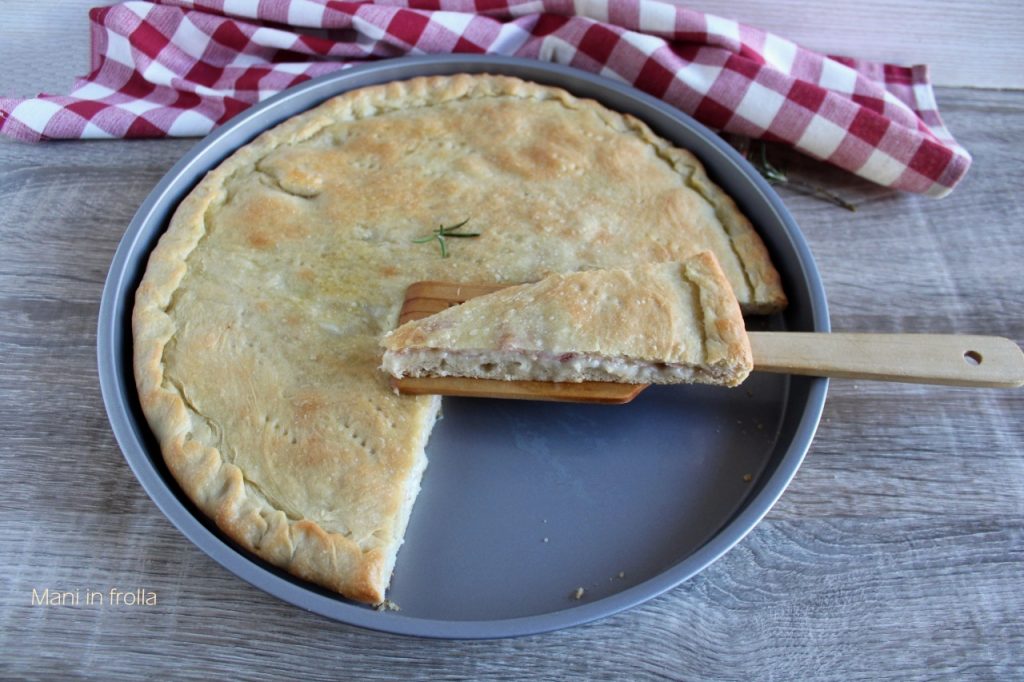
Remove from the oven and let the focaccia rest for a couple of minutes before cutting it: this will allow the cheese to settle, making the slice perfect and stretchy just right.
Here is the Stuffed Focaccia with Ham and Cheese ready. Enjoy your meal!
Until the next recipe
Storage
You can store the Stuffed Focaccia with Ham and Cheese in the refrigerator in an airtight container for up to 2 days.
How to reheat it: to restore crispness to the base, avoid the microwave (as it would make it soggy). Instead, pass it in a hot oven at 356°F (180°C) for 5-7 minutes or use a well-heated non-stick skillet with the lid on for a couple of minutes: it will be just like freshly baked!
In the freezer: you can also freeze it already cut into slices, wrapped in plastic wrap or parchment paper. When needed, put it directly in the oven without defrosting.
Tips and Suggestions
– Water temperature: in winter, use it slightly warm (about 75-79°F), while in summer you can use cold tap water to prevent the dough from overheating due to the hook’s movement.
– Salt: remember to add the salt only at the end, when the water is almost completely absorbed, to prevent it from coming into direct contact with the yeast and inhibiting its action.
– Mozzarella: the secret to avoiding the watery effect inside the focaccia is to use pizza mozzarella (the block type) or, if you prefer fresh, slice it at least an hour before and let it drain in a strainer in the refrigerator.
– The order: putting the ham underneath and the cheese on top helps protect the base’s dough: the ham acts as a barrier and the cheese, melting, will fuse with the upper layer of dough, making it delightful.
Variations
The beauty of this focaccia is its versatility: once you’ve mastered the dough, you can have fun changing the filling according to the season or your tastes!
– Vegetarian: replace the ham with grilled zucchini or sun-dried tomatoes. For the cheese, opt for smoked provola or crumbled feta for a bolder flavor.
– Bold: for a more rustic taste, use speck instead of cooked ham and replace the mozzarella with taleggio or gorgonzola. Add a handful of chopped walnuts for a crunchy note.
– Mediterranean: fill with well-drained tuna in oil, finely sliced red Tropea onion, and a handful of Taggiasca olives.
– Whole grain: you can replace 30% of the all-purpose flour with whole wheat flour. In this case, remember to add a bit more water (about 20-30 ml), as whole grains absorb more liquids.
Recycling Corner: zero waste in the kitchen
This recipe is the queen of “fridge cleaning”! If you have leftover small cuts of cold cuts or cheeses, don’t hesitate to use them:
– Mixed cold cuts: not just ham! Cubes of mortadella, leftover salami, or pancetta can be mixed together for a more flavorful and original filling.
– “Forgotten” cheeses 😉: that wedge of provolone that has hardened or the last piece of scamorza is perfect if grated or cut into small pieces. Melting together, they’ll create a creamy and surprising heart.
– Leftover dough: if you find you’ve made too much dough, don’t throw it away! Form small balls, flatten them slightly, and cook them in a skillet with a drizzle of oil: you’ll have delicious appetizer focaccines ready in minutes.
–
–
IF YOU LIKE MY RECIPES, YOU CAN ALSO FOLLOW ME ON MY FACEBOOK PAGE HERE OR ON PINTEREST HERE OR EVEN ON INSTAGRAM HERE
And to not miss the latest news, add a nice ‘Like’ to my Facebook page, it will make me very happy! Thank you from the bottom of my heart!
FAQ (Questions and Answers)
Can I use a flour different from “0”?
Yes, type 1 flour is a great alternative for a more rustic taste. If you want to use Manitoba, you’ll get a much higher and fluffier focaccia, but the rising times might be slightly longer.
What to do if the dough doesn’t rise?
Check that the yeast wasn’t expired and that the water wasn’t too hot (above 95-104°F, heat kills the yeast). If the house is cold, place the bowl in the oven with the light on to create a constant microclimate.
