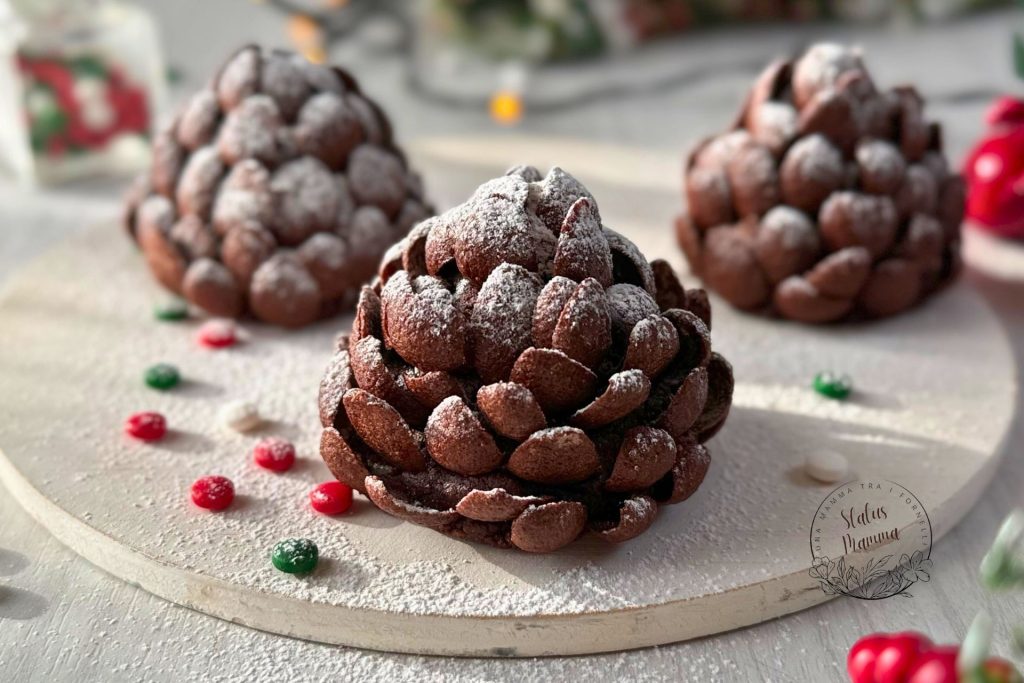
Christmas Pinecones – Delicious, Scenic, and Ready in No Time:
The Christmas Pinecones are that clever little sweet that can save you in a thousand situations: when you have unexpected guests, when you want to prepare something nice without turning on the oven, or when you want to impress with zero stress. I discovered them a few years ago, and since then, they have become my go-to treat in December: ready in ten minutes, no baking, and with that “fairy tale” look that immediately brings joy. Once you try them, you might end up making them more than once during the holidays!
Also check out:
- Difficulty: Easy
- Cost: Economical
- Rest time: 15 Days
- Preparation time: 20 Minutes
- Portions: 8
- Cuisine: Italian
- Seasonality: Epiphany, Christmas
Ingredients
The ingredients for the Christmas Pinecones are simple and accessible to everyone: dry cookies, cocoa, butter, and a touch of milk. These are the elements you probably already have in your pantry when an unexpected sweet craving hits or when you need a quick dessert to bring to the table. The magic, however, is made by the chocolate cereals, which transform a soft dough into small scenic and irresistible pinecones!
- 7 oz cookies (dry)
- 4 oz sugar
- 1.75 oz unsweetened cocoa powder
- 3.5 oz butter
- 2 tbsp milk
- to taste cereals (chocolate)
- to taste powdered sugar
Nutritional value (estimate per serving)
Total recipe calories (estimate): ≈ 2394 kcal
Calories per pinecone (if 10 pieces): ≈ 240 kcal
Calories per pinecone (if 8 pieces): ≈ 300 kcal
(Estimate calculated on: 200 g cookies, 120 g sugar, 50 g cocoa, 100 g butter, 30 ml milk. Decorations and cookie types may vary the calories.)
Tools
To prepare the Christmas Pinecones, you don’t need much equipment: just a few tools that everyone has in the kitchen. A mixer to chop the cookies, a large bowl to mix, and a tray to assemble and serve the sweets. It’s a “smart” preparation precisely because it requires the bare minimum.
- 1 mixer or blender
- 1 large bowl
- 1 kitchen scale
- 1 serving tray
Steps
The process is truly immediate: no oven, no rising, just a few minutes to chop, mix and shape. It is one of those recipes you can make even at the last minute, perhaps with children, because it is fun and creative. And the beauty is that it always works out, even if you’re not very experienced with desserts!
1. Finely chop the cookies in the mixer until reduced to a powder.
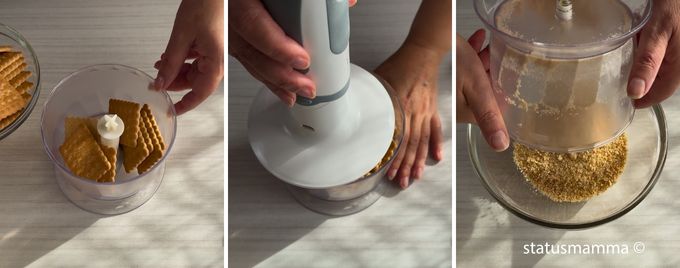
2. Transfer them to a bowl and add sugar and unsweetened cocoa.
3. Add the melted butter and mix with a spatula.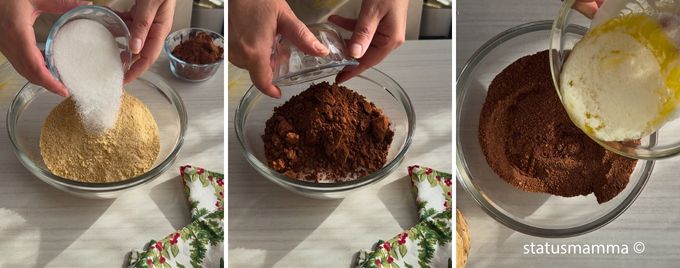
4. Gradually pour in the milk until the dough becomes compact and moldable.
5. Divide the mixture into balls the size of a mandarin.
6. Shape them with your hands into small pinecone shapes.
7. Start inserting the chocolate cereals from the bottom up, slightly overlapping them to create the “scale” effect.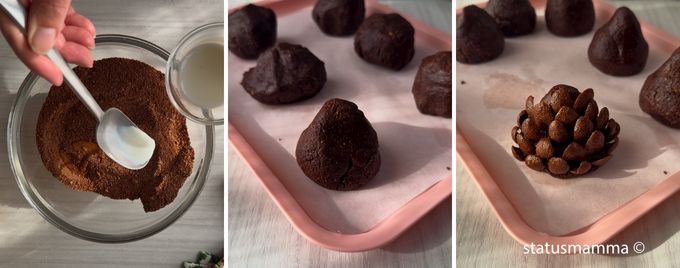
8. Dust with powdered sugar for a snowy touch.
9. Refrigerate for 10–15 minutes to set (optional but recommended).
Follow me on FACEBOOK and on INSTAGRAM and on YOUTUBE VIDEO TUTORIALS to not miss new recipes
If you like pinning, don’t miss the photographed recipes on PINTEREST!
TO RETURN TO HOME CLICK HERE!
Storage
In the fridge: 3–4 days in an airtight container
In the freezer: up to 1 month (thaw in the fridge)
At room temperature: max 6–8 hours (the butter softens the dough too much)
Notes
Milk should be added gradually: each type of cookie absorbs differently.
If the dough is too soft, add more crushed cookies.
If it’s dry, adjust with a little milk.
The longer they rest in the fridge, the firmer and easier they are to serve.
Tips + Variants
Butter-free variant: use cocoa spread or vegetable margarine.
Lighter version: replace part of the butter with thick Greek yogurt.
With rum (adults): 1 teaspoon of rum or aroma in the milk.
For a “snow” effect: dust the pinecones twice with powdered sugar, right away and before serving.
Recipe for children: use cocoa cereals that aren’t too thin, so they don’t break while inserting.
To gift them: package them in baking cups and keep them in the fridge until delivery.

Christmas Pinecones – Delicious, Scenic, and Ready in No Time
FAQ (Questions and Answers)
If you make these Christmas Pinecones, let me know in the comments how they turned out!
And if you want more clever and scenic sweet ideas for the holidays, subscribe to the newsletter: every week, I bring you a new recipe to save.
1. Can I use different cookies?
Yes! They are also delicious with digestive, chocolate, or whole wheat cookies. The only change will be the amount of milk to add.
2. How do I make the pinecone shape stay “up”?
The trick is all in the consistency: the dough should be compact but not hard. If it crumbles, add 1–2 tablespoons of milk. If it’s too soft, add crushed cookies.
3. What cereals to use for a perfect effect?
The classic “petal” chocolate cereals are ideal: they are solid and hold their shape even after hours.
4. Can I make them without butter?
Yes! Try them with cocoa spread or vegetable margarine: you’ll get a softer dough and a more intense flavor.
5. Can they be made in advance?
Absolutely yes: in fact, resting in the fridge makes them even better.
6. How long do Christmas Pinecones last?
3–4 days in the fridge, stored in an airtight container.
7. Can they be frozen?
Yes, up to 1 month. Thaw in the fridge to prevent the cereals from becoming soggy.
8. Can I make them without milk?
Of course: use vegetable cream, lactose-free milk, or simply water.
What’s the ideal amount for 10 people?
Double the recipe: with these quantities, you get about 6–8.
