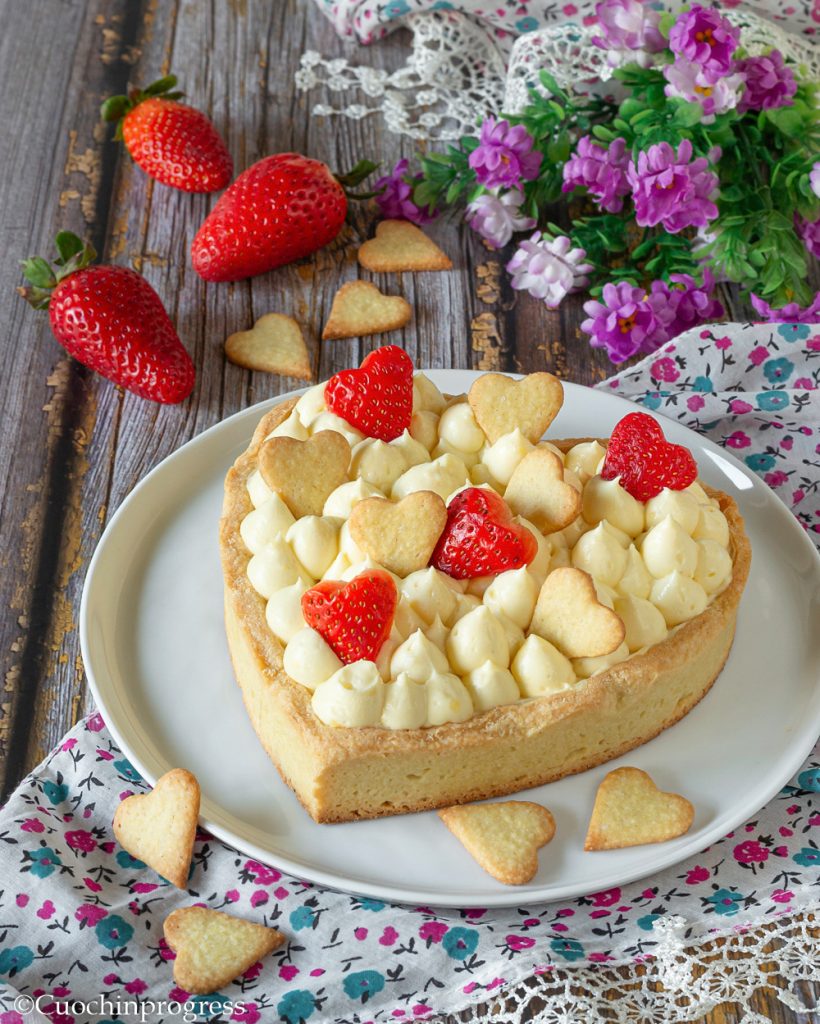
The LEMON CREAM TART is an indulgent and fragrant dessert, lovely to look at and truly special to enjoy, which can be served on many occasions to celebrate a special person. For this reason I used a heart-shaped tin to prepare it, making the message even clearer that the palate already communicates so well.
Although each component is simple, this tart requires a bit of time because of the different preparations, which make it rich in contrasting flavors and textures that marry wonderfully: a crunchy shortcrust shell on the outside, a soft sponge cake soaked with Alchermes, and finally a delicate, aromatic lemon cream.
Making this dessert takes some time but no hard work, especially if you follow the step-by-step photo recipe I provide below. Get started right away and you won’t regret it, I promise!
YOU MIGHT ALSO LIKE:
- Difficulty: Very easy
- Cost: Budget-friendly
- Rest time: 4 Hours 30 Minutes
- Preparation time: 30 Minutes
- Portions: 6-8 servings
- Cooking methods: Oven, Stovetop
- Cuisine: Italian
- Seasonality: Autumn, Winter and Spring
Ingredients
- 4 eggs (medium, at room temperature)
- 1/2 cup + 2 tbsp (120 g) granulated sugar
- 3/4 cup (90 g) all-purpose flour
- 1/3 cup (40 g) potato starch
- 1 teaspoon vanilla extract
- lemon zest
- 2 cups (250 g) all-purpose flour
- 1/2 cup + 1 tbsp (125 g) butter (cold)
- 1/2 cup + 2 tbsp (125 g) granulated sugar
- salt
- lemon zest
- 1 egg (medium, at room temperature)
- 1 egg yolk
- 1 cup + 1 tbsp (250 ml) milk
- 2 egg yolks
- 1/2 cup (100 g) granulated sugar
- 3 tbsp (25 g) cornstarch
- Half lemon (zest and juice)
- plant-based whipping cream
- 1 small shot Alchermes liqueur (about 1 fl oz / 30 ml)
- 2 strawberries
WHAT YOU’LL NEED FOR THE LEMON CREAM TART
- 1 Pan 8 in
- 1 Pan adjustable heart
- 1 Saucepan
- 3 Bowls
- Electric beaters
- 1 Whisk
- 1 Small bowl
- 1 Plastic wrap
- 1 Rolling pin
- 1 Piping bag
PREPARATION – LEMON CREAM TART
Important: use eggs at room temperature. Separate the eggs: place the whites in one bowl and the yolks in another.
Start whipping the egg whites and as soon as they begin to turn white add one third of the sugar (about 40 g). Mix for 2 minutes, then add another 40 g and continue with the rest in the same way.
You should obtain a well-aerated, foamy mass.
Add the vanilla extract or the seeds of a vanilla pod, the grated lemon zest and stir.
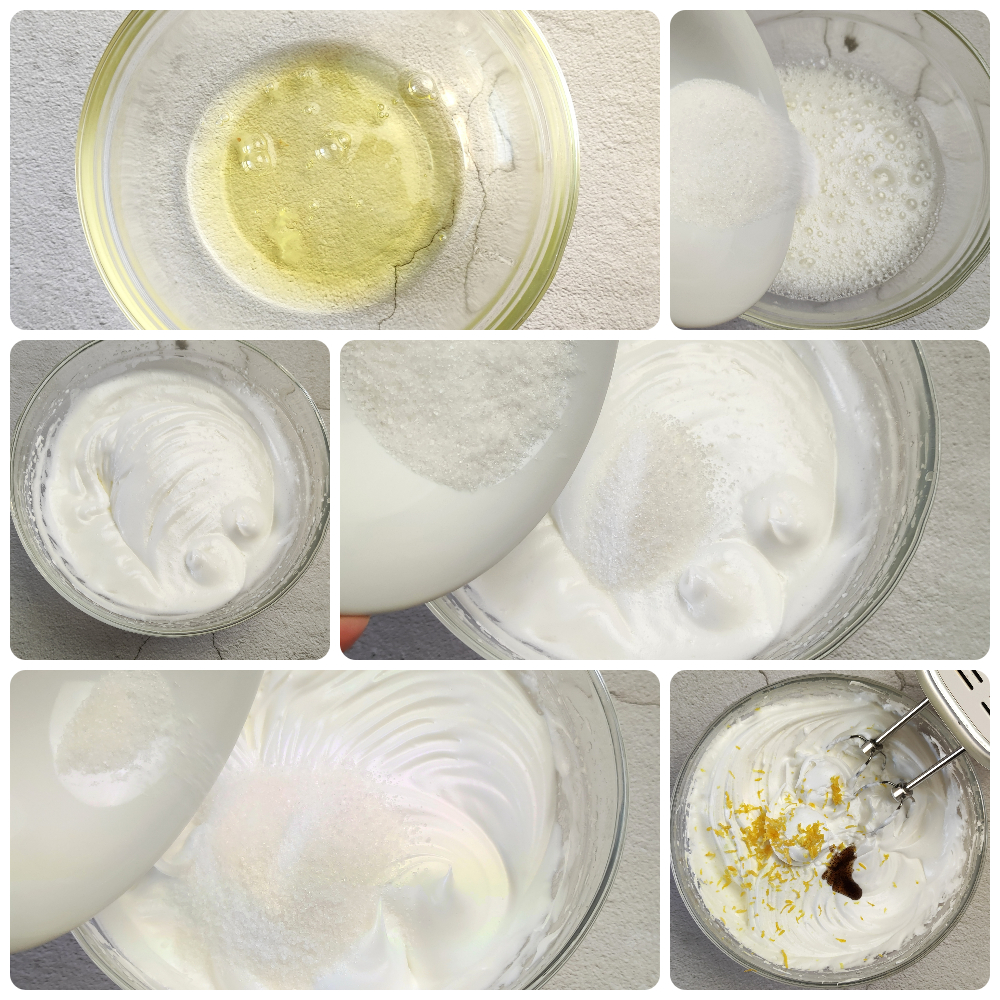
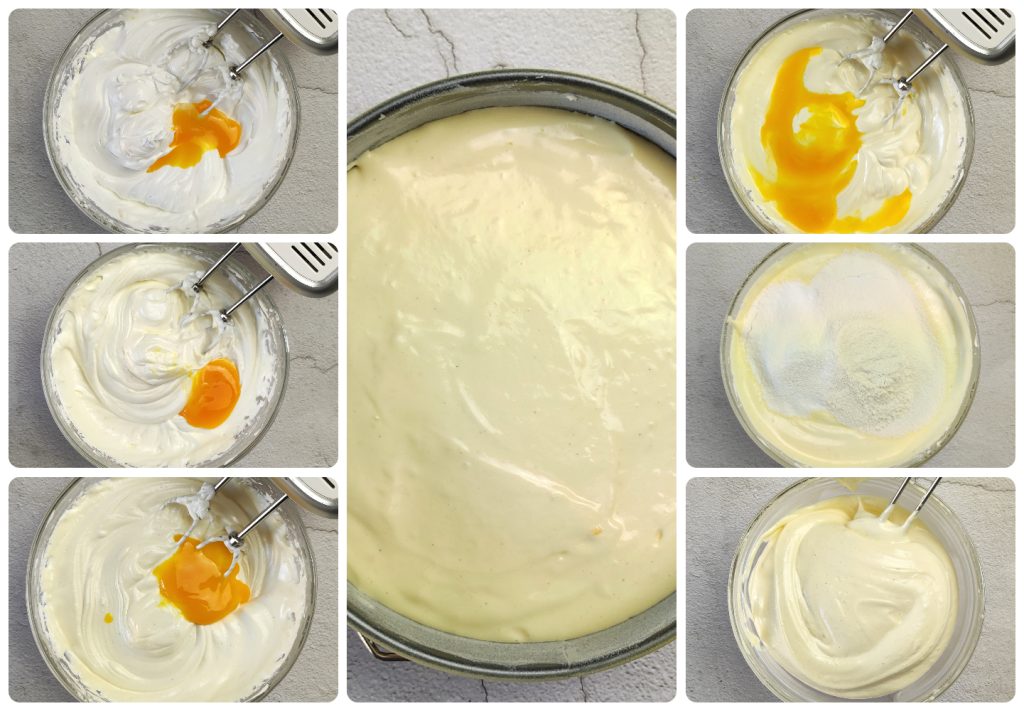
Add one yolk at a time and incorporate well. Add the dry ingredients (flour and potato starch), sifted, and gently fold them in with a spatula.
Butter and flour an 8 in (20 cm) diameter pan, pour in the batter and level the surface.
Bake in a preheated conventional oven at 347°F (175°C) for 30 minutes.
Remove the sponge cake from the oven and let it cool slightly. Then turn it out and let it cool completely on a rack.
Once cold, cut a 1 cm (about 3/8 in) slice and remove the darker outer part.
I recommend preparing it the day before.
Place the milk with the lemon zest in a saucepan and bring it just to a simmer.
Meanwhile, lightly beat the eggs with the sugar in a bowl, mix well and add the cornstarch.
Once everything is combined set it aside.
As soon as the milk reaches a boil, remove the lemon peels and pour it little by little into the egg mixture, whisking quickly to temper it and avoid the eggs curdling.
Return the mixture to the heat over low flame and continue cooking, stirring with a whisk or wooden spoon until it thickens.
When the cream begins to simmer, add the juice of half a lemon and continue stirring until you reach the desired thickness. Be careful at this stage, as the cream will thicken further once cold.
When cooked, place it in a bowl, cover it directly with plastic wrap and let it cool completely.
Once the cream has cooled, whip it with the beaters to make it smooth and creamy again. Whip the cream (keep it well chilled) and fold it into the lemon cream. Combine gently with a spatula using upward motions.
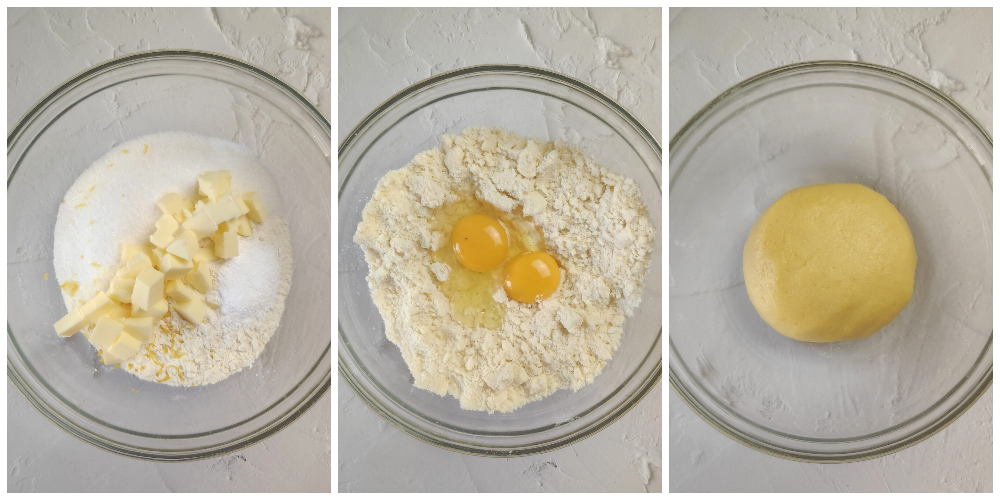
In a bowl place the sifted flour, the sugar, cold butter in pieces, the salt and the grated lemon zest.
Quickly mix everything until you obtain a sandy texture. Add the whole egg and the yolk and incorporate quickly without warming the butter. You can make the dough with a stand mixer following the same order.
Form a disk, wrap it in plastic wrap and rest it in the refrigerator for at least 30 minutes.
Roll the shortcrust to a thickness of 3 mm (about 1/8 in). Using a 20 cm (8 in) heart-shaped cutter cut the dough and place it on a baking tray lined with parchment paper. With the remaining dough cut strips about 3 cm (about 1.2 in) wide to form the tart walls. Chill in the fridge for 20 minutes so the walls won’t slide down during baking.
Dock the base, cover it with a sheet of parchment and place dry chickpeas (or baking beans) on top. Bake in a preheated conventional oven at 356°F (180°C) for 15 minutes.
Remove from the oven, remove the chickpeas and parchment and bake for another 15 minutes. Once lightly golden, remove and let cool completely.
With the remaining dough you can cut out little hearts for decoration.
Cut a disc of sponge cake so it fits inside the shortcrust shell.
Cover the shortcrust base with a layer of cream, place the sponge insert, soak it with Alchermes and cover everything with dollops of cream.
Decorate with halved strawberries shaped into hearts and the shortcrust hearts.
Transfer the lemon cream tart to the fridge for at least 1 hour before serving.
STORAGE
The lemon cream tart keeps well in the refrigerator, covered, for up to 3 days.