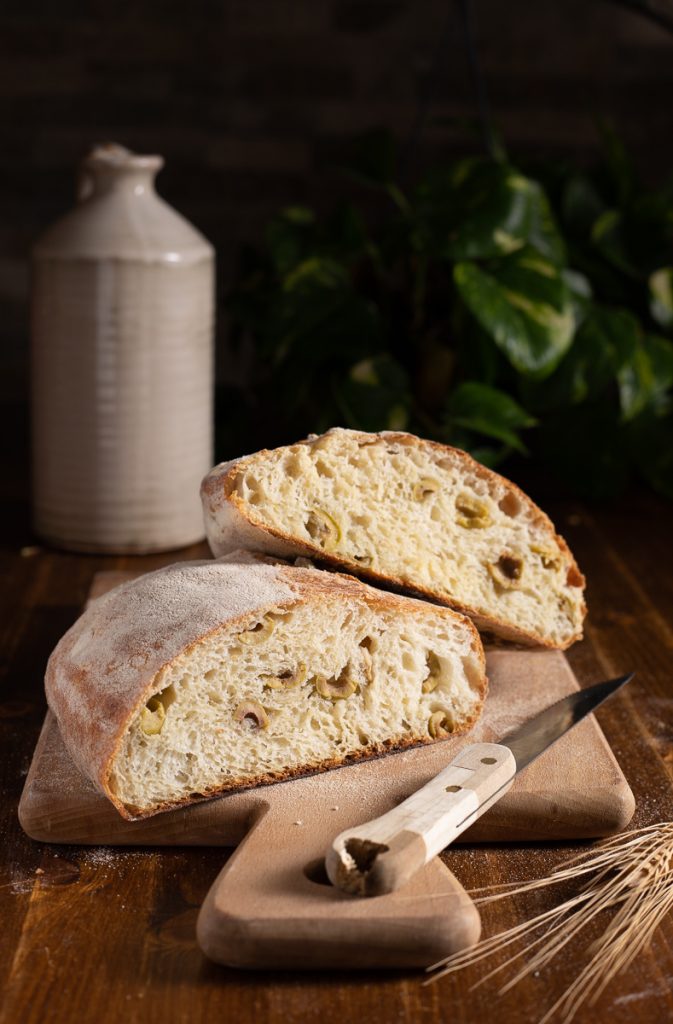
Super easy olive bread with baker’s yeast.
I love olive bread so much, you can’t imagine! Sometimes I buy it, but I also love making it at home either with sourdough or with baker’s yeast!
Making olive bread is easy and for me it’s like reliving memories: my grandmother, when she baked bread in the wood-fired oven, always prepared it along with the dried tomato bread. Grandma used sourdough, and its scent was unmistakable. Grandpa put the wood in the oven and brought it to temperature, then grandma finished baking her loaves. Now, sadly, they are no longer with us and that beloved oven has been cold for years, but when I can I refresh my starter and bake bread — also olive semolina bread — in my kitchen. When I don’t have time or can’t wait for the long sourdough rises, I make my olive bread with baker’s yeast and even if the aroma isn’t exactly like grandma’s, it’s still delicious! If you’re crazy about olive bread too, follow me — we’ll make a simple but really excellent loaf with baker’s yeast. Ready? Let’s go to the kitchen. Before we start, if you want to stay updated on all my recipes, you can follow my Facebook page (here) and my Instagram profile (here).
Also check:
– Mafalde Siciliane, re-milled semolina bread;
– Cucciddatu, re-milled durum semolina bread;
– Super soft milk rolls;
– Durum semolina bread with sourdough;
– High-hydration semolina walnut bread with sourdough;
– Semolina bread with dried tomatoes;
– Semolina bread with black olives;
– Semolina bread with sourdough, fridge-to-oven baking.
In the preparation you will find two procedures: one with a stand mixer (you’ll get the bread shown in the photo) and one by hand (a slightly denser loaf).
- Difficulty: Very easy
- Cost: Very inexpensive
- Rest time: 3 Hours
- Preparation time: 20 Minutes
- Portions: about 2.2 lb (1 kg)
- Cooking methods: Oven
- Cuisine: Italian
Ingredients
- 4 cups (about 21 oz / 600 g) fine durum wheat semolina (re-milled)
- 2 cups (about 17 fl oz / 500 ml) Water
- 1 3/4 tsp Salt
- 3/4 tsp Active dry yeast (or about 10 g fresh yeast (≈ 0.35 oz))
- 2 cups (about 10.5 oz / 300 g) Olives (green or black)
Tools
- Stand mixer
- Oven
Preparation of olive bread with baker’s yeast by hand
If you use this method, use about 1 7/8 cups (15 fl oz / 450 ml) of water.
Put the flour in a bowl, add half of the water and dissolve the yeast in it; as an alternative to active dry yeast you can use 10 g fresh baker’s yeast.
Mix, pour in the rest of the water and add the salt; work in the bowl with a spoon.
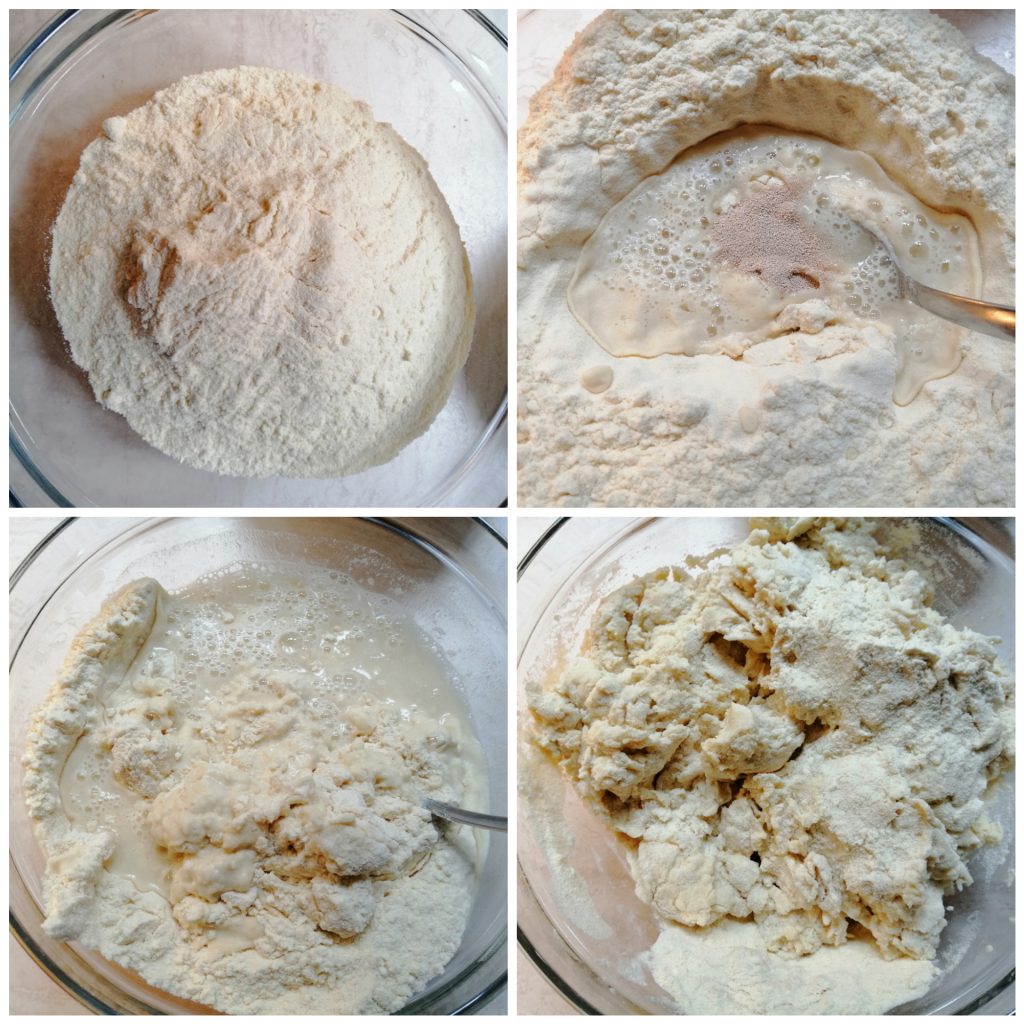
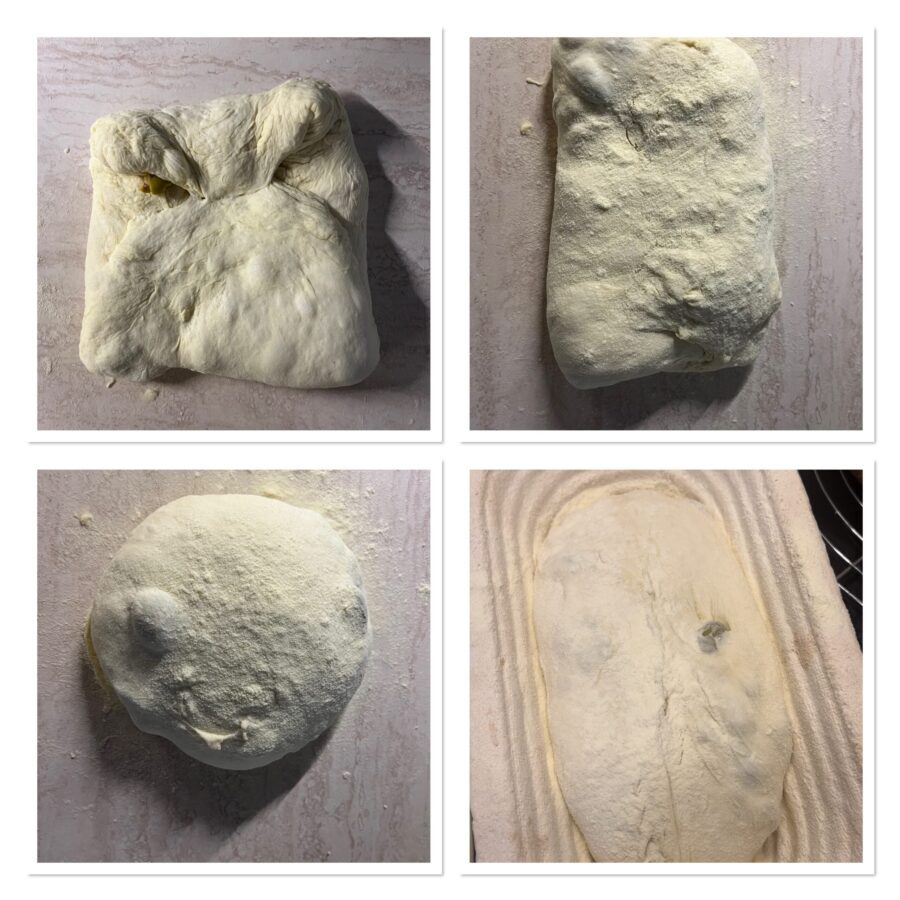
Turn the dough out onto the work surface and work for 5 minutes until you obtain an elastic dough; cover it with a cloth and let it rest for 15 minutes.
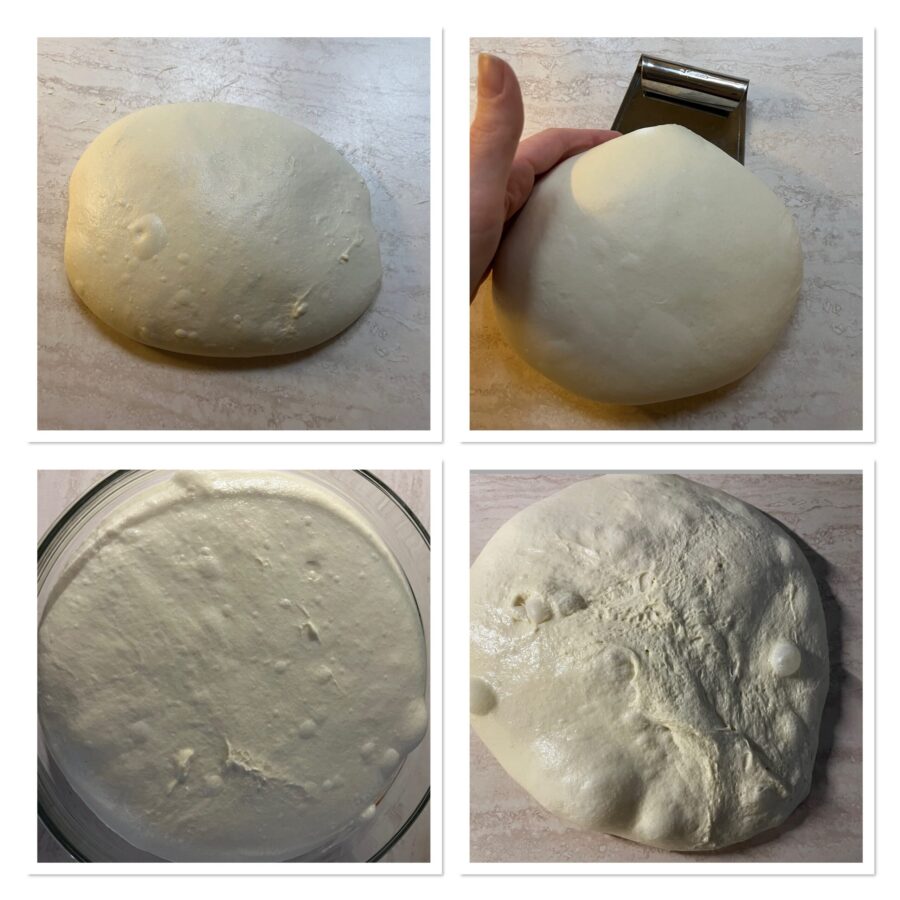
Pick up the dough and shape it into a ball; at this point it should be smooth and homogeneous.
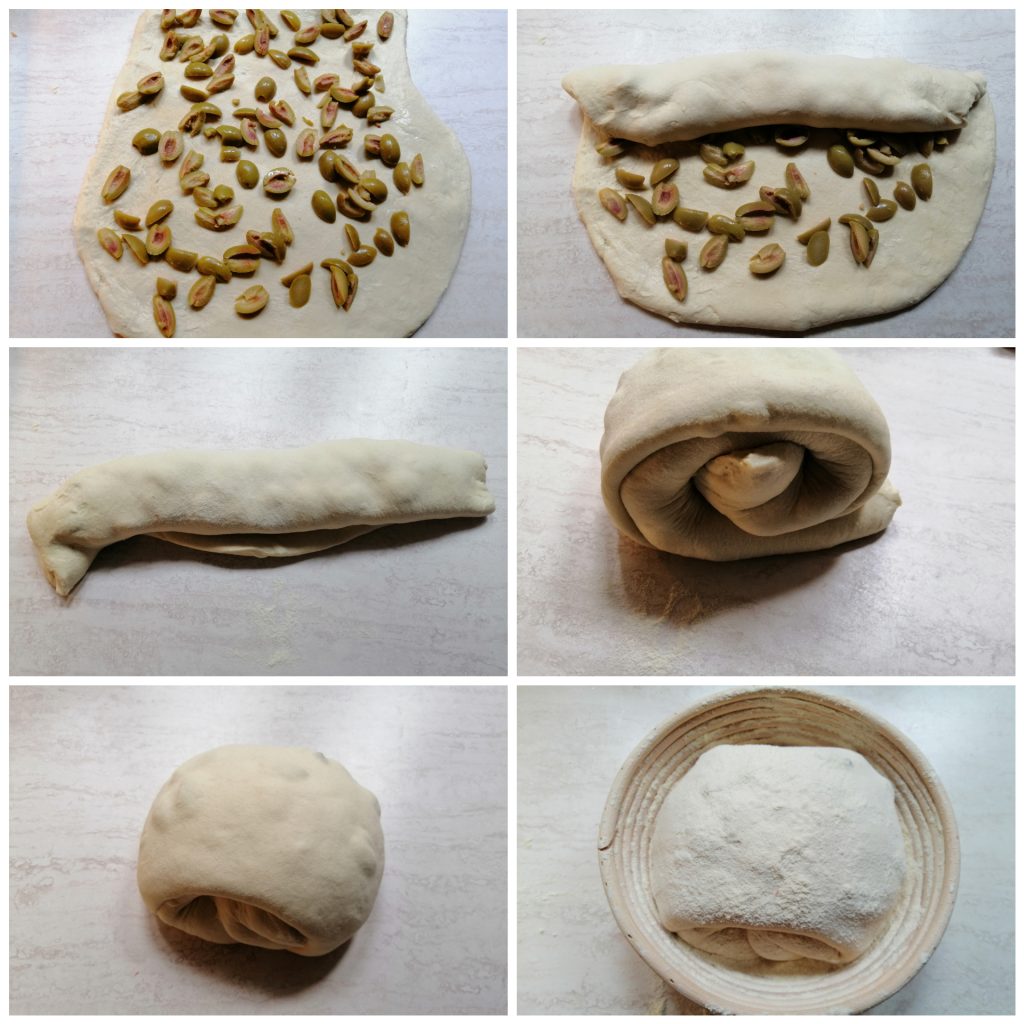
Roll the dough out into a disk and fold it like a wallet as in the photo: fold 1/3 of the circle toward the center, fold the other third over it, then fold the short side of the formed rectangle toward the center and fold the other side over it.
Let rest for ten minutes.

Roll the dough out once more into a disk, distribute the olives over it (choose the ones you prefer — I used simple green olives in brine, but black or oven-dried olives are delicious), roll the disk into a cylinder, then roll the cylinder into a spiral and shape the spiral with your hands into a loaf.
Flour a proofing basket (if you don’t have one, use a bowl lined with a kitchen towel), flour it well and place the loaf inside.
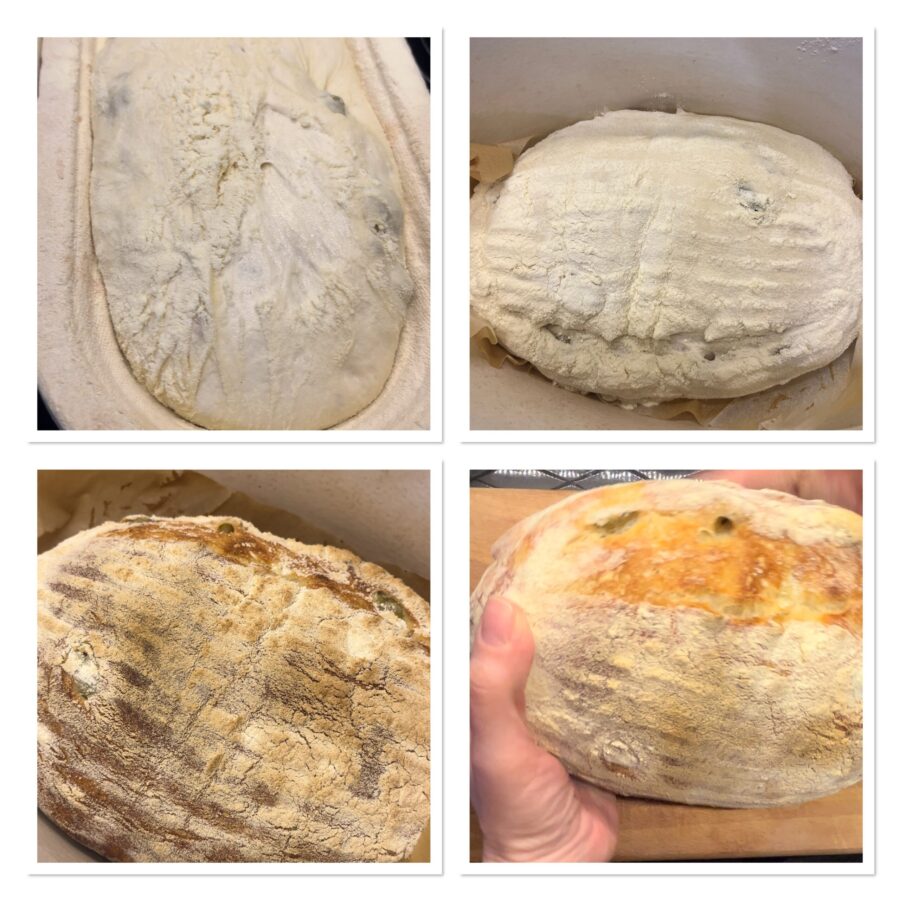
Place in a warm spot — for example in the oven with the light on — to proof until doubled; it will take about 3 hours, but this time is highly variable and depends on the seasonal temperature.
Now you will bake the bread; you can do it in either of these ways:
1) Preheat the oven and bring it to 446°F (230°C), turn the loaf out onto a piece of parchment paper, make a few slashes with a lame or sharp knife and move it to a baking sheet.
If you have a baking dish or a baking stone, put it in the oven as it heats and bring it to temperature; once hot, simply transfer the loaf onto the hot baking surface.
Bake in static mode: the first 20 minutes at 446°F (230°C), lower to 392°F (200°C) for the next 20 minutes, and finish the last 20 minutes at 356°F (180°C). Turn the oven off and leave it slightly ajar; remove the bread after about half an hour. The bread is done when it sounds hollow when tapped on the bottom.
2) If, like me, you want to bake the bread in a pot, preheat the oven to 482°F (250°C) and place the pot (with its lid) inside.
When the temperature is reached, turn the loaf out onto parchment and make slashes; take the pot out with oven mitts and place it on a suitable surface.
Place the bread into the pot, cover it and put it in the oven.
Bake for the first 20 minutes at the maximum temperature, then lower to 446°F (230°C) and continue without the lid for 20 minutes.
Finish baking at 356°F (180°C) for 20 minutes, turn off the oven, open slightly and let cool for 15 minutes before removing from the pot.

The bread is cooked when it sounds hollow like a drum when tapped.
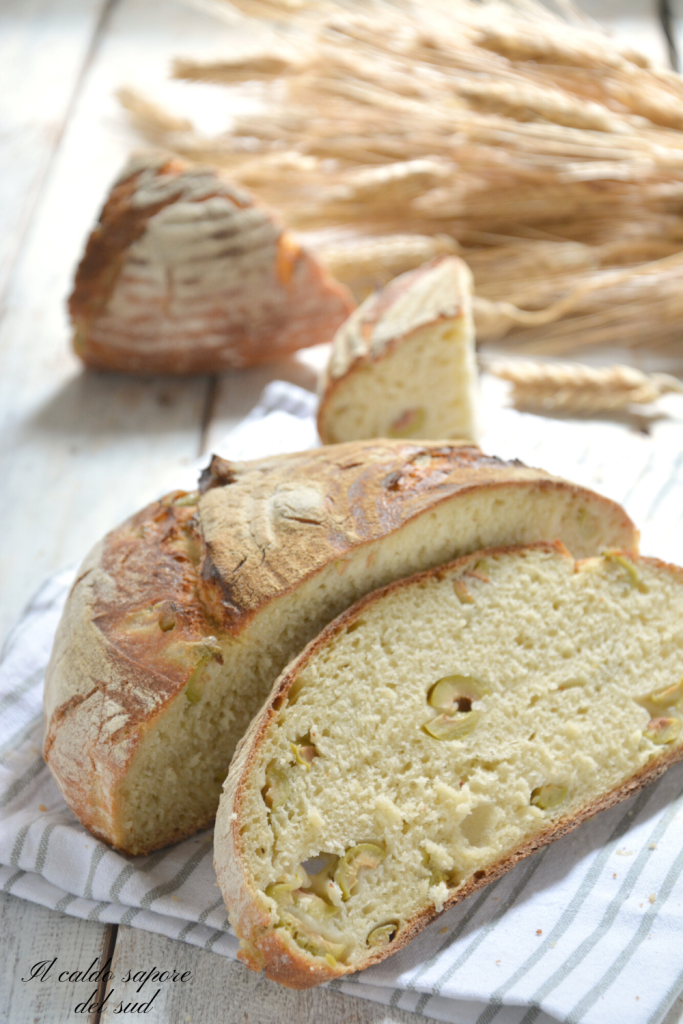
Remove from the oven, let it cool slightly and bring to the table.
This bread keeps well for a couple of days if stored in a cotton bag in a cool, dry place.
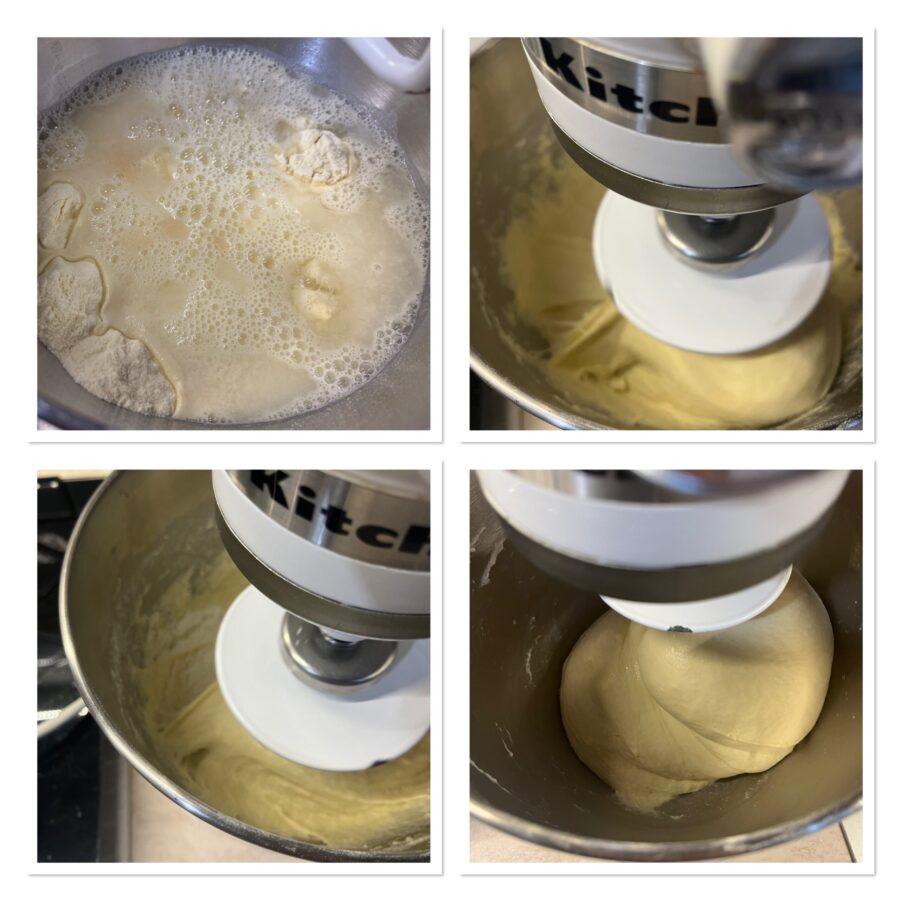
If you use this stand-mixer method, use about 2 cups (17 fl oz / 500 ml) of water.
Place the flour, yeast and water in the bowl of the stand mixer and mix for 15–20 minutes at medium speed, adding the salt after the first 10 minutes. In the end you should achieve a perfect gluten development (a good ‘windowpane’).
Turn the dough out onto the work surface, shape it into a ball and put it in a warm place to proof until doubled. Then turn it out onto the work surface and divide it.
Shape two small loaves; if you know how to make folds, do them; let rest 10 minutes and then on a lightly floured surface spread them into disks.
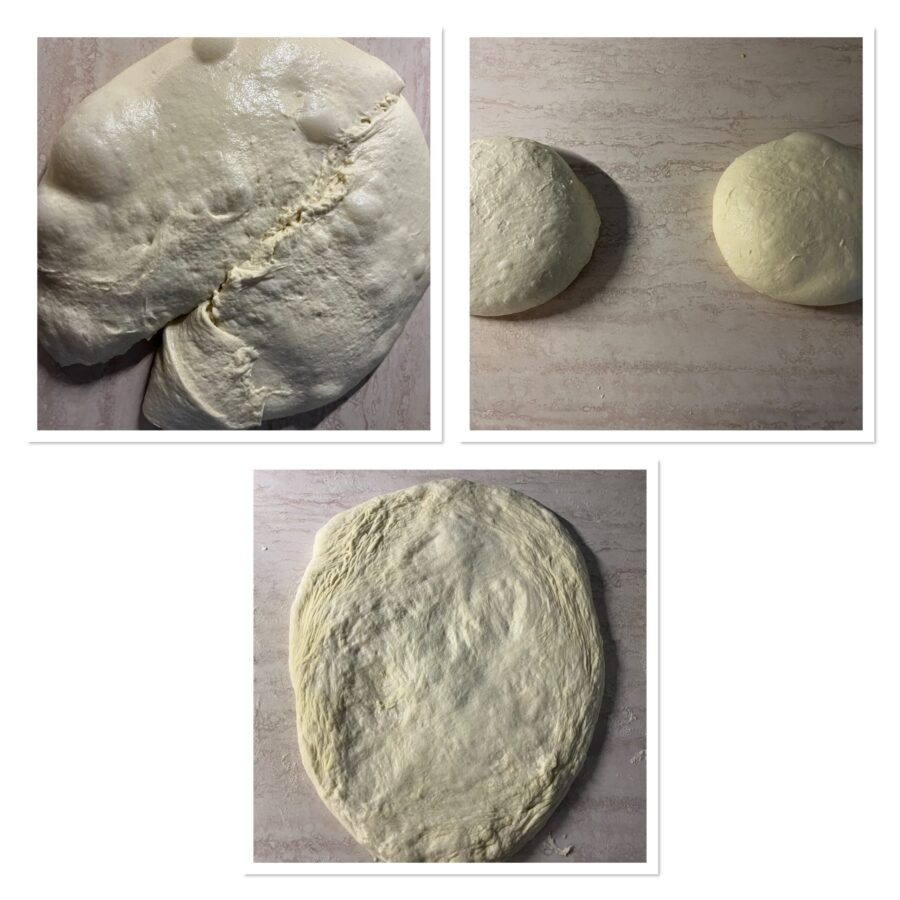
Fill the disks with olives, then fold the sides and fold like a wallet.
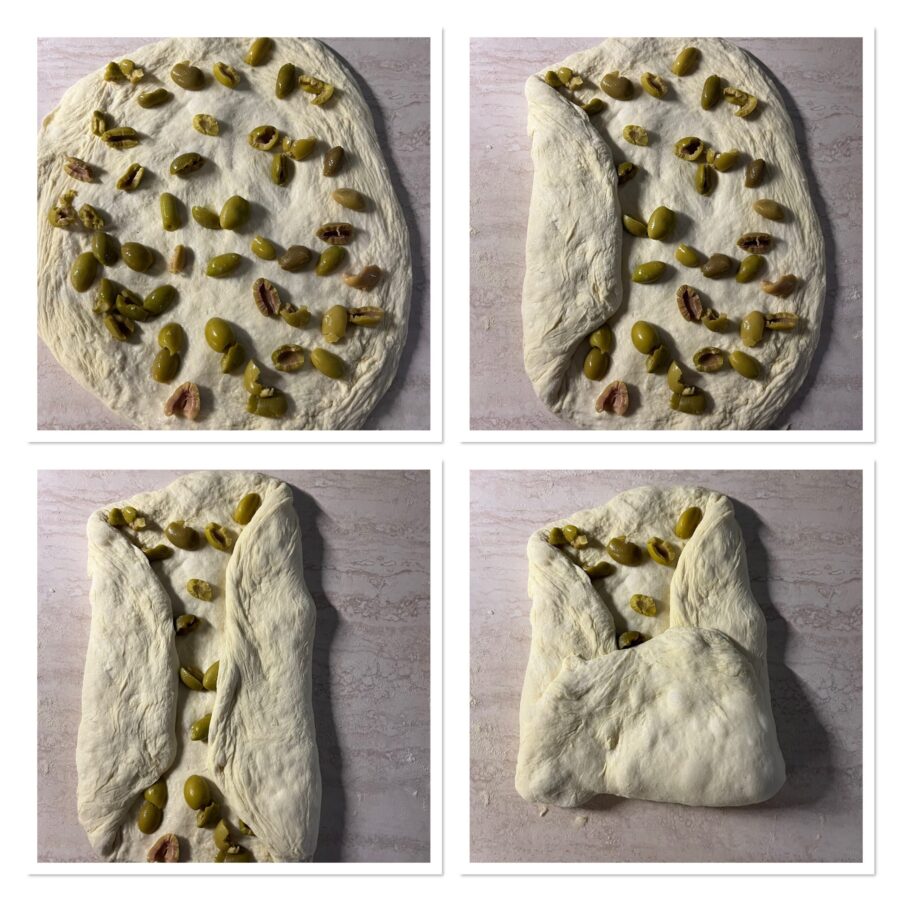
Turn them over with the seam down, shape another small loaf with your hands and place them to rise in your proofing baskets well floured, with the seam facing up.
Let rise at room temperature until tripled (about 2½ hours in winter, less in summer).
When the dough has tripled or at least doubled, you can bake and choose one of two methods:
1) Preheat the oven to 446°F (230°C), turn the bread out onto a piece of parchment, make slashes with a lame and transfer to a baking sheet.
If you have a baking dish or stone, place it in the oven as it heats; once hot simply move the bread onto it.
Bake in static mode: first 20 minutes at 446°F (230°C), lower to 392°F (200°C) for the next 20 minutes, and finish the last 20 minutes at 356°F (180°C). Turn off the oven and leave it ajar; remove after about half an hour. The bread is done when it sounds hollow when tapped underneath.
2) If, like me, you want to bake the bread in a pot, preheat the oven to 446°F (230°C) and put the pot (with its lid) inside.
When the temperature is reached, take the pot out, cut a piece of parchment, turn the bread onto it, make a slash and place everything into the pot. Cover and bake in the oven for the first 20 minutes at the maximum temperature, then lower to 392°F (200°C) and continue baking for 10 minutes. Remove the lid and finish baking at 356°F (180°C) for 20 minutes. Turn off the oven, open slightly and let cool for 15 minutes before removing.
Our bread is ready to enjoy; let it cool slightly before slicing.
It keeps well for up to 2–3 days, especially in winter if stored in a cotton bag. In summer it dries out more quickly.