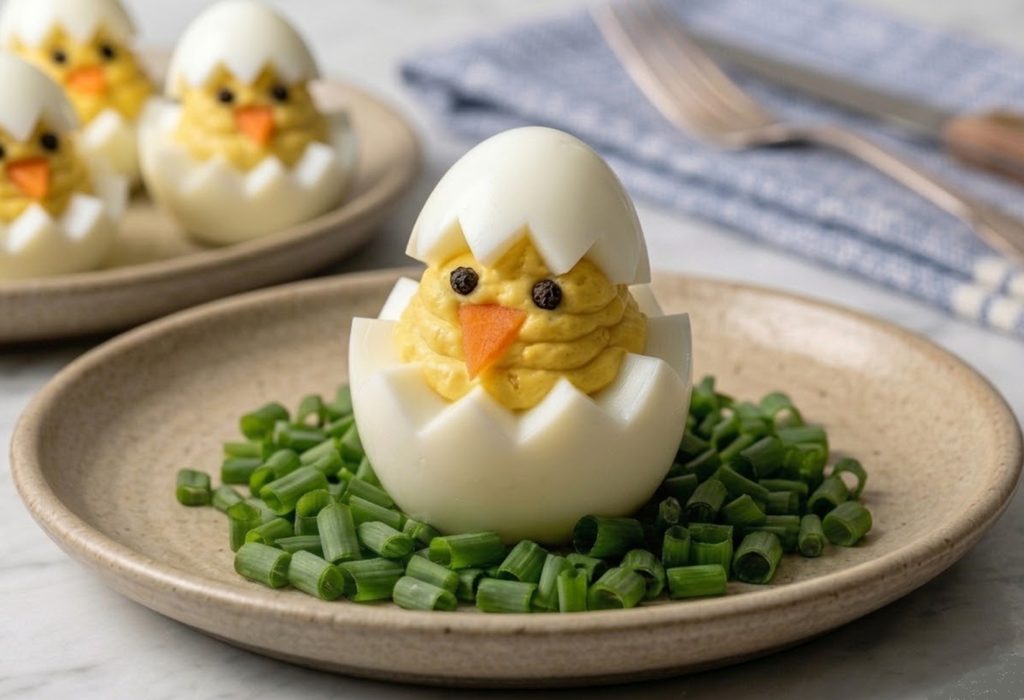
How to make little chicks from stuffed hard-boiled eggs: a simple technical trick for a perfect and stable Easter starter
HARD-BOILED EGG CHICKS: THE PERFECT EASTER STARTER
You know that moment of panic when you’re preparing a cute Easter starter and the eggs decide to have a mind of their own, rolling around on the plate or making the egg “cap” slide off as soon as you set them down?
Yep, it’s happened to everyone! The big issue with decorative hard-boiled eggs is stability: they look simple, but making them stand up without looking like they came out of a battle is a small challenge.
In this recipe I’ll reveal a very simple technical cutting trick that will solve the problem once and for all, giving you “soldier” chicks that will stand upright and proud throughout the whole meal.
But it’s not just about looks, because let’s be honest: a starter has to taste good. Classic stuffed eggs often feel a bit heavy or, worse, too dry.
Here we play with a super-silky yolk mousse, brightened by a hint of garlic and a touch of Dijon mustard.
It’s the perfect mix between the fun of bringing them to the table (kids will go crazy, trust me!) and the pleasure of eating them, because the texture is creamy as a cloud.
Get ready for lots of compliments: they’re so cute you’ll almost feel bad about eating them… almost!
- Difficulty: Easy
- Cost: Very inexpensive
- Preparation time: 30 Minutes
- Cooking time: 10 Minutes
- Portions: 12 chick-shaped eggs
- Cooking methods: Stovetop
- Cuisine: Italian
Ingredients for Hard-Boiled Egg Chicks
- 12 eggs (large, hard-boiled)
- cup mayonnaise
- 1 1/2 tablespoon Dijon mustard (about 8 g)
- tsp garlic powder
- 1 pinch fine salt
- 1 carrot (for the chicks' beaks)
- 24 peppercorns black pepper (for the chicks' eyes)
- as needed chives (or parsley to simulate the grass)
Tools
- Pot
- Mixing bowl
- Skimmer
- Knife
- Cutting board
- Bowl
- Fork
- Spatula
Step-by-Step: Hard-Boiled Egg Chicks
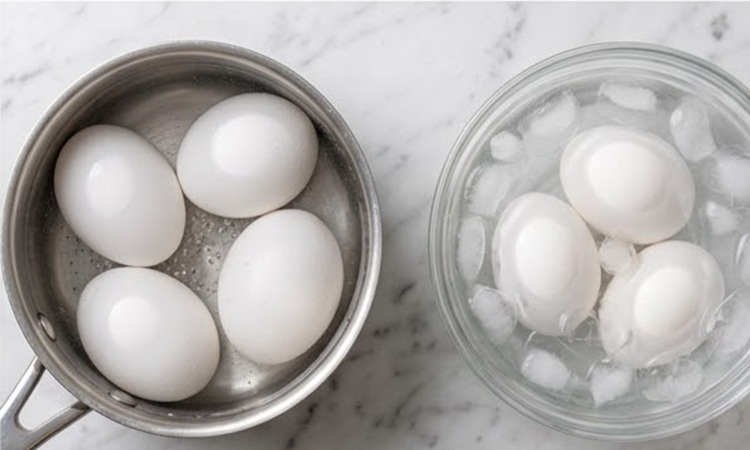
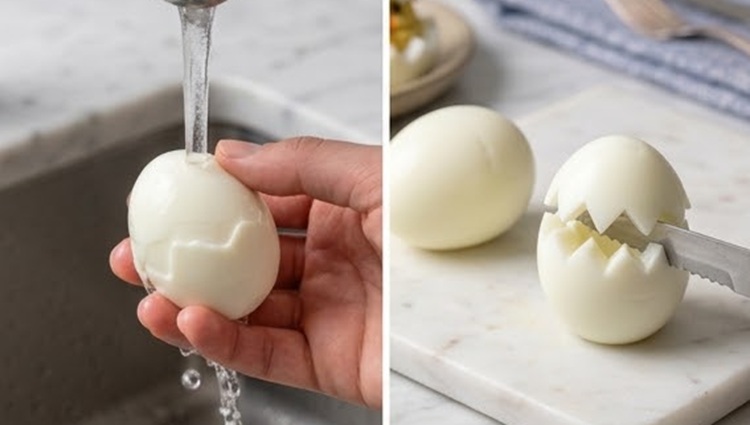
To get a smooth white and a vibrant yellow yolk, immerse room-temperature eggs into already boiling water, but immediately lower the heat to maintain a gentle simmer and avoid cracking the shells. Cook for exactly 9 minutes, then drain immediately and plunge them into a bowl of ice water. This thermal shock will stop the cooking (preventing the green ring around the yolk) and make the membrane detach from the shell more easily. For a flawless peeling that doesn’t damage the white surface, peel them under a stream of cold running water: the water will help the shell slide off without tearing the white, leaving it perfectly smooth for your chicks.
With a very sharp knife, slice off a very thin sliver from the base of the hard-boiled egg (the wider end): this will create a flat surface so the chick can stand steadily on the plate.
Cut the top of the egg (about one third of the total) with a zig-zag cut to simulate the hatching shell. Gently press the base to push out the hard yolk, being careful not to break the white. Keep each “cap” close to its own base.
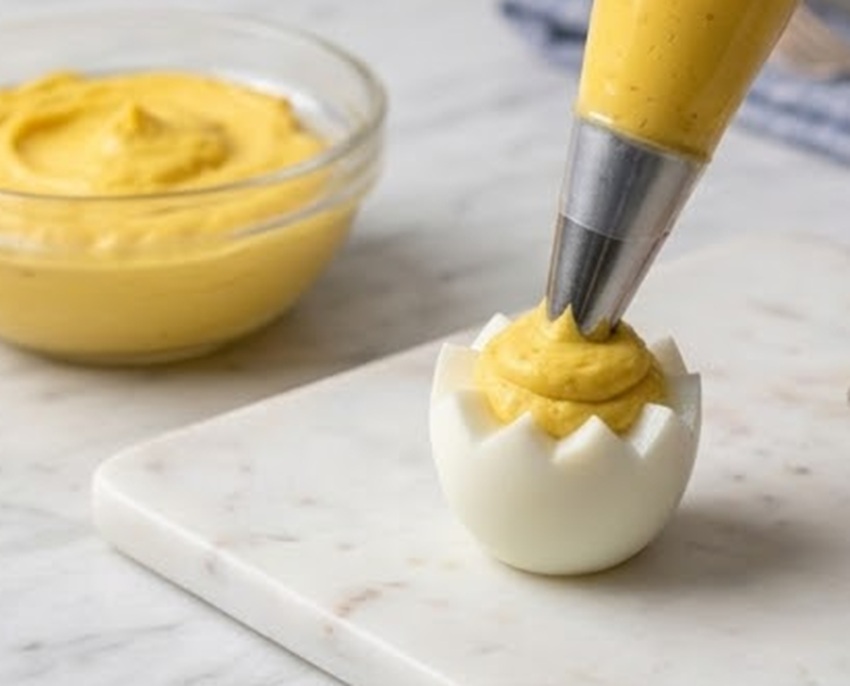
In a bowl, mash the 12 yolks with a fork. Add the mayonnaise, mustard, garlic and salt. Work until you obtain a smooth, velvety mixture. Transfer the cream into a piping bag fitted with a plain tip.
Fill the egg white bases with the mousse, pushing it upwards to form the chick’s “head.” Place the top shell cap on the mousse, tilting it slightly to give a lively, playful look.
Cut the carrot into small triangular wedges. Insert a wedge into the mousse for the beak and place two black peppercorns for the eyes, pressing lightly.
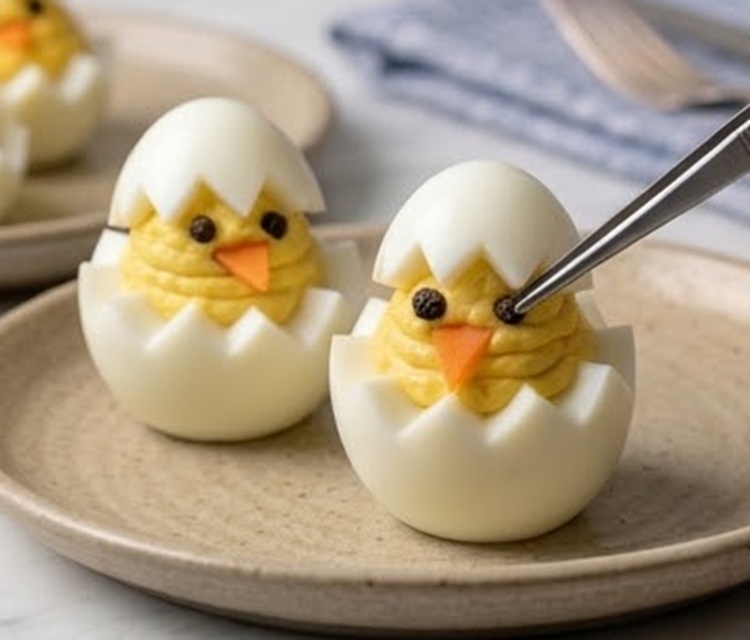
For presentation, create a “bed” with chopped chives or parsley leaves. Here’s your Easter Starter: Egg Chicks!
Ingredients: Notes and Substitutions
Eggs: Use eggs that are 7–10 days old; they’re much easier to peel than very fresh ones.
Mustard: If you don’t like Dijon, replace it with the same amount of white wine vinegar for the acidic note.
Eyes: Peppercorns give a perfect shape, but remind guests to remove them or use small pieces of black olives for little ones.
Storage
Keep the chicks in the refrigerator in an airtight container for up to 2 days. Freezing is strongly discouraged because the white would become rubbery.
Variations
You can add a pinch of paprika to the mousse for a more intense yellow color or stir in finely chopped chives into the filling for an extra fresh touch.
Tips
For a magazine-worthy “pasture” effect, arrange the chicks on a bed of coarsely chopped chives. It will give that touch of green that makes the yellow of your chicks pop!
FAQ (Questions and Answers)
How can I peel the eggs without damaging the white?
Peel them under a stream of cold running water: the water helps separate the membrane from the shell without tearing the white, leaving it very smooth.
Can I prepare them in advance?
Yes, but add the eyes and beak just before serving. The carrot tends to wilt and the peppercorns could leave a small dark mark on the cream if left in the fridge too many hours.
The mousse is too runny, what do I do?
Add an extra hard-boiled yolk or slightly reduce the mayonnaise. The consistency should be firm enough to support the weight of the white “cap.”