The schiacciata with sourdough is amazing: crisp on the outside, soft inside, and fragrant as only a product made with sourdough starter can be. This is a long-fermentation schiacciata that gave me incredible satisfaction. I know — I often hear that it takes too long, that people prefer things “ready to eat,” that sixty hours of maturation is absurd, that when you make the quick version in two hours it doesn’t taste different when you eat it. But for me, there’s a difference. Refreshing the starter, letting it work, waiting for it to bring the dough to life, watching it slowly rise first in the fridge and then in the oven is moving. I hadn’t made a recipe like this for a long time. If you’re a little like me, you must try this schiacciata with sourdough.
Don’t miss
- Difficulty: Medium
- Cost: Economical
- Rest time: 2 Days 22 Hours
- Preparation time: 30 Minutes
- Cooking time: 30 Minutes
- Portions: 2 pieces
- Cooking methods: Oven, Electric oven, Stove
- Cuisine: Italian
- Seasonality: Autumn, Winter
Ingredients
- 5 1/2 cups flour (W 380) (I use Manitoba Oro Caputo)
- 1 1/4 cups milk
- 3/4 cup water
- 1 cup sourdough starter (refreshed and at doubling)
- 2 tbsp extra virgin olive oil
- 1 orange (zest)
- 1 tbsp salt
- 3 pears (Abate or Williams, not underripe)
- 2 tbsp whole cane brown sugar
- to taste pepper
- 1.5 oz feta
- 1/4 cup walnuts
- to taste fresh rosemary
- 12 pieces Romanesco broccoli florets
- to taste salami (sliced)
- to taste Taggiasca olives
- 3 tbsp water
- 4 tbsp extra virgin olive oil
- 1 tsp salt
Tools
- 1 Mixer Kitchen Aid Artisan
- 1 Bowl
- 1 Cover reusable proofing cover
- 1 Cutting board
- 1 Knife
- 1 Pan
- 1 High-sided saucepan
- 1 Slotted spoon
- 1 Basting bottle
- 2 Baking trays 11 3/4 x 15 3/4 inches
Steps
Pour the flour into the mixer bowl, add all the water and all the milk, mix quickly so that all the flour is hydrated, cover and leave to autolyse for three hours. Refresh the sourdough starter as usual, take the amount needed for the recipe and let it double. After the autolyse period, put the sourdough starter in pieces into the mixer bowl. Start the machine and let it knead with the dough hook until the dough is well developed and has formed its gluten network. While continuing to mix, add the oil in three additions and when it is absorbed let the dough rest for 20 minutes. Add the salt, knead well so it is absorbed, then transfer the dough ball to an oiled work surface and let it rest another twenty minutes. After the resting time, do two series of strengthening folds (slap & fold — lift the dough and fold it over itself), leaving 45 minutes between one fold and the next. After the last fold transfer the dough ball to a lightly oiled bowl and let it rest 30 minutes at room temperature. Cover and refrigerate for 60 hours. But you don’t have to change the flour. Not all flours tolerate this. If you use flours with lower strength, leave them to mature in the refrigerator for a maximum of 48 hours.
The day before baking the schiacciate prepare the toppings. Peel the pears, cut them into small cubes, transfer them to a saucepan with the brown sugar and a pinch of pepper and cook for ten minutes, stirring often: they should be soft but not mushy. Transfer them to a baking dish without overlapping them, let them cool then cover and refrigerate. Blanch the broccoli: wash the Romanesco and divide into small florets, boil them in plenty of salted water for 5 minutes then drain and set aside.
After the resting time remove the dough from the refrigerator, let it acclimate to room temperature then divide it into two parts and let them rise until doubled. Take the pears out of the fridge so they can come to room temperature.
Dust the work surface with semolina, place one of the dough balls on it, stretch it slightly with your fingertips and make the classic schiacciata dimples. Oil the baking pan (11 3/4 x 15 3/4 in) and place the schiacciata inside: the side that was facing up on the work surface should be in contact with the pan. Repeat with the second dough ball and let rest for an hour.
Prepare the emulsion by mixing the water, oil and salt in a food-grade squeeze bottle. Brush it over the schiacciata and, with your fingertips, make another series of dimples. The schiacciata should be fully hydrated by the emulsion; there should be no dry spots.
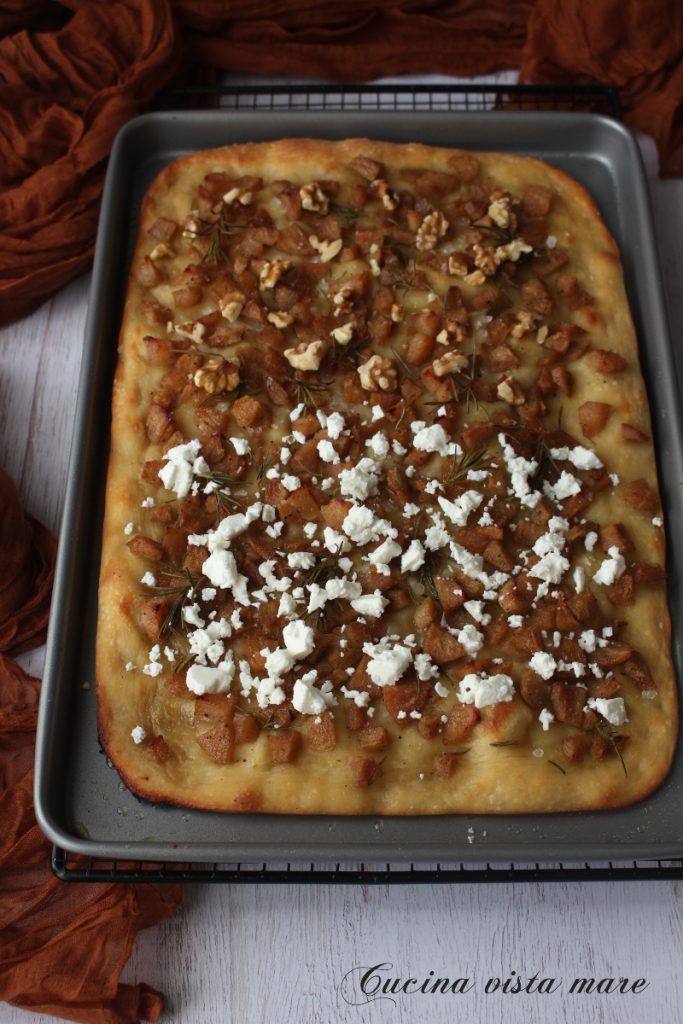
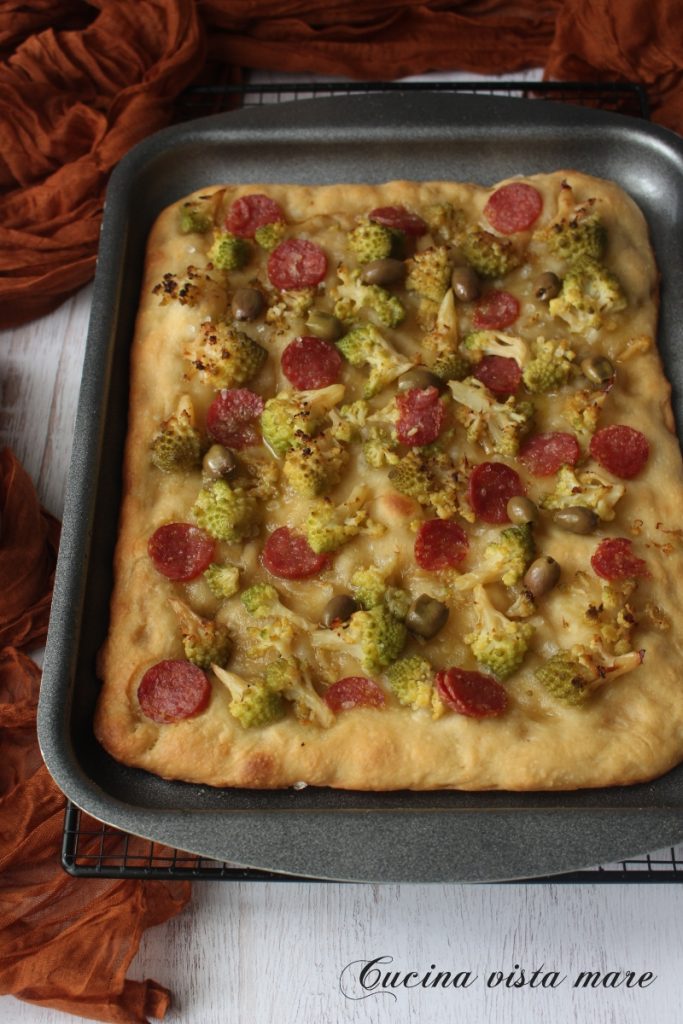
Top one schiacciata with the caramelized pears and fresh rosemary and the other with the broccoli and salami, then cover them with a cloth and let rest for 30 minutes. Before baking sprinkle with coarse salt and a drizzle of oil.
Preheat the oven to 482 °F (250 °C) for 30 minutes. Bake the schiacciata on the lower rack for 12 minutes then lower the temperature to 428 °F (220 °C) and bake for another 10–15 minutes. If the base is still pale, cover the surface with aluminum foil and continue for a few more minutes.
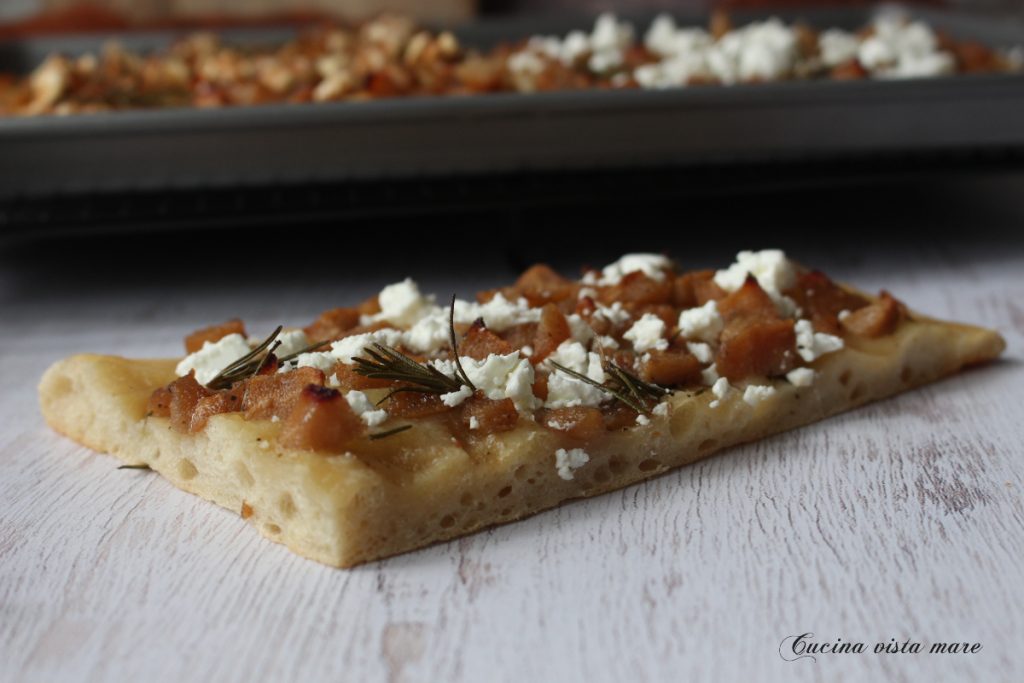
Out of the oven finish the schiacciata with the pears by adding the feta (I put it only on half of the schiacciata because I’m the only one who eats cheese) and the walnuts, and finish the focaccia with broccoli by adding the Taggiasca olives.
Notes
The schiacciata should be enjoyed warm. Once cold it can be frozen. Store in an airtight bag if not consumed all at once.
Spiga is my sourdough starter. She is 17 years old. And once again she did a great job. I like doing everything in the kitchen myself, but the satisfaction of seeing a dough that holds up to 60 hours of maturation is priceless. I know it’s long. But if you are passionate and have a sourdough starter this is something you absolutely must make again. As I always say, it’s the starter that works. You put it in the fridge and it does everything. I peeked at it every morning… but only to make sure everything was progressing well and to fall even more in love with this dough.
Recipe source that I slightly adapted: HERE.