Cold Chocolate and Biscuit Cake: No-Bake and Egg-Free Recipe
This cake is the perfect solution for anyone looking for an indulgent dessert without turning on the oven.
Discover how to prepare a delicious no-bake Cold Chocolate Cake that is egg-free. An easy and quick recipe with a base of crushed biscuits and an irresistible chocolate glaze. Ready in only 10 minutes, it’s the perfect dessert for any occasion!
Craving something sweet but don’t want to turn on the oven? Just simple ingredients like butter, milk and chocolate for a patisserie-like result. Egg-free recipe ready in a flash!
Learn the trick for a perfect biscuit base and a creamy glaze without complications. Ideal for those short on time who love chocolate!
- Difficulty: Very easy
- Cost: Economical
- Rest time: 1 Hour
- Preparation time: 10 Minutes
- Portions: 8 servings
- Cooking methods: No-bake
- Cuisine: Italian
- Seasonality: All seasons
Ingredients for Cold Chocolate and Biscuit Cake
- 14 oz (about 3 1/3 cups) dry biscuits
- 7 oz (about 14 tbsp / ~1 3/4 US butter sticks) butter
- 3.5 oz (about 1/2 cup) granulated sugar
- 1/2 cup (4 fl oz) milk
- 3.5 oz (about 1 cup) unsweetened cocoa powder
- 11 oz milk chocolate
- 1/4 cup (2 fl oz) milk
- to taste chopped hazelnuts
Tools for Cold Chocolate and Biscuit Cake
- Springform pan
Steps for Cold Chocolate and Biscuit Cake
The base of our cold chocolate cake is very simple and does not require a food processor. Follow these steps for a crunchy, compact result:
Crush the biscuits: In a large bowl, roughly crumble the dry biscuits using your hands. Do not reduce them to powder: leaving larger pieces will give you a more rustic texture and a pleasant bite.
Combine the dry ingredients: Add the sugar and the unsweetened cocoa powder. Mix well with a spoon to distribute the cocoa evenly.Add the butter: Pour the melted butter (make sure it’s not hot) and combine with the milk. Stir until the biscuit crumbs are well moistened.
Prepare the pan: Take a 9-inch springform pan. For a perfect result, line the bottom with parchment paper and wrap the sides with plastic wrap or parchment strips.
Press the base: Pour the mixture into the pan and press well with your hands or the back of a spoon or a glass to level and compact the base.
Chill in the fridge: Transfer the base to the refrigerator for at least 30 minutes. This step is essential to solidify the butter and make the cake stable for slicing.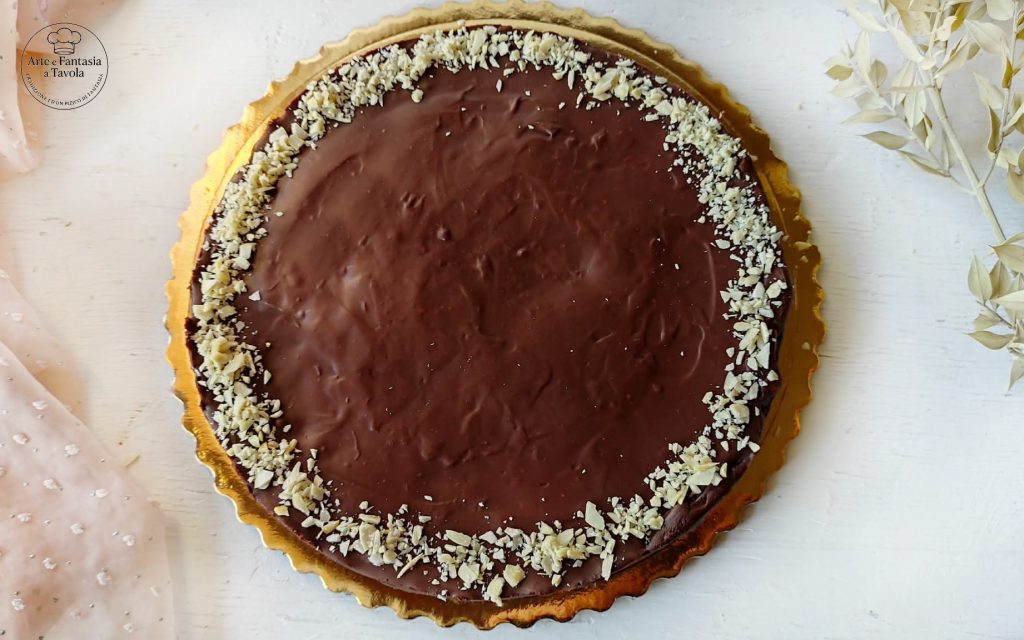
🍫 How to prepare a shiny, quick Chocolate Glaze
While the biscuit base firms up in the fridge, let’s move on to the most indulgent part: the chocolate topping. Here’s how to get it smooth and lump-free:
Melt the chocolate: Chop the chocolate into small pieces (it will melt faster). Put it in a suitable bowl with the milk and proceed with a double boiler (bain-marie).
Extra tip: Make sure the water in the bain-marie never touches the bottom of the bowl to prevent burning the chocolate.Stir carefully: Using a spatula, stir continuously until you obtain a smooth, glossy and completely homogeneous mixture.
Cooling: Once ready, remove the glaze from the heat and let it cool for a few minutes. Do not pour it boiling hot onto the base so you don’t melt the butter in the biscuit layer too much.
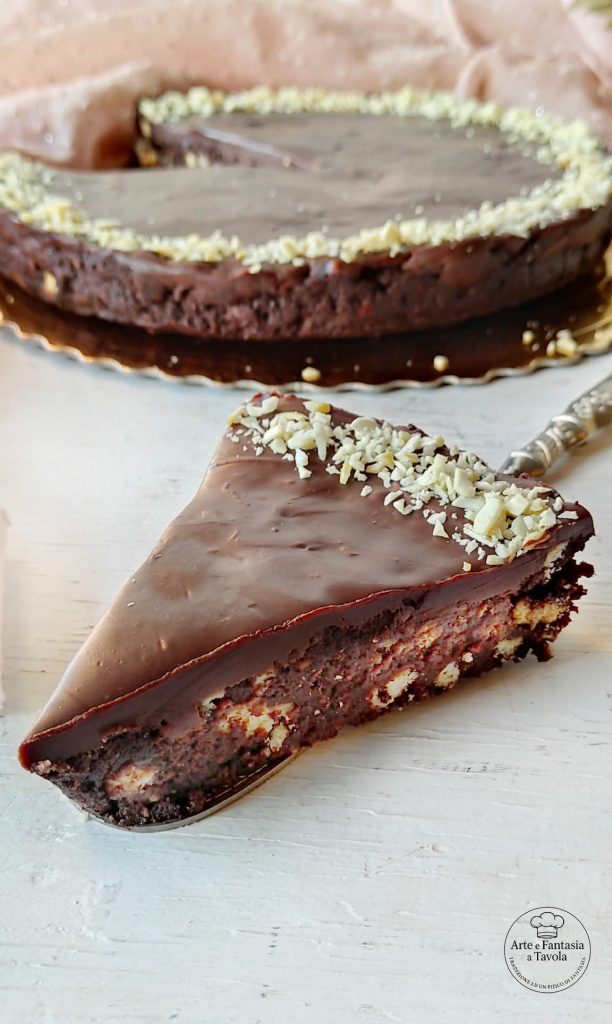
Fill the cake: Take the base out of the fridge and pour the chocolate glaze in the center. Use the spatula to spread it evenly over the entire surface.
Final decoration: If you want to make your cake even more inviting, sprinkle the surface with chopped hazelnuts. The contrast between the soft glaze and the hazelnut crunch will be irresistible!
Chill in the refrigerator: Place the cake in the fridge for at least 2 hours (or until the glaze has properly set).✨ A little twist:
If you love the sweet-salty contrast, try replacing the chopped hazelnuts with a pinch of Maldon salt sprinkled on the glaze just before serving. It’s a gourmet trick!Have you tried this recipe? Let me know in the comments
Share Your Creation
Did you make this recipe too? I would love to see your versions!
📷 Tag me on Instagram @camozzini.sonia or in the blog comments.
Together we can create a gallery of elegance and taste!
Follow me on All Channels
Want more ideas like this? Find me:
⭐ On the official blog
⭐ On Instagram
⭐ On Pinterest
⭐ On Facebook
⭐ And of course on the new YouTube Channel
To never miss a recipe, join the channel and the Facebook group Arte e Fantasia a Tavola: a space to share passions, tricks and kitchen moments.
Thanks for Being Here
Heartfelt thanks to everyone who visits these pages, leaves a comment, a like or simply a thought. Cooking is love, beauty and sharing. Every visit, every word, every shared recipe is part of this small world of taste and imagination.
See you in the next recipe!
With love,
Sonia – Arte e Fantasia a Tavola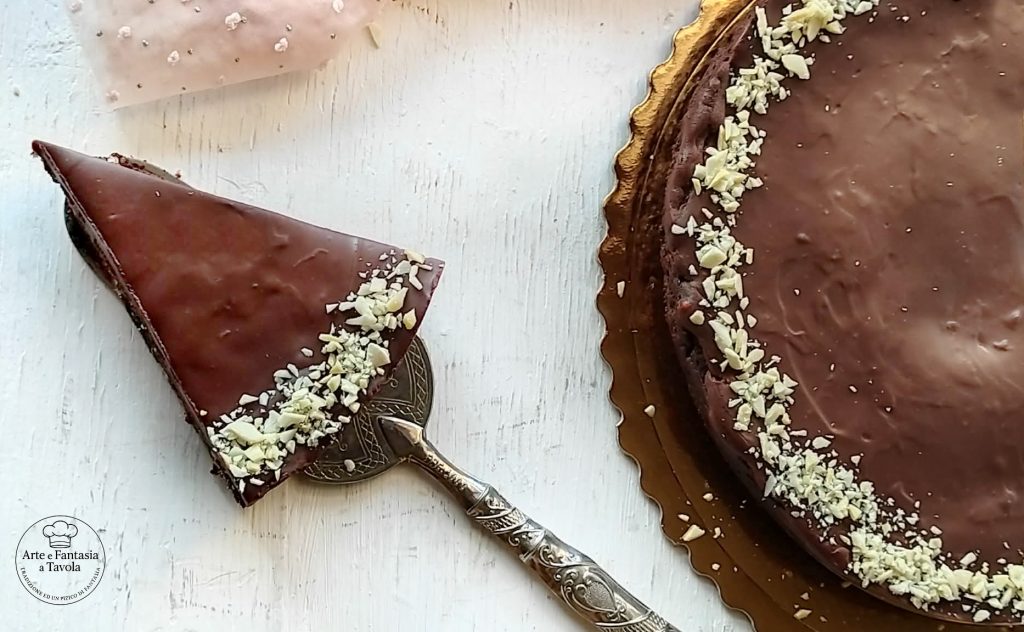
Cold Chocolate and Biscuit Cake
❄️ Storage: How to keep the Cold Cake perfect
One of the most frequent questions is: “How long does the cold cake last in the refrigerator?” Here’s everything you need to know to preserve its freshness and flavor:
In the refrigerator: The cake keeps perfectly for 3-4 days. I recommend covering it with a cake dome or plastic wrap to prevent the glaze from absorbing fridge odors.
In the freezer: If you want to keep it longer, you can freeze it! Slice it first and wrap the slices individually. They keep in the freezer for about 1 month.
Tip: Before serving, thaw in the refrigerator for a couple of hours to regain the ideal texture.
Serving: For a clean, neat slice of glaze, dip the knife in hot water and dry it before cutting the cake.
🎨 Delicious Variations: Customize your Biscuit Cake
This recipe is a fantastic base that you can personalize in a thousand ways. Here are some ideas to keep it always different:
Coffee variation: For an extra kick, add a teaspoon of instant coffee to the milk for the glaze or lightly moisten the crushed biscuits with unsweetened coffee.
White heart: You can decorate the surface with streaks of melted white chocolate over the dark glaze for a super elegant marbled effect.
Nuts: Besides chopped hazelnuts, try chopped pistachios or toasted sliced almonds. The color contrast with the chocolate is wonderful!
Lactose-free version: Replace the butter with margarine (or solid coconut oil) and the cow’s milk with a plant-based milk (almond or oat are perfect for chocolate desserts).
FAQ (Questions and Answers)
Can I prepare the cold cake the day before?
Absolutely yes! In fact, preparing it in advance is recommended. Prolonged chilling in the refrigerator (overnight) allows the biscuit base to firm up perfectly and the glaze to reach the ideal consistency for a clean cut.
Why does the biscuit base crumble when I slice it?
If the base crumbles, it could be for two reasons:
Not enough butter or milk: Make sure to follow the quantities; the liquids act as a “binder.”
Not enough resting time: The cake needs time for the butter to firm up. Leave it in the fridge for at least 30-60 minutes before adding the glaze.Can I use oil instead of butter?
Yes, you can replace the butter with coconut oil (which solidifies when cold) using the same amounts. If you use a neutral vegetable oil, the base will remain much softer and less compact, so I suggest adding a little more finely crushed biscuit to help the structure.
How can I make the chocolate glaze shinier?
The secret for a mirror-like glaze is to add a teaspoon of honey or glucose syrup to the chocolate while melting it with the milk. Also, avoid stirring too vigorously to prevent incorporating air bubbles.
I don’t have a springform pan, what can I do?
No problem! You can use a regular cake pan or a rectangular baking dish, but be sure to line it very well with plastic wrap leaving some overhang. That way you can gently lift the cake out once it has set.
Is it possible to make this recipe Vegan?
Certainly. Just use animal-free biscuits, a plant-based butter (or quality margarine) and a plant milk (soy or almond are great for chocolate desserts).
