This Kinder Bueno cheesecake is a very delicious cold cake, it prepares quickly and does not require baking.
I guess I don’t even have to tell you, but the kids absolutely love it!
It is completely gelatin-free and, compared to many recipes you find online, it has less butter in the cookie base compared to other cheesecakes.
To recall the taste of Kinder Bueno, I chose to chop these together with the cookies that make up the base, and I mixed a good amount of hazelnut cream (the one found inside Kinder Bueno, to be clear) together with cream cheese and cream.
I preferred not to add coarsely chopped Kinder Bueno into the cream, as they wouldn’t stay crispy and personally, I don’t like them that way, but if you want, you can certainly add them.
Scroll down a bit, and you’ll find the complete list of ingredients, the step-by-step recipe, and even the FULL VIDEO, which will help you follow the various steps even though they are very simple.
What do you say, can we start together to prepare our Kinder Bueno Cheesecake?
These are other recipes that, if you like this one, might definitely interest you:

- Difficulty: Very easy
- Cost: Economical
- Rest time: 1 Hour
- Preparation time: 30 Minutes
- Portions: serves for a 7.9 inch springform pan
- Cooking methods: No-bake
- Seasonality: Summer
Ingredients to make the KINDER BUENO CHEESECAKE
- 1 1/4 cups cocoa cookies
- 2 packages kinder bueno (3 kinder for the base, 1 kinder for decorating)
- 1/4 cup butter (melted)
- 12 1/3 oz mascarpone (or philadelphia)
- 1 cup heavy whipping cream (+ 100 ml to melt the chocolate on the surface)
- 1/2 cup hazelnut spread (of good quality)
- 3 tbsp powdered sugar
- 6 1/3 oz milk chocolate (for the surface)
- 1 3/4 oz 70% dark chocolate (for the surface)
Tools for the KINDER BUENO CHEESECAKE
- 1 Springform pan 7.9 inches in diameter
Steps to make the KINDER BUENO CHEESECAKE
First, in a mixer, put the cookies and the three kinder bueno; chop everything until you crumble them evenly.
Place the crumbled cookies and kinder bueno in a bowl and add the melted butter slightly cooled; mix well.
Transfer the resulting mixture into a 7.9 inch springform pan lined at the bottom with parchment paper; distribute them to form a uniform base and compact them slightly with the back of a spoon.
Place in the freezer just long enough to prepare the cream to pour over it.
Proceed to prepare the cheese cream: in a large bowl, pour the mascarpone (or philadelphia) and the hazelnut spread.
With the electric beaters on minimum power, mix the two ingredients to obtain a cream of a homogeneous color.
In another bowl, with the beaters clean and at maximum power, whip the cold-from-the-fridge heavy whipping cream (very important, mind you), and once whipped, add the powdered sugar, mixing again, this time with the beaters at the lowest power.
At this point, you can incorporate the cream by pouring it into the bowl of the cream obtained previously, and mix everything again with the electric beaters at the minimum, until you get a nice fluffy and homogeneous mixture (impossible not to taste it 😉 )
Take the springform pan with the cookie base from the freezer and pour the cream obtained.
Level it and return to the freezer while you carry out the next step.
To make the chocolate ganache to pour over the surface of your Kinder Bueno cheesecake, in a saucepan heat 100 ml of heavy whipping cream and before it reaches a boil, add, little by little, the pieces of milk chocolate.
Stir continuously with a spatula or spoon, keeping the flame to a minimum, and remove from heat as soon as you see the chocolate is practically all melted and well combined with the cream.
Continue stirring off the heat for a few seconds and let it cool for a few minutes.
Take the springform pan from the freezer and pour the chocolate ganache over the cheesecake surface.
Return to the freezer during the time of the next step.
As the last step, melt 50 g of dark chocolate in a saucepan (the smallest you have), and once completely melted and left to cool for about a minute, you can decide whether to pour it into a disposable piping bag and make a tiny hole with scissors, or alternatively use a spoon for a slightly less precise but faster result.
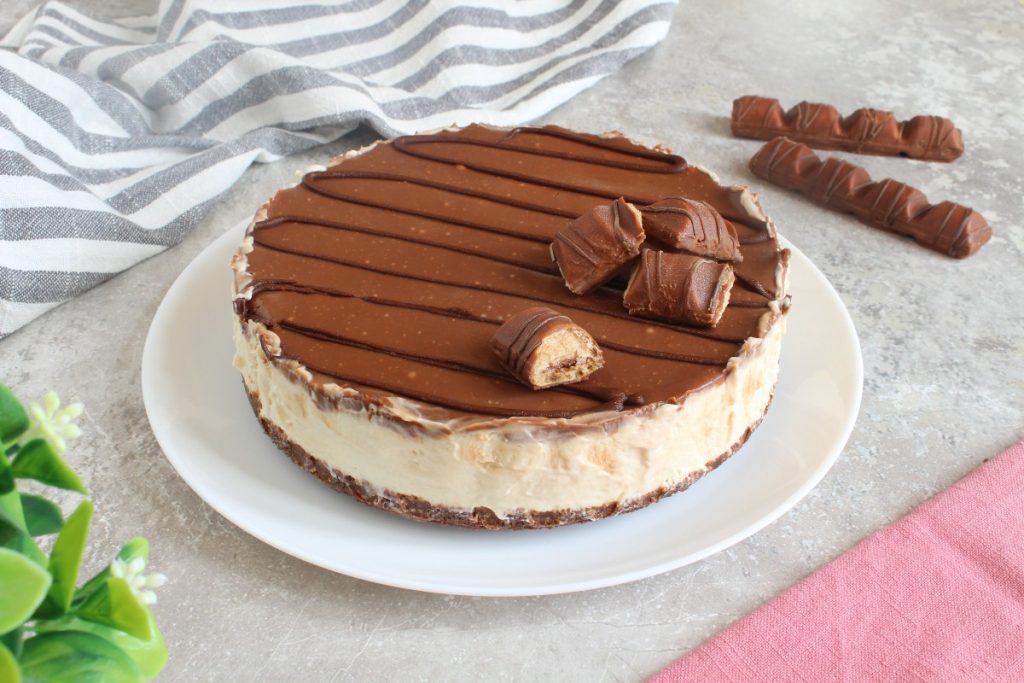
Decorate the surface of your Kinder Bueno cheesecake by making thin waves of dark chocolate, which recreate the effect of those that decorate Kinder Bueno 😉
If you like, you can use the remaining Kinder Bueno as I did to further decorate your cheesecake.
Place in the freezer for about an hour, then in the refrigerator until you want to enjoy it.
Taste and let yourself be overwhelmed by the goodness!
Tips and storage
The Kinder Bueno cheesecake keeps in the refrigerator for a couple of days.
As for the amount of powdered sugar I indicated among the ingredients, you can adjust it to your taste; since the milk chocolate ganache is very sweet, I didn’t want to sweeten the cream too much, but that’s my personal taste.
If you liked this recipe, these might also interest you:
