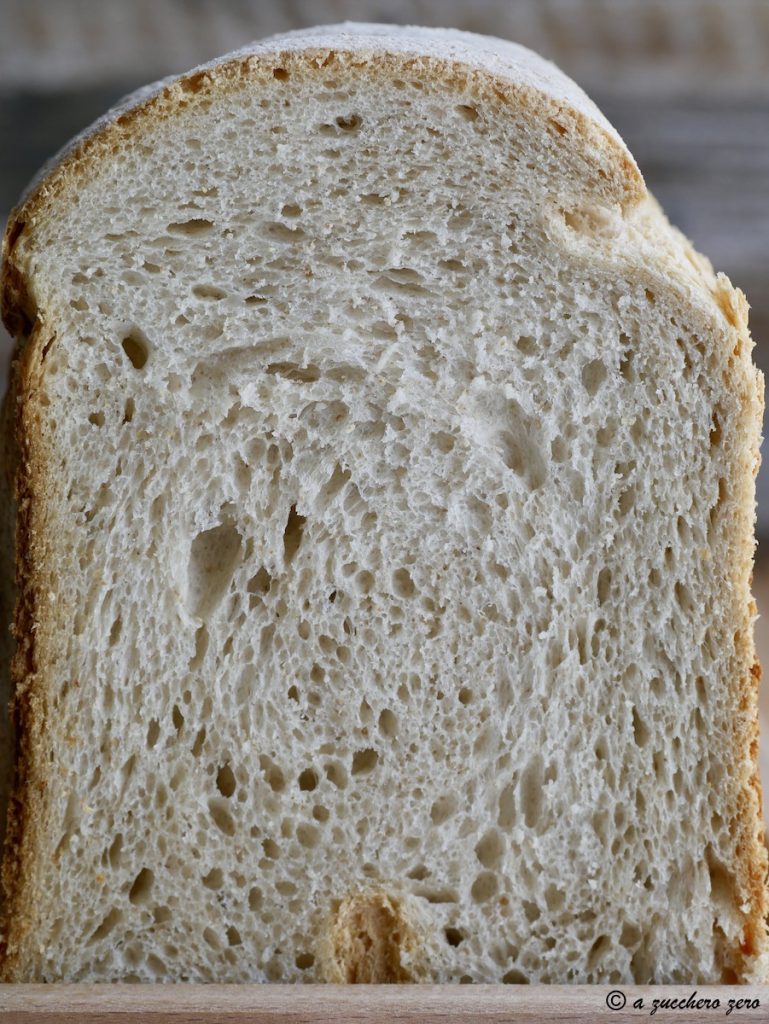
The low glycemic index bread is a bread rich in fiber.
I made a high and soft sandwich loaf but the low glycemic index dough is a versatile dough with which you can prepare different types of bread.
I used the low glycemic index mix from Molino Spadoni: based on type 1 flour and resistant starch, rich in fiber and protein, it’s a practical ally in case of hyperglycemia, prediabetes, and type 2 diabetes.
No sponsorship.
This content is not a collaboration with the brand.
I modified the homemade bread recipe from the mix package by reducing the amount of yeast and applying the poolish method.
Below, the procedure with and without a bread machine.
I swear it’s easier than it seems!
- Rest time: 14 Hours
- Cooking methods: Bread Machine
- Cuisine: Italian
Ingredients
- 1 1/4 cups water
- 1/4 tsp dry yeast (Mastro Fornaio PANEANGELI)
- 300 g low glycemic index flour (Molino Spadoni mix)
- 3 1/3 tbsp water
- 200 g low glycemic index flour (Molino Spadoni mix)
- 1 tbsp extra virgin olive oil
- 1 1/2 tsp salt
- to taste flour (or semolina)
As an alternative to the gram of dry yeast, you can use:
– 0.1 oz of fresh yeast;
– 0.15 oz of dried sourdough yeast.
You can vary the dough by adding unsweetened cocoa, turmeric, or saffron.
If you want stuffed bread, prepare the ingredients; some examples: chocolate chips, nuts, olives, sun-dried tomatoes, deli meats, and/or cheeses.
Suggested Tools
- Bread Machine Imetec Zero Glu or other model
- Glass graduated glass
- Food Scale digital
- Food Scale spoon
- Spoons measuring
- Spatula silicone
- Dough Cutter
- Cutting Board kneading board
Preparation
This recipe can be reproduced with any model of Bread Machine, stand mixer, or mixer as actions and durations of the different phases are detailed; compare the programs before executing the recipe.
Prepare the ingredients for the poolish:
– 1 1/4 cups of water;
– 1/4 tsp dry yeast;
– 300 g low glycemic index mix.From the 1 1/4 cups of water, heat a small portion: about 3 1/3 tbsp, it should be warm, not hot.
Pour it into a small bowl, add and dissolve the yeast.
* with experience, I’ve found that adding sugar is not necessary to activate it.POOLISH WITH BREAD MACHINE
Place the ingredients for the first dough – poolish in the bread pan:
– water;
– water + dissolved yeast;
– low glycemic index mix.
Select the program 13 [bread with little yeast poolish method] and press the START button.
The machine will start kneading for 8 minutes.
Use a silicone spatula to push any remaining flour from the sides of the container.
Once the kneading phase is complete, press the STOP button for a few seconds and turn off the machine [OFF].The poolish must mature for 12 hours, set an alarm!
POOLISH WITHOUT BREAD MACHINE
If you don’t have a bread machine, you can use a stand mixer or a hand mixer.
Knead for 8 minutes, cover, and let it mature.After 12 hours the poolish is mature and appears doubled and full of bubbles.
The appearance varies depending on the flour used.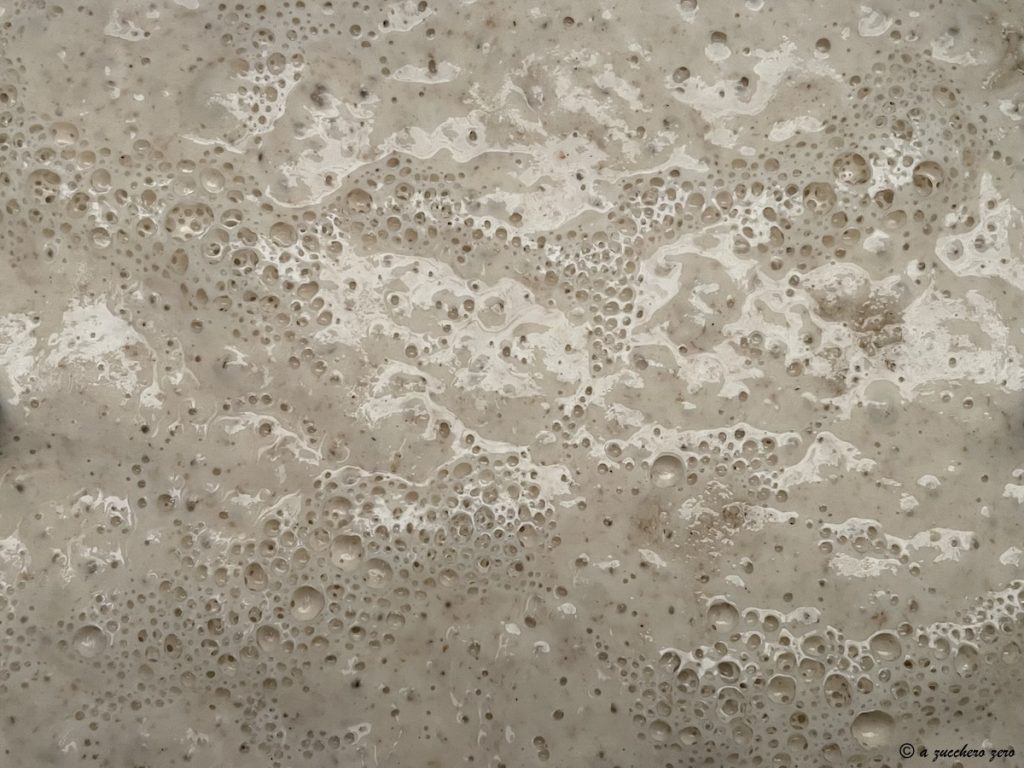
SECOND DOUGH WITH BREAD MACHINE
Prepare the ingredients for the second dough:
– 3 1/3 tbsp of water;
– 200 g low glycemic index mix;
also:
– 1 tbsp extra virgin olive oil;
– 1 1/2 tsp salt [adjust the amount to your taste or dietary needs, you can also omit it].Select the program 18 [dough and leavening] which provides:
– a kneading phase lasting 27 minutes;
– three leavening phases lasting 40 minutes each, totaling 2 hours;
for a total duration of 2 hours and 27 minutes.Pour over the poolish:
– the water;
– the low glycemic index mix;
and press the START button.
Wait a couple of minutes for the dough to start to form and add:
– the oil.
Wait a couple more minutes for the dough to incorporate it and add:
– the salt.
Use a silicone spatula to push any remaining flour from the sides of the container.If you want stuffed bread: add the prepared ingredients at the 4 BEEPS.
During the leavening phases do not open the lid to avoid temperature fluctuations; between each phase, the machine emits a signal.
When the program ends the machine emits several beeps, remove the bread pan.
The dough is elastic and smooth.
SECOND DOUGH WITHOUT BREAD MACHINE
If you don’t have a bread machine, you can use a stand mixer or a hand mixer for the kneading phase and the oven turned off or blankets for the leavening phase, extending the time until the dough doubles.Knead for 27 minutes, cover, and let rise until doubled.
Spread a thin and even layer of semolina on the work surface.
Flip the bread pan to remove the dough.
Remember to remove the kneading blades and carefully remove any dough residue from the bread pan.Pour a few drops of oil inside the bread pan, and carefully oil the bottom, walls, and pins with a paper towel.
Do not handle the dough too much:
– gently shape it by folding it downward;
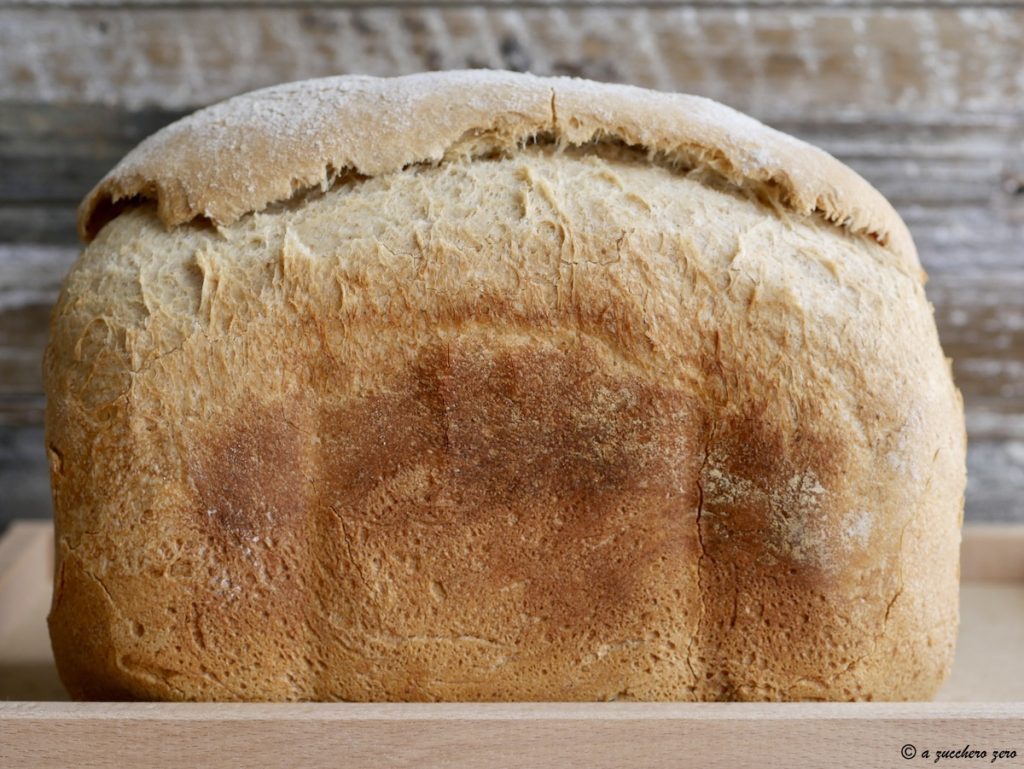
– place it back in the bread pan.If you want a more rustic look, sprinkle the surface with a thin and even layer of flour using a fine mesh sieve.
Insert the bread pan into the machine.
Select the program 20 [leavening and baking] which provides:
– a leavening phase of 50 minutes;
– baking phase of 30 minutes [modifiable by -10 and +10 minutes];
modify by +10 minutes and press the START button.
* The Program 20 can be used when the baking phase is, as in this case, a single one.To extend the baking
When program 20 ends, if you wish to extend the baking, use program 19 [baking].
Select the program 19 [baking], set 10 minutes and press the START button.If you don’t have a bread machine
– the dough can also be baked in the oven, in a loaf pan or free-form;
– preheat the oven;
– bake in a static oven at 356°F for 35-40 minutes.
* each oven is different; check that the surface is well browned and that the bread is not too moist in the center.The cookbook suggests removing the bread from the bread pan a few minutes after the end of baking.
To avoid damaging it, I proceed as follows:
– flip the bread pan onto a rack;
– gently rotate the pins;
and usually, the bread comes down without difficulty.If not, leave it in this position until it slides down on its own.
Place the bread on the rack and let it cool completely before slicing.
Your low glycemic index bread is ready.
Ideal:
– for slicing;
– for making rusks;
– for preparing toasts;
– as a light version of sandwich bread;
– as a light version of the gourmet panettone.Experiment with savory leavened products:
– bread like sandwich loaf, rustic loaf, rolls, baguette, ciabatta, loaf;
– pizza in pan, Neapolitan, Roman;
– pizza strips and mini pizzas;
– focaccia and schiacciata;
– leavened flatbread, tigelle, and crescentines;
– naan bread, pita bread;
– breadsticks and taralli;
– gourmet panettone;
– filled bread or plumcake;
– stuffed savories: calzones, croissants, muffins, panzerotti, Danube bread.Experiment with light sweet leavened products:
– brioche, croissants, rolls;
– pandoro;
– panbrioche, plumcake;
– panettone;
adding to the dough the sweetener you normally use and/or ingredients like fresh fruit, nuts, dark chocolate chips; cinnamon or vanilla, and possibly replacing the water with milk or plant-based milk, flavored infusions or teas with no added sugars.Saffron low glycemic index bread baked in loaf pan.
Browse the blog section dedicated to Bread Machine Recipes.
Storage, tips, and variations
Add seeds [chia, sunflower, flax, poppy, sesame] to the dough to increase fiber and crunchiness.
You can store the dough in the fridge inside a bowl closed with a lid or sealed with plastic wrap, in the lower part immediately above the vegetable shelf.
Take the dough out of the fridge at least 3 hours before working it.
You can take it out the night before to work it in the morning.
The low glycemic index bread stays soft for several days.
Slice it and heat it in a pan to restore its fragrance and softness as if it were freshly baked.
FAQ (Questions and Answers)
What is the low glycemic index mix?
The low glycemic index mix from Molino Spadoni: based on type 1 flour and resistant starch, rich in fiber and protein, is a practical ally in case of hyperglycemia, prediabetes, and type 2 diabetes.
What is resistant starch
During digestion, digestible starch is broken down into simple sugars causing glycemic spikes.
Resistant starch is not digested and reaches the colon intact, acting like fiber, so it does not cause glycemic spikes.
It’s not a chemical additive but a type of starch that behaves like fiber, helping to reduce postprandial glycemic response and keeping blood sugar more stable.
Can it be consumed by children?
Yes, it can be consumed by children, but it’s good to ask the pediatrician.Where can I find the low glycemic index mix?
In supermarkets – not all unfortunately – or in some pharmacies.
In Sicily, I can’t find it, so I buy it online directly from the official producer’s website: low glycemic index mix from Molino Spadoni.Can I substitute flours?
In this case, it doesn’t make sense because it’s a dough dedicated to those following a particular diet and a high-fiber diet.
With experience, you can substitute and vary flours, considering they have different characteristics.
Whole grain flours absorb a varying amount of water, tend to rise less, and the doughs are less elastic; for a softer result, I recommend mixing them with semi-whole grain flours like type 2 or type 1 flour.
Naturally, changing flours can impact glycemia differently.
To explore the topic read the article by clicking on the following link: Semolina and whole grain flours glycemic index type 2 diabetes.
A valid alternative is this dough based on whole wheat flour and type 2:
– Bread with whole wheat flour and type 2.Glycemic response is personal, and there are many variables.
– use a glucometer to test your personal response.