Tomahawk Steak: Perfect Cooking in Oven and Grill
The Tomahawk steak, with its long bone and marbled meat, is a cut of beef that commands awe and admiration. But how do you achieve perfect cooking, with a crispy crust and a tender, juicy interior? The secret lies in a combination of slow oven cooking and final searing on the grill. This method, which involves cooking the steak in the oven at low temperature for several hours before finishing it on the grill, allows for an extraordinary result: meat as soft as butter, with a perfect Maillard reaction on the outside, providing unparalleled flavor and aroma.
In this guide, we’ll explore step by step the oven and grill cooking technique for the Tomahawk steak, revealing the secrets to achieving a result worthy of a real barbecue master.
- Difficulty: Very easy
- Cost: Medium
- Rest time: 4 Hours 30 Minutes
- Preparation time: 10 Minutes
- Portions: 2
- Cooking methods: Gas barbecue, Slow cooking, Oven
- Cuisine: Italian
- Seasonality: New Year's Eve, All seasons
- Energy 1,130.80 (Kcal)
- Carbohydrates 0.00 (g) of which sugars 0.00 (g)
- Proteins 77.88 (g)
- Fat 89.54 (g) of which saturated 38.94 (g)of which unsaturated 0.00 (g)
- Fibers 0.00 (g)
- Sodium 596.27 (mg)
Indicative values for a portion of 440 g processed in an automated way starting from the nutritional information available on the CREA* and FoodData Central** databases. It is not food and / or nutritional advice.
* CREATES Food and Nutrition Research Center: https://www.crea.gov.it/alimenti-e-nutrizione https://www.alimentinutrizione.it ** U.S. Department of Agriculture, Agricultural Research Service. FoodData Central, 2019. https://fdc.nal.usda.gov
Ingredients
- 3.75 lbs Tomahawk
- 1 pinch Maldon salt
Tools
- 1 Cast iron skillet
- 1 Oven
Steps
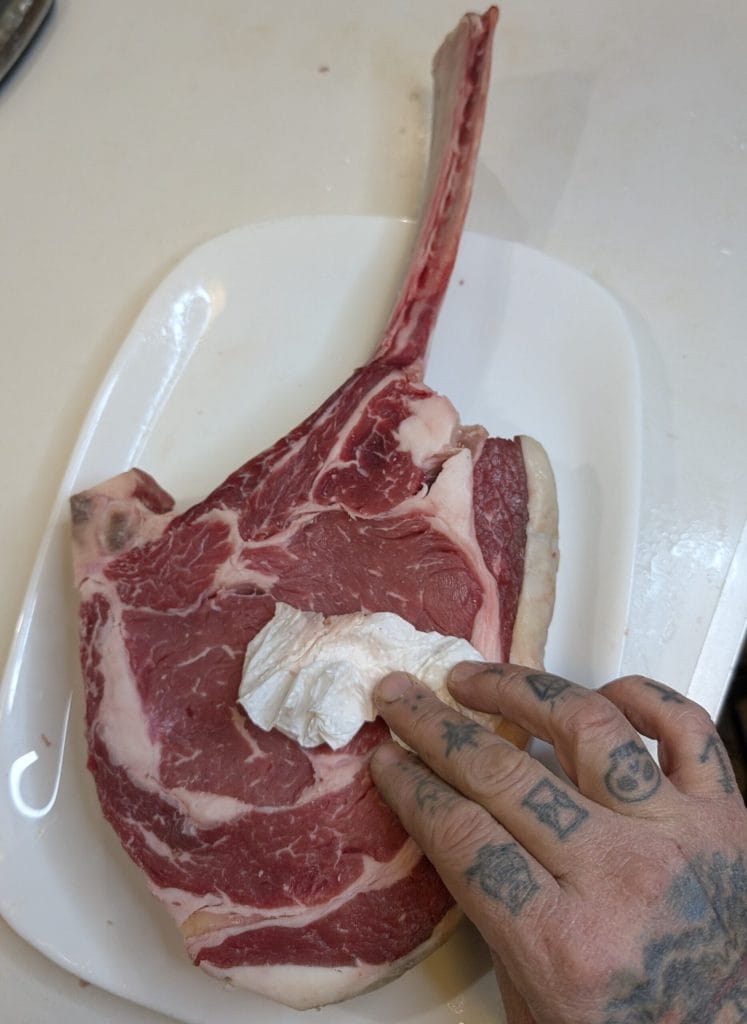
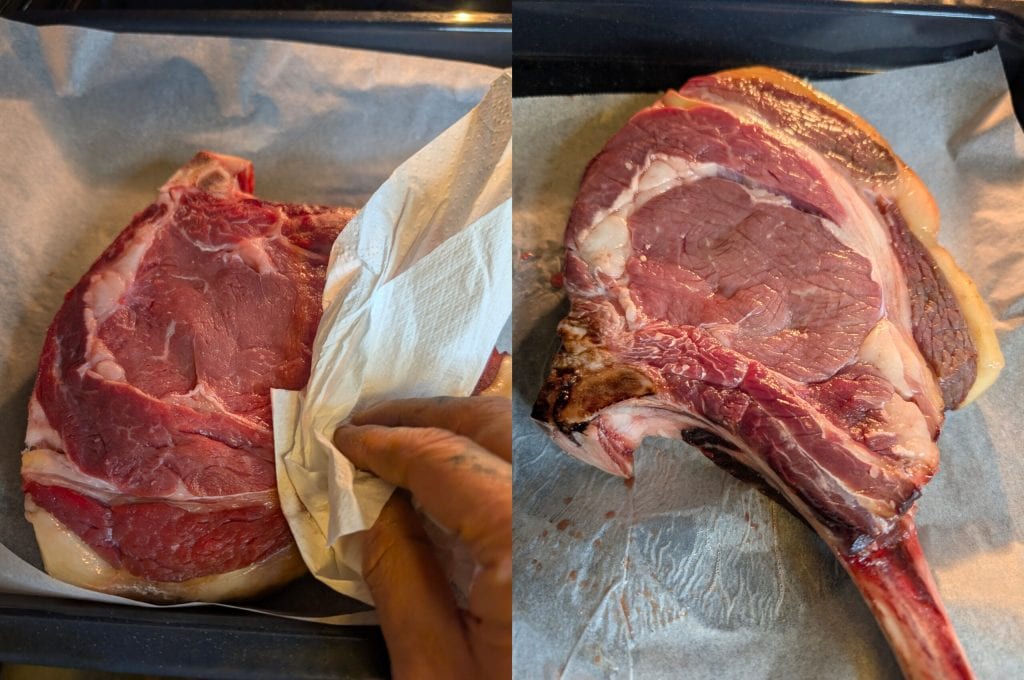
Before starting to cook your Tomahawk, it’s crucial to spend some time preparing the meat. The first step is to carefully pat the steak dry using paper towels. This step is essential because excess moisture on the surface of the meat prevents the proper formation of the crust during cooking, whether in a pan, on the grill, or in the oven. A dry surface, on the other hand, promotes the Maillard reaction, responsible for the golden brown color and intense flavor that characterize a perfectly cooked steak. Once dried, it’s important to leave the Tomahawk at room temperature for about an hour before starting to cook. This step allows the meat to reach a uniform temperature, avoiding thermal shock when exposed to the oven’s heat. This way, the steak will cook more evenly, resulting in a tender and juicy inside and perfectly cooked outside.Even though we will cook the Tomahawk in the oven at a low temperature (122°F), resting at room temperature remains essential. This is because, despite the slow cooking, the muscle fibers of the meat undergo tension. By letting the steak rest before cooking, these fibers relax, ensuring more uniform cooking and a final result that is more tender and juicy.
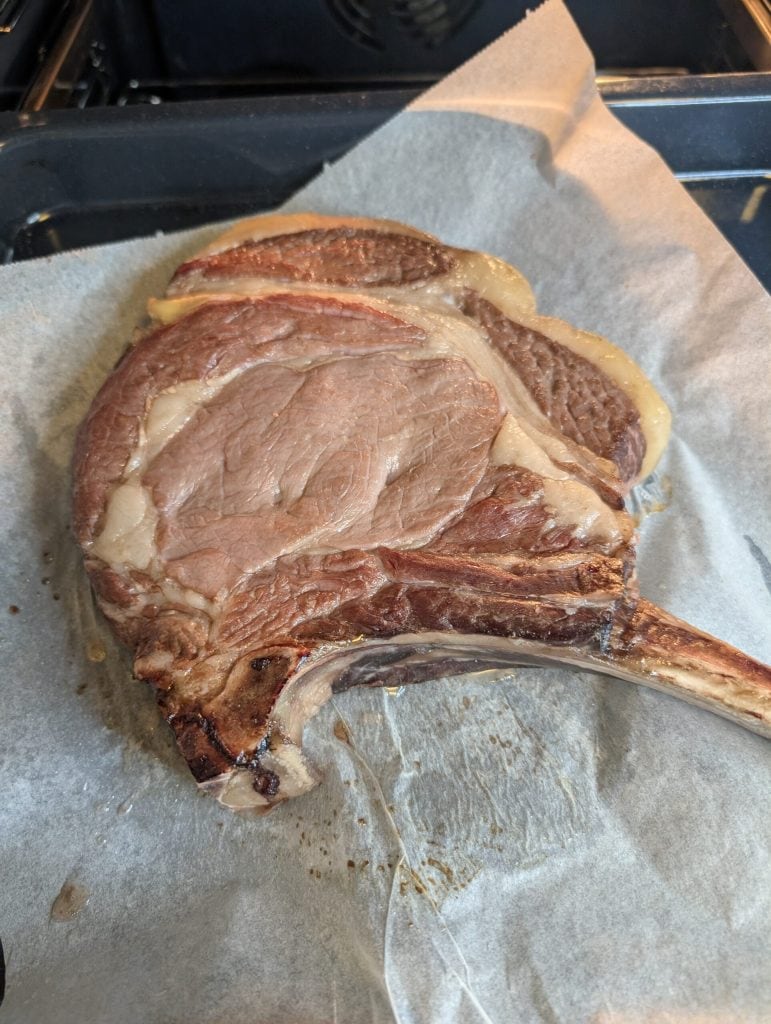
Now that our Tomahawk has acclimated to room temperature, we can proceed with the slow cooking in the oven. Set the oven to 113°F, a constant and gentle temperature that will ensure even cooking and best preserve the meat’s juices, for an incredibly tender final texture. Place the Tomahawk on a baking tray with a rack, allowing hot air to circulate freely around the meat, and bake by positioning the rack in the center of the oven. The time needed in the oven is about 4 hours but can vary depending on the thickness of the meat: this timeframe, in an oven with a stable temperature of 113°F, allows the steak’s core to reach the ideal temperature of 113°F for proceeding to the next cooking stage. During cooking, to ensure even cooking and keep the meat’s surface dry, it’s advisable to turn the Tomahawk halfway through (after about 2 hours) and gently pat it with paper towels every hour. This precaution will allow you to achieve an even crispier and tastier crust in the final cooking stage.
Set the oven to 113°F. This temperature, kept constant and gentle, is the key to even cooking and best preserving the meat’s juices, ensuring an incredibly tender final texture. Place the Tomahawk on a baking tray with a rack (this will allow hot air to circulate freely around the meat) and bake. Position the rack in the center of the oven. The time in the oven is about 4 hours (it depends on the thickness of the meat). This timeframe, in an oven with a stable temperature of 113°F, allows the steak’s core to reach the ideal temperature of 113°F to proceed to the next cooking stage. It’s essential to monitor the meat’s internal temperature with a thermometer to ensure reaching the target temperature.
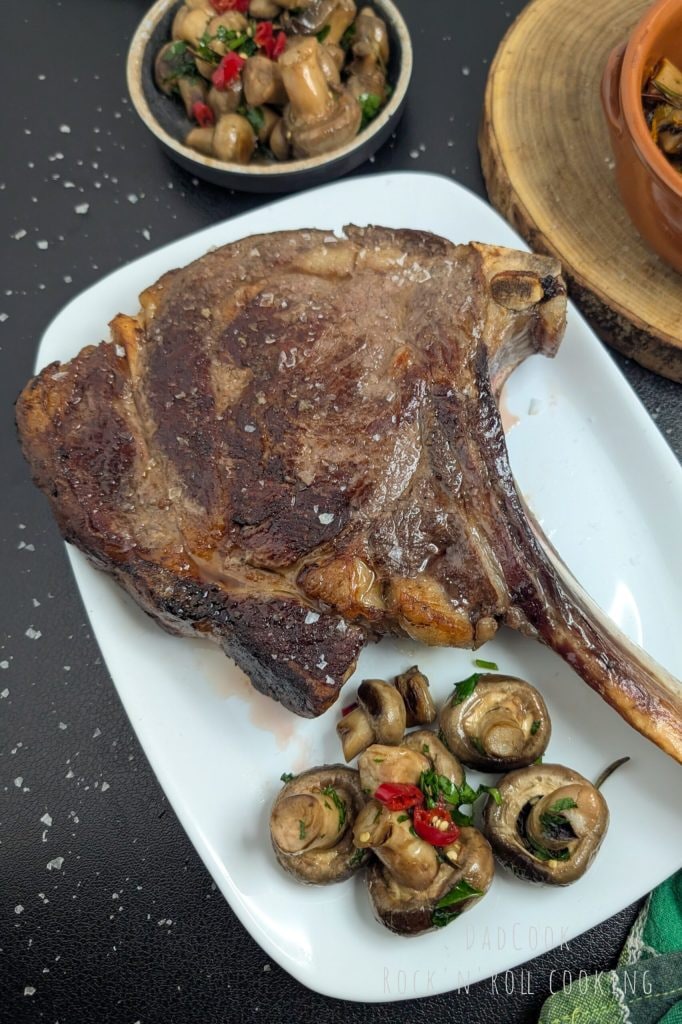
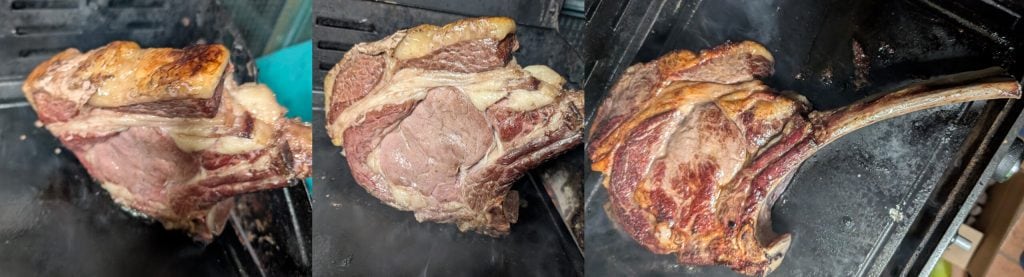
It’s time to give our Tomahawk the crust it deserves! Heat the grill or barbecue to high heat: we want a scorching surface to trigger the Maillard reaction, responsible for the unmistakable color and aroma of grilled meat.Before proceeding, let’s seal the meat. Wrap the bone in aluminum foil to protect it from heat and make it easier to handle. Holding the bone, place the steak on its side on the scorching grill and “seal” all sides, including the edges, creating a barrier that will prevent juices from escaping.Now place the Tomahawk on the grill and cook for a few minutes per side, just enough time to get a nice golden crust. Remember that the heart of the meat has already reached 113°F in the oven, so don’t overdo it! The goal is the crust and to add a few degrees to the core, depending on the desired doneness.For a “blue” doneness, a few minutes per side will suffice. For medium or well-done, extend the time slightly but monitor the internal temperature.With this final step, your Tomahawk will be ready: tender and juicy inside, crunchy and flavorful outside. A true masterpiece!
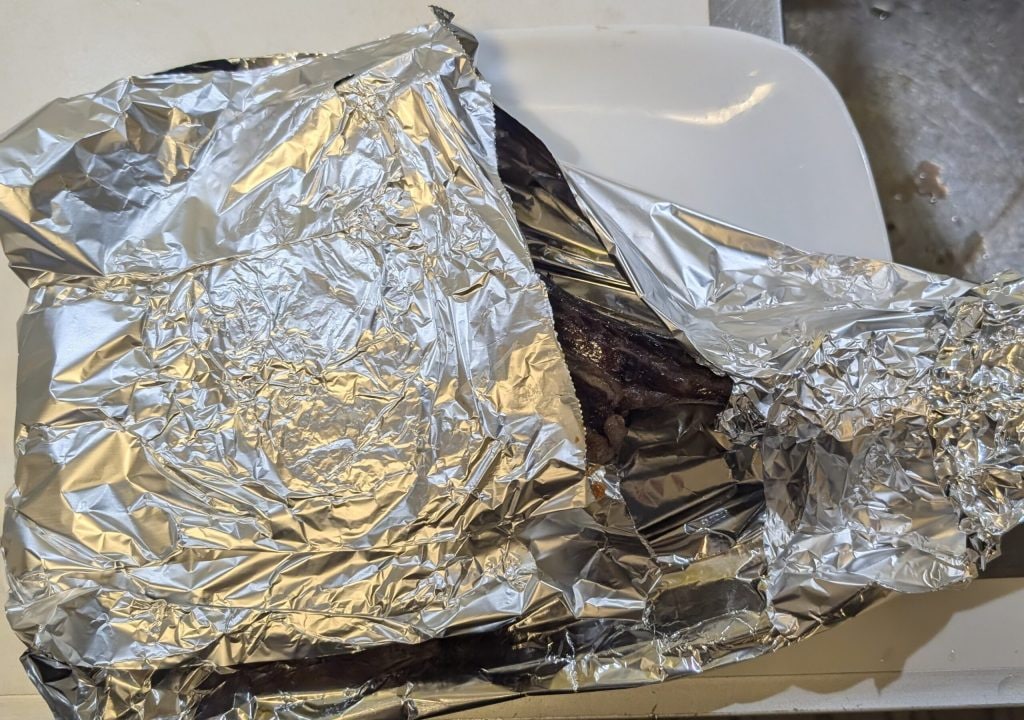
After achieving the perfect crust, resisting the temptation to cut the Tomahawk immediately is crucial. In fact, this is the time to arm yourself with patience and allow the meat to rest properly. During cooking, the juices inside the steak have moved towards the center. By cutting it immediately, these precious juices would escape, making the meat tough and dry and wasting all the time and care dedicated to preparation. To avoid this unpleasant inconvenience, let the Tomahawk rest for at least 20 minutes, wrapped in aluminum foil to keep it warm. This time will allow the juices to redistribute evenly within the meat, ensuring a tender and juicy texture with every bite. Before serving, you can briefly heat the Tomahawk on the grill or in the oven to bring it back to the ideal temperature.
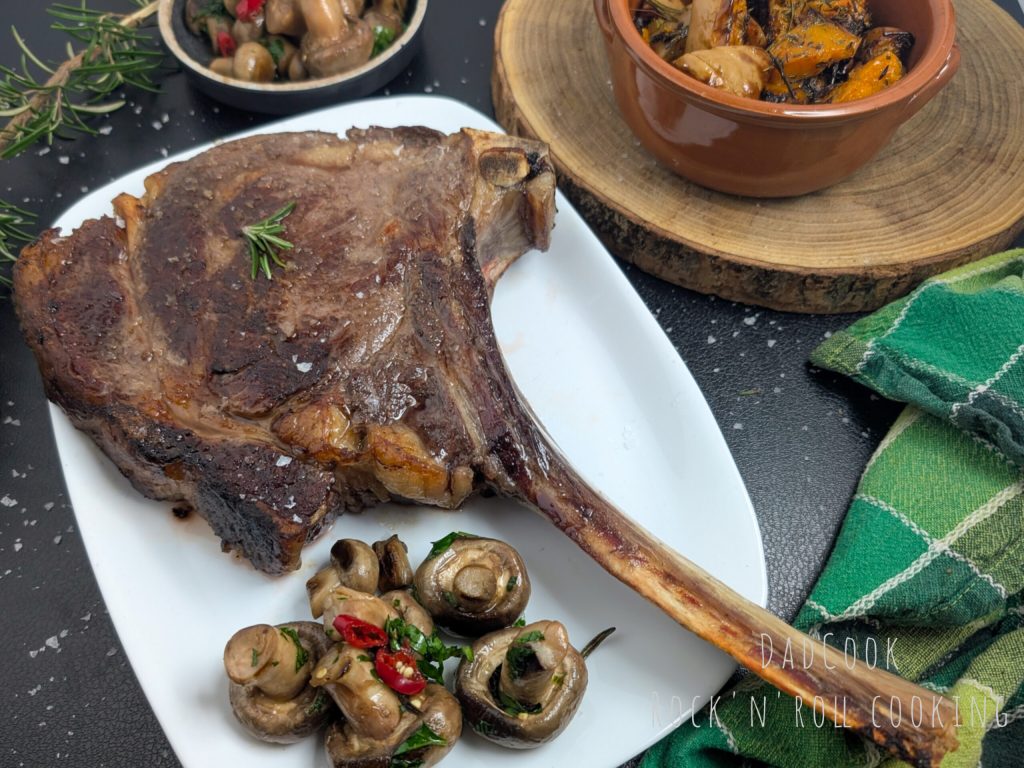
Before serving, briefly heat the Tomahawk on the grill or in the oven to bring it back to the ideal temperature. When it’s time to slice it, remember to do so against the grain for more tender and easier-to-chew slices. Enjoy this masterpiece of taste! A sprinkle of flake salt, perhaps smoked or herb-flavored, will enhance the meat’s flavor. Serve the Tomahawk with your preferred side dish: roasted potatoes, grilled vegetables, or a fresh salad are just a few ideas. And for a gourmet touch, try adding a knob of herb-flavored butter or a mustard sauce. Enjoy your meal!
Here are some tips for storing Tomahawk, both raw and cooked:
Storing raw Tomahawk:
In the refrigerator: If you have purchased the Tomahawk and do not intend to cook it immediately, store it in the refrigerator, wrapped in butcher paper and then in an airtight container or food bag, to prevent it from drying out or absorbing odors. You can keep it in the refrigerator for 2-4 days.
In the freezer: For longer storage, you can freeze the Tomahawk. Wrap it well in plastic wrap, then in aluminum foil, and finally in a freezer bag, removing as much air as possible. This way, the meat will keep for 2-3 months.
To thaw, transfer it from the freezer to the refrigerator and allow it to thaw slowly for at least 24 hours.
Storing cooked Tomahawk: At room temperature: Cooked Tomahawk can be stored at room temperature for a maximum of 2 hours. Beyond this time, bacteria can proliferate and make the meat unsafe to consume.
In the fridge: If you have leftover cooked Tomahawk, let it cool completely and then store it in the refrigerator in an airtight container. You can keep it for 3-4 days.
In the freezer: You can also freeze cooked Tomahawk, following the same guidelines as for raw meat. In this case, the meat will keep for 2-3 months. To thaw, transfer it from the freezer to the refrigerator and allow it to thaw slowly for at least 24 hours.
Additional tips: Buy Tomahawk from a trusted butcher: Ensure the meat is fresh and of good quality.
Choose a Tomahawk with good marbling: Marbling, the presence of intramuscular fat, helps make the meat more tender and flavorful. Don’t overcook the Tomahawk: Overcooking will make the meat tough and dry.
Use a meat thermometer: A meat thermometer will help you achieve the desired doneness, avoiding overcooking or undercooking the steak.
Let the meat rest after cooking: Resting allows the juices to redistribute within the meat, making it more tender and juicy.
By following these tips, you can enjoy your Tomahawk at its best, whether you cook it immediately or store it for a special occasion.
By following these tips, you can enjoy your Tomahawk at its best, whether you cook it immediately or store it for a special occasion.
Wine to Pair with Tomahawk:
The Tomahawk is an important cut of meat with a rich flavor and good marbling. To best enhance it, I recommend a full-bodied red wine with soft tannins and good persistence. Here are some options, with different styles and origins:
Italy:
Tuscany: A great classic like Brunello di Montalcino is always an excellent choice. Its elegant tannins and notes of ripe fruit pair perfectly with grilled meat. Alternatively, a Chianti Classico Riserva offers excellent structure and complexity at a more affordable price.
Piedmont: A Barolo with a few years of aging offers an unforgettable sensory experience. Its intense aromas of rose, spices, and licorice harmonize with the succulence of the Tomahawk. A Barbaresco can also be an excellent choice, with its softer tannins and notes of red fruit.
Veneto: Amarone della Valpolicella is a powerful and structured wine with aromas of dried fruit and spices. Its richness and complexity perfectly match the richness of the Tomahawk.
Southern Italy: Let’s not forget the great reds of the South! An Aglianico del Vulture or a Taurasi offer firm tannins and good acidity, balancing the fatness of the meat.
France:
Bordeaux: A Saint-Émilion or a Pomerol based on Merlot offers soft tannins and aromas of black fruit, perfect for accompanying the Tomahawk.
Burgundy: A well-structured Pinot Noir, such as a Gevrey-Chambertin or a Nuits-Saint-Georges, can be an interesting pairing, with its earthy and spicy aromas.
United States:
California: A Cabernet Sauvignon from Napa Valley, with its powerful structure and notes of black fruit and vanilla, is an excellent choice for the Tomahawk.Additional tips: The serving temperature of the wine is important: serve red wines at a temperature of about 64-68°F to best appreciate their aromas.
If the Tomahawk is accompanied by specific sauces or sides, take them into account when choosing the wine. For example, a mushroom-based sauce pairs well with wines with earthy notes, while a sweet-and-sour sauce requires a wine with good acidity.
Ultimately, the choice of wine depends on your personal tastes. Don’t hesitate to experiment and find the pairing that satisfies you the most
Ultimately, the choice of wine depends on your personal tastes. Don’t hesitate to experiment and find the pairing that satisfies you the most
FAQ (Questions and Answers)
What is the difference between cooking a Tomahawk and a regular steak?
The Tomahawk, being a very thick cut of meat, requires slower and more controlled cooking than a regular steak. The two-phase cooking process, first in a low-temperature oven and then on the grill, allows for evenly cooked meat that is tender and juicy inside and with a crispy crust outside. Additionally, the presence of the long bone requires particular attention in managing the cooking to prevent the meat near the bone from remaining undercooked.
The Tomahawk, being a very thick cut of meat, requires slower and more controlled cooking than a regular steak. The two-phase cooking process, first in a low-temperature oven and then on the grill, allows for evenly cooked meat that is tender and juicy inside and with a crispy crust outside. Additionally, the presence of the long bone requires particular attention in managing the cooking to prevent the meat near the bone from remaining undercooked.
Can I cook the Tomahawk only on the grill without using the oven?
I do not recommend cooking the Tomahawk only on the grill, especially if it is a very thick cut. The risk is burning the outside of the meat before the inside reaches the desired temperature. Cooking in a low-temperature oven allows for even and gentle cooking, preparing it for the subsequent searing phase on the grill. If you don’t have the possibility to use the oven, you can try cooking the Tomahawk on the grill over very low and indirect heat, using a lid to create a cooking environment similar to that of the oven. However, this technique requires a lot of experience and attention to avoid burning the meat.
I do not recommend cooking the Tomahawk only on the grill, especially if it is a very thick cut. The risk is burning the outside of the meat before the inside reaches the desired temperature. Cooking in a low-temperature oven allows for even and gentle cooking, preparing it for the subsequent searing phase on the grill. If you don’t have the possibility to use the oven, you can try cooking the Tomahawk on the grill over very low and indirect heat, using a lid to create a cooking environment similar to that of the oven. However, this technique requires a lot of experience and attention to avoid burning the meat.
What is the best method to cook the Tomahawk: gas barbecue, charcoal, or gas stovetop?
Each method has its advantages and disadvantages:
Gas barbecue: Offers good temperature control and quick cooking. It is practical and easy to use, ideal for those looking for a quick solution without too many “frills”.
Charcoal barbecue: Gives the meat an unmistakable smoky aroma, loved by grill purists. However, it requires more experience in managing the fire and cooking times.
Gas stovetop: It is the most practical solution if you do not have a barbecue. In this case, I highly recommend using a cast iron skillet. Cast iron, with its ability to accumulate and distribute heat evenly, allows for a crispy and flavorful crust, similar to that obtained on the grill.
In conclusion, the choice of cooking method depends on your preferences and equipment.
If you’re looking for practicality and speed, gas barbecue or gas stovetop with a cast iron skillet are excellent solutions. If you desire a more intense and smoky flavor, the charcoal barbecue is the ideal choice.Each method has its advantages and disadvantages:
Gas barbecue: Offers good temperature control and quick cooking. It is practical and easy to use, ideal for those looking for a quick solution without too many “frills”.
Charcoal barbecue: Gives the meat an unmistakable smoky aroma, loved by grill purists. However, it requires more experience in managing the fire and cooking times.
Gas stovetop: It is the most practical solution if you do not have a barbecue. In this case, I highly recommend using a cast iron skillet. Cast iron, with its ability to accumulate and distribute heat evenly, allows for a crispy and flavorful crust, similar to that obtained on the grill.
In conclusion, the choice of cooking method depends on your preferences and equipment.
If you’re looking for practicality and speed, gas barbecue or gas stovetop with a cast iron skillet are excellent solutions. If you desire a more intense and smoky flavor, the charcoal barbecue is the ideal choice.
