Welcome to my kitchen! Today I take you to Germany, but with a delicious and original twist. The Black Forest Cake with blackberries is a staple of international pastry, usually loved for the chocolate-and-cherry combination.
In this version, however, I decided to give it a wilder and more sophisticated note using fresh blackberries.
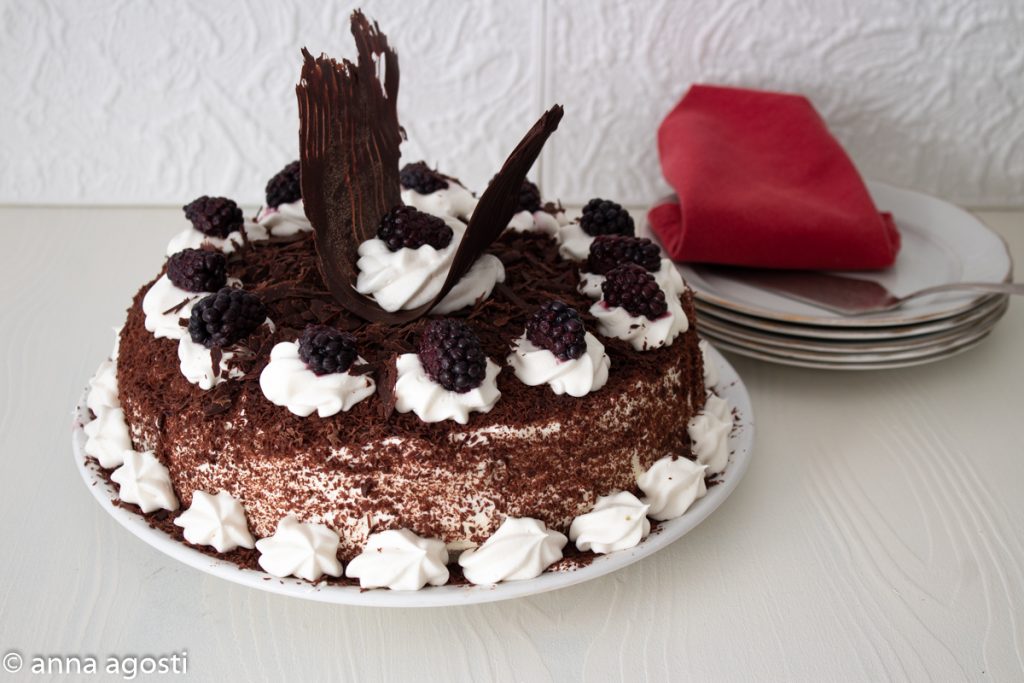
The contrast between the intensity of the cocoa sponge cake, the softness of whipped cream and the slightly tart note of the blackberries is simply divine.
This cake was the gift for a special birthday—my niece turned 15—so I couldn’t photograph the slice… but I assure you it disappeared in a flash and the inside was a cloud of cream and blackberries!
To crown it all, a homemade dark chocolate tuile gives height and crunch. Ready to discover how to make this masterpiece? As always, let’s go under the photo to see what you need for the Black Forest Blackberry Cake 😉
See you soon with the next recipe, Ana Amalia!
- Difficulty: Medium
- Cost: Economical
- Rest time: 4 Hours
- Preparation time: 45 Minutes
- Portions: 8Servings
- Cooking methods: Oven
- Cuisine: German
- Seasonality: All seasons
Ingredients for Black Forest Blackberry Cake
- 6 eggs (medium, at room temperature)
- 3/4 cup granulated sugar
- 1 cup all-purpose flour (type 00 equivalent)
- 6 tbsp unsweetened cocoa powder (about 6 tbsp (approximately 3/8 cup))
- 1 pinch salt
- 2 cups heavy cream for whipping (cold)
- 2/3 cup powdered sugar (confectioners')
- 2 cups blackberries (fresh, or cherries for the original version)
- 3.5 oz 70% dark chocolate (for shavings and the tuile)
- 1/3 cup water
- 1/4 cup granulated sugar (for the syrup)
- 1 tbsp liqueur (such as kirsch or another, optional)
Tools
- 2 Bowls
- 1 Electric mixer
- 1 Cake pan removable, 8.7 in (22 cm) springform pan
Preparation — Black Forest Cake
– Begin by whipping the eggs with the sugar and a pinch of salt for at least 15 minutes, until the mixture is pale and frothy.
– Sift together the flour and cocoa and gently fold them in by hand with upward motions.
– Pour into a 8.7–9.4 in (22–24 cm) pan greased with butter and bake at 356°F for about 30 minutes. Let cool completely.
My tip: If you can, prepare the sponge cake the day before and wrap it in plastic wrap; once well rested, it will be much easier to slice and won’t crumble.
While the cake bakes, melt the dark chocolate in a bain-marie.
– For the tuile: brush a strip of melted chocolate onto a sheet of parchment paper.
Place the sheet over a rolling pin to give it a curved shape and chill in the fridge to set.
– For the sides: grate the remaining chocolate or use a vegetable peeler to create thin shavings.
– Bring water and sugar to a boil for the syrup, then let cool (add the liqueur if you like).
– Whip the very cold cream with the powdered sugar until stiff and glossy. Keep it refrigerated until ready to use.
Cut the sponge cake into three layers.
– Place the first layer on the serving plate and soak it lightly with the syrup.
– Fill with a layer of cream and distribute some of the blackberries cut into pieces (keep the nicest ones for the final decoration).
– Repeat with the second layer.
Top with the third layer, soak it, and cover the entire cake (top and sides) with a thin coating of cream.
– Cover the sides and surface with the chocolate shavings. Pipe cream rosettes with a piping bag along the top edge and base of the cake.
– Place one blackberry on each top rosette and finally lay your curved chocolate tuile carefully in the center.
Note on storing the tuile: > To keep the tuile perfectly shiny and crisp, I recommend adding it to the cake only shortly before serving. Dark chocolate dislikes the humidity of the refrigerator: if you prepare the cake in advance, store the tuile at room temperature in a cool, dry place, protected under a cake dome or in an airtight container, and place it on the cake at the last moment. This will prevent it from losing its curve or developing unsightly condensation drops.
Extra tip: Let the cake rest in the refrigerator for at least 3–4 hours before serving; the flavors will meld and the slices will be perfect!
Storage, tips and variations for Black Forest Cake
In the refrigerator: Black Forest Cake keeps in the refrigerator for up to 2–3 days, preferably under a cake dome.
In the freezer: You can freeze only the cocoa sponge (well wrapped in plastic wrap) for up to one month.
Non-alcoholic version: If there are children, replace the liqueur in the syrup with blackberry juice or simply a little vanilla syrup.
White Forest: You can invert the colors by using a classic sponge (without cocoa) and decorating with white chocolate shavings for an even more “snowy” effect.
Careful with the blackberries: Make sure the blackberries are perfectly dry after washing; any residual water could stain the cream or cause it to break.
More recipes
🖥If you want to see more recipes you can return to HOME
📲If you don’t want to miss any recipes you can follow me on my Facebook Page, just turn on notifications and you’ll see many new recipes every day.
FAQ — Black Forest Cake
Can I use frozen blackberries instead of fresh ones?
Yes, but with a precaution: don’t add them directly to the cream because they will release too much liquid while thawing. I recommend cooking them for a few minutes in a pan with a tablespoon of sugar to create a sort of compote, let it cool well and use it for the filling. For the outer decoration, though, fresh ones are unbeatable.
Why did my whipped cream collapse after a few hours?
Whipping cream for desserts must be beaten very firm. If the cake must stay out of the fridge for a while (for example during a meal), you can add a teaspoon of “whip stabilizer” while whipping, or use part mascarpone to make it more structured.
I don’t have a rolling pin for the tuile, what can I use?
No problem! You can use a glass bottle (clean and at room temperature) or even the inside of an empty paper towel roll, lined with plastic wrap or parchment paper. The important thing is to have a cylindrical surface that gives the curve.
Can I prepare the cake well in advance?
Ideally assemble it in the morning for the evening, or at most the day before. Being a cake made with fresh cream, after 48 hours it tends to lose freshness and the base may become overly soggy.