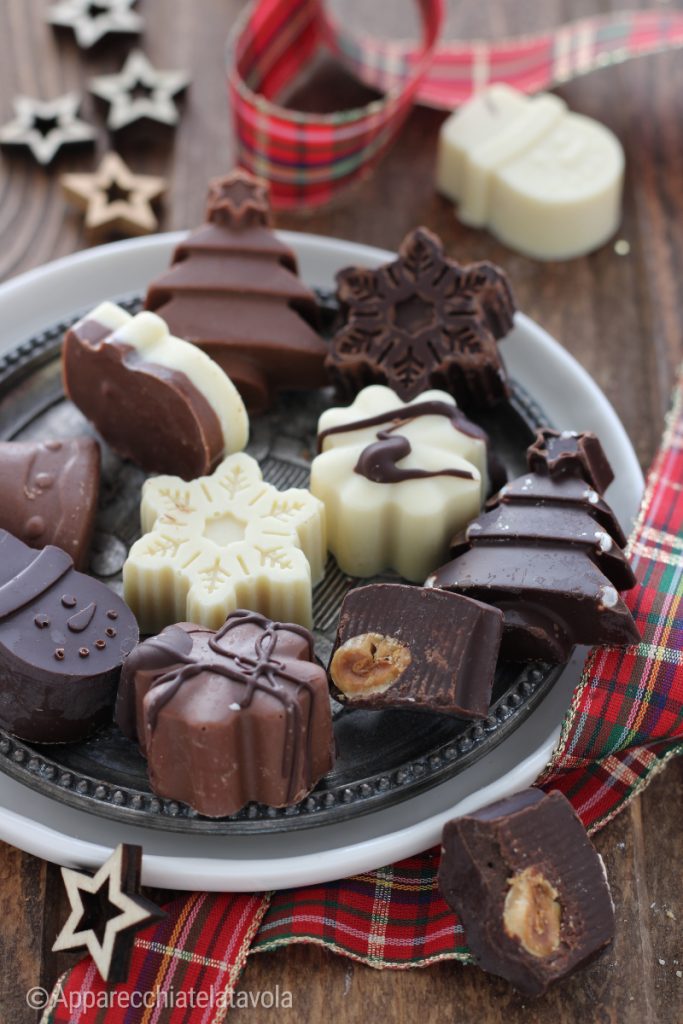
Simple and very quick homemade Christmas chocolates made with silicone molds perfect for gifting. Of course, you can make this recipe at any time of the year; just change the shapes, and they will be perfect for any holiday like Valentine’s Day, Easter, etc.
Main ingredient is chocolate: to make a nice assorted tray, get some good dark chocolate, milk chocolate, and white chocolate, so you can invert the decorations, make them two-toned, and even fill them with hazelnuts, walnuts, or other nuts to taste.
Once the chocolate is melted in a double boiler, the molds should be filled and left to solidify in the refrigerator for at least 45 minutes. What do you say, shall we try to make them together?

- Difficulty: Very easy
- Cost: Economical
- Rest time: 45 Minutes
- Preparation time: 15 Minutes
- Portions: about 24 pieces
- Cooking methods: Double boiler
- Cuisine: Italian
- Energy 596.24 (Kcal)
- Carbohydrates 40.50 (g) of which sugars 26.74 (g)
- Proteins 10.67 (g)
- Fat 44.16 (g) of which saturated 25.71 (g)of which unsaturated 16.64 (g)
- Fibers 9.16 (g)
- Sodium 61.43 (mg)
Indicative values for a portion of 100 g processed in an automated way starting from the nutritional information available on the CREA* and FoodData Central** databases. It is not food and / or nutritional advice.
* CREATES Food and Nutrition Research Center: https://www.crea.gov.it/alimenti-e-nutrizione https://www.alimentinutrizione.it ** U.S. Department of Agriculture, Agricultural Research Service. FoodData Central, 2019. https://fdc.nal.usda.gov
Ingredients
- 3.5 oz dark chocolate
- 1.75 oz milk chocolate
- 1.75 oz white chocolate
- to taste toasted hazelnuts (optional)
Homemade Chocolates: Tools
To make perfect chocolates, you need to get the appropriate silicone molds, which are easily available on the market.
- Chocolate mold
- Small pot for double boiler
Homemade Chocolates Recipe
First, separate the chocolate by type and cut it into small pieces with a knife.
Melt the dark chocolate, white chocolate, and milk chocolate separately in a double boiler. If you only have one pot and not three, be sure to clean it well between uses for each type of chocolate.

Now prepare the silicone mold (with these amounts, you will need two molds with 12 cavities each) and fill each cavity with the melted chocolate using a teaspoon, as I did, or with a piping bag.
You can get creative by filling with different types of chocolate or making two-toned chocolates; just fill the mold halfway with white chocolate and the other half with dark chocolate.
For more flavorful chocolates, try this: fill the cavity halfway with melted chocolate, place a hazelnut or walnut kernel in the center, then continue filling to the top.
In short, let your imagination run wild… and see what lovely treats you can create.Once you have used all the ingredients and filled the mold, gently tap it on the work surface to level the chocolate and eliminate air bubbles.
Place the mold in the refrigerator on a flat surface to solidify for at least 45 minutes, then unmold. You can decorate them with some chocolate drizzled here and there with a teaspoon, reversing the chocolate colors, if desired.

See how easy and quick these chocolates are to make? You’ll effortlessly be able to present your guests with a beautifully decorated tray, but they are also ideal for gifting. Arrange the chocolates in transparent cellophane bags, close them with a nice colored ribbon, and give them to your loved ones.
Storage and Tips
Storage: store the chocolates in a tin container in a cool, dry place. They keep well for 4-5 days.
Tips: you can also melt the chocolate in the microwave (time and power depending on your appliance).