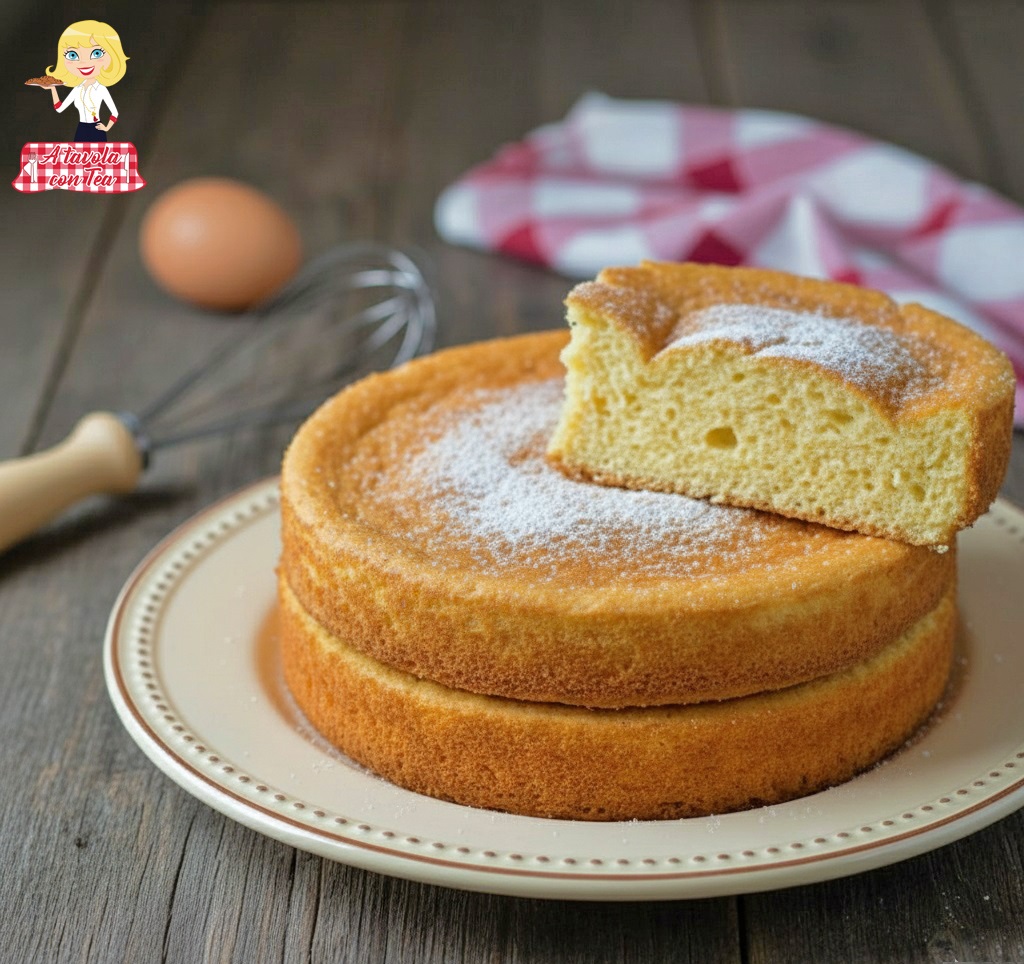
Perfect Classic Sponge Cake: Soft, Tall and Structured for Pastry Cakes
The Sponge Cake is the true litmus test for an amateur pastry chef. It contains no butter, no oil and, in its classic version, no chemical leavening. Its entire structure depends on the mastery of a single step: the perfect whipping of eggs and sugar.
This recipe I propose is not just a list of ingredients, but the technique that ensures a result that does not collapse, stays tall and has that sponge-like texture ideal for absorbing a soaking syrup without falling apart.
The key is the proportion between whole eggs and additional yolks: the yolks add richness and moisture that the whipped whole eggs alone cannot provide, making the sponge cake more yellow and structured.
The other crucial secret is the combined use of 00 flour and potato starch. The starch reduces gluten formation, making the final crumb incredibly velvety and light.
If the first whipping phase is energetic and long (don’t be afraid to whip for 10 minutes!), the second phase of adding the flours must be as gentle and slow as possible.
This is not the place for a stand mixer or electric whisk alone: only the spatula and movements from bottom to top can keep all the air we’ve worked to incorporate intact.
This Sponge Cake is the ideal base for a Sacher, a classic birthday cake or a grandmother’s dessert.
Get your stand mixer ready: it’s time to whip up the base for your next creation!
- Difficulty: Easy
- Cost: Very inexpensive
- Preparation time: 20 Minutes
- Cooking time: 35 Minutes
- Portions: Springform pan 10 1/4 in (26 cm)
- Cooking methods: Oven
- Cuisine: Italian
Ingredients Classic Sponge Cake – Springform pan 10 1/4 in (26 cm)
- 225 cups granulated sugar (about 1 1/8 cups (≈ 8.0 oz / 225 g))
- 4 eggs (medium whole eggs — about 210 g total without shells (≈ 7.4 oz))
- 4 egg yolks (about 75 g (≈ 2.6 oz))
- 90 cups 00 flour (type 00) (about 3/4 cup (90 g))
- 125 cups potato starch (about 1 cup (125 g))
- 1 pinch salt
Tools
- Kitchen scale
- Stand mixer
- Spatula
- Springform pan
How to prepare the PERFECT CLASSIC SPONGE CAKE
Whip: Put the whole eggs, the extra yolks, the sugar and a pinch of salt into the stand mixer (or into a bowl if using electric beaters).
Aerate: Whip at maximum speed for at least 10 minutes. The mixture should become very foamy, triple in volume and take on a pale yellow color. When ready, it should “write” (that is, the ribbon that falls from the beaters remains visible for a few seconds on the surface).Flours: In a separate bowl, sift the 00 flour and the potato starch and gently mix them together to make them homogeneous.
Slow Addition: Add the flour mixture to the egg mixture in 2-3 additions.
Incorporate: Gently fold by hand with a spatula, using slow and decisive upward strokes, turning the bowl. This step is crucial to avoid deflating the batter!Pan: Butter a 10 1/4 in (26 cm) springform pan, fit a circle of parchment paper to the bottom and flour the rim to help release. [Note: Never flour the bottom of the pan, only the rim].
Pour: Pour the batter into the pan and gently level it to flatten the surface.
Bake: Bake in a preheated static oven at 180°C (356°F) for 30-35 minutes, placing the pan on the lowest rack of the oven.
Test: With 5 minutes remaining, perform the bake test with a toothpick (it should come out dry).
Cool: Once out of the oven, let it rest for 5 minutes, then invert it while still warm onto a rack and allow it to cool completely. Slice the layers only when it is completely cold! The Sponge Cake is very delicate, but with the right technique you can obtain perfect layers and creative shapes without risking breakage. Remember: always cut only when the cake is completely cold.
Slicing into Layers for Layer Cakes
The Right Knife: Forget overly serrated bread knives. For a clean slice, use a long serrated knife (like a bread knife but with fine serration) or, even better, a very long smooth-blade knife (like a carving knife), razor sharp.
Mark the Circumference: Before inserting the blade, use a small knife or a toothpick to mark the perimeter (the side of the cake) at the desired height. This creates a horizontal guide.
Blade Movement: Start slicing following the guide you marked, using a slow, steady back-and-forth motion, without pressing down. Let the blade do the work, rotating the sponge cake slowly on the rack or work surface.Shaping for Creative Cakes (Custom Shapes)
When you want to make a number, a letter or any non-standard shape, precision is essential:
Create the Template: Draw the desired shape on a sheet of parchment paper. Cut out the drawing to get a template.
Position and Score: Place the template over the cold sponge cake. With the tip of a sharp paring knife or a toothpick, lightly score the outline of the drawing on the surface of the cake.
Cut Vertically: Once the outline is scored, use a long smooth-blade knife to make the vertical cut. Keep the blade perpendicular to the work surface to ensure clean edges and that your shapes (e.g., two numbers) are identical for assembly.
Ingredient Notes and Tips
Warm Eggs: For an even more stable and quicker whip, place the eggs and sugar in a bowl and warm them in a bain-marie (not exceeding 40°C (104°F)) before whipping.
Flours: The combination of 00 flour and potato starch is fundamental. Do not replace potato starch with cornstarch, because potato starch gives a specific softness.
Sugar: Make sure the sugar is completely dissolved during whipping: it should not be felt between your fingers.
Storage
The classic Sponge Cake keeps at room temperature, wrapped in cling film, for 3-4 days. If well wrapped, it can also be frozen, whole or in layers, for 2 months.
Alternatives and Recipe Variations
Lemon/Orange Flavored: Add the grated zest of one untreated lemon or orange together with the liquid ingredients before whipping.
Cocoa Version: Replace 30 g of flour with 30 g of sifted unsweetened cocoa powder.
Gluten-Free Version: Replace the 00 flour with a mixture of rice flour and cornstarch, keeping the same total amount of dry ingredients.
Uses and Perfect Pairings
Classic Cake: Ideal with pastry cream, chocolate cream or whipped cream and strawberries.
Tiramisu (Alternative): Sliced into thin layers and soaked, it can replace ladyfingers.
Pairing: Pairs perfectly with soaking syrups flavored with maraschino, rum or fruit syrups.
Origins and History of the Recipe
The Sponge Cake (or Pâte génoise) has a fascinating history. It was invented in the 1700s by the Genoese cook Giovan Battista Cabona, who served the ambassador of the Republic of Genoa in Spain, the Marquis Domenico Pallavicini. The cake was prepared for a banquet at the Spanish court and for this reason it was called “Pâte à Gênes” (Genoese paste) or, in Italian, “Pan di Spagna”. It immediately stood out for its lightness, due to the absence of chemical leavening, which at the time was a real novelty.
My Trick for a Perfect Sponge Cake
My real trick is not in the ingredients, but in the patience when incorporating the flours. Once the whip is perfect, imagine the batter is a balloon full of air. Any sudden movement will deflate it. For this reason, I always incorporate the flour in four additions (not just two or three!) and lift the spatula as high as possible, letting it fall gently. This ensures that every gram of flour is blended while keeping the airy structure intact. Don’t rush: the Sponge Cake will reward your calm!
FAQ (Questions and Answers)
1. Why did my Sponge Cake collapse during baking?
A: There are two reasons: A) The egg whip was not stable and foamy enough (10 minutes is the minimum!). B) You opened the oven before the sponge cake had finished stabilizing (never before 20 minutes) or you handled it too roughly.
2. Can I use only 00 flour?
A: Yes, but the result will be less light and “spongy.” Potato starch is the secret ingredient for the pastry-like texture.
3. Why is the bottom darker?
A: You’ve placed the pan correctly on the lowest rack. It’s normal for the bottom to darken slightly more, but it is well protected by the rest of the cake. If it becomes too dark, try lowering the temperature to 175°C (347°F) for the last 10 minutes.