I had been thinking about it for a while, curious to taste those polenta sticks I sometimes saw online and found enticing, but since the opportunity never arose… I decided to create that opportunity myself. 😊
The perfect inspiration came from our usual Monday column: this week’s Light and Tasty features a recipe with a whole grain ingredient, and it was just what I needed! Finally, I opened that package of taragna polenta I had at home and couldn’t decide to use!
Then my air fryer got involved, which I find really thrilling (have you already seen the collection?).
Such a great invention 😃 it gives me a ton of new ideas, so much so that I’m using it practically every day to cook or grill just about everything, so how could I not try it with these new taragna polenta sticks?
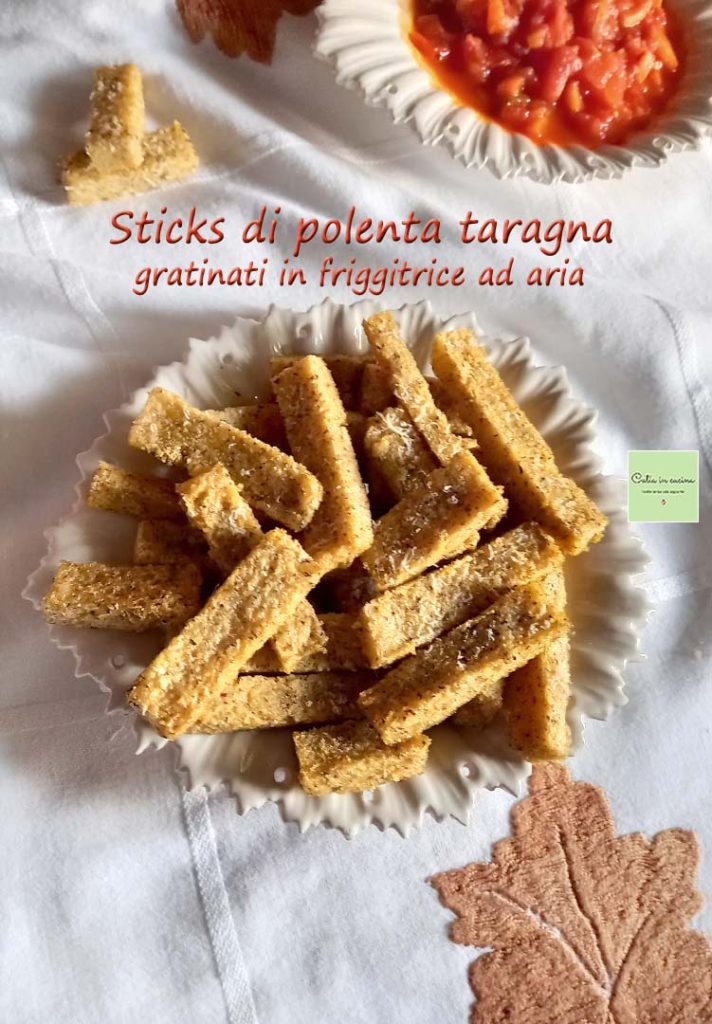
Today I made them light, of course, as per the Light and Tasty ‘constitution’, also because I accompanied them with the spicy Tex-Mex sauce and other spices weren’t necessary. But these polenta sticks can also be enjoyed with simple mayonnaise, or on their own, like crispy chips, so they can be varied in flavor in many different ways: without parmesan but also cheesier, peppery or ‘paprika-ed’, spiced or aromatic with the spices or herbs you prefer, basically… adding a pinch of everything, including imagination.
Are you ready?
👉 I’m adding this recipe right away to my collection of Appetizers, Nibbles, and Snacks recipes.😉
Then, take a look at these other ideas!👇
- Difficulty: Easy
- Cost: Economical
- Preparation time: 20 Minutes
- Portions: about 50 sticks
- Cooking methods: Stovetop, Air Frying
- Cuisine: Contemporary
- Seasonality: All seasons
Ingredients
- 4.4 oz taragna polenta flour (precooked)
- 2.1 cups water
- 4 tsps grated parmesan cheese
Tools
- Air Fryer
- Cutting Board
- Saucepan
Steps
Prepare the taragna polenta. The one I used was precooked, so it was very quick to prepare.
Bring the water to a boil, then sprinkle the flour into the boiling water.
Stir with a spoon and cook for 5 minutes (or for the time indicated on the package).
When the polenta is ready, transfer it immediately to a cutting board.
Spread the polenta with the back of a spoon, level it with a knife or spatula, and trim the edges if necessary.
Let it cool, or even just warm slightly, cut it into strips about 0.4 inches wide (but if they’re irregular, that’s fine too!) and then cut the strips into sticks about 2 to 2.8 inches long (roughly!).
Dust the sticks with grated parmesan cheese.
👉 I didn’t use oil, but a quick brush of oil on the sticks can help the parmesan stick better.
Place the sticks in the basket, without overlapping them.
👉 If the polenta is not completely cooled, the sticks might stick to the cutting board: in this case, simply detach them with a spatula or a knife.
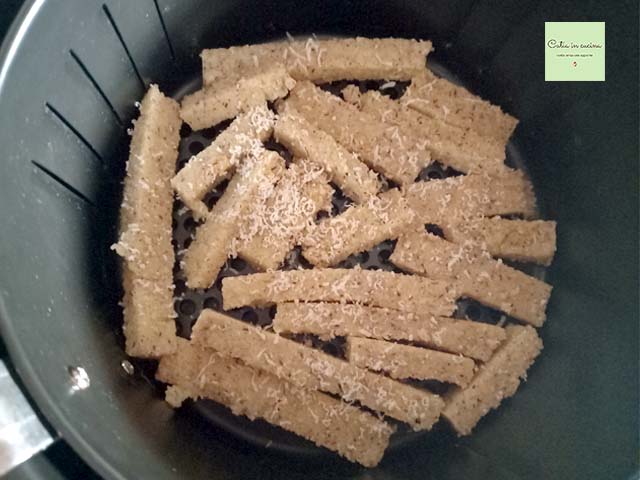
Operate the air fryer at 392°F for 12 minutes, stopping once halfway through to shuffle the sticks (by shaking the basket).
👉 To grill all the sticks obtained with this recipe, you need to repeat the operation three times, three baskets (with a 2.5-liter air fryer, the basket space is what it is).
Utility and Tips:
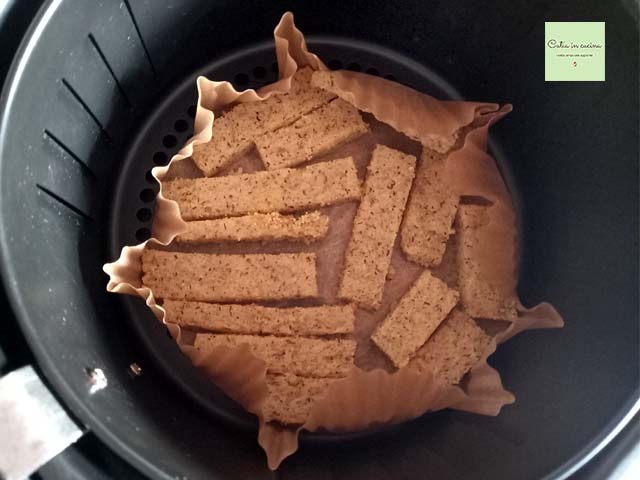
To prevent some parmesan from falling (inevitably) through the basket’s grid, you can use a paper basket for air fryers.
These baskets are useful to avoid parmesan or any spices or herbs used from scattering. However, I found that the paper basket makes the sticks more difficult to mix: shaking the air fryer basket doesn’t work as it bounces the entire paper basket without turning the sticks inside (also because the edge crumples, covering some of the sticks). You need to turn the sticks one by one with tongs, a task not as quick as a simple basket shake.
In any case, the final result of your air fryer grilled taragna polenta sticks will be more or less this:
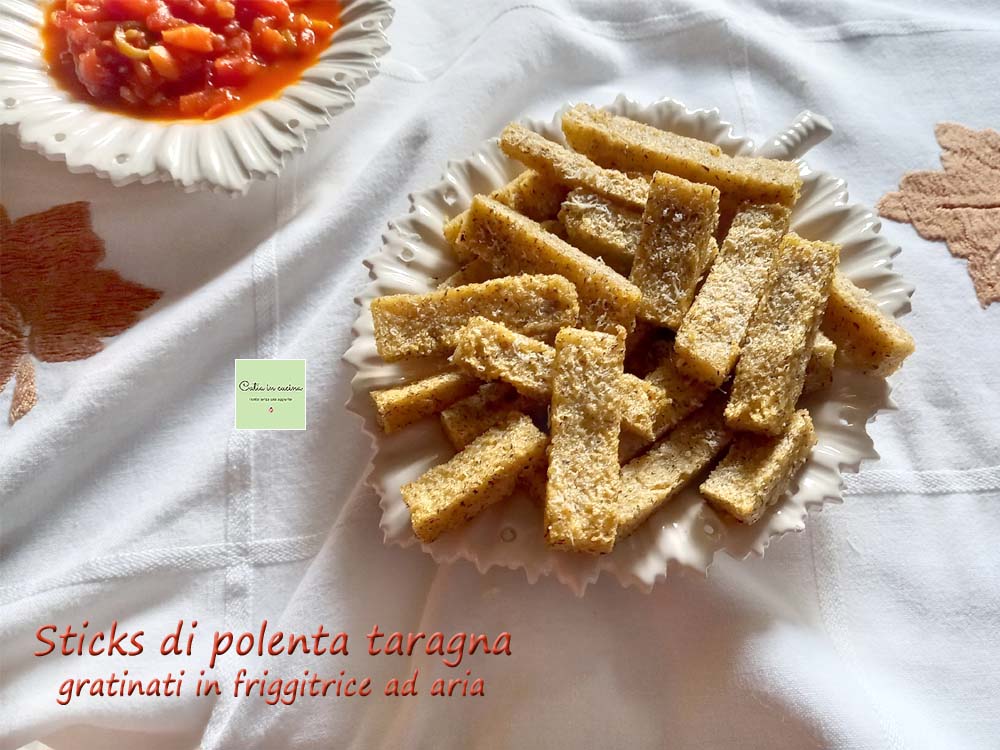
And I assure you, they are a classic example of ‘one leads to another’.
If you make them, send me a photo!!! 😃
Salt-Free Tips
 These taragna polenta sticks are a delight. For this reason, the spicier and more aromatic they are, the better. And you’ll see they will be so flavorful (especially if you dip them in the Tex-Mex sauce) that you won’t feel the need to add salt!
How are you doing with your salt reduction journey? 😉
If you’re interested in reducing or eliminating salt, always remember to:
▫ Gradually decrease the salt, your palate needs to slowly get used to it without noticing the progressive reduction.
▫ Use spices. Chili, pepper, curry, nutmeg, cinnamon, cloves, cumin…
▫ Use herbs. Basil, parsley, oregano, thyme, sage, marjoram, rosemary, mint…
▫ Use seeds. Sesame, pine nuts, almonds, walnuts…
▫ Use hot vegetables or fruits. Garlic, onion, lemon, orange…
▫ Use my salt-free vegetable granules and gomasio
▫ Prefer fresh foods.
▫ Avoid water cooking, prefer cooking methods that retain flavors (grill, foil, steam, microwave).
▫ Avoid bringing the salt shaker to the table!
▫ Allow yourself an occasional indulgence. It’s good for the mood and helps perseverance.
If you don’t want, or can’t, give up salt:
▫ You can still try my recipes by salting according to your habits.
Follow me!
In my new WhatsApp channel and on Instagram, on my Facebook page, on my Pinterest boards, in my two groups: Catia’s Group, in the Kitchen and Beyond and Just What I Was Looking For! and if you want… subscribe to theNewsletter
In my new WhatsApp channel and on Instagram, on my Facebook page, on my Pinterest boards, in my two groups: Catia’s Group, in the Kitchen and Beyond and Just What I Was Looking For! and if you want… subscribe to theNewsletter
Light and Tasty:
Here are the whole grain recipes from my Light and Tasty Team:
Carla Emilia: Whole Grain Rice Salad with Eggplants
Daniela: Whole Grain Bruschetta with Robiola, Grapes, and Honey
Elena: Whole Grain Yogurt Cookies
Milena: Plum Cake with Whole Wheat Flour and Spices
Serena: Whole Grain Rice according to Prof. Berrino
FAQ (Questions and Answers)
I don’t have an air fryer, can I grill them in the oven?
Absolutely! You can grill them in the oven using the same method, at 392°F for 10-15 minutes.
