This beer focaccia is similar to the sourdough focaccia, leavened with kefir, which has been one of the most repeated recipes in my house for years.
There are only two differences between the two recipes, the first and most obvious was mentioned in the title: it is the beer.
The other is the stand mixer.
The stand mixer, yes, that object of desire for us home bakers, which, to be honest, I didn’t want at all for years, in fact, for years I didn’t even want to buy it!
I started considering it only when I felt some ‘youth pains’ in my hands and wrists.
And before I knew it, an angel made me find this truly unexpected gift under the Christmas tree. 😊
Ehhhh, a month has passed and the truth must be told: yes yes, you can do it without, it’s true. But you can do it very well with it too!!! 😁
The doughs – all types, leavened with all kinds of yeast – turn out really nice, they’re ready in no time and with zero effort.
What can I say, it was really needed!!! 💪
〰️〰️〰️

- Difficulty: Easy
- Cost: Economical
- Rest time: 8 Hours
- Preparation time: 10 Minutes
- Portions: 4
- Cooking methods: Oven
- Cuisine: Italian
- Seasonality: All seasons
Ingredients
- 5 oz Milk kefir (homemade)
- 5 oz Flour 1
- 1 tsp Honey
- Starter (doubled)
- 21 oz Flour 1
- 1 ⅓ cups Light beer
- 1 tbsp Extra virgin olive oil
- 1 tbsp Extra virgin olive oil (for brushing)
- 1 tbsp Water (for brushing)
Tools
- Stand Mixer Russell Hobbs
- Pitcher or glass container
Preparation
First, you need to prepare the starter: mix flour and kefir adding a teaspoon of honey and let the mixture rise in a sheltered place for about 12 hours (it’s better to cover the container with plastic wrap).
The mixture generally doubles in volume in 12 hours, but naturally, the time may vary according to the room temperature. In winter, it may be useful to place it in a rather warm place, for example, in front of a radiator. I prefer to put it in the microwave, which in my experience is an excellent proofing chamber.
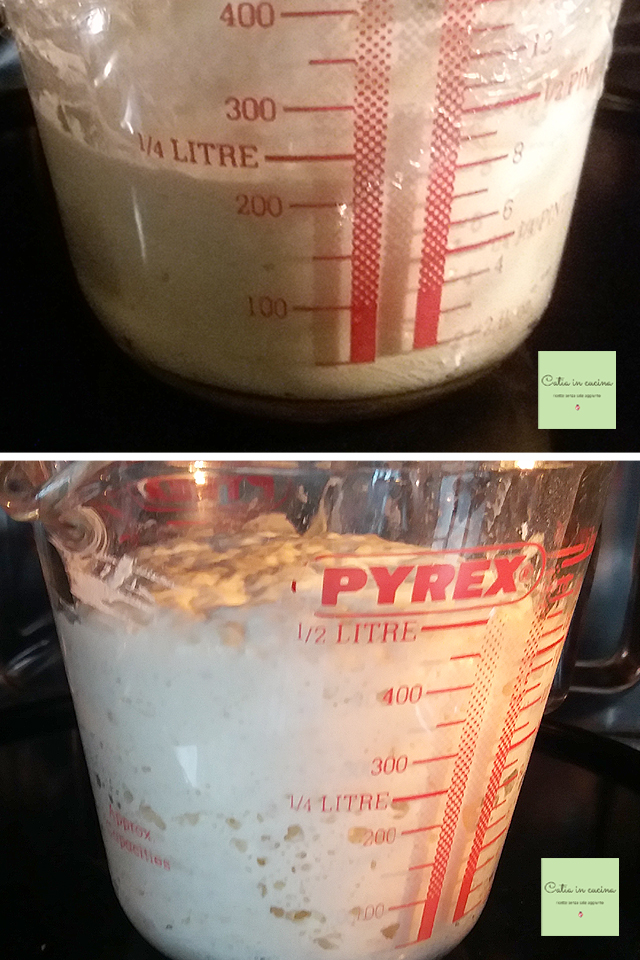
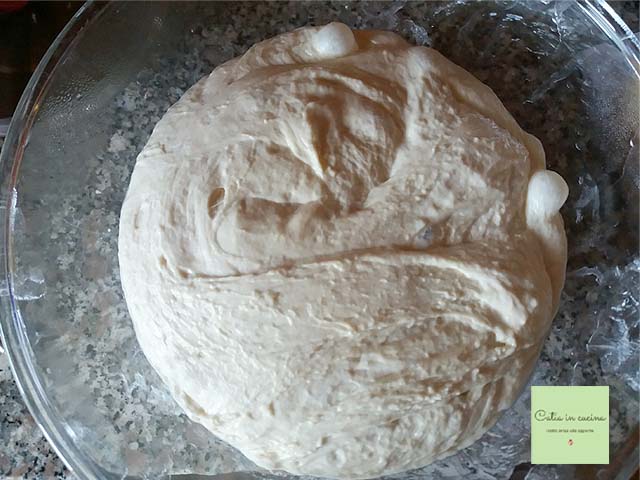
When the starter has doubled, you can proceed with preparing the dough for the focaccia: pour the flour into a large bowl (or into the bowl of the stand mixer), add all the starter, the oil, and the beer.
It is preferable for the beer to be at room temperature but on another occasion, I’ve used it cold from the fridge – that is, I had used leftover beer from the night before which I had kept in the fridge specifically to try it in dough – and I didn’t notice any particular differences in rising time.
For those with a stand mixer, knead at low speed (I use 2) until the dough comes together. In my case, about 10 minutes.
Kneading by hand takes a bit more time, about 20 minutes.
At this point, I proceeded with some S&F folds as I’ve been used to doing since I started making bread.
If you don’t know them, you can take a look at the photos of the sourdough bread recipe.
For those who decide to proceed with the folds, I advise doing them every 15 minutes for 3-4 times.
It is a useful step (albeit not mandatory) and serves to incorporate air into the dough, making it more aerated.
After completing the folds, or for those who decide to skip them, cover the bowl with plastic wrap and let the dough rise until doubled. Generally, and again depending on room temperature, for 8-10 hours.
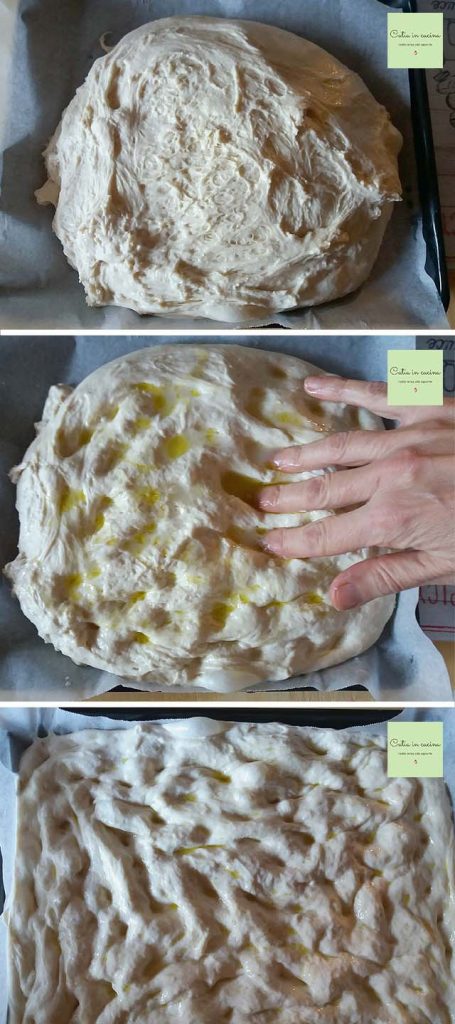
When the dough has doubled, spread it out, preferably with your hands, then brush the surface with water and oil before baking.
Or you can put it in the fridge until the next day. I’ll explain why:
When making a leavened dough that requires several hours of rest, calculating the times correctly is very important to avoid having the dough not fully risen at lunch or dinner time.
If you want to take a look at the wheel of bread recipe (made with the same kefir starter), I had given a little schedule there – based on my experience – to optimize preparation and rising times and make them coincide with working hours. Something indispensable for all of us.
With this focaccia, after having started the whole process in the morning and having the starter ready in the evening, I found myself at 2 am with three choices:
a) bake the focaccia right away in the middle of the night, b) pretend nothing happened and go to sleep, leaving the dough there and hoping it wouldn’t overproof, c) put it in the fridge.
I put it in the fridge 😀 and I also recommend you do the same 😉
Refrigeration can be prolonged (generally 24 hours), but after 10 hours, that is at noon the next day, I decided it was time to eat this focaccia!
Once removed from the fridge, I left the dough to acclimate at room temperature for about twenty minutes, during which some small bubbles appeared, always very gratifying 😀
Spread the dough on a baking sheet (mine is small, 10×12 inches) lined with parchment paper.
Brush the surface with oil and water.
Bake in the oven at 430°F for 25-30 minutes.
If spread out wider and thinner than I did, the cooking time can be reduced to 20 minutes. In any case, and as always, I recommend adjusting the cooking to your habits and your oven.

Variations for hand-kneaded focaccia:
I want to show you a photo of another beer focaccia, always leavened with this fantastic kefir starter, but which has the following differences compared to the recipe I’ve described so far: half Flour 1 and half semolina (but I’ve also made them with Flour 2, and also with a mix of Flour 0 and spelt, so you can experiment with the choice of flour), no oil in the dough, hand-kneaded and without folds (I was in a hurry!) (and I didn’t have the stand mixer yet), spread out after doubling (and therefore without refrigeration).
As you can see from the photo, the final appearance is more compact, demonstrating that both the folds and refrigeration play a role in the formation of the crumb, but I want to say it turned out beautifully to look at because it rose a lot during baking, soft inside with a crunchy crust, and eaten warm it was a delight.
So if you are new to managing doughs, yeast, and leavening, or if you don’t have time to follow the whole procedure to the letter, listen to me: don’t be intimidated and start kneading! 😀
I’m sure you will love this beer focaccia leavened with kefir, so I’m waiting for your photos!!!

Salt-free Tips
 My salt-free tips for today:
If you’ve never tried eliminating salt from bread and focaccia, try the simplest method: with aromatic herbs, especially the classics like rosemary and sage. Or add a couple of tablespoons of oilseeds to the dough, like a great mix of sesame and poppy seeds. Also, to give your beer focaccia a more intense and bold flavor, try using dark beer instead of light beer!
If you’re interested in reducing or eliminating salt, always remember to:
▪ Reduce salt gradually, the palate must get used to it gradually and should not notice the progressive reduction.
▪ Use spices. Chili, pepper, curry, nutmeg, cinnamon, cloves, cumin…
▪ Use aromatic herbs. Basil, parsley, oregano, thyme, sage, marjoram, rosemary, mint…
▪ Use seeds. Sesame, pine nuts, almonds, walnuts…
▪ Use spicy vegetables or fruit. Garlic, onion, lemon, orange…
▪ Use my salt-free vegetable granules and gomasio.
▪ Prefer fresh foods.
▪ Avoid cooking in water, prefer cooking methods that don’t dilute flavors (grill, parchment, steam, microwave)
▪ Avoid bringing the salt shaker to the table!
▪ Occasionally indulge in breaking the rules. It’s good for the mood and helps persevere.
If you don’t want, or can’t, give up salt:
▪ You can still try my recipes, salting according to your habits.
Follow Me!
In my new WhatsApp channel and on Instagram, on the Facebook page, in Pinterest and in my two groups: Catia’s group, in the kitchen and beyond and Just what I was looking for! and if you like… subscribe to my Newsletter.
