Here it is! The recipe for my blood orange marmalade, which I always cook in the microwave, is ready!
I’m a week late, and to think that I told Nina I hoped to write it over the weekend… two weekends ago 🙄 but I just couldn’t manage it; events took over, with work, kids, sports competitions (the kids’), music recitals (the kids’), piles of laundry to iron (everyone’s)…
…I’m sure you can understand, right? 😀
Sure, what you might argue now is that the orange season is already at its end, but who knows, maybe you’ll forgive me later, in a few months, when you find the blood orange marmalade recipe here all ready… ahead of the next season 😉 😛
I had never made orange marmalade before, I didn’t even know where to start, didn’t know if I needed the peel or not, didn’t know how much sugar to use, didn’t know if it would pass the microwave-cooking-test… but I tried 😄 and it was a great decision as we loved it.
I did some research, of course, but to be honest, I only found recipes with traditional cooking and nothing that enlightened me on cooking oranges in the microwave, so as always, I went a bit by intuition and a bit by experience, and I’m satisfied, actually, we’re all satisfied, because I got a really delicious marmalade.
I made it with blood oranges for juicing, the same oranges I bought in bulk a couple of weeks ago, which you already know in dried version.
For convenience, I divided my orange marmalade production into:
– version with fine texture and red oranges:
– and version with a coarser texture and visible bits of peel, made with both red and yellow oranges and added lemon:
The differences in making them are almost nil, but anyway, I’ll explain everything in detail in the recipe 😄
Ready?
👇 For more recipes with oranges, take a look here! 😉👇
- Difficulty: Easy
- Cost: Medium
- Preparation time: 15 Minutes
- Portions: jars: 1
- Cooking methods: Microwave
- Cuisine: Italian
- Seasonality: Winter, Spring
Ingredients
👉 I used blood oranges for juicing, but I am sure all varieties of oranges are excellent, naturally considering small variations in the amount of sugar according to the sweetness of the oranges used.
- 1.1 lbs blood oranges (for juicing, weighed without peel)
- 1 cup brown sugar
- 0.7 oz lemon zest
- 1.1 lbs blood oranges (for juicing, weighed without peel)
- 1 lemon (about 2.1 oz weighed without peel)
- 0.9 oz mixed orange and lemon peel
- 1.3 cups sugar
Tools
- Microwave Oven
- Immersion Blender
- Bowl glass
Steps
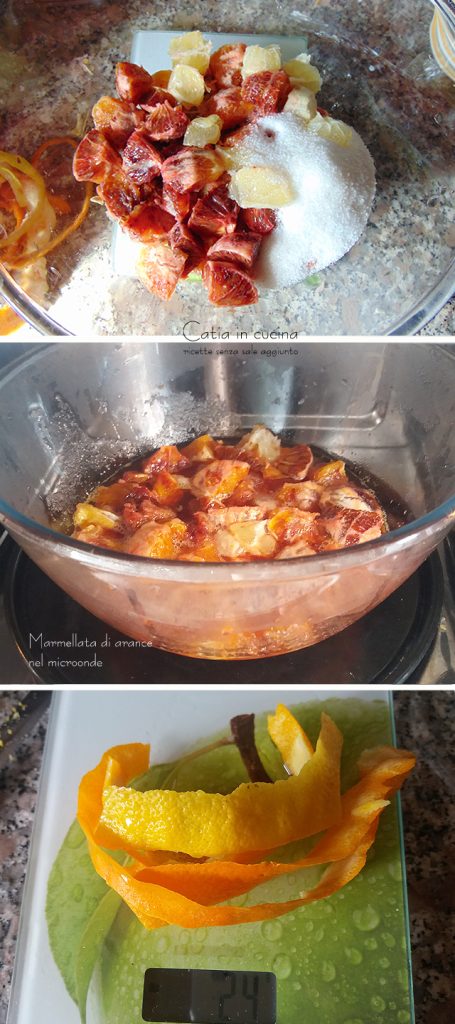
Peel the oranges (and the lemon, if used) removing all the white pith.
Since part of the peel will be used, ensure that the oranges and lemons have edible peel.Remove the white part from the peels intended for use, wash the peels and soak them in water for 10-15 minutes.
Meanwhile, chop the oranges and place them with the sugar in a microwave-safe container (I used glass).
Microwave on high for 5 minutes, open and stir, then proceed in 5-minute increments for a total of 20 minutes (in the lemon version, I used 25 minutes total).
During the last step, you may set 1-2 minute intervals for better consistency control.Halfway through cooking, add the sliced peels.
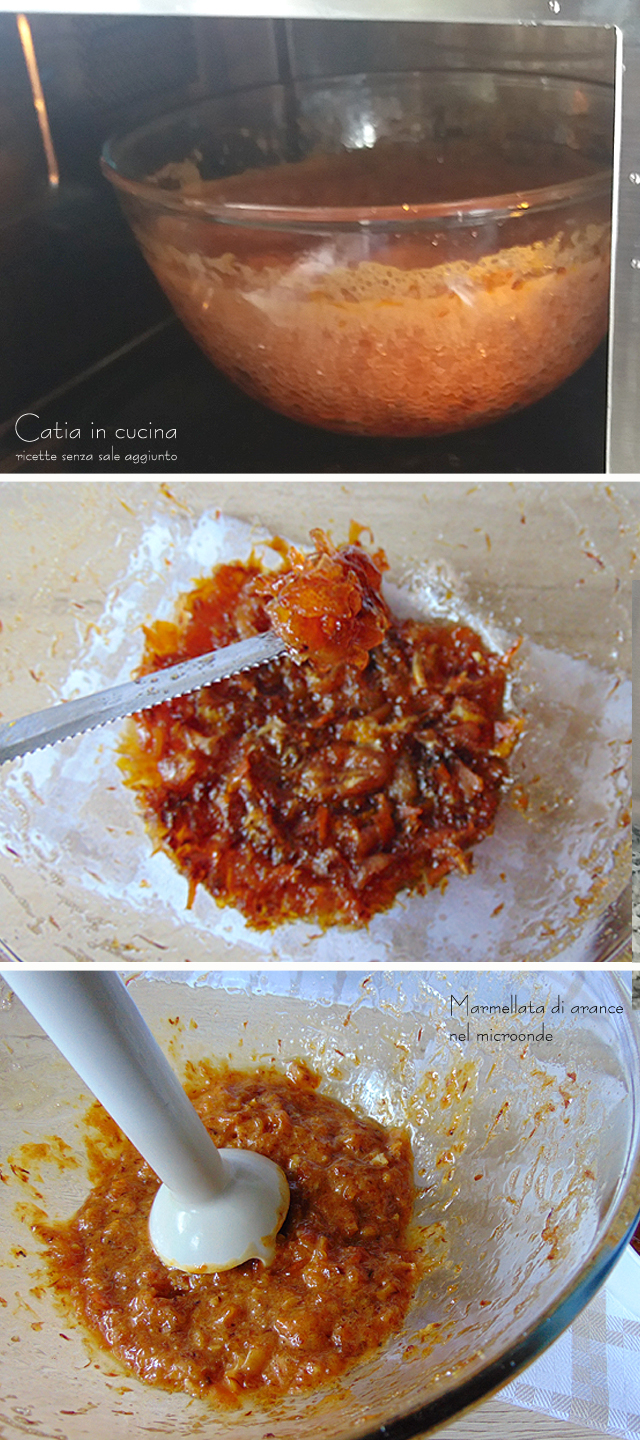
At this stage, you can decide whether to blend the mixture, taking advantage of the liquid produced by the oranges and dissolving sugar, or if you want to continue cooking and blend at the end. In the first case, you will achieve a finer marmalade.
If you want a coarser texture, you can blend after cooling. In both cases, I used the immersion blender.It’s good to use a large container because cooking will produce a kind of foam, as you can see from the next photo (foam that subsides immediately when you open the microwave door).
To prevent spillage, I suggest respecting the 500 grams, or slightly more, from the recipe, or using an even larger container than mine (which is 3 liters), or dividing the cooking into shorter steps.
After cooking, let the marmalade cool inside the microwave. Once cooled, it will thicken (even if it hasn’t been blended).
With 500 grams of oranges, you’ll get about one jar of marmalade (depending on the jar’s size of course 😄), which can be stored in the fridge for several days.
If you want to preserve it longer, you’ll need to boil the jar or jars (instructions for boiling are in the apricot marmalade recipe).This orange marmalade is really delicious, we liked it in both versions. Often packaged orange marmalade is quite bitter, but this isn’t, thanks to the not excessive amount of peel, and although the sugar amount is less than typically used in marmalades, not just orange ones.
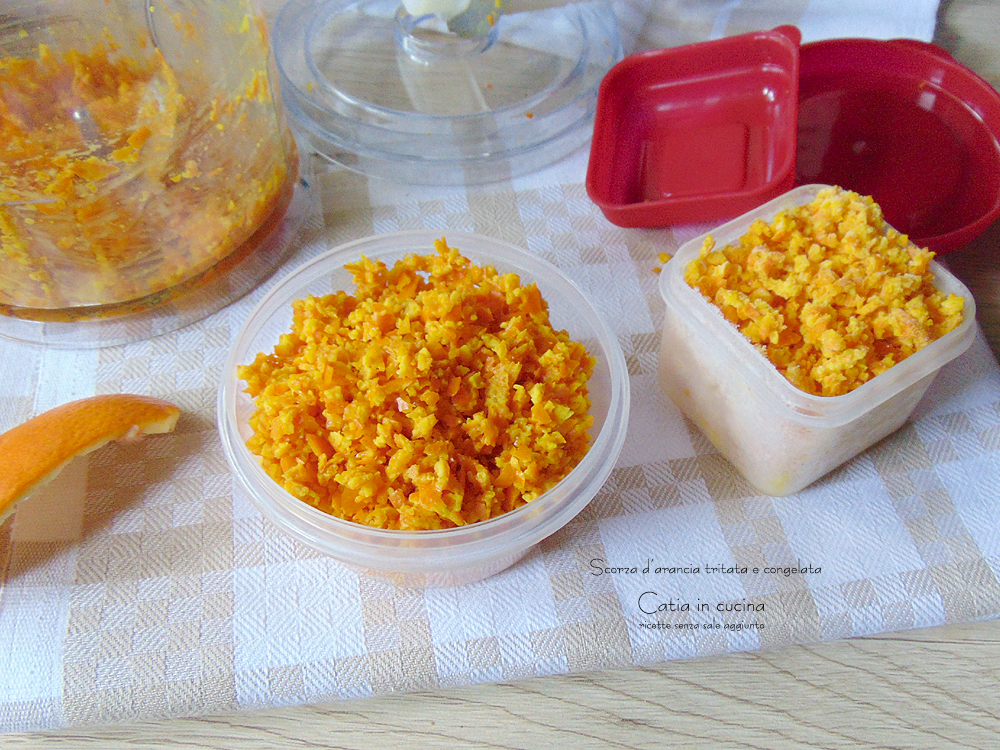
But don’t throw away the peels you have after peeling all the oranges! I mostly dried and turned them into powder; if you have a dehydrator, it’s a great way to always have an aromatic supply for sweets. But if you don’t have a dehydrator or don’t have the time or inclination to try, I suggest preserving the peels by simply chopping and freezing them: it’s a simple but very convenient, and useful, way to preserve excellent organic peels that would be a shame to waste (always remember to wash the peels and remove the white part before proceeding 😉).
Enjoy!
Follow Me!
In my new WhatsApp channel and on Instagram!
As always, you can also find me on my Facebook page, on my Pinterest boards, in my two groups: Catia’s group, in the kitchen and beyond and Exactly what I was looking for! and if you like… subscribe to my Newsletter.
As always, you can also find me on my Facebook page, on my Pinterest boards, in my two groups: Catia’s group, in the kitchen and beyond and Exactly what I was looking for! and if you like… subscribe to my Newsletter.
