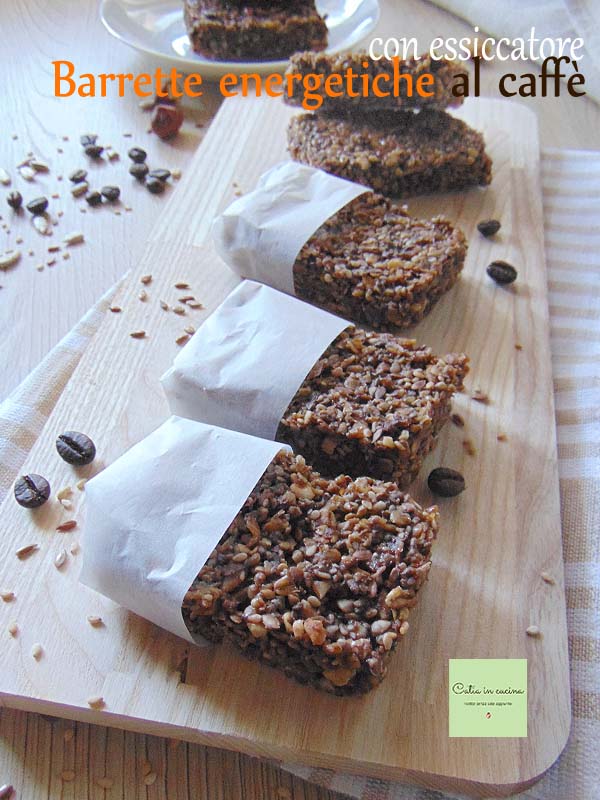
Let me introduce my coffee energy bars. 😊
For years I wanted to try making bars, and I finally decided to. I took advantage of two opportunities: having to use up two cups of excess coffee (nothing goes to waste here! 😊), and making something for my kids’ snack without turning on the oven, which is prohibitive in the summer.
And that’s how I remembered that old idea of energy bars. They are usually baked in the oven, but they can also be made no-bake, specifically with a dehydrator.
Result: successful coffee energy bars 😊 Yes, excess coffee sometimes leads to great ideas! 😃
〰 〰 〰
Here are 2 more coffee-flavored snack ideas ☕ and also the recipe for other bars: 👇
- Difficulty: Easy
- Cost: Cheap
- Preparation time: 10 Minutes
- Portions: 8
- Cooking methods: Other
- Cuisine: Fast food
- Seasonality: All seasons
Ingredients for 8 Coffee Energy Bars
- 3.4 oz coffee (2 cups)
- 1 cup oats
- 0.4 cup brown sugar
- 0.7 oz almonds
- 0.7 oz hazelnuts
- 0.7 oz sesame seeds
- 0.7 oz sunflower seeds
- 0.7 oz flax seeds
- 0.7 oz chia seeds
- 1.4 oz chocolate (mixed dark and milk)
- 1 tbsp honey
Tools
- Dehydrator DR 448 CB
Steps
Mix the oats with the sugar and coffee in a bowl. Let it rest for about half an hour.
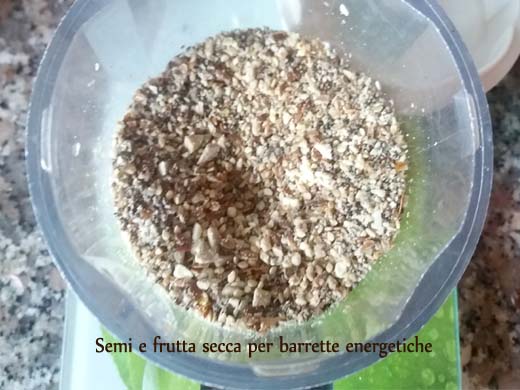
Meanwhile, coarsely chop the almonds and hazelnuts together with all seeds using a small food processor.
Toast the chopped mixture in a non-stick pan for a couple of minutes.
When the oats have absorbed the coffee well, pour the chopped toasted nuts and seeds into the same bowl. Mix well, also adding the tablespoon of honey and the coarsely chopped chocolate (I used the usual, inexhaustible, Easter egg chocolate that I keep in the freezer). The mixture will be a bit sticky, but not excessively so, given the minimal amount of honey.
Using a rectangular cookie cutter (or another mold of your liking), form the bars on a sheet of parchment paper by inserting the mixture into the mold and pressing it with the back of a spoon or teaspoon.
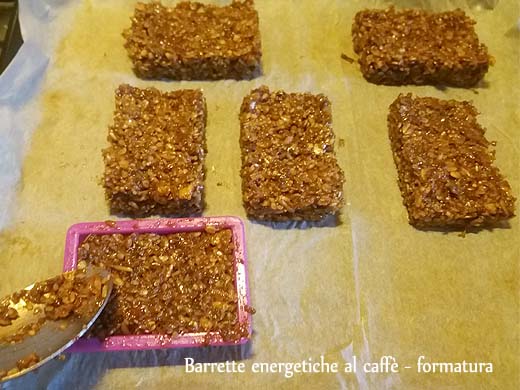
Cut the parchment paper to size around the bars and transfer them all to the dehydrator tray.
The parchment paper naturally prevents the bars from sticking to the tray and allows you to handle them without the risk of crumbling (although they are compact, they are a bit delicate at this stage).
Turn on the dehydrator (I use the highest setting on my machine, about 149°F) and proceed with drying for a total of 8 hours.

I didn’t keep the dehydrator running for 8 continuous hours but proceeded in two phases: 3 hours in the evening, then a night break because the noise of the dehydrator in the silence of the night is not very pleasant, and then turned it back on in the morning for another 5 hours, turning the bars a couple of times, as the side in contact with the parchment paper remains moister. Then during the last hour of drying, since the bars were no longer sticky, I removed the pieces of paper and placed them directly on the tray.
The drying time is naturally not strict and can be shorter if you decide to make your bars thinner than mine (Update: I made them thinner and in less than 7 hours they were ready).
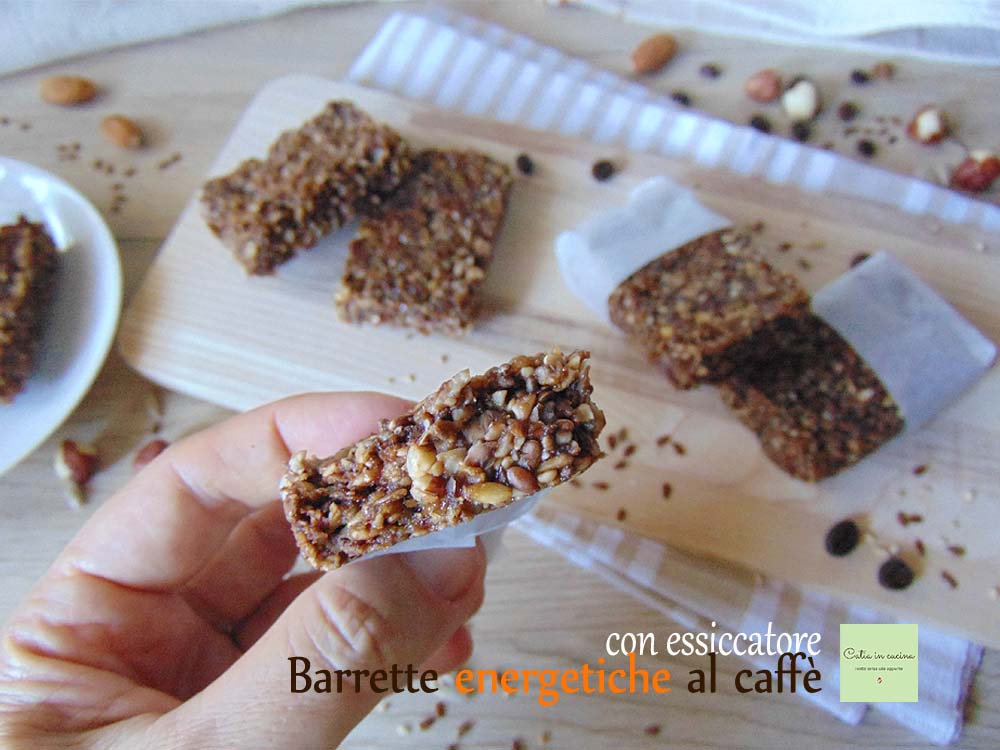
Or it can be extended by an hour or two if you want to obtain drier bars. Mine turned out semi-soft, by the express request of my children, although dry and crunchy on the outside: indeed, it was my children who, after a couple of test tastings, suggested extending the drying “for another hour,” then telling me when to turn it off (“this is how they should be”) 😊 What allies I have!
I recommend letting the bars cool before consuming them. They were not bad warm, but they are better cold 😊 And even better the next day, and the “test” bar that we kept (in a tin box) specifically for two days seemed even better, with a pronounced coffee flavor.
In short, don’t limit yourself to making the 8 bars I made (making them thinner they become 12 or 13), but double or triple the doses without fear because they keep very well for a few days. Also because, apart from pilot experiments like this one of mine, it is always advisable and convenient to operate the dehydrator with all trays full and not with just one.
A couple of clarifications:
As mentioned, these coffee energy bars are a first experiment, which I fully intend to repeat. When I make them again, I will try to vary some ingredients, in particular, I would like to try using a greater amount of oats, adding some walnuts and maybe removing the chia seeds. In short, I will keep you informed about the many possible variations of these delicious coffee bars, which perhaps (without a doubt) are not exactly dietetic and zero calories (otherwise they wouldn’t be energetic, right? 😉), but they are good, good, good.
In fact, let me tell you more… they are quite addictive! 😀
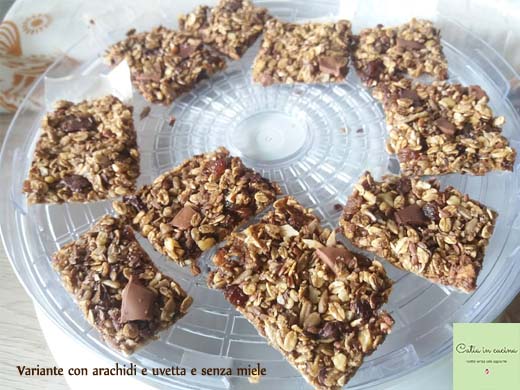
Update: as promised, I update you on the variants tried. Here is the first: I made the bars without chia seeds, with peanuts instead of sesame, with the addition of some raisins and without honey. They are delicious this way too! Being without honey, they crumble a bit more, albeit slightly, but I think I will use it again next time. The peanuts and raisins blend very well in this mix of flavors, so… variant approved!
Not to mention the fact that it was a good opportunity to use leftover Easter egg! 😃😉
Update 2: I report another version (always with raisins) that I was very satisfied with, in which I removed the hazelnuts, reduced the weight of all seeds, and added pumpkin seeds (excellent!). And in which I added puffed millet, a very good idea this puffed millet, which I highly recommend. 😉
Waiting to update with another variant… I wish you a good energetic snack!
Follow me!
In my new WhatsApp channel and on Instagram, on the Facebook page and Pinterest, in my two groups: Catia’s group, in the kitchen and beyond and Exactly what I was looking for! and if you like… subscribe to my Newsletter.
