This is my very first attempt at making cookies with stained glass. A recipe that for years has been one of my desired recipes.
Once upon a time, as a complete novice, these cookies with stained glass left me speechless, they seemed like unattainable works to me, but how do you make the stained glass?! I looked at all the photos circulating on the web with a lot of admiration.
Then when I discovered the mystery, that is, when I found out with what this blessed stained glass is made, I think I made a face like… more or less the face of children when the magician reveals a trick to them, something like…. whaaaat noo waaaay!! 😳😮😳😮
So, after watching a few videos, where it seemed the process was so easy, I got the itch to try it myself. How hard could it be, just put pieces of gummy candy in the holes made in the cookies (in some videos they used those) or a heap of crushed hard candy (in another they used lemon hard candies), put it in the oven and off you go.
Not quite.
Oops, I mean… oh dear! No, it’s not like that! 😅
First of all, the gummies work fine, yes, in the sense that they melt well. But they don’t turn into stained glass at all, or rather, they turn into something opaque, colored, even a nice color, but opaque.
That is, something more or less like this:
To get a stained glass that can be called that, you need hard candies. But be careful though, because even with those it’s not all roses and daisies. Because you have to crush them.
And, perhaps, before doing it consider that: a) you need to smash them with some blows, that is, rolling pin blows, which I did not expect, I thought they were less resistant, you have to use a certain strength, they won’t settle for a little tap; b) don’t attempt this crushing operation after unwrapping them, because candy shards end up everywhere in the kitchen. So: remember to crush them while wrapped (even though when you open them some spreading of sticky crumbs still happens, but oh well).
Having ascertained this, we proceed. Even though it’s not over yet. Did you think so? Yes yes, other troubles lie ahead. 😀
Question: how much candy, or candy crumbs or candy pieces, do you need to put in each cookie hole? Tell the truth, you hadn’t thought that the quantity could matter, huh?
Yes, of course, the candies melt during baking. It was expected, as well as seen in the aforementioned videos. Only I hadn’t anticipated that the final outcome of the stained glass might also depend on the amount of crumbs. If there are too many, they overflow onto the cookie. If too few, they burn before the cookie is baked, even evaporating. Haha yes, I swear. 😄 In a couple of cookies (where I used pieces of gummy candy) instead of the stained glass I found the previous hole, just added with burnt candy all around! Thinking I had been too stingy with crumbs, I added another piece (of gummy) and re-baked the cookies. Result: an opaque and grainy stained glass that maybe needed one more minute in the oven to melt properly, but at that point, I risked burning the cookie, so I saved the cookie of the two options.
Last thing to tell: the color of the stained glass.
What color are stained glass usually? Have you noticed? I’ll tell you: they are usually yellow or orange, or red or pink or green, I’ve never seen a white one, maybe there is but I haven’t seen it. And so, since I have a bag of (hard) mint candies to use up, bought when my son had a cold and never eaten by him or us, I said to myself that the web really needed cookies with white stained glass yesss. And that I would be the first to make them oh yeah. What a brilliant idea! Erm. I mean. 😅
Okay, let’s do this: I will experiment, one day or another, with cookies other than these today, to see if the mint jelly stained glass can really be a valid idea, but for now, no, for now, it’s not for me. These cookies with chocolate chips don’t go well with the flavor of mint stained glass, not at all. Yet mint-filled chocolates exist, and they are good. Huh. 😄
In the meantime, my dear ones, here is the recipe.
It was supposed to be a Christmas recipe, made just to wish you Merry Christmas, but instead, it turned into a treatise on the Theory of the Ideal Candy for Stained Glass Cookies. Ahhhh experimenting with recipes is really hard work! 😀
So, while waiting to document my next stained glass attempts that I will surely make during the holidays, for this year my Christmas cookies are like this, with chocolate and experimental stained glass. 😀
The shortcrust pastry is good, the cookies are good and crunchy, and I recommend them. For the stained glass right now, make it with gummies or hard candies flavored with orange or lemon, and those with mint… eat them if you have a cold!!
〰〰〰
- Difficulty: Easy
- Cost: Very cheap
- Rest time: 30 Minutes
- Preparation time: 10 Minutes
- Cooking methods: Oven
- Cuisine: Italian
- Seasonality: All seasons
Ingredients
- 2 1/3 cups all-purpose flour
- 2 tbsp butter
- 2 tbsp corn oil
- 1/3 cup sugar
- 1 egg
- 1/6 cup plain yogurt (or kefir)
- 1 tsp baking powder
- 1 tsp orange zest (grated)
- candies (hard or gummy)
- 1 oz dark chocolate
Tools
- Cookie Cutters for Christmas cookies
- Plain Nozzle for piping bag
- Rolling Pin
Steps
Prepare the shortcrust pastry.
For the procedure, I refer you to a couple of my previous recipes: the classic shortcrust pastry and the cream shortcrust pastry. The procedure for making shortcrust pastry is always the same, only the proportions between the ingredients vary.
👉 In this recipe I used half oil and half butter, it is the first time I try this combination (actually because I ran out of butter) but I would say a very successful attempt.
☝ I added the chocolate, chopped with a knife, to the dough as the last ingredient.
After resting in the fridge, roll out the dough with a rolling pin and cut out the cookies using your favorite cutters.
To make the central hole, smaller cutters of the same shape can be used (like star and little star, flower and little flower, heart and little heart). But I, not having cutters in dimensional sequence, used a piping bag nozzle.
👉 The plain-tip nozzle is perfect because the tip is the right size to make (in tree-shaped cookies) little holes that simulate the balls of the tree. For larger holes, just use the nozzle from the other side.
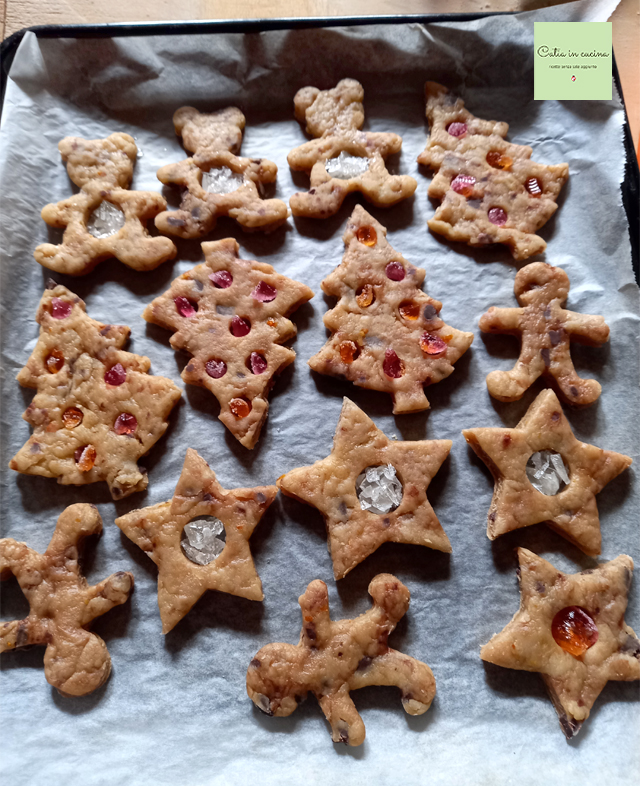
Then insert the candy pieces into the holes. Like this:
Bake at 350°F for 10-15 minutes, the standard cookie baking time.
During baking, the candies melt and produce bubbles.
☝ Pay attention to the baking time, make sure the candy doesn’t burn.
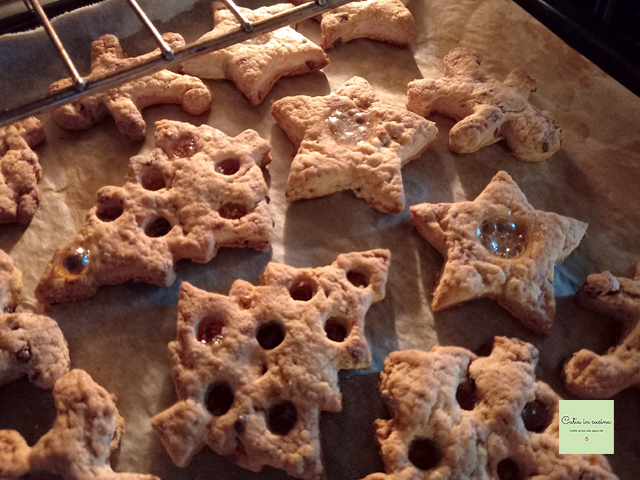
Once baked, check the result:
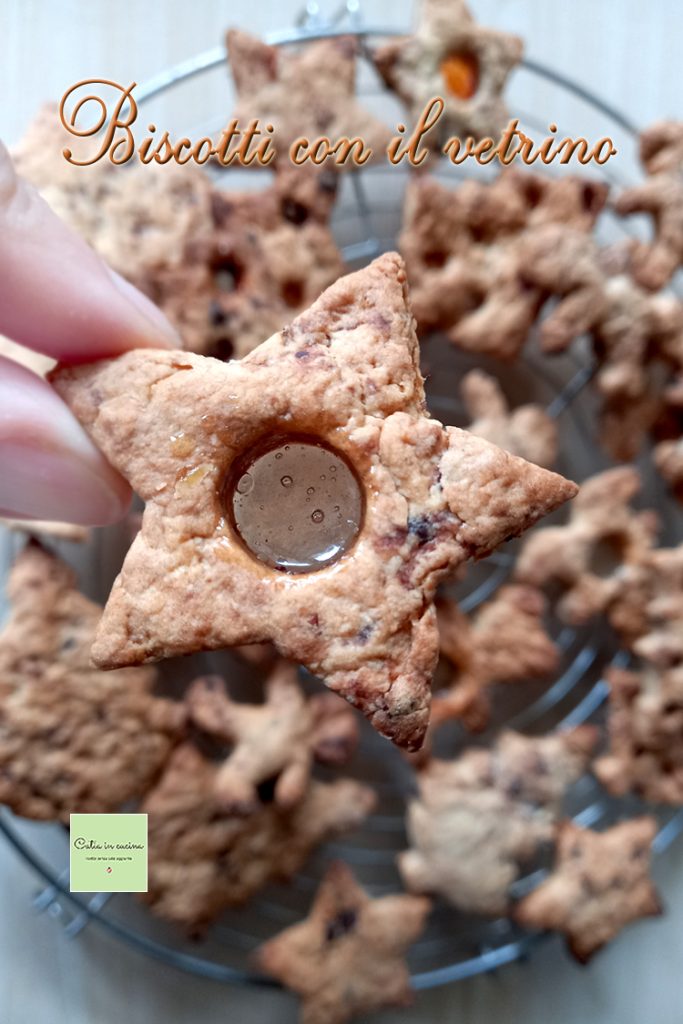
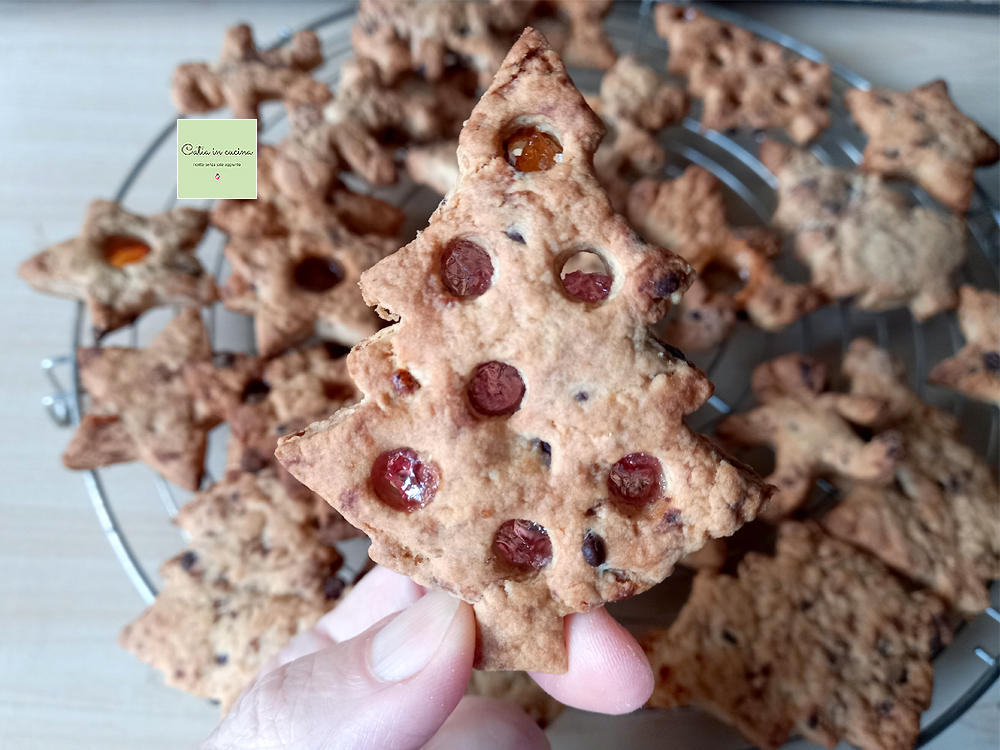
If the amount of candy crumbs was right, the stained glass will be lovely like the one on the cover photo, the first of this recipe.
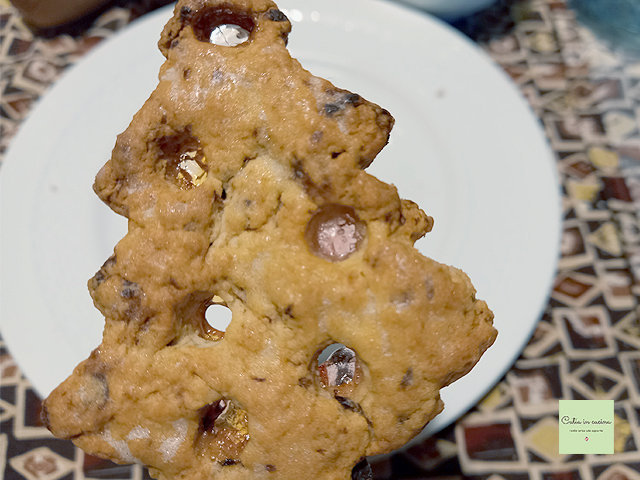
If it was too little, or if the candy wasn’t the right type (a plausible hypothesis), you might risk a not so effective result like this:
Anyway, it can be improved like this: (I will update you on future improvements! 😉)
If the amount of candy is too much, the thickness of the stained glass hinders transparency, and it probably results in roughness, not smoothness.
In any case, it’s delicious to eat, since the original candy was good (unlike the mint one 💪).
In conclusion:
Whatever the outcome, the beauty of these cookies with stained glass is that they are scenic. They are beautiful even if imperfect.
And they really create a Christmas atmosphere.
And I’m sure they are perfect cookies for entertaining children. As I was making them, I thought about my children and imagined going back in time to when they were little. I’m sure they both would have had a lot of fun helping me, and I’m sure that in the end, beautiful or not, they would have invariably exclaimed: “mom, how beautiful!” 💛🌸

Merry Christmas! 🌟
Follow Me!
On my new WhatsApp channel and on Instagram, on the Facebook page and Pinterest boards, in my two groups: Catia’s group, in the kitchen and beyond and Exactly what I was looking for! and if you want… subscribe to my Newsletter.
On my new WhatsApp channel and on Instagram, on the Facebook page and Pinterest boards, in my two groups: Catia’s group, in the kitchen and beyond and Exactly what I was looking for! and if you want… subscribe to my Newsletter.
