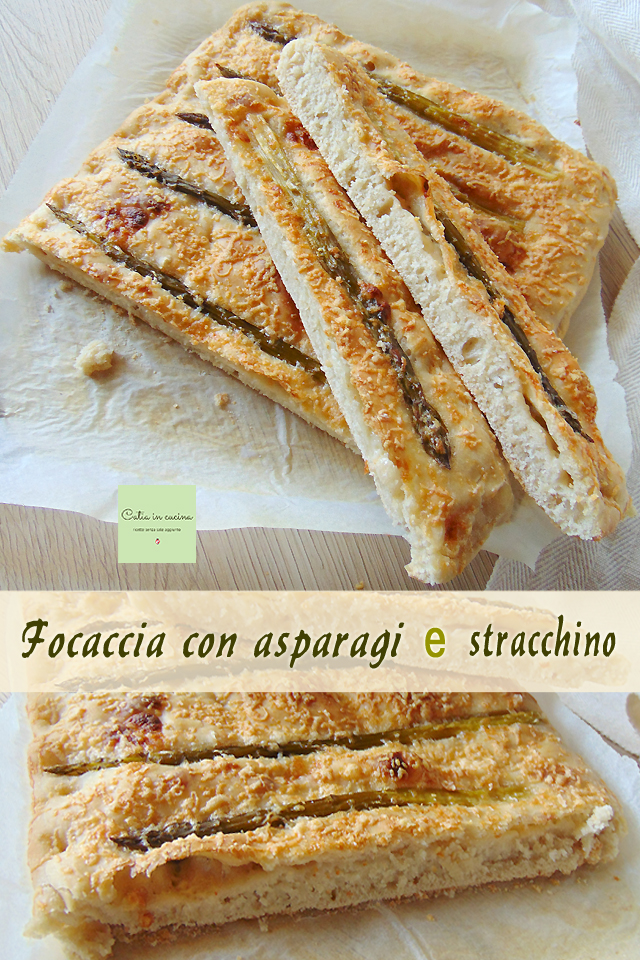
Lately, I had to perform several close refreshes of my sourdough starter because it was a bit “tired”, and thus I found myself with quite a bit of excess starter to use. I took the opportunity to devote myself to a real overproduction of pizzas and focaccias 😀 and among all, the one I liked the most, both aesthetically and taste-wise is this focaccia with asparagus and stracchino, with the asparagus arranged whole on the dough and with the stracchino spread between two layers of dough.
The asparagus placed like this are really beautiful. And yes, it’s an idea that calling simple is an understatement, and to be honest, it’s not that great an invention 😀 but the scenic effect is remarkable, it’s good, and therefore what more could I want? The stracchino is a non-intrusive presence, but it has its reason. Which I will explain at the end. 😀
Are you ready?
👇 For more ideas with asparagus, check out these recipes! 😉👇
- Difficulty: Easy
- Cost: Inexpensive
- Preparation time: 16 Hours
- Portions: 7-8 pieces
- Cooking methods: Oven
- Cuisine: Italian
- Seasonality: All seasons
Ingredients
- 2 3/4 cups Flour Type 1
- 3/4 cup Water
- 1/2 cup Excess Sourdough Starter
- 2 tbsps Extra Virgin Olive Oil
- 3 1/2 oz Stracchino
- 7 Asparagus
- 2 tablespoons Grated Cheese
- pinches Pepper
Tools
- Bowl
- Baking Tray
- Parchment Paper
- Peeler
- Pan
Steps
Dough Preparation and Fermentation
To help those who aren’t familiar with the fermentation times of doughs, I’ve decided to indicate the times of my process so you can adjust them to suit your needs.
Which means: if you want to make this focaccia for tomorrow, but you already know that tomorrow at 9 a.m. since it’s Sunday you’ll still be under the covers (lucky you!!), then start kneading an hour or two later, postponing all the times, but following the scheme I describe below. If instead tonight you want to go out for dinner because it’s Saturday and there’s always room for a night out 🙂 you’ll need to start a couple of hours earlier to put the dough in the fridge before leaving the house (and then wake up a bit earlier tomorrow morning to take it out of the fridge).
Yes, I know!, it’s the tough life of those who love kneading! and baking! But I assure you… once you start, then… you can’t stop!
Never – but really never until a little while ago – would I have said that I, precisely I who could hardly bear a wait of just two hours, could adapt to these strange and long proving times! And yet… here I am writing recipes for you, and I say it can be done. Strange things happen in life! 😀
Okay, shall we start?
Start h 6:00 p.m.
In a large bowl, dissolve the excess starter in the water, add the oil and flour and mix with a spoon.
Knead by hand for 15-20 minutes until the dough becomes elastic.
Cover the bowl and place it in a sheltered place (I always put it inside the microwave) and let the dough rise for about 3 hours.
During the 3 hours, perform the S&F folds twice (i.e., after each hour, but if you can do more, every half hour, it’s even better).
👉 The so-called S&F (Stretch and Fold) folds are the folds that are usually done in the preparation of bread and are intended to give elasticity to the dough and allow it to incorporate air. I haven’t photographed those made for this focaccia but you can take a look at the photos in the autolysis bread recipe.
h 9:00 p.m.
After the 3 hours, cover the bowl with plastic wrap and put it in the fridge until the next morning (for about 12 hours).
h 9:00 the next morning
Remove the bowl from the fridge and let it sit at room temperature for half an hour (or an hour depending on the temperature) to allow the dough to acclimate.
Focaccia Preparation
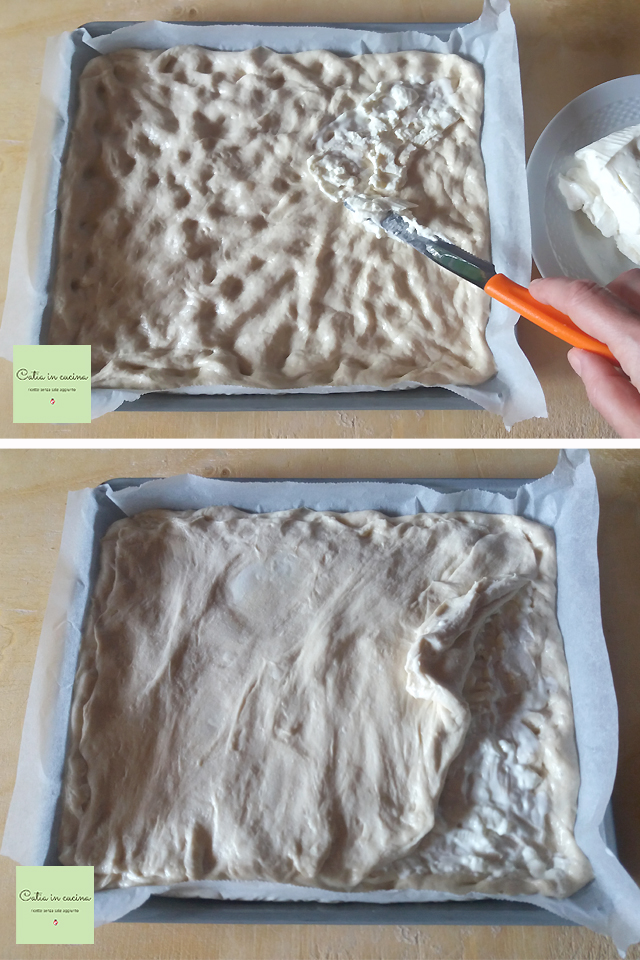
After the half-hour acclimation, divide the dough into two parts in the proportion of 2/3 and 1/3, i.e., one larger part and a smaller one.
👉 The purpose of this difference between the two pieces of dough is to obtain a thicker base and a second thinner layer.
Spread (directly on the parchment paper and in the baking tray, I used a 10×12 inch tray) the larger piece of dough by tapping it with your fingertips, preferably oiled or wet with water.
Distribute the stracchino on the surface of the first layer of dough.
I deliberately did not use an abundance of stracchino because I wanted to avoid that an excess of moisture could cause cooking problems, and also because the initial intention was for this focaccia to be cut in half and filled. Although we ended up eating the strips of focaccia like big breadsticks.
Spread the second layer, which being smaller will be thinner, and place it on top of the other covering all the stracchino.
Press the dough slightly along the edge.
End of dough preparation.
Now, before proceeding to bake the focaccia, let me explain how to clean and cook the asparagus.
Cleaning and Cooking Asparagus
Cut the terminal part of the stalk.
Wash the asparagus under a stream of running water, rubbing them gently between your hands.
Peel the stalks with a peeler, starting from halfway down the stalk.
Cook the asparagus for about 10 minutes in a shallow pan or skillet, covered with a teaspoon of oil, a splash of water, and (optional) a pinch of pepper.
For more information on cleaning and cooking asparagus, I suggest the introductory notes to the asparagus recipe collection, which I’ve recently updated.
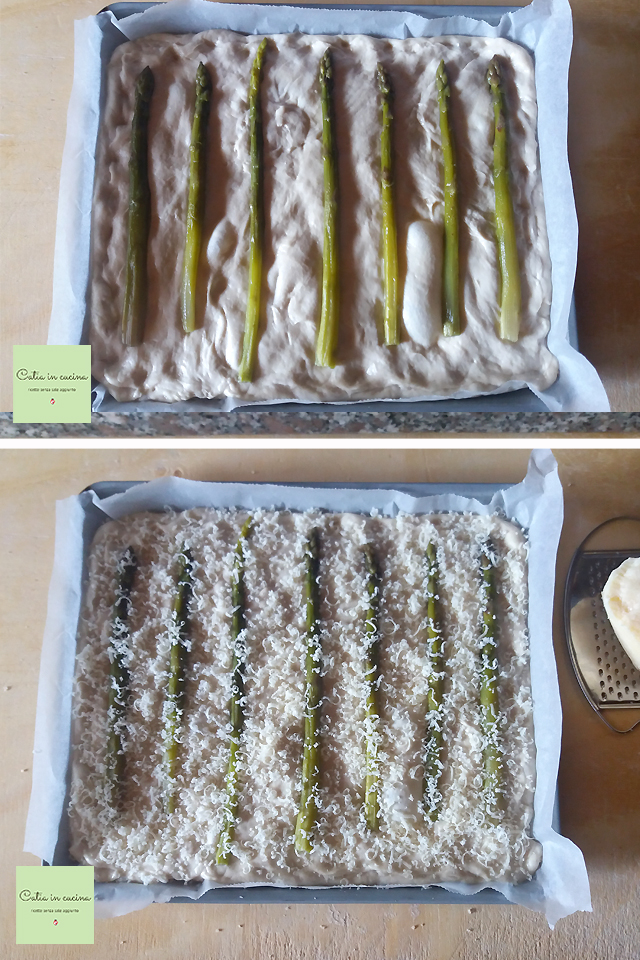
Arrange the asparagus on the surface of the focaccia, I used 7 but depending on the size of the asparagus or to your taste, the number can differ.
Cover the asparagus and the entire surface of the focaccia with a nice sprinkle of Parmesan or other grated cheese.
Baking the Focaccia
Bake at 428°F and cook for 25 minutes. After 10 minutes, I lowered to 392°F, but make sure to adjust according to your oven.
☝ The rule for baking focaccia is to bake at the highest possible temperature of the oven for at least the first 10 minutes and then slightly lower the temperature. If the high temperature makes the surface of the focaccia brown too quickly, you can cover it with a sheet of foil. I learned this rule from the Licoli group by Luigi Appi and made it my own, despite the inevitable adaptations my little oven requires.
I also suggest that it is good to test the temperature with an oven thermometer because it can happen that the temperature indicated on the knob does not correspond to the actual cooking temperature (it happened to me and it was a real discovery).
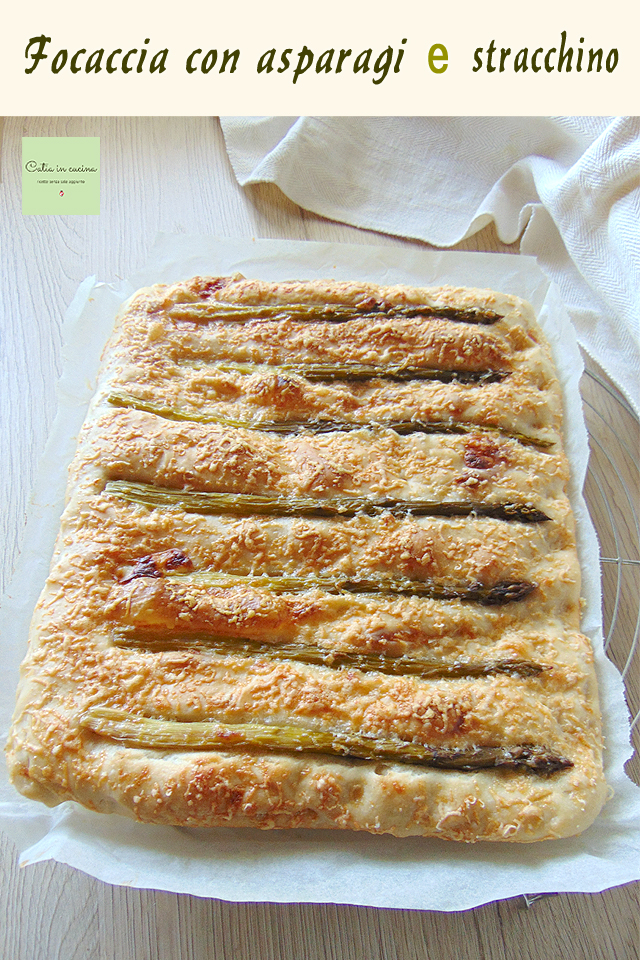
Remove from the oven and place on a wire rack to avoid moisture at the bottom.
Serve hot, warm, or cold.
Thanks to the second thin layer of dough and the grated cheese, the surface of this focaccia with asparagus and stracchino will be golden and crispy, while the stracchino will make the underside soft.
Salt-Free Tips
![]() The asparagus, stracchino, and grated cheese flavor this focaccia, making any addition of salt unnecessary.
The asparagus, stracchino, and grated cheese flavor this focaccia, making any addition of salt unnecessary.
Remember that all my recipes are without added salt 🙂
If you’re interested in reducing or eliminating salt, always remember to:
▫ Gradually decrease the salt, the palate must adapt slowly and should not notice the progressive reduction.
▫ Use spices. Chili pepper, pepper, curry, nutmeg, cinnamon, cloves, cumin…
▫ Use aromatic herbs. Basil, parsley, oregano, thyme, sage, marjoram, rosemary, mint…
▫ Use seeds. Sesame, pine nuts, almonds, walnuts…
▫ Use spicy vegetables or fruits. Garlic, onion, lemon, orange…
▫ Use my salt-free vegetable granules and gomasio.
▫ Prefer fresh foods.
▫ Avoid cooking methods that dissipate flavors (grill, foil, steam, microwave).
▫ Avoid bringing the salt shaker to the table!
▫ Occasionally allow yourself to stray from the rules. It’s good for morale and helps persistence.
If you don’t want, or can’t, give up salt:
▫ You can still try my recipes by salting according to your habits.
Follow Me!
In my new WhatsApp channel and on Instagram, on my Facebook page and Pinterest, in my two groups: Catia’s Group, in the Kitchen and Beyond and Just What I Was Looking For! and if you feel like it… subscribe to my Newsletter.
