Not a few years ago, but just two or three months ago if someone had told me that I would start making bread with autolysis, and with this frequency, well… I would have said ‘you must be dreaming!’.
😄
I have never liked trying my hand at long leavening processes. Maybe because I never had the right imprinting, belonging to that generation of ’60s-’70s kids who were children of the white bread with oil, the first snacks, and the first baby foods eaten with a spoon directly from the jar. Those kids who truly said ‘wow how cool!’ when mom made Catarì pizza. 😄
Tell me you also thought that paper doser cone seemed like it came out of the Jetsons’ cartoons!, tell me you also thought it whispered that… ‘yes! the future is already here!’ 😀
It was a time of contradictions, I understand now, because the combination of that boxed pizza mix and the flour bought from the trusted mill run by a lovely old man, not to mention homemade tagliatelle because store-bought ones never ever, in fact seen from now it seems a slightly jarring combination.
But eras can only be understood in hindsight, I’m convinced of this.
And now, with boxed pizza having faded away, I’m quite happy that the current era has rediscovered the satisfaction of kneading and baking bread at home.
Even though it highlights, in my opinion – yes, let’s talk about it – another contradiction: that is, reconciling the management of sourdough, the leavening times, folds every half-hour, rest times in the fridge and out of the fridge, with the fact that women now work full-time and are no longer (we are no longer) the housewives like my mom or grandma, well, this is also a nice combination to analyze.
When more or less twenty-five years ago I finally abandoned instant boxed pizza to venture into yeasted doughs, it seemed to me that I had made a conquest. I struggled quite a bit to reconcile work schedules with the three hours of leavening for a pizza dough, and it didn’t occur to me that I could have organized myself better and perhaps prepared the dough during the lunch break. It was a mindset I didn’t have. I later learned it over time, but very slowly.
In fact, only three years ago I made the solid sourdough step. The solid sourdough period was a transitional phase for me during which I made many mistakes with leavening, mistakes that increasingly told me that long leavening isn’t for me (because I lack patience!).
During the two years of sourdough, I baked tons of breadsticks and crackers. I loved the excess, because it allowed me to produce things suitable for my limited bread-making skills, about which in the breadsticks, crackers, and rolls recipes I published on this blog, I have always told you with sincerity. (Read the explanation I gave you in the intro of the crackers, it’s a hoot, I laugh by myself every time I read it! 😁).
In the end, I moved on to licoli, which evidently was the decisive step, the one that sparked the idea of trying the bread route. 🙂
I bought books, joined a couple of FB groups dedicated to sourdough, where I read all the posts and comments, and understood nothing at all. I moved on, tried kneading by putting into practice what I read or sometimes following my intuition, experimented with leavening times, tried doing folds managing poorly (still true now, to be honest), in short, I gained a decent self-taught experience.
But unfortunately, it wasn’t enough because until you understand the meaning of certain procedures or certain terminology, experimenting is pointless!! For example, what the hell is autolysis?? What does that W that everyone talks about mean?
Previously, every time I encountered the word autolysis I turned the page. I considered it a technique for sector experts too difficult for me to understand, so I avoided it outright. Almost like saying ‘strong flour’ or ‘corded’: but what does it mean?? Boh, I don’t know and I don’t want to know, oh, I just want to make bread, not complicate my life. Oh.
Oh, oh, oh. It almost feels like – just to make a comparison – seeing myself on a day about more or less thirty years ago when I first sat in front of a computer and it all seemed like alien stuff, I didn’t understand anything, and continued not to understand for months and months and months. Stuff like saving all the files into a single folder because I didn’t know, and didn’t even realize, that new folders could be created, until someone took pity and told me. And from that moment everything changed in my head, and from that moment I started to understand.
So, with this abstruse thing that was autolysis for me, about the same thing happened: the day I suddenly understood what it is, wow, a world opened up for me.
So, you talk and talk and talk but will you tell us or not what ‘this autolysis’ is? Well, autolysis is nothing but preparing a dough of just flour and water left to rest for a while before adding the yeast and kneading in order to aid gluten development. That’s all.
Exactly, that’s all. And I had imagined who knows what kind of procedure for years.
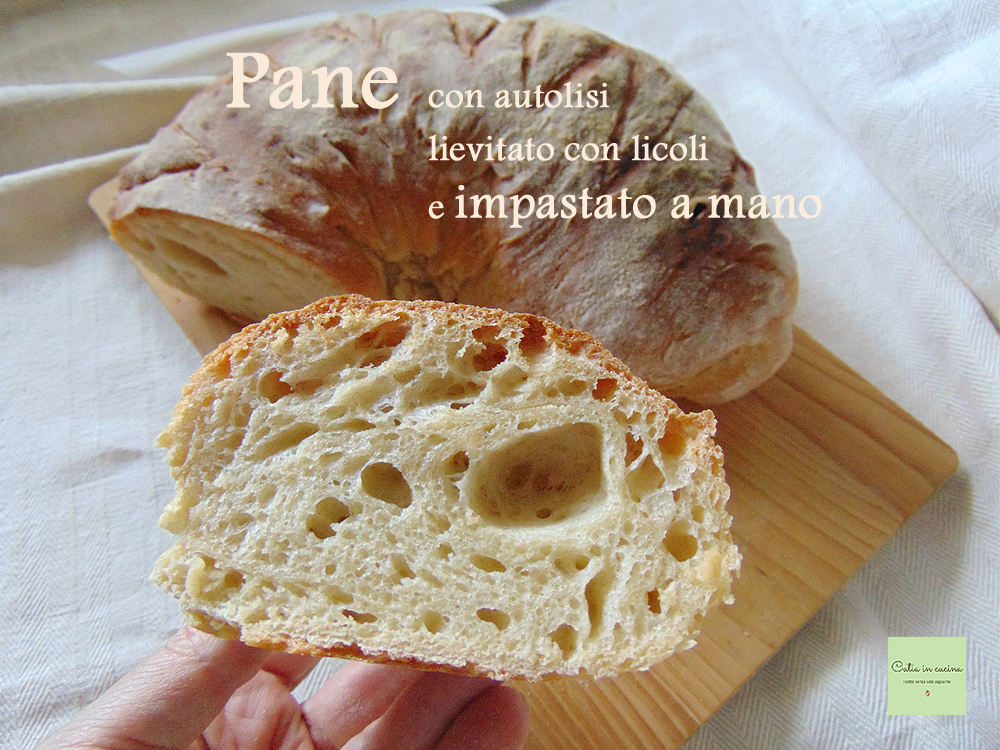
So, even if other things like the issue of flour strength, I haven’t fully resolved, well, let’s take things as they come and address one issue at a time: today it’s autolysis’s turn. In a few lines and a few photos, it will have no more secrets for you either, that is for you who don’t know yet (and others will forgive me for the imperfections that are certainly in this recipe). 😊
〰〰〰
- Difficulty: Medium
- Cost: Economical
- Rest time: 15 Hours
- Preparation time: 3 Hours
- Portions: 1 loaf
- Cooking methods: Oven
- Cuisine: Italian
- Seasonality: All seasons
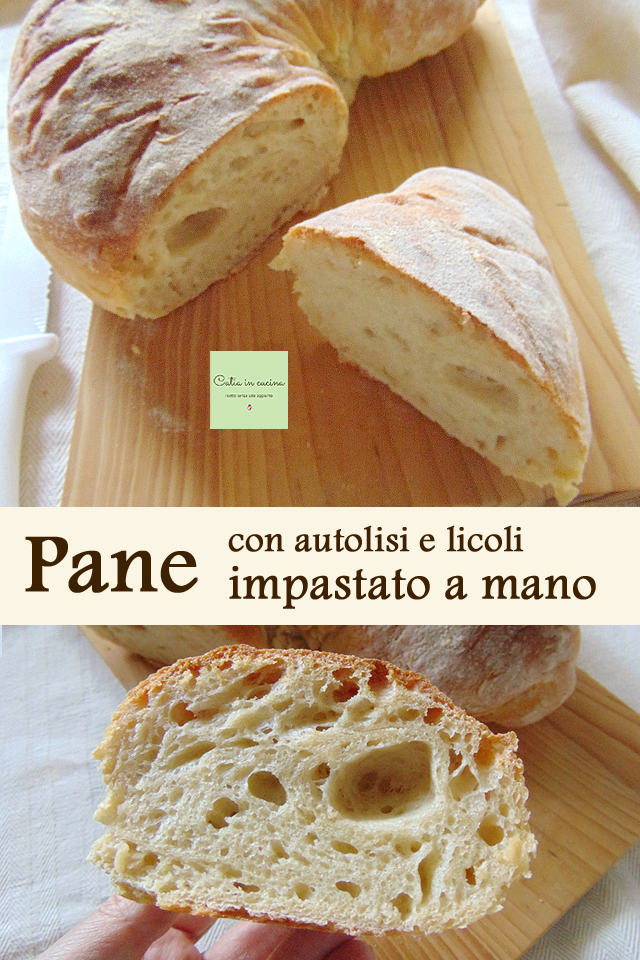
Hand-Kneaded Bread with Autolysis (and Licoli): THE INGREDIENTS
👉 I made it a rule to use half semolina and half flour in almost all the trials I conducted, except for two times when I didn’t use semolina. However, I had to vary the flour using sometimes Manitoba, sometimes 0, and sometimes 1, for ‘pantry availability’ reasons.
Therefore, I pass on two versions to you, one with 0 Manitoba and one with type 1, showing that the water to use can never be indicated precisely but must be adapted each time, even if only slightly.
- 250 g 0 Manitoba flour (protein 12.5 g)
- 250 g re-milled semolina (protein 12.5 g)
- 150 g active licoli
- 320 g water (for autolysis)
- 20 g water (to add during kneading)
- 1 tsp extra virgin olive oil
- 250 g type 1 flour (protein 12 g)
- 250 re-milled semolina (protein 12.5 g)
- 150 g active licoli
- 330 g water (for autolysis)
- 30 g water (to add during kneading)
- 1 tsp extra virgin olive oil
Useful Tools
- 2 Bowls
- 1 Proofing Basket
Hand-Kneaded Bread with Autolysis (and Licoli): THE STEPS
Before deciding to write this recipe, I made this bread with autolysis eleven times.
It turned out well every time – even if someone might say ‘well, let’s say pretty good’ – but every time my family jury approved it because it had a good taste, and we enjoyed eating it every time despite all its flaws.Flaws that will certainly be present in the twelfth loaf, currently ‘maturing’ in the fridge. However, each time there was a small evolution, I realized on my own that everything was constantly improving, so the conclusion I’ve reached is that the recipe is valid, and now it can be shared. 😀 And I also understood that the final success does not lie in the recipe itself, but in a whole range of variables that sometimes ‘bare and raw’ recipes don’t mention. Also, because, rightly, not all recipes can be written in the form of an endless poem as this writing of mine seems to turn out.
But blogs are precisely for this, right? To write. And to read them. And if you are here, I imagine you agree with me. 😊So, as I was saying, the variables are: flour, resulting hydration (i.e., the amount of liquids, that is, water), the season (i.e., room temperature), and the oven. Additionally, outside the list, the use or not of a mixer, or a planetary mixer. Outside the list because from what I could understand they have become quite popular in recent years, although I have neither and therefore cannot make evaluations regarding their use.
There’s a whole world around flours. As I mentioned in the introduction, I haven’t fully delved into this world made of grains of various types, strengths, proteins. At the moment, my knowledge is limited to the division that everyone knows in 00, 0, 1, 2, wholemeal, soft wheat, hard wheat, ancient grains, Manitoba, basically the most basic basics. The only new thing I’ve learned so far is to look at the label and read the grams of proteins, something I had never done until now in my venerable age. The flours I verified during this 12-loaf journey had the following protein content indicated on the label:
– 0 flour: sometimes 10.5 sometimes 11 g
– 1 flour: 12 g
– 0 Manitoba: 12.5 g
– durum wheat semolina: I have two packs at home, one 10.5 g and the other 12.5 g
– wholemeal and 00: unavailable, because I haven’t yet tried the wholemeal, and I don’t think I will try the 00.
I have found differences even between flour packs of the same type and the same producer, different batches with different proteins.In conclusion, check the proteins indicated on the label because a greater amount of proteins means – in principle, and if I have understood everything I’ve read on the subject correctly – greater gluten presence, therefore greater liquid absorption, therefore better performance with longer leavening.
From reading, from explanations given by my dear friend Deborah, and also from trying it on the field, I know that the amount of water to use depends on the flour: the more water the flour absorbs, the more strength it has, i.e., the more proteins it has (there would be an explanation to give about wholemeal flour and its proteins, but we will talk about it later when I venture into wholemeal bread and know more, let’s take one step at a time which is better).
Anyway, the more the dough absorbs water, the more it will be hydrated. It should be noted that high hydrations, those over 80% (of water on the flour weight), make the dough so soft as to require either the use of a mixer or a certain manual skill (and experience) that I don’t have (not yet!), so the bread I propose in this recipe has a lower hydration – I calculated it: it is 68% in the version with Manitoba flour and 72% with type 1 flour – and is manageable in manual processing even by those who are beginners in bread-making like me.This item does not need much explanation. We all know that when it’s hot, dough rises faster, so it is necessary to evaluate the out-and-in-fridge times of our doughs from time to time to avoid over-leavening and the dough becoming acidic. In winter, the problem is the opposite, it is necessary to guarantee a minimum temperature, and the standard advice is to let the dough rise inside the oven with the internal light on. I don’t do it (then in the oven section you will understand why), but I have the habit of using the microwave as a proving chamber (I have a 24-liter microwave, slightly larger than the standard size, therefore quite roomy).
The oven is my sore point. My oven (that is the normal oven, the ‘real’ one) has been out of order for an age. I won’t bore you with the hidden reasons why I haven’t decided to buy a new one yet, the fact is that for quite some time all my oven production has been the work of the mini oven, and to be precise – and far be it from me to advertise but naming it is necessary, given the importance of baking in bread production – the DeLonghi Sfornatutto, which I’m on the second generation of after the predecessor Sfornatutto, which had eighteen years of honorable service.
One of the reasons I procrastinated long before embarking on bread production was precisely this oven problem: I must confess that for obvious dimensional reasons, I had no faith that a mini oven would bake bread well.
But I adapted, and also somewhat changed my mind. Certainly, with one-kilo loaves, I preferred not to try, but the 11 productions made so far (some of which I will show you photos of at the end of the recipe) are all loaves or baguettes of 500 g of flour (excluding licoli) and all have baked decently well. There’s no doubt that a ‘serious’ oven can only improve the current results but as mentioned before: let’s take one step at a time, and the current step is this.
It remains fundamental to know your oven (or mini oven), and you must accept making some errors of course to ‘measure it up’.Well, are you ready? 🙂
First, proceed with autolysis: pour the flours into a bowl, add 300-320 g of water and knead quickly until you get a coarse dough. Start with 300 g, then adjust by adding 10 or 20 g as required by the flour.
Cover the bowl and let the obtained dough rest for about an hour.The rest can proceed for a longer time, nothing happens if you forget or if other commitments prevent you from kneading at the preset moment, at times I had to leave it for 2 hours, on a couple of occasions for the whole afternoon, and I did not find any striking differences in the dough.
Take 150 g of licoli (refreshed the day before) from the jar kept in the fridge, and let it acclimate to room temperature.
However, I recommend that if the ‘other commitments’ mentioned above arise, what I said for autolysis does not apply to licoli: sourdough cannot be left for hours at room temperature otherwise it becomes acidic. Acclimating means: taking it out of the fridge and leaving it at room temperature for half an hour or an hour at most.
If instead, the licoli needs refreshing, it is necessary (predicting it 4 hours before) to take only 50 g from the jar, then proceed with 50 g of water and 50 g of flour + wait about 4 hours to get the doubling at room temperature and have the 150 g of active licoli we need. During the hours of waiting it is good to adjust with the times of the autolysis, which can be prolonged as I said a little while ago, or simply postponed.
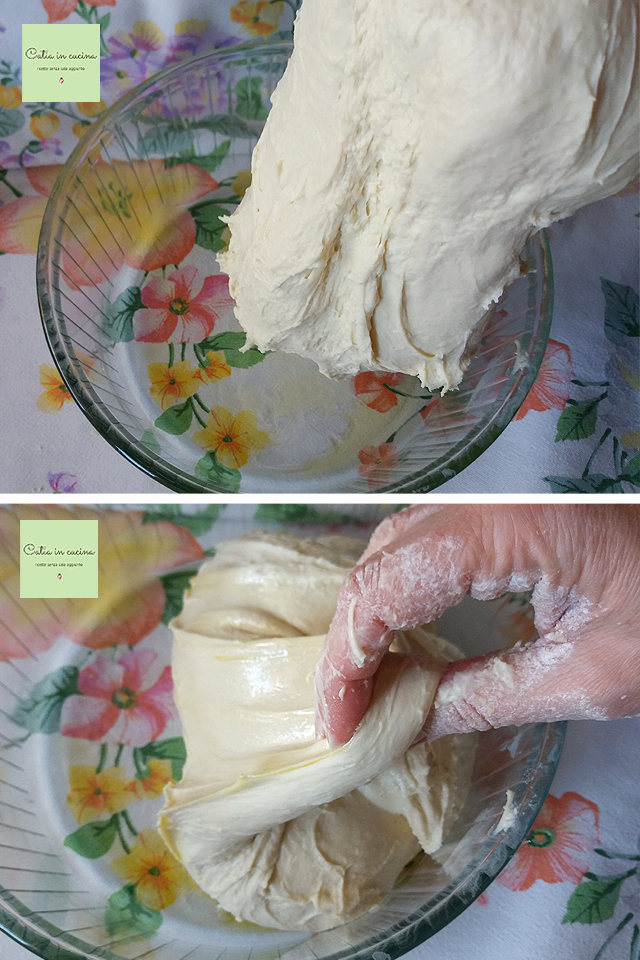
After the autolysis time has passed, the gluten strands have relaxed and the dough that was coarse becomes more elastic.
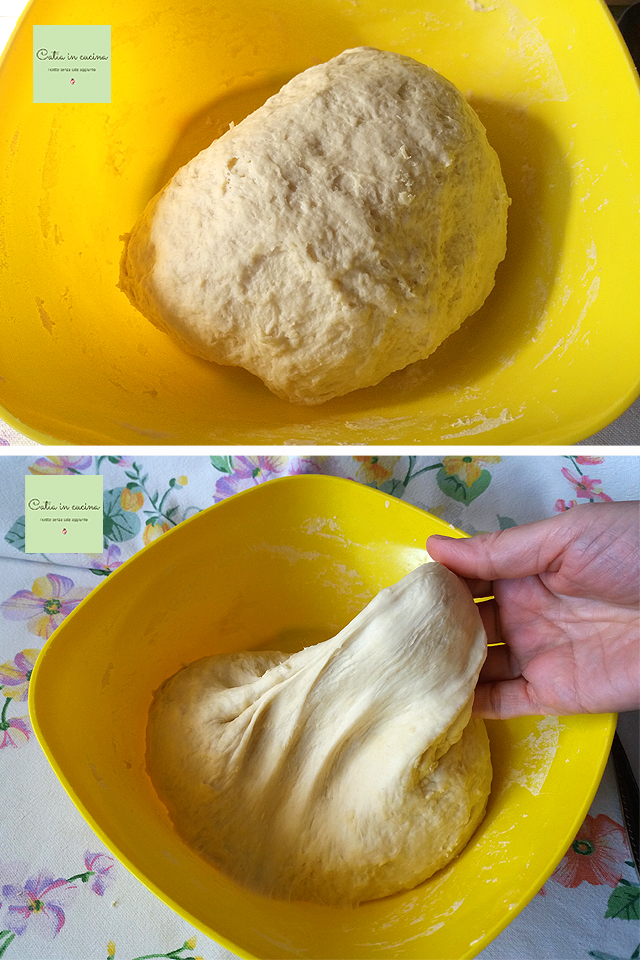
At this point, you can combine the dough with the licoli and start kneading (inside the bowl).
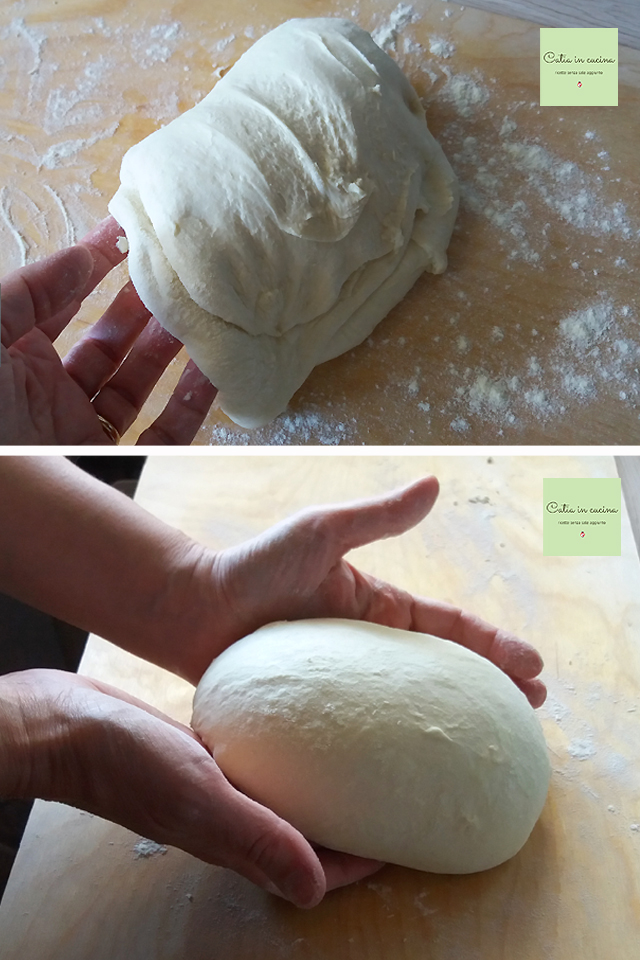
The first time I put my hands in this mix of dough and yeast, I wasn’t confident, I thought kneading that sticky mess by hand would be an impossible task, but you can do it, trust me. It simply requires kneading slowly, without haste and without aggression, mainly using the fingertips, using your fingers as if they were a hook, mimicking in some way the movement of the mixer and folding the dough over itself, even pulling it as you do when making folds (the photos of the folds are a little further ahead).
Slowly the dough will transform, and you will feel it becoming more elastic and less sticky until it starts to detach from the bowl’s sides. All this in about 20 minutes.
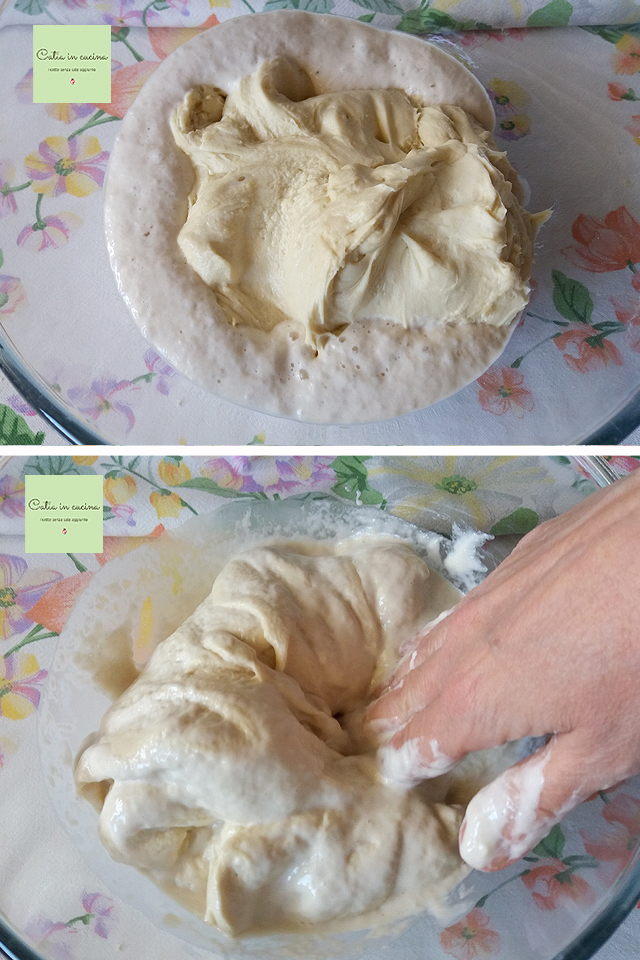
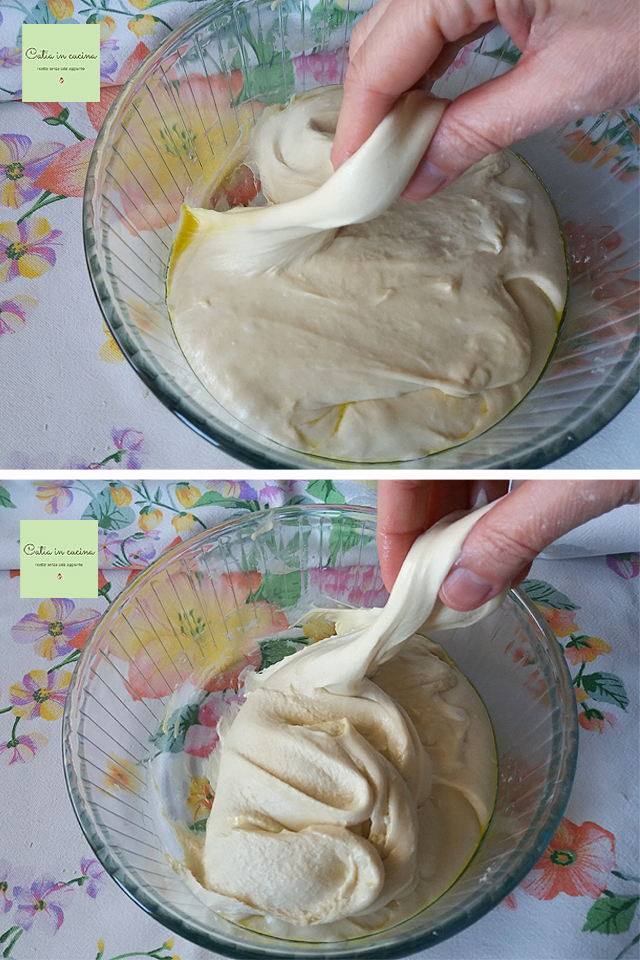
At this point, even if the dough seems ready (and it already is if you want, in the first loaves I stopped here), it is actually useful to continue by adding small amounts of water, little by little no more than 5-10 g, working the dough until the water is absorbed, then adding a little more (for example a teaspoon) and kneading again until the ‘dough takes it’ (quoting the words of my friend Deborah, who helped me a lot in this learning phase).
The total amount of water needed depends on the flour used, the important thing is that the addition is very little each time and that it is absorbed by the dough each time.When the dough is corded (i.e., becomes firm, and I hope I have sufficiently understood the meaning of ‘corded’), transfer it to a bowl greased with a teaspoon (or more, if you prefer) of oil. Thanks to the oil, it will be possible to proceed with the folds easily. If necessary, to prevent the dough from sticking to your hands, wet them with water.
To make the folds, proceed as follows: use the fingertips to take a portion of dough from the edge, pull it up, then lay it on the dough, repeat around the entire circumference of the dough.
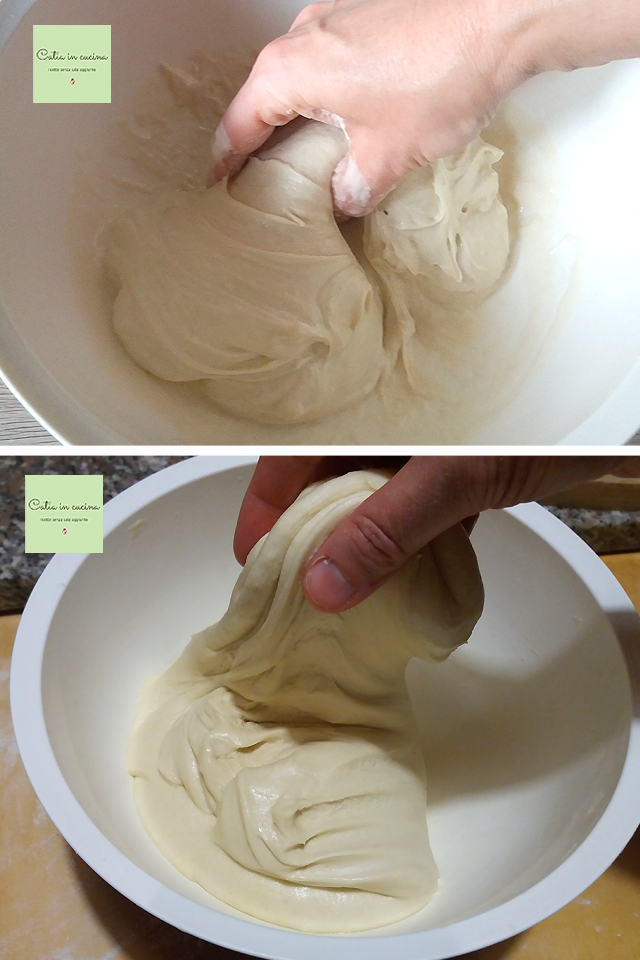
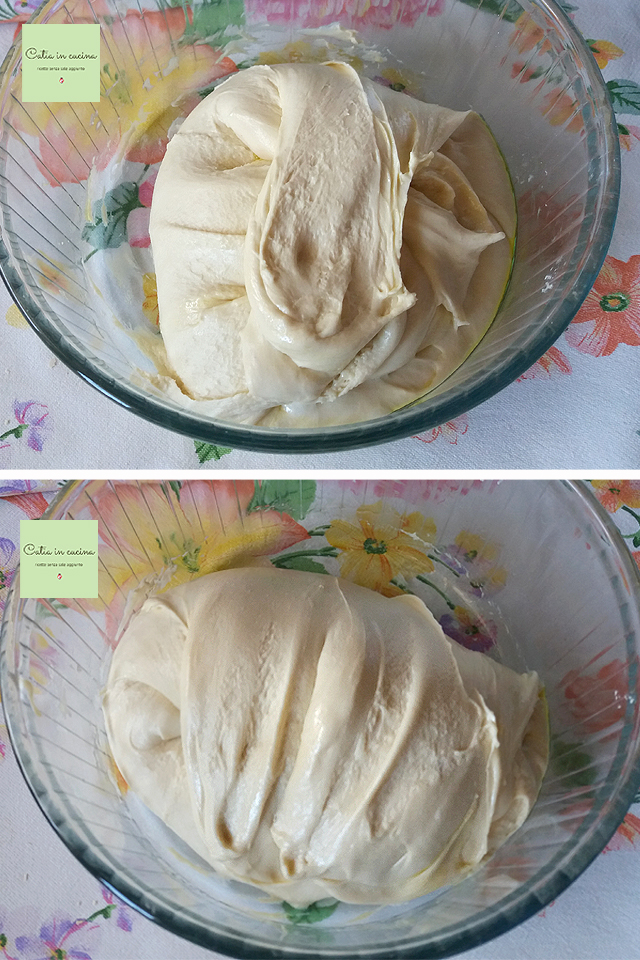
Cover the bowl with plastic wrap or a lid and let the dough rest for 2 hours. During this rest, repeat the folds every half hour.
Personal advice: if you can’t be precise with the timing, don’t get too stressed and do the folds when you remember, even every 15 minutes or every 45, the important thing is that they are done at least three or four times, or five, decide based on evaluating the elasticity of your dough.Each time you handle the dough after the half hour from the previous folds, you will notice it will be improved, each time it will be firmer and more elastic than half an hour before.
This type of folds has a specific name; they are called S&F, which stands for Stretch and Fold, and they are really very effective because they incorporate air which will then produce the holes in the bread. If you want to research, you will certainly find a sea of information about this type of folds online (and surely you will find photos or videos of those who do them better than me!). If in the meantime you want to try to copy my folds, I believe these photos of mine may be helpful:
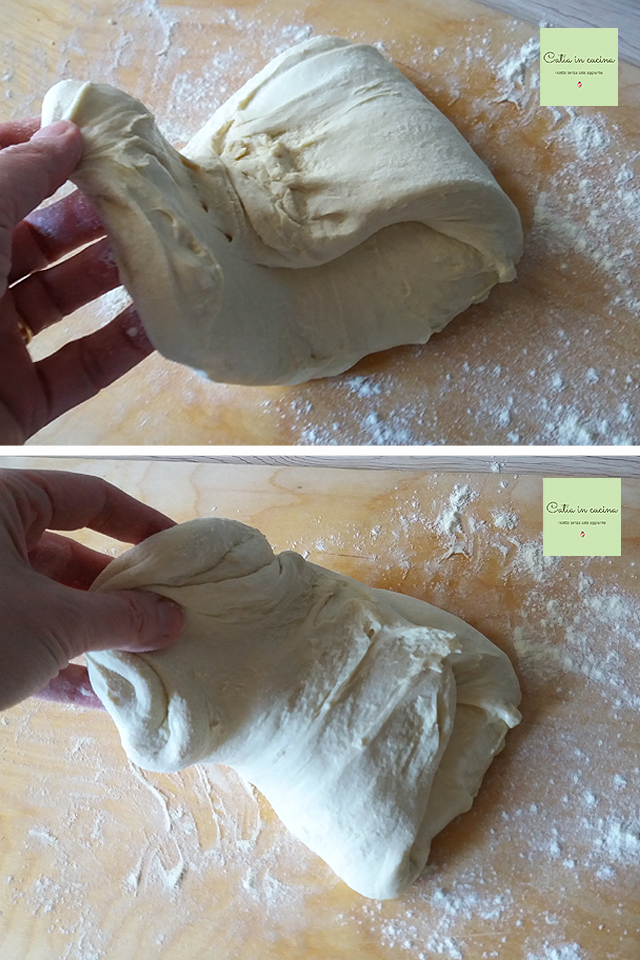
After completing these folding cycles, after two or three hours (adjust based on the room temperature), turn the dough onto a floured (or ‘semolinated’) work surface, do a round of threefolds and then pirlarlo.
If you don’t know this terminology, I understand! (I also wondered, what does it mean to pirlar??), now I explain it in my own words. 😉 🙂
But let me tell you right away: my threefolds still have a lot of room for improvement! however, although imperfect, I am not hesitant to show them to you; later when I have learned better, I will not fail to update you.
The principle of threefolds is simple: fold one side over two-thirds of the dough, and then fold the opposite side. Only that between saying and doing, there is the experience: just a few days ago, I realized that it would be good to close the edges of the folds (something I didn’t do when I photographed) by pressing the edges gently with the fingertips. The purpose is to retain the air inside the dough.
At this point, transfer the ball to a basket (those without a basket can use a colander) lined with a cloth or towel sprinkled with semolina.
Sprinkle semolina (or flour) over the dough, then cover it with another towel or a corner of the cloth, and place it in a food bag, or a freezer bag, or another similar bag. Finally, place the basket in the fridge.
Note: it would be good to place the ball in the basket with the closure (i.e., the part that during shaping is underneath) facing up, so then when you take the basket out of the fridge and turn it over onto the tray, the loaf will be facing the right way. But this thing I have half the time not remembered.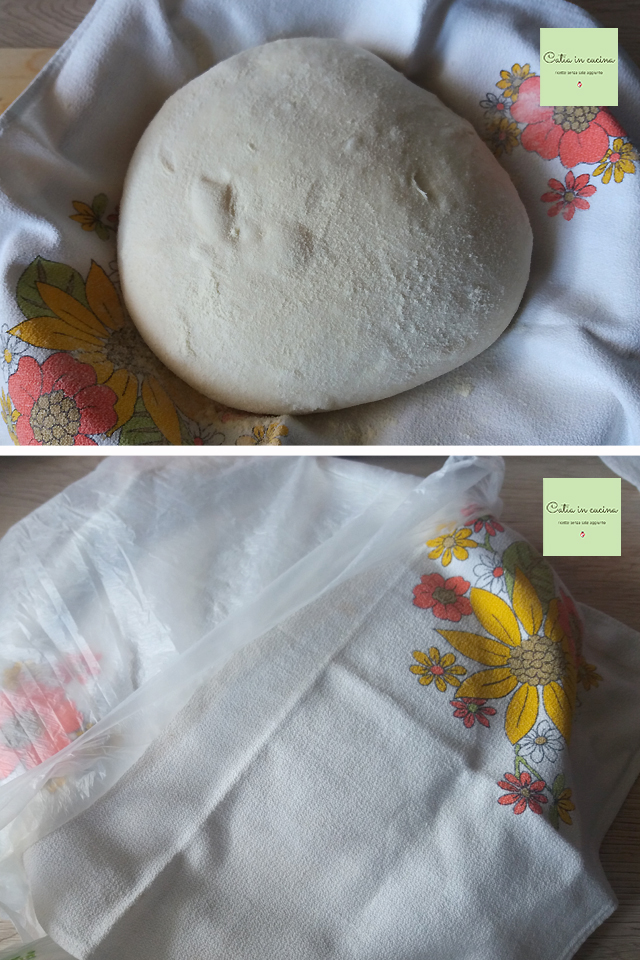
The duration of the rest in the fridge can range from 12 to 24 hours, or even 48, depending on the flour used. The first breads I produced I left in the fridge for 12 exact hours, later I also tried longer times, but in the end, I concluded that the optimal time for me was 15 hours.
After the 12-15 hours have elapsed, take the basket out of the fridge, turn the loaf over onto the tray that will then be used for baking, lined with parchment paper.
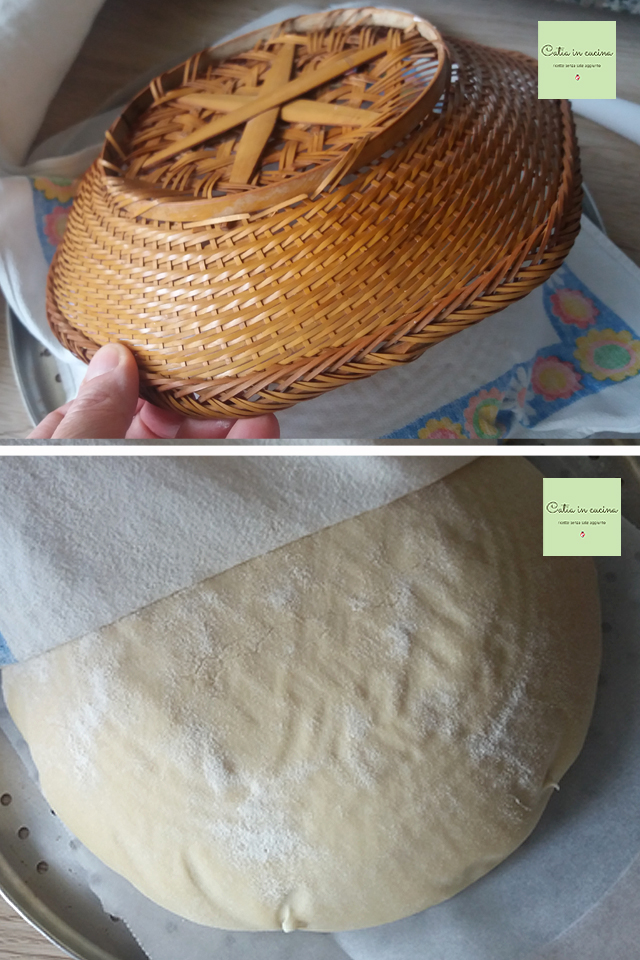
Sprinkle semolina over the surface, gently massaging with your fingertips to distribute it evenly, in this way you will get that nice light-dark effect on the crust after baking.
Proceed with the scoring.
The scores should be made with a razor blade, for now, I get by with a sharp knife, then in the future, I will equip myself better.This scoring step… let’s say it is to the beauty of the bread… just as inspiration is in the hands of each of us, 😃 in short… I don’t have a grain of artistic flair, the best I could do are these two minimal decorations I show you in the photos below. But I’m sure you can achieve better, so go wild!
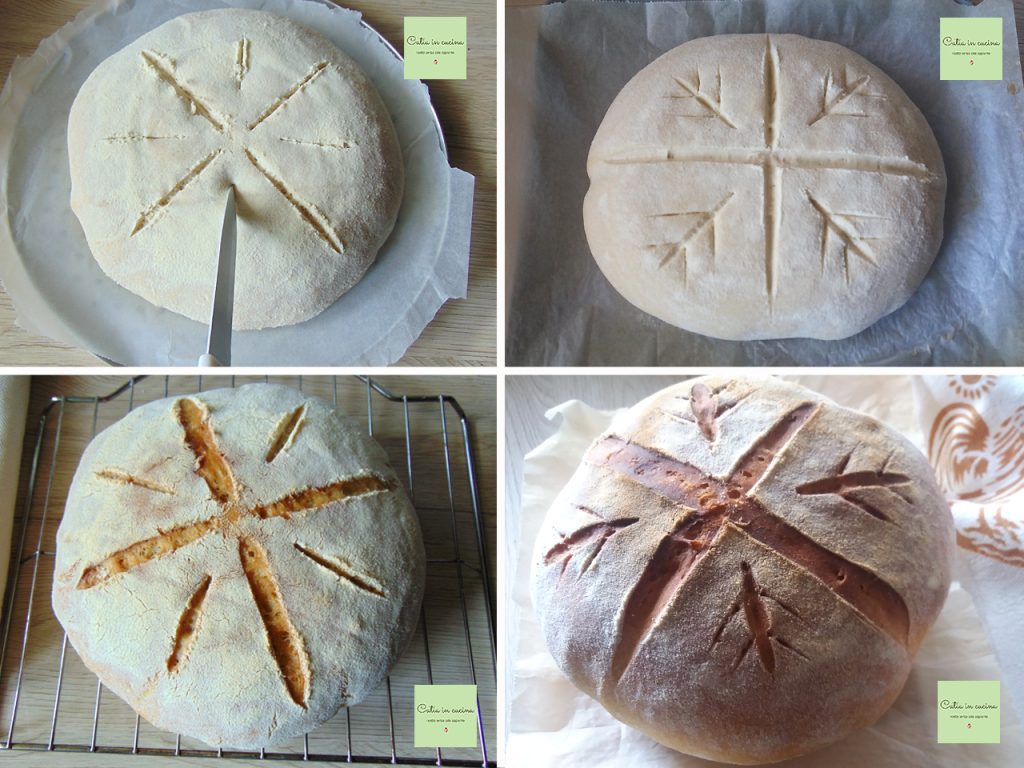
After scoring the surface, leave the loaf at room temperature for about 15 minutes, then bake at 465°F (240°C) for 15 minutes, then lower to 390°F (200°C) for another 30 minutes (or 355°F (180°C) for 40 minutes).
With traditional ovens, I know you should put a pan of water inside the oven and then slightly open the door during the last 15 minutes of baking to release the steam, but with the mini oven, these precautions are precluded; the best thing to do in my case is to lower to 355°F (180°C) and cover the loaf with a foil during the last 10 minutes of baking to avoid overcooking the crust, due to the proximity of the resistance.Once baking is completed, take the bread out of the oven and place it to cool on a wire rack, preferably standing, that is, leaning on the circumference, or in the case of baguettes on the small side, to facilitate the escape of moisture.
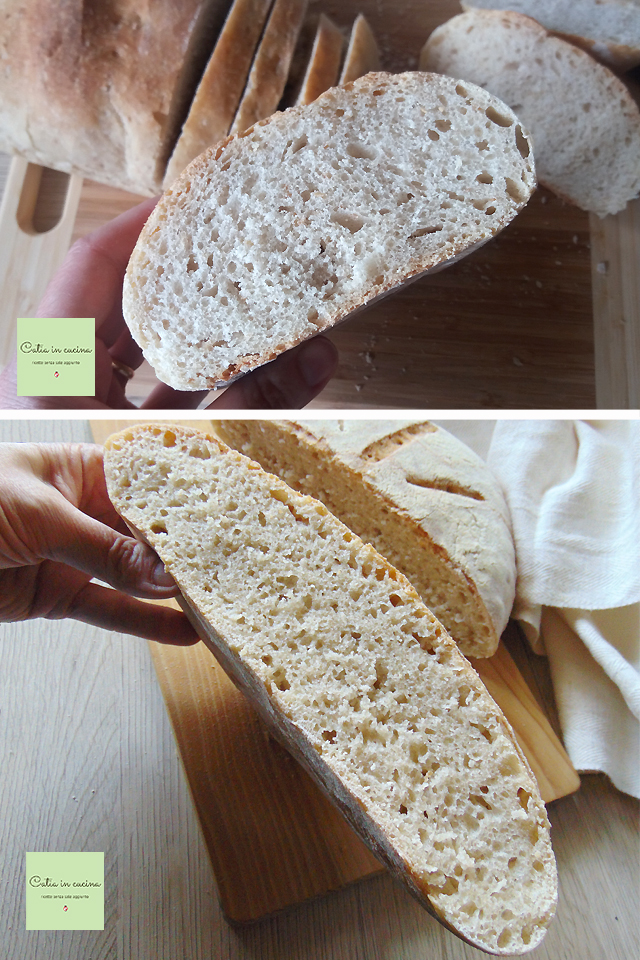
I’ve read somewhere that it is advisable to slice it only after cooling, and I have always followed this rule, except… when I couldn’t resist 😀 for example with the last bread, the one that so far has come out with the crumb we liked the most:
Well, I think I have really told you everything, hoping it can be useful to you, about my production of hand-kneaded bread with autolysis and licoli.
It’s true, my mini oven is decidedly undersized, and I never would have thought it could be suitable for baking bread, but in the end, it’s doing quite well. We like my bread, so… come on, make it too! Dive into this fantastic world of homemade bread!
If you think you don’t have the right oven, if you think you don’t have manual skills, if you think you don’t have time… don’t worry and try it anyway!Look at the following photos, they show the evolution of my bread, from the very first slice to the last.
The ‘holes’ have evolved, improving with each loaf, and the baking has improved because each time I understood how to interact with my mini oven. You’ll see it will be the same for you. 🙂
The first bread (first of the two following photos) I made a small size, specifically to test the baking. With the second loaf, I realized that the mini oven could handle even half-kilo loaves.
I like baguettes, they work well in the mini oven.
In the second of the next two photos, you can see that the baking wasn’t well done, there’s also a crust separation due to, perhaps, though I’m not sure if it’s for that, not optimal folds or shaping.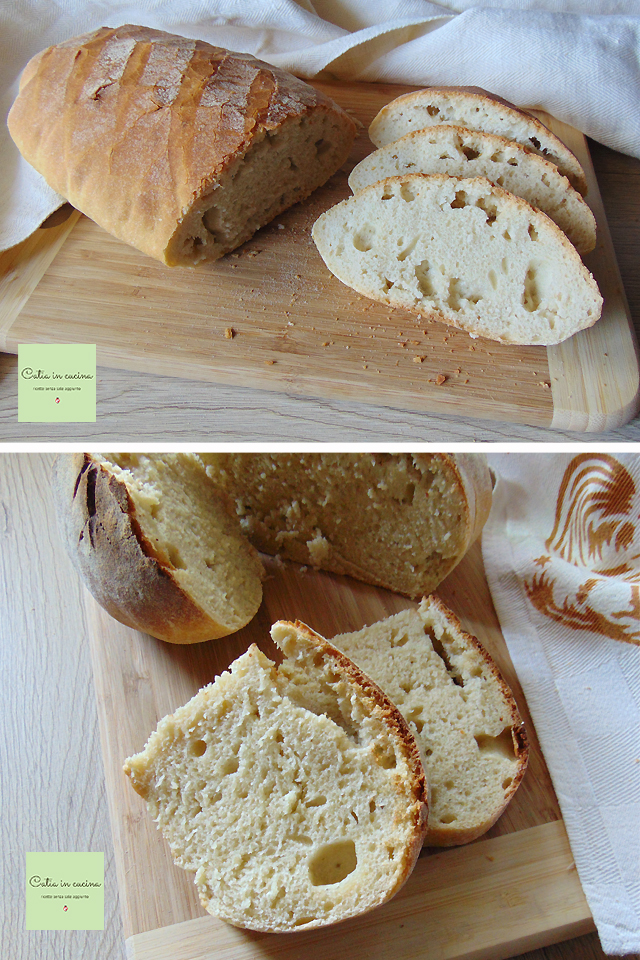
With these two breads, I began to understand that maybe I was on the right track:
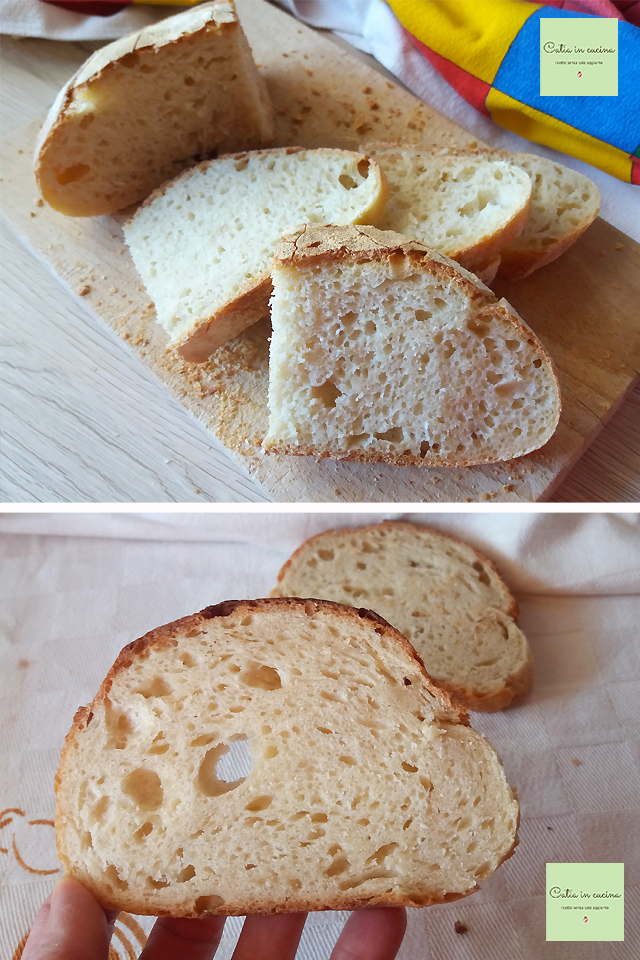
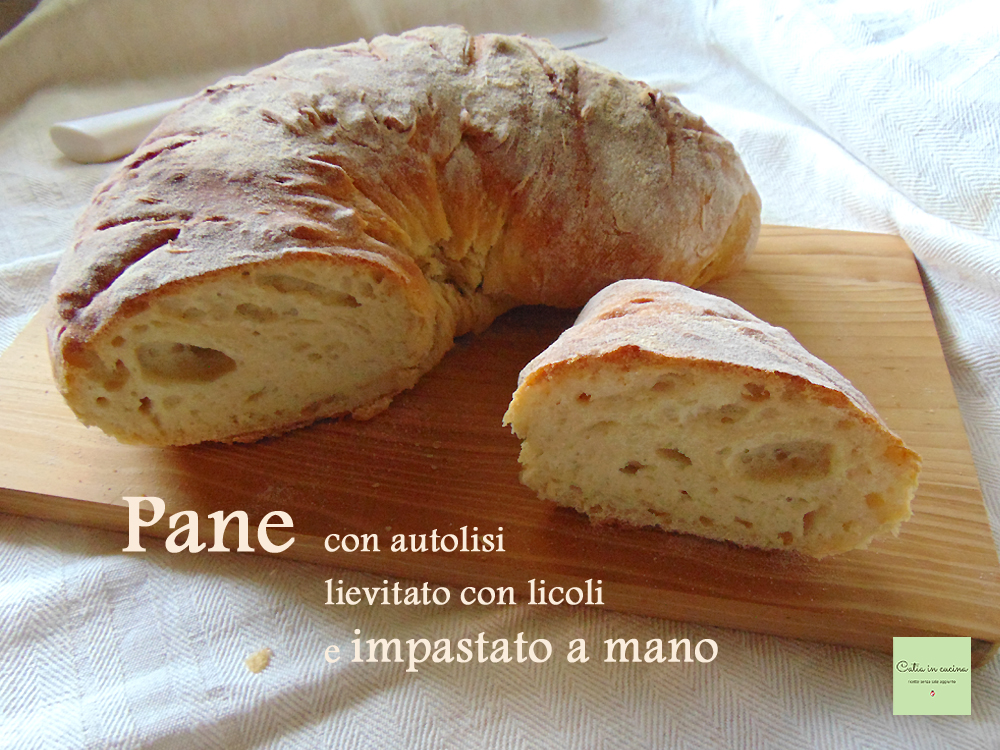
And here’s the last one. The shape isn’t perfect, the loaf was too long and didn’t fit in the mini oven! And so I bent it in a half-moon.
But the outer appearance doesn’t matter, right? 😀
Advice, Thanks, and…
 Naturally, my bread with autolysis and licoli cannot be anything other than a no-salt bread 🙂
If you have landed on this blog by chance and do not yet know that all my recipes are without added salt, well, you can still use my recipe by adding salt (remember to dissolve it first in some of the water).
But it is my duty to advise you to limit salt to a minimum, unfortunately, most of the bread and other bakery products you buy contain much more salt than necessary, so limiting its use at least in homemade bread is a good and just thing. 🙂
Enjoy!
I warmly thank my friend and fellow blogger Deborah (blog Gusto Sano) for helping me during some crucial phases of this bread-making journey of mine, with advice on folds, flours, baking, sending me videos, and analyzing photos of my failed attempts. Thanks, Debby! 🙂
…and I look forward to seeing you on social media!
A warm greeting to all of you who have read to the end! 😀
Now I also await you on the Facebook page, on Pinterest and in my beautiful group 😉 -> Catia’s group, in the kitchen and beyond
And now… the news of all news… you can also find me on Instagram and you can subscribe to my new WhatsApp channel. Looking forward to seeing you!
