Today’s topic is: how to make kefir cheese. Homemade, of course.
Don’t be intimidated by the name, it is simply a fresh spreadable cheese (which, if you are not familiar with kefir, you can also make with natural yogurt).
If your kefir grains are healthy and produce kefir abundantly, you’ve probably wondered at some point, “What do I do with all this kefir?” Even those who consume it regularly might not always be able to eat (or drink) all the production, so excess kefir eventually happens to everyone.
There are many options for using this inevitable surplus: milk kefir can be used in any recipe that calls for yogurt or milk, such as cake or pastry doughs, or it can be used instead of cooking cream, or it can be used to thicken risotto… so many uses indeed.
But if you need to dispose of a larger quantity than a cake or a thickening would require, the best way is to make cheese.
Cheese that we can call by its precise name of kefir cheese, or more generally fresh cheese, creamy, spreadable, homemade, little cheese, or also… cheeselet 😀 yes yes, we call it that (and yes, I know it’s a bit funny but hey, every family has its traditions!).
This beautiful and good homemade cheeselet… 😀 can be left plain – exactly like this spreadable I made when I didn’t yet know my homemade yogurt was kefir – or it can be enriched with flavors.
Today I offer you two versions:
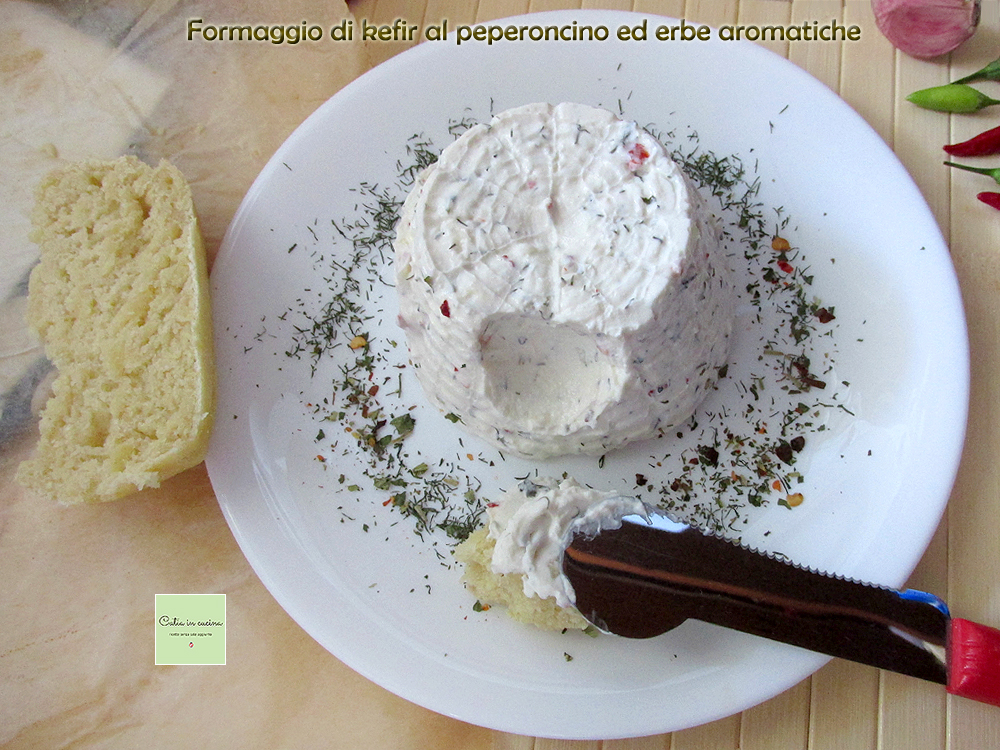
Kefir cheese with chili pepper and herbs (and garlic),
and kefir cheese with chives, the two versions I make most often.
But consider them only a starting point. They’re a couple of ideas that can be varied to taste both in proportions and ingredients.
And I recommend trying a third version, the one with chopped olives, which I couldn’t photograph but I assure you is really good. 😉
〰 〰 〰
My other homemade cheesy productions:
- Difficulty: Easy
- Cost: Economical
- Rest time: 1 Day
- Preparation time: 5 Minutes
- Portions: 2
- Cooking methods: No cooking
- Cuisine: Healthy
- Seasonality: All seasons
Ingredients
- milk kefir (homemade)
- dried herbs (dill, oregano, basil and mint)
- garlic
- hot chili pepper
- chives (fresh)
Tools
- 1 Napkin fabric
- 1 Container narrow and tall
- 1 Sieve
- 2 Skewers
- 1 Container perforated (fuscella)
Procedure
☝ First of all, I renew my recommendations regarding the napkin. Even if I had already mentioned it in the homemade spreadable cheese article, I want to repeat these recommendations: the napkin must be clean but must not have detergent or softener residues. My advice is to wash it separately, by hand, not in the washing machine with the rest of the laundry, and to boil it for a few minutes before each use.
Compared to the procedure I illustrated in the spreadable article, recently I have experimented with a different dripping method: instead of letting the kefir drain on a sieve, I have been using the hanging napkin method. There is no difference in the final result, but I mention it so you can choose the method you prefer, or that is more convenient depending on the equipment you have in your kitchen.
Here is my hanging napkin, closed with a bag clip in which I inserted two skewers:
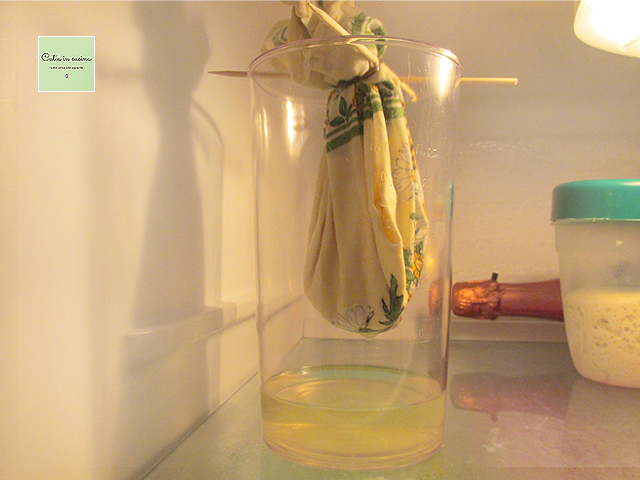
(Ahhh, I know that bottle neck in the background is a bit funny, but when I took the picture, I didn’t really notice! Haha! But I am pleased that you can see in the background my sourdough starter, a production I am very proud of and will talk about later!)
But back to us.
The whey that collects at the bottom should definitely not be thrown away! It’s rich in all the properties of kefir and can be drunk as is or added to juices and smoothies, or used in cooking, for example in dough instead of water or milk to make focaccia, bread, or pizza dough.
Naturally, before you manage to hang the napkin, you will still need a sieve on which to place the napkin and into which to pour the kefir. A support base (i.e., the sieve, because the whey starts dripping immediately) is essential during the napkin closing phase.
Tie the ends of the napkin with a bag clip, or a string or twine, whichever you prefer, in which to insert the sticks, which will be used to hang the bundle, as seen in the photo.
Refrigerate. It’s important that the dripping occurs in the fridge because outside the fridge, kefir “matures” quickly, and the characteristic acidic note of kefir could become too harsh, which would require stopping the dripping process before the time needed to obtain cheese compacted to the right point.
Let it drip for about 24 hours. Already after 12 hours, your kefir cheese will have lost most of the whey, but for it to be as compact as possible, I recommend extending it even beyond 24 hours. When you notice that the hanging drop on the napkin has been gone for a while, there, your spreadable kefir cheese will be ready.
All that remains is to open the napkin and collect your beautiful cheese with a spoon or a spatula.

At this point, you move on to flavoring: add the chopped chives, chili pepper, herbs (whichever you like), minced garlic, mix and store in a closed container. Let it rest and flavor for at least a few hours, but even until the next day.
If you want to give your cheese a “real” cheese shape, you can put it in an old ricotta container.
Admit it, you always keep the ricotta baskets, just in case they might come in handy someday… and today they do. 🙂 In any case, if you don’t have them, they are available in various sizes and shapes, for instance –> these
Resting in the basket, the cheese will lose even the last residual drops of whey.
When you serve it, it will make a great impression. 😋
Salt-Free Tips
 Naturally, my kefir cheese is without salt. For those of you who want to salt it, I believe – I believe, not having tried this myself – that salt can be added to the kefir either before dripping (in this case, I think the whey will also be salty) or to the spreadable cheese during flavoring. I do not know, however, if it alters the final structure of the cheese or if it prolongs or shortens the dripping time. If you try this (and if you can, i.e., if salt hasn’t been banned from your table), let me know your findings, write to me! I will read your comments and opinions with great interest, which I believe can be helpful to all of us, low-sodium and not. 😀 Thank you!!
Enjoy your kefir cheese!
If you want to learn more about kefir and my kefir recipes click HERE to access the page dedicated to collecting all my recipes with kefir.
Below are my usual low-sodium tips in a nutshell:
If you are interested in reducing or eliminating salt, always remember to:
▫ Gradually decrease the salt, the palate needs to gradually get used to it and should not notice the progressive reduction.
▫ Use spices. Chili, pepper, curry, nutmeg, cinnamon, cloves, cumin…
▫ Use herbs. Basil, parsley, oregano, thyme, sage, marjoram, rosemary, mint…
▫ Use seeds. Sesame, pine nuts, almonds, walnuts…
▫ Use spicy vegetables or fruits. Garlic, onion, lemon, orange…
▫ Use my salt-free vegetable granules
▫ Prefer fresh foods.
▫ Avoid cooking in water, prefer cooking methods that do not disperse flavors (grill, foil, steam, microwave)
▫ Avoid bringing the salt shaker to the table!
▫ Sometimes allow yourself to break the rule. It’s good for the mood and helps to persevere.
If you don’t want, or can’t, give up salt:
▫ You can still try my recipes by salting according to your habits.
Follow Me!
In my new WhatsApp channel and on Instagram, on Facebook page and Pinterest boards, in my two groups: Catia’s group, in the kitchen and beyond and Just what I was looking for! and if you want… subscribe to my Newsletter.
In my new WhatsApp channel and on Instagram, on Facebook page and Pinterest boards, in my two groups: Catia’s group, in the kitchen and beyond and Just what I was looking for! and if you want… subscribe to my Newsletter.
