I tried making the kefir cheesecake in a glass. 😊
This is the second recipe I propose to use kefir in a dessert, and it is a variation of this recipe. Or maybe not… actually, the truth is that these are two recipes I made the same day, and they are the result of two different kefir productions: the “yogurt”, i.e. the simple strained kefir, and the spreadable cheese.
As you already know, I discovered kefir recently; I shared this discovery and my doubts (is it kefir or not? 😅) in this article and then my certainties in this one. 😉 Now I’m really satisfied. It’s satisfying to produce something you know is healthy and full of beneficial properties. It’s gratifying to see that over time the quality of the production improves. I like to use kefir not only as a drink or as a yogurt (i.e. eaten with a spoon instead of classic yogurt), but also as an ingredient in both sweet and savory recipes.
The spreadable cheese is the origin of it all. My homemade production of spreadable cheese began long before I realized that the yogurt I was producing was actually kefir. Now that I’ve given myself permission to call it kefir cheese (as I clarified at the end of the article about the spreadable cheese), it seems fair and right to present this small kefir cheesecake-in-a-glass experiment.
☝ I remind you that the spreadable cheese can also be made with traditional yogurt (plain, homemade or purchased), so this kefir cheesecake can easily be prepared with fresh spreadable cheese made from yogurt. It will probably — in fact, certainly — have a different aftertaste, since kefir gives a slightly tangier flavor.
But if you landed on this recipe looking for kefir recipes, well then you surely already know kefir and its more-or-less tangy flavor — which is precisely what we kefir lovers enjoy. If you’re not yet a fan, I’m sure you can become one! It happened to me. If kefir is new to you, I refer you again to this article, where I explain how I discovered kefir and give some information about its nutritional properties and the differences between kefir and yogurt.
And now, after all these necessary explanations, here is the recipe, in which you will also find the story of how I tried to make the recipe as light as possible. Do you think I succeeded? Yes, well, more or less! 😄
✺ ✺ ✺
- Difficulty: Easy
- Cost: Inexpensive
- Rest time: 2 Hours
- Preparation time: 20 Minutes
- Portions: glasses: 6
- Cooking methods: No-bake
- Cuisine: Healthy
- Seasonality: All seasons
Ingredients
- 8 oz spreadable cheese (kefir-based) (homemade)
- 1/3 cup powdered sugar
- lemon zest (or alternatively vanilla powder)
- 1/2 cup dry cookies
- 3 1/2 tbsp butter
- 3 tsp hazelnut crumble (to add to the cookies)
- 3 tsp hazelnut crumble
- 1/2 cup dry cookies
- 3 1/2 tbsp butter
- 1 peach (small, or half if large)
- 1 slice melon (small)
- sugar (1-2 teaspoons per glass)
- hazelnut crumble (alternative to the fruit)
Tools
- Small bowls
Steps
To obtain the kefir cheesecake in a glass you first need to make the kefir spreadable cheese (or use yogurt-based spreadable cheese).
👉 Of course you can also use store-bought spreadable cheese, which will perform differently since packaged products usually contain salt (like most packaged items).
Flavor the spreadable cheese with grated lemon zest or a packet of vanilla powder.
Add the powdered sugar and stir with a spoon until the powdered sugar is dissolved.
Crumble the cookies or crush them with a glass (or with a meat tenderizer), moisten them with melted butter. (*)
Add the hazelnut crumble.
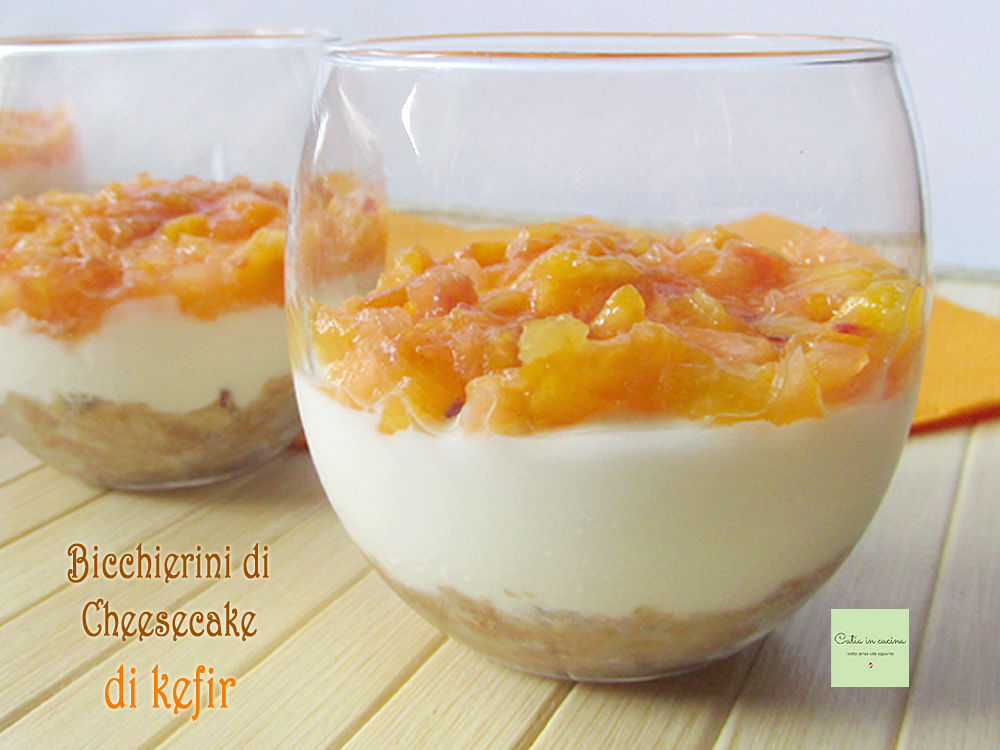
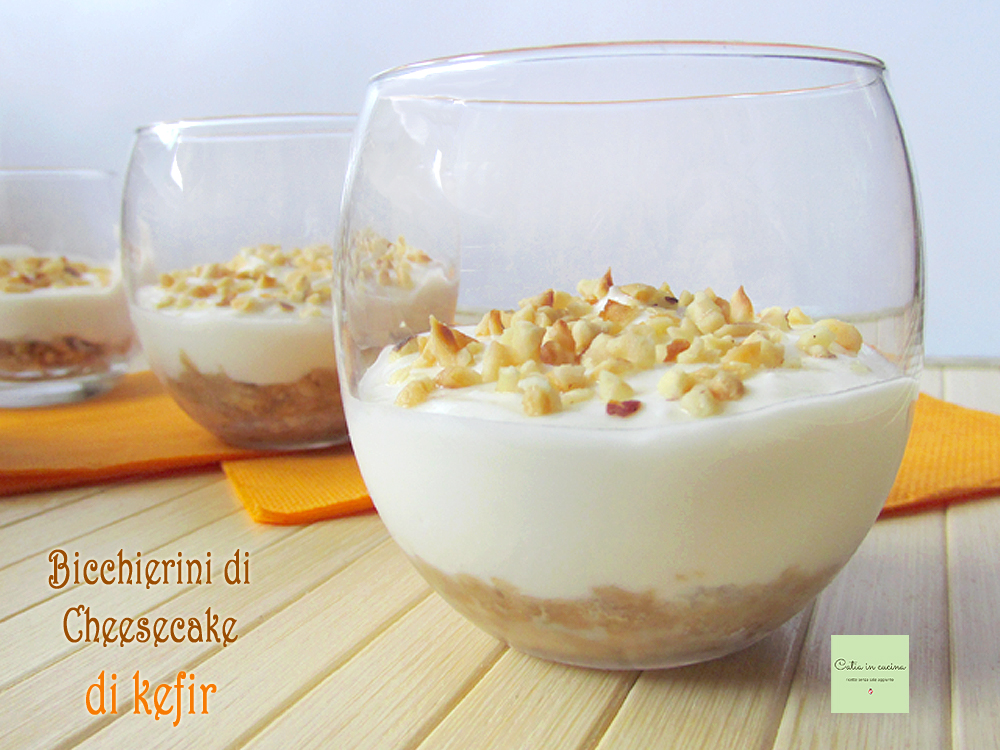
Place a layer of moistened cookie crumbs on the bottom of each glass. One or two teaspoons.
Pour in the sweet kefir cheese cream.
👉 As indicated in the ingredients, I used 220 grams of spreadable cheese. That’s what I had, because when you make it at home it’s hard to know in advance the final weight. Anyway, even if about 36.6 grams (~1.3 oz) per small glass (ehhh, says the calculator!) may seem little, in the end I got 6 small glasses suitable as an after-meal dessert. Of course, choosing the size of the glass is a very personal matter! 😃
Decorate as you like with more hazelnut crumble.
Or with fresh fruit, either puréed or chopped with a knife.
For the fruit topping I tried a mix of melon and peach, both in a sugared version (with a couple teaspoons of sugar per glass) and in a natural fruit version. Both are excellent.
Place the small glasses in the fridge for a few hours before serving.
What do you say kefir lovers, do you want to try this kefir cheesecake in small glasses (either in the “regular” version or a light version, i.e. without butter and with unsweetened fruit)? 😍 Enjoy!!!!
(*) Okay, I’ll be honest: with butter the cookie base has a better texture; milk softens the cookies a bit too much. I also tried using half the butter, but it wasn’t enough to properly moisten all the cookies (although it’s a valid option for those who need to limit fat and calories). In any case, 50 grams (~1.8 oz / about 3 1/2 tbsp) is really little for 6 small glasses. That’s why I tried using milk instead of butter: I got obsessed with wanting to achieve a light, diet-friendly cheesecake — so far I’ve only found buttery, creamy cheesecakes! I know I can do it! 😄
Follow me!
On the WhatsApp channel and on Instagram, on my Facebook page, on Pinterest, in my two groups: Il gruppo di Catia, in cucina e oltre and Proprio quello che stavo cercando! — and if you like… subscribe to my Newsletter
On the WhatsApp channel and on Instagram, on my Facebook page, on Pinterest, in my two groups: Il gruppo di Catia, in cucina e oltre and Proprio quello che stavo cercando! — and if you like… subscribe to my Newsletter
