Today I won’t just talk about a historic recipe for making excellent milk rolls.
I’ll also tell you why simple milk rolls are the perfect recipe to celebrate a year of blogging.
Exactly a year ago, on February 23, I published my first recipe. To be honest, the official opening of the blog was a week before, a week during which I didn’t know how to handle a blog, how to publish a recipe, and especially, how to photograph a dish. I still have a lot to learn, especially… I think I need to learn how to photograph rolls! 😀
Although… looking back at my first photo… well, I allow myself a little bit of satisfaction. 🙂
I love having this blog. I love writing recipes. I love writing about all the things I write before, during, and after the recipes. And fortunately, many of you like it too. 🙂
I love cooking and, above all, experimenting. I love inventing recipes and trying out other people’s recipes, I love revisiting recipes I’ve tried in restaurants or eaten at friends’ houses, my mom’s, from books, magazines, and other blogs.
And it’s thanks to another blog and the blogger who writes it, and her milk rolls recipe, that I started this blog. 🙂
Here’s the story. No, I’m not going to spare it.
I’ve talked several times about my recipe collections.
You already know, I think, that I have a couple of handwritten notebooks decades old, a binder with computer-written and printed recipes, my first technological attempt, and now, for a couple of years, I’ve had all my recipes stored and divided into files.
Before that, that is, before dividing the recipes into separate topic-based files (meaning one for first courses, one for second courses, one for risottos, one for focaccias, one for vegetarian recipes, one for baked desserts, one for… imagine them, all other topics!), I had a single file, created on a specific day that I’ll tell you about later, where I inserted in chronological order all the recipes found online: when I found a recipe that interested me, I copied and pasted it to the end of the last one, sweet or savory.
At the time of creating this collection, I saved the file with the name of the very first recipe entered: you know how it works with Word, right? When you want to save a new file, if you don’t give it a name, the program automatically inserts the first words present in the document, and if you don’t change the name, the file takes that title.
That’s how it happened, and the document, my recipe collection, took the title “Milk and Honey Rolls,” the very first recipe saved in that file.
The recipe for those milk and honey rolls was taken from a cooking blog of a girl from Fano who inspired me with her friendliness. Back then, besides cooking, she painted and also had a painting blog, and the fact that she had two blogs simultaneously fascinated me. I was already toying with the idea of starting my blog at the time, but it took me nearly seven years to muster the courage to do it!
And this courage began to take shape suddenly about a year ago, thanks to a chickpea recipe. Don’t laugh! That’s exactly how it was!
I was looking for chickpea recipes, and that’s when I stumbled upon, after years of oblivion, the blog that I’m about to mention to you.
I know, someone has surely already recognized it, it’s the blog Nella cucina di Martina. That day a year ago, rediscovering Martina’s blog was enlightening, it awakened old thoughts in me… and impulsively I contacted her. Martina’s friendly and encouraging response spurred me on, and shortly after I opened my blog, which you’re reading.
That document, that recipe file titled Milk and Honey Rolls that I just told you about, and which I still keep in my backups, has a creation date that I checked a few days ago and when I saw it, it made me smile: July 8, 2007. Prehistory!!!
Here’s the original recipe from Martina here, even though now the title is no longer “little rolls.”
My milk rolls, on the other hand, I’m going to tell you about now.
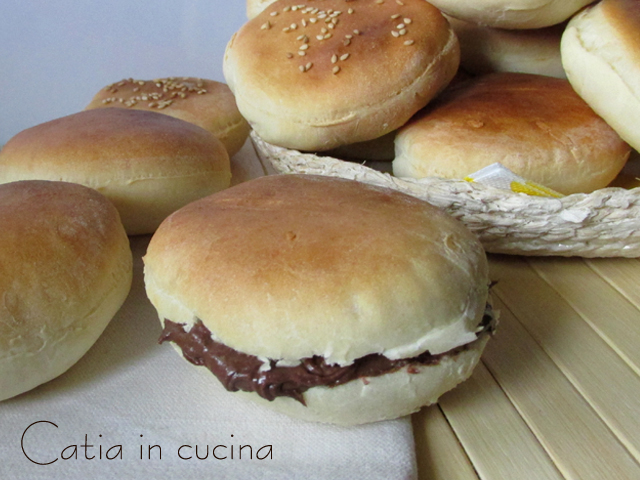
They are perfect for breakfast filled with hazelnut cream or jam. You can enrich them with chocolate chips or raisins, or with nuts, sesame seeds, poppy seeds, or whatever you prefer because they are excellent in both sweet and savory versions (even without salt 😉). Sometimes I make them mini, perfect for appetizers. Other times, or rather often, I use them as buns for hamburgers.
In short, these milk rolls are suitable for all occasions.
〰 〰 〰

- Difficulty: Easy
- Cost: Economical
- Rest time: 3 Hours
- Preparation time: 15 Minutes
- Portions: 15 Pieces
- Cooking methods: Oven
- Cuisine: Italian
- Seasonality: All Seasons
Ingredients
- 4 cups all-purpose flour
- 1 cup milk (up to 1 1/8 cups, adjust based on the absorption of the flour used)
- 2 teaspoons honey (heaping)
- 2 tablespoons vegetable oil (corn or sunflower)
- Half cube fresh yeast
Tools
- Bowl
- Baking Tray
- Cookie Cutter
- Parchment Paper
Steps
Dissolve the yeast and honey in warm milk.
Place the flour in a large bowl. Add the milk (in which the yeast and honey have dissolved) and the oil.
Mix with a spoon, then knead with your hands and work vigorously as you normally do for bread dough.
Let it rise until it doubles in volume (2 to 3 hours).
Roll out the dough with a rolling pin, leaving it rather thick, and cut round shapes using a glass or a cookie cutter. This way you get rolls similar in shape to hamburger buns.
Otherwise, you can form simple buns with your hands.Whatever shape your milk rolls are, place them on a baking tray lined with parchment paper, moisten the surface with milk, and let them rise again for 20-30 minutes inside the oven.
Bake for about 15 minutes at 390°F.
Hello Martina! 🙂
Thank you.
Thanks to those who helped me at the beginning and continue to do so now, because I really have so much to learn.
Thanks to anyone who passed by here even just once.
Thanks to everyone who chose to return.
Thanks to those who contacted me and thanks to those who remained silent.
Thanks to the bloggers with whom I formed virtual friendships and whom I hope to meet in person one day.
Thanks to my husband.
Thanks to my children.
Thanks to everyone from the heart.
😀
Unsalted Tips
![]() Now, even if this is a special recipe, I can’t conclude without reminding you that the main feature of my recipes is the absence of added salt.
Now, even if this is a special recipe, I can’t conclude without reminding you that the main feature of my recipes is the absence of added salt.
Those who’ve followed me for a year surely already know, and now those who’ve arrived here for the first time also know: every one of my recipes concludes with my unsalted tips below.
If you were surprised and wondered why this “oddity” of mine, you can find out more by reading my article Cooking without Salt.
If you’re interested in reducing or eliminating salt, always remember to:
▫ Gradually reduce salt, the palate needs to get used to it slowly and shouldn’t notice the progressive reduction.
▫ Use spices. Chili, pepper, curry, nutmeg, cinnamon, cloves, cumin…
▫ Use aromatic herbs. Basil, parsley, oregano, thyme, sage, marjoram, rosemary, mint…
▫ Use seeds. Sesame, pine nuts, almonds, walnuts…
▫ Use spicy vegetables or fruits. Garlic, onion, lemon, orange…
▫ Use my unsalted vegetable granules and gomasio.
▫ Prefer fresh foods.
▫ Avoid cooking in water, prefer methods that do not disperse flavors (grill, foil, steam, microwave)
▫ Avoid bringing the salt shaker to the table!
▫ Occasionally allow yourself a break from the rule. It’s good for the mood and helps to persevere.
If you don’t want to or can’t give up salt:
▫ You can still try my recipes by salting according to your habits.
Follow Me!
On the WhatsApp channel and on Instagram, on the Facebook page, on Pinterest boards, in my two groups: Catia’s group, in the kitchen and beyond and Just what I was looking for! and if you like… subscribe to my Newsletter
On the WhatsApp channel and on Instagram, on the Facebook page, on Pinterest boards, in my two groups: Catia’s group, in the kitchen and beyond and Just what I was looking for! and if you like… subscribe to my Newsletter
