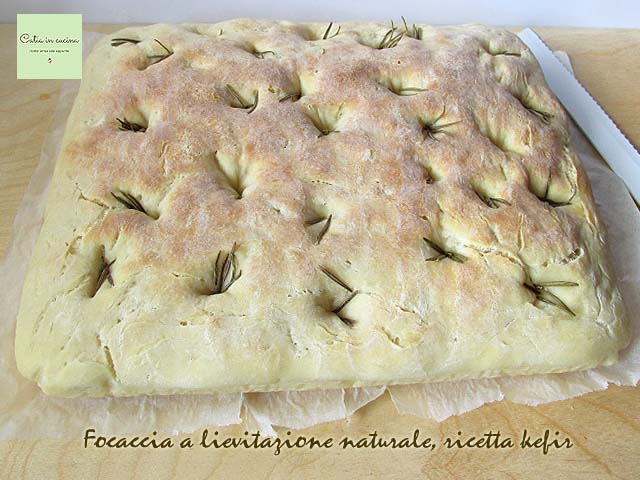
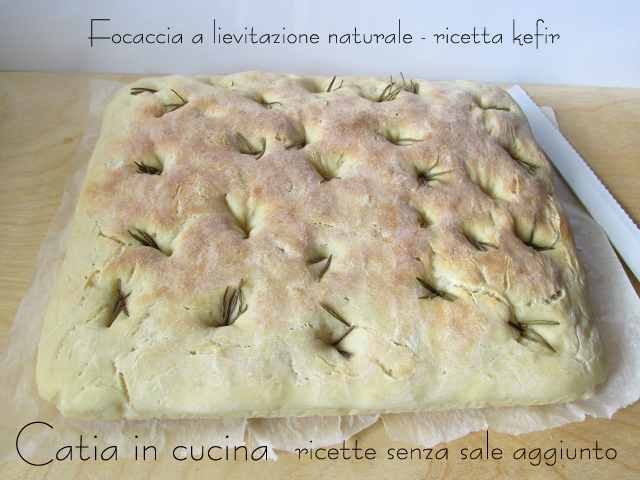
With great pleasure today I present my first naturally leavened focaccia.
I’m super happy, this focaccia, the very one I show you in the photo right away, is the result of my first attempt to produce a leavened dough without baker’s yeast, and I succeeded greatly. 🤩
I move right away to the thanks, because they are deserved. 🙂 I thank Maria Giovanna from the blog Stella senza glutine, thanks to the recipe of this bread of hers I decided to embark on this experimentation. And I did very well!
Since I started producing my leavened goods this way, I’ve really understood what the difference is. Certainly, I do not renounce the use of baker’s yeast (also because for a long time I have been using only half the dose compared to what I used to do years ago, and this already makes the leavened goods better); I continue to maintain that baker’s yeast gives good results with reasonable leavening times because sometimes there simply isn’t time to wait for long leavening. But I have to admit that seeing a dough grow without having used yeast is quite satisfying. 😊 In the end, organizing the leavening times well isn’t demanding. And if I changed my mind, being a supporter of quick recipes, you can indeed try too!
As you already understood from the title, this dough leavens thanks to a starter (pre-ferment) prepared with homemade milk kefir and flour. And the result is a super soft dough.
Get ready because I intend to show you little by little my entire bread-making evolution! After this focaccia, I also produced various types of bread, always with natural leavening, of which I can’t wait to share here photos and recipes! (Update: here it is, HERE the new article).
〰 〰 〰
Below I’ll add 3 more recipes made with kefir (another leavened focaccia + two delicious recipes: 👇
- Difficulty: Easy
- Cost: Very cheap
- Rest time: 20 Hours
- Preparation time: 15 Minutes
- Portions: 4 slices
- Cooking methods: Oven
- Cuisine: Italian
- Seasonality: All seasons
Ingredients
- 1 1/4 cups all-purpose flour
- 2/3 cup milk kefir (i.e., the product of draining)
- 1 tsp honey
- the obtained starter
- 3 1/2 cups all-purpose flour
- 1 cup of water (warm)
- 2 tbsps extra virgin olive oil
- rosemary (or other aromatic herb to taste)
Tools
- Container / Pitcher
- Plastic Wrap
- Bowl
- Baking Pan
- Parchment Paper
Steps
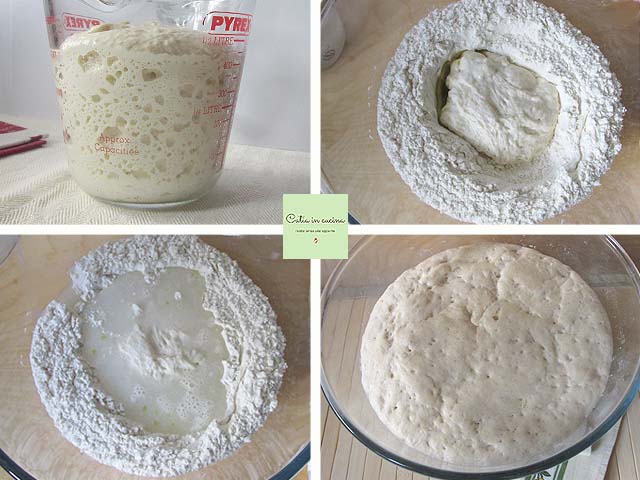
First, prepare the starter by mixing the flour with the homemade milk kefir and adding a teaspoon of honey.
Let it rest for 12 hours at room temperature in a sheltered place with the jar covered with plastic wrap (as I always do with my leavened goods, I put the container inside the microwave, in this case the plastic wrap is not essential).
👉 Use a container that is at least twice the size of the initial mixture because it doubles in volume during fermentation. You will notice the presence of bubbles in the mixture, indicating fermentation has occurred.
After about 12 hours, the volume doubling will have occurred.
☝ If not, wait a few more hours (but I have always found the starter doubled after no more than 12 hours). In any case, if you don’t have time, at the end of the 12 hours or if you forget it (it happens!) nothing will happen if the time is extended, it will simply continue to ferment and increase in volume. 😉
In a bowl, pour in the flour, the starter, the oil, and the warm water.
Work with your hands and knead as you would with any dough.
😊 If you have a stand mixer or kitchen robot with a dough hook, use them if it is your habit. Lately, I often knead in the evening when my children are already asleep, so I got into the habit of not turning on appliances to avoid noise, and knead by hand. It gives me a lot of satisfaction, both in making and in the results.
Let the dough rise in the bowl until doubled, it may take a few hours, in the specific case of this focaccia I let it rise overnight.
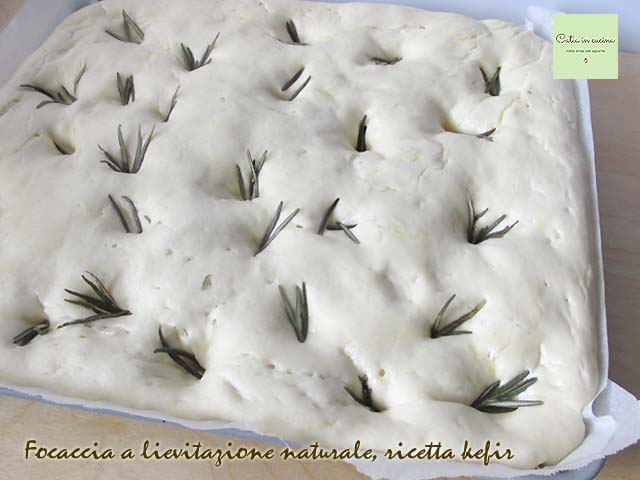
Transfer the dough onto a baking sheet or tray lined with parchment paper, spread it with your hands, moisten the surface with an emulsion made with a tablespoon of water and one of oil and let it rest for an hour or two before baking.
💪 An hour or two, it’s true, is not an exact time to the minute 😌 but you can see with the eye when the dough has grown enough to be baked 😉).
The dough is extremely soft. Before baking, I decorated the surface of this naturally leavened focaccia with rosemary, pressing it with the fingertips, the rosemary sank into the dough. It was so delicate to touch with fingers!
I really hope that by looking at the photo, you can understand how soft this dough is!
Bake at 356-392°F for 20-25 minutes.
👉 I deliberately used a small pan (my inseparable 9.8×11.8 inch pan) because I wanted to achieve a rather high focaccia, but with this dough, you can easily use a normal oven tray and still obtain a good thickness for a focaccia or a pan pizza.
Salt-Free Tips
![]() This naturally leavened focaccia is also without added salt. If you want to add it… you can do it, I won’t stop you 😌 but in this case do it during the second phase, don’t put it in the starter. However, it’s my duty to invite you… at least to try… reducing salt in your preparations. You could start by reading the brief salt-free tips listed below. 😉
This naturally leavened focaccia is also without added salt. If you want to add it… you can do it, I won’t stop you 😌 but in this case do it during the second phase, don’t put it in the starter. However, it’s my duty to invite you… at least to try… reducing salt in your preparations. You could start by reading the brief salt-free tips listed below. 😉
If you’re interested in reducing or eliminating salt, always remember to:
▫ Decrease salt gradually, the palate needs to get used to it slowly and should not notice the gradual reduction.
▫ Use spices. Chili, pepper, curry, nutmeg, cinnamon, cloves, cumin…
▫ Use aromatic herbs. Basil, parsley, oregano, thyme, sage, marjoram, rosemary, mint…
▫ Use seeds. Sesame, pine nuts, almonds, walnuts…
▫ Use spicy vegetables or fruits. Garlic, onion, lemon, orange…
▫ Use my salt-free vegetable granules and gomasio.
▫ Prefer fresh foods.
▫ Avoid cooking in water, prefer cooking methods that do not disperse flavors (grilling, en papillote, steaming, microwave)
▫ Avoid bringing the salt shaker to the table!
▫ Occasionally allow yourself a cheat day. It boosts morale and helps perseverance.
If you don’t want to, or cannot, give up salt:
▫ You can still try my recipes by salting according to your habits.
Follow Me!
On the WhatsApp channel and on Instagram, on the Facebook page, in Pinterest, in my two groups: Catia’s group, in the kitchen and beyond and Just what I was looking for! and if you like… subscribe to my Newsletter
On the WhatsApp channel and on Instagram, on the Facebook page, in Pinterest, in my two groups: Catia’s group, in the kitchen and beyond and Just what I was looking for! and if you like… subscribe to my Newsletter
