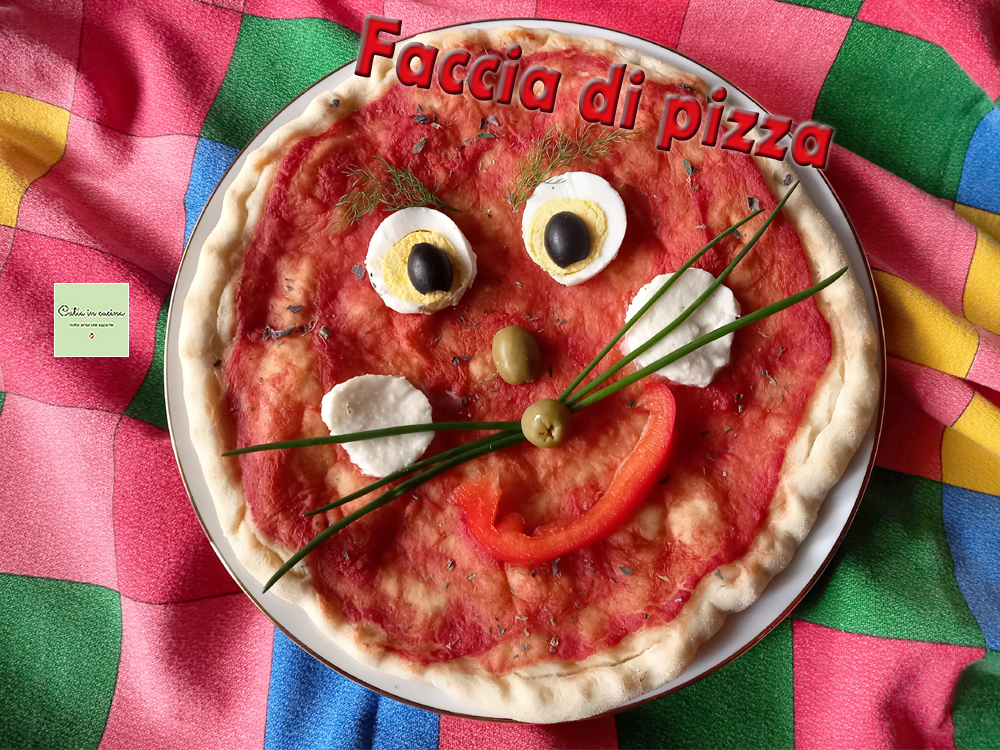
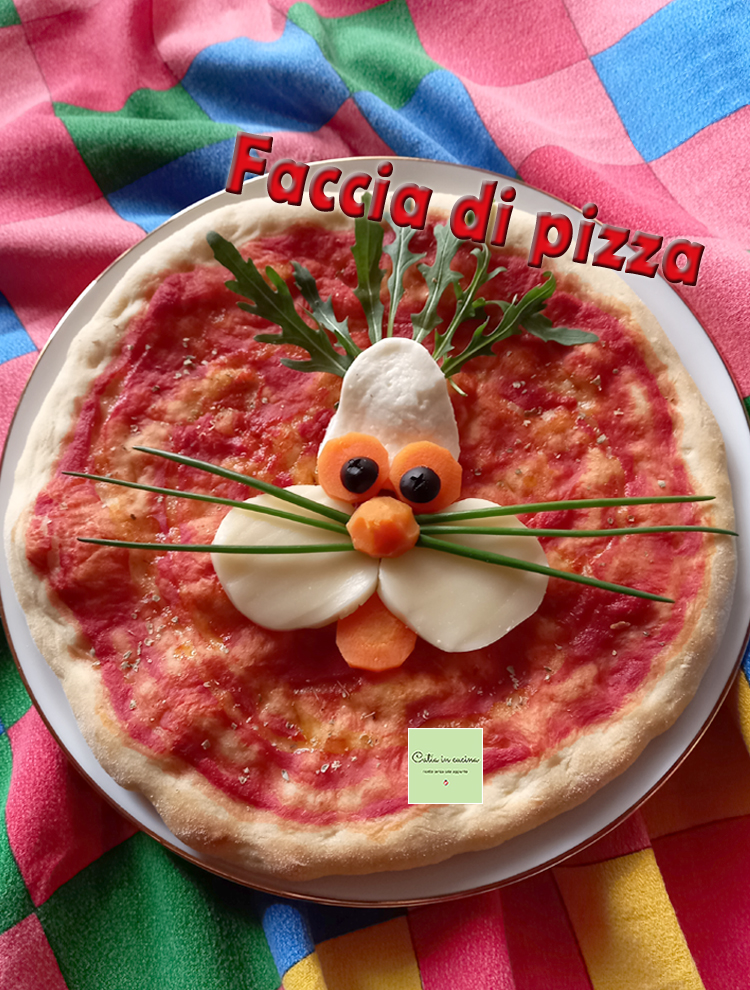
Pizza Face 😜🍕 is a fun idea to prepare for (and with) children, inspired by a children’s cookbook, Cream Face, that I bought when my kids were still in elementary school. It’s a beautifully illustrated book that we liked so much that we bought a second copy to gift to Flavia’s classmate, and I fondly remember that at the time it was used as inspiration for a themed dinner of decorated pizzas + pajama party among girls (ahhh the beautiful childhood memories of our children! 🥰).
Searching for it on the internet for this recipe, I saw that now it (and I must say inevitably) is only found in the used market, and I wonder if it has become a collector’s item given the prices it reaches 😵 (and to think that I found it among the remainders at the time!). But perhaps the reason lies in the happy combination of La Cucina Italiana’s expertise and the iconic figure of Geronimo Stilton, the journalist mouse who was very popular with children back then (is it still?), and Flavia was one of those avid readers of those fantasy adventures (to my great joy! How wonderful are children who love to read!).
But, um, I’m digressing, as always when there are books involved. 🤭 Let’s get to today’s recipe!
Which is more of a non-recipe, or rather a mini-collection of tips for decorating the pizza in a playful way, and especially easy, so the decorations can also be created with children, to get them involved and have fun in the kitchen.
These are toppings made with few and simple ingredients, which can brighten up your pizza Saturdays, or a birthday, or entertain your kids’ friends during afternoons at home, and then offer them the snack prepared with their own hands.
And since tomorrow is Mardi Gras, let’s turn the pizza faces into a Carnival recipe! Prepare them for tomorrow’s masquerade party! 🎉
Moreover, today they are my “cheerful dishes” proposal for Light and Tasty 😊
〰 〰 〰
Looking for decorated recipes? Here are some other ideas: 👇
- Difficulty: Easy
- Cost: Economical
- Preparation time: 30 Minutes
- Portions: 4 pizzas
- Cooking methods: Oven
- Cuisine: Creative
- Seasonality: All seasons
Ingredients
☝ For the decoration ingredients, I don’t indicate weights, as they are minimal and can be substituted as needed. Example: if you don’t want to boil an egg for just two slices, you can make the eyes with two slices of mozzarella or two slices of carrot or cucumber. 😉
- 2 cups all-purpose flour
- 2 cups semolina flour
- 2/3 cup liquid sourdough starter (licoli)
- 1 cup water
- tomato sauce (about 3 tablespoons for each pizza)
- carrots
- mozzarella
- provola (or similar cheese)
- black olives
- green olives
- bell pepper
- chives
- arugula
- wild fennel (or fennel tops)
- hard-boiled egg
- extra virgin olive oil
Tools
- Baking Tray for pizza
- Knife
- Immersion Blender
- Bowl
Steps
In a bowl, dissolve the liquid sourdough starter in the water, add the flours and mix.
Knead by hand directly in the bowl until a firm dough is obtained.
Lightly grease the bowl and cover it with a plate, then let the dough rise in a sheltered place.
Let it rise until doubled (about 7 hours), then place the bowl in the fridge (for a few hours, typically overnight, but the fridge rest is not mandatory).
👉 This dough is basic, it’s a dough made only of flour (I used half flour and half semolina), water, and yeast, without added oil except for the bowl. It’s the same dough as the apple bread, but with water instead of oat milk.
Alternatively, other doughs can be used, such as:
– the dough for baking sheet pizza (also with flour+semolina but with added kefir)
– the yeast-risen dough with brewer’s yeast (for those who don’t like to use sourdough)
– the dough with beer (always keep leftover beer, don’t throw it away but use it in doughs!)
After resting in the fridge, divide the dough into 4 parts (220-230 g for each pizza).
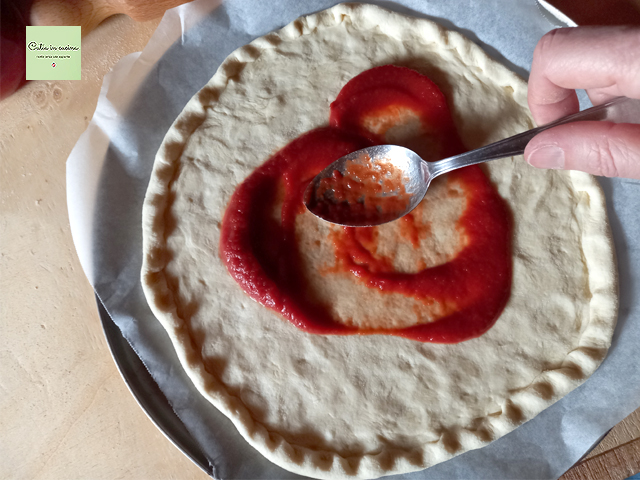
Roll out the dough with your hands or a rolling pin.
👉 I tried both methods, but I found it better to roll it out with my hands. First, because with the rolling pin you can’t leave the edge (as seen in the following photo, I had to create it by rolling the dough), and also because the dough rolled out with the rolling pin then produced many bubbles during baking, nice to look at but less practical for decorations (also the edge of the hand-rolled dough turned out better).
Spread the tomato sauce on the dough, then bake for about 15 minutes at 392°F (cooking time depends on the thickness of the dough, I rolled the pizzas thinly).
Optionally, a drizzle of oil before or after baking, to taste.
Here are the photos of the three pizza faces (plus 1 variant).
You can copy them exactly, or simply use them as inspiration for your personal creations.
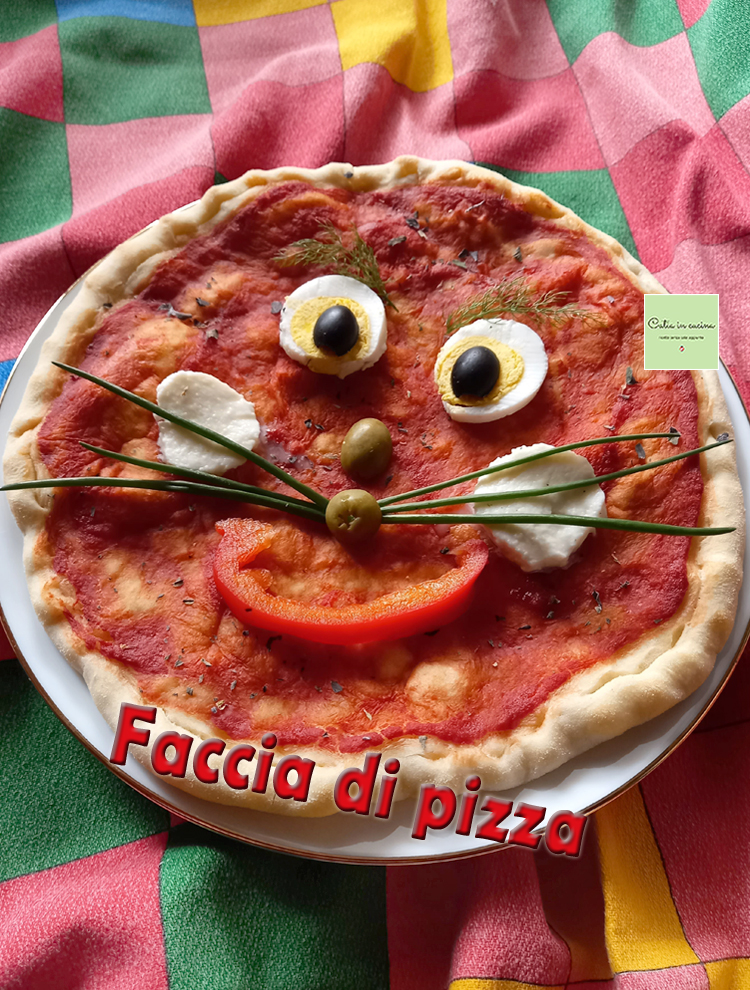
The final appearance of each pizza shows which ingredients I used, but I’ll leave you some useful tips to optimize the work, especially if you plan to involve the children, in this case, it’s good to prepare the ingredients already cut, and cooked, if pre-cooking is needed, in advance.
1. Cook the hard-boiled egg and carrot slices in advance (I cooked them in the microwave).
2. Keep the cheese in the fridge until the last moment, if they soften it becomes harder to handle them, especially for children.
3. For mozzarella, let it drain in advance, otherwise, it releases liquid on the pizza. Alternatively, prefer the slicing type.
4. Cook the red pizzas, without decorations, and decorate them after baking.
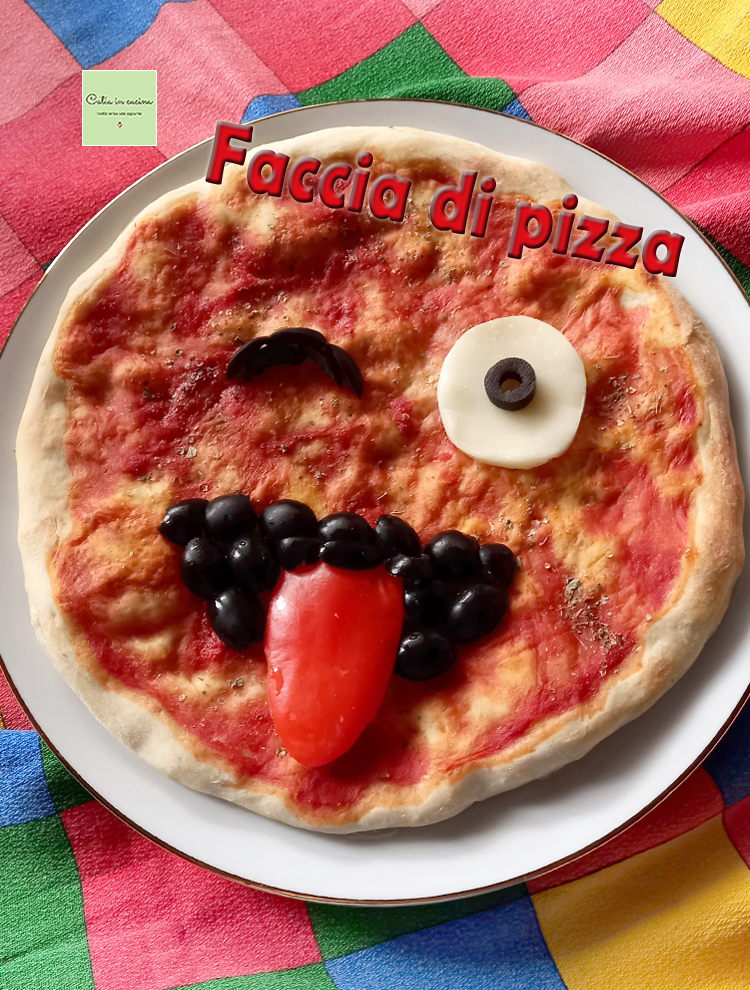
5. They can be served immediately after decorating, the cheeses soften when in contact with hot pizza. Or they can be put back in the oven for a couple of minutes after decorating (in this case some ingredients, such as chives, will inevitably wilt).The bunny (following photo) I copied exactly from the Cream Face book (which also inspired me for the title of this recipe 😊). Although… more than a bunny, it reminds me of a gnome. 😄
For the third pizza, I wanted to try a decoration that was my idea and not from the book, and I got the whim to reproduce emoticons.
But I’ll tell you, I stopped immediately 😀 when I realized that the little animals are much easier! You wouldn’t think, right? Instinct makes you say: “This face is easy, after all, there is only one eye and a tongue” and instead…..
So I repeated this pizza face twice, and I’m showing you both, even if, well, it can be improved, but already with the second try I understood better how to act and after the photos, I’ll leave you some tips that will make the realization easy.
This is the first attempt:
And here’s the second:
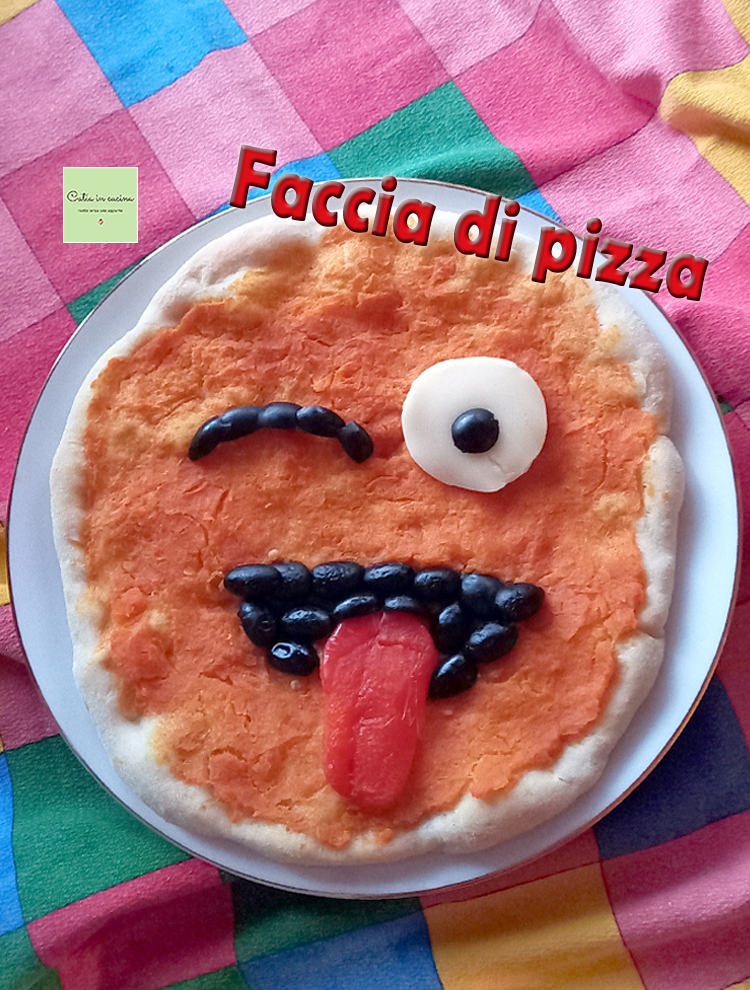
Here the “winking face with tongue sticking out” (that’s exactly the name!) turned out better! 💪
Although in focusing on the good outcome of the decoration… I forgot to check that the pizza was round. 😄In this second version, I used carrots instead of tomatoes (a variant that, as you know, I like a lot), so as to obtain a face if not exactly yellow like the emoticon… at least not red. 😀
For one pizza, 150-180 g of carrot (one large carrot or two small ones) is sufficient. It should be cooked (I cooked it in the microwave for about 4 minutes) and then blended with an immersion blender, adding a couple of tablespoons of water (and after the fact, I would also add a little oil) to facilitate blending. Then the obtained puree is spread on the dough exactly as is done with the tomato sauce.
Here are some tips for making this pizza face:
1. Cook (briefly in the microwave) the bell pepper piece to soften it. Also, in this second try I peeled the bell pepper.
2. Galbanino (or similar cheese) is not always truly round as we believe, to best render the open eye, I recommend cutting the cheese with a round cutter, whatever cheese you decide to use.
3. I made the closed eye with black olives cut lengthwise, nothing else came to mind (that was black) but I’m open to suggestions! Tell me, what would you use instead of olives? 😜
Good luck! And have fun!! 🤩
Salt-Free Tips
![]() If you’re interested in reducing or eliminating salt, always remember to:
If you’re interested in reducing or eliminating salt, always remember to:
▫ Gradually decrease salt, the palate must gradually get used to it and shouldn’t notice the progressive reduction.
▫ Use spices. Chili pepper, pepper, curry, nutmeg, cinnamon, cloves, cumin…
▫ Use aromatic herbs. Basil, parsley, oregano, thyme, sage, marjoram, rosemary, mint…
▫ Use seeds. Sesame, pine nuts, almonds, walnuts…
▫ Use spicy vegetables or fruit. Garlic, onion, lemon, orange…
▫ Use my salt-free vegetable granules and gomasio.
▫ Prefer fresh foods.
▫ Avoid cooking in water, prefer cooking methods that do not disperse flavors (grill, foil, steam, microwave)
▫ Avoid bringing the salt shaker to the table!
▫ Occasionally allow an exception to the rule. It’s good for the mood and helps perseverance.
If you do not want, or cannot, give up salt:
▫ You can still try my recipes by salting according to your habits.
Follow Me!
In my WhatsApp channel and on Instagram, on the Facebook page, in Pinterest and in my two groups: Catia’s Group, in the Kitchen and Beyond and Exactly What I Was Looking For! and if you feel like it… subscribe to my Newsletter.
Other Light and Tasty Recipes:
Carla Emilia: Radicchio Salad with “Smiling” Goat Cheese
Claudia: Whole Wheat Farfalle with Peppers and Mushrooms
Daniela: Boat with Cheese and Ham, the Cheerful Sandwich
Elena: Colorful Carrot Gnocchi
Milena: The Coccodè Omelette
Carla Emilia: Radicchio Salad with “Smiling” Goat Cheese
Claudia: Whole Wheat Farfalle with Peppers and Mushrooms
Daniela: Boat with Cheese and Ham, the Cheerful Sandwich
Elena: Colorful Carrot Gnocchi
Milena: The Coccodè Omelette
