Have you ever heard of Pull-Apart Pizza? But be careful, because you might have encountered it as Pull-Apart Pizza Bread or Pizza Pull-Apart Bread, or as Pull-Apart Pizza Rolls. With or without the hyphen between Pull and Apart.
And there is also Pizza Monkey Bread (yes yes, monkey meaning monkey).
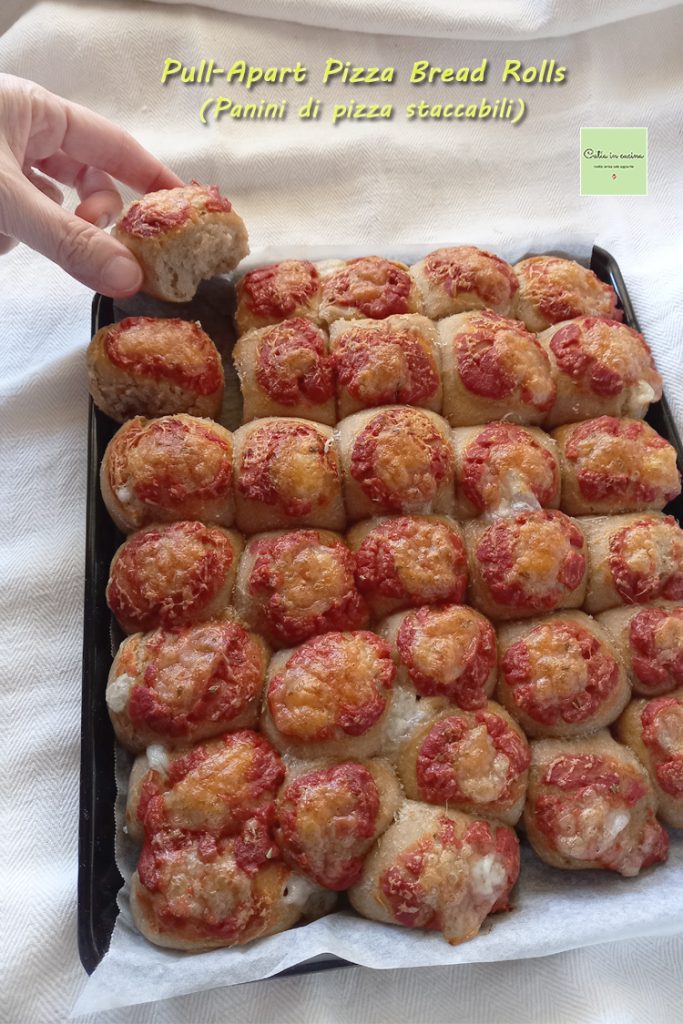
Despite some shades of meaning, it is always the same thing, which is a pizza-like, or pizza-flavored bread, in a portionable, detachable, hand-held version (that’s why it’s called pull-apart, breakable apart, and that’s why monkey, eaten with hands like primates do 😂).
It’s a pizza idea that circulates a lot on the web, of Anglo-Saxon origin (and so it has a… broad concept of pizza, so to speak 😄).
A tray of Pull-Apart Pizza Bread Rolls is usually made of small stuffed rolls or rolls of bread dough, placed close together to ensure they merge during baking into a sort of tray pizza or focaccia, made into bites.
Which, to be honest, isn’t that different from my bread wheel (which surely some of you remember) but in a pizza-flavored version.
Browsing online I saw there are also versions of Pull Apart Bread, meaning bread (not necessarily pizza-flavored) like pre-portioned checkerboard loaf or pre-sliced bread, always with a filling, usually with an abundance of cheese.
All this with a single purpose: to eat with hands and, possibly, with the scenic effect of making the cheese stringy at the moment of detaching and taking the piece of bread, or roll.
So, that was the premise/description of what a Pull-Apart Pizza Bread is.
Now I will tell you about my version. 😊
I Italianized it, lightened it, made it more suitable for my way of cooking, as well as suitable for the Light and Tasty column, with which every Monday my colleagues and I try to promote recipes that are as light and healthy as possible. Today’s episode of this column is dedicated to Father’s Day, with the specification of proposing a “dish of choice that is appreciated by the father of the house”.
And since I have no doubts about what this dad’s two favorite foods are, I wanted to amaze him with the special effect of this halfway between bread and pizza. With which I was sure, certain, I would hit the mark. 😀
Anyway, in the end, my personalized pull-apart pizza is nothing but a very Italian tray of stuffed pizza-flavored rolls, certainly detachable and certainly hand-eatable, but with a more rustic look (also thanks to spelt flour) and less ‘stringy cheese’ than a standard British pull-apart pizza bread.
Because… what can I say… eating with hands is fine with me and I enjoy it, especially on festive occasions like a birthday or buffet, but dipping my fingertips into hot molten cheese… come on, let’s be honest!
Because even holding these rolls to photograph them as soon as they came out of the oven was a feat! They were quite hot!!!
PS: we liked them so much that I made them twice in one week, as you can see well from the photos, and as I will tell you in the process. So, are you ready?
Let’s start!
What would you like to start with, the small rolls?
Or the big ones?
😊
〰〰〰
Looking for more ideas? 👇
- Difficulty: Easy
- Cost: Economic
- Rest time: 8 Hours
- Preparation time: 10 Minutes
- Portions: from 15 to 32 pieces
- Cooking methods: Oven
- Cuisine: Vegetarian
- Seasonality: All seasons
Ingredients
- 1 1/2 cups type 1 flour
- 1 1/4 cups spelt flour
- 5.3 oz liquid sourdough (licoli)
- 1 cup cup water
- 1 tbsp tbsp extra virgin olive oil
- 1 mozzarella
- 5.3 oz tomato sauce
- 1 tbsp tbsp grated Parmesan cheese
- oregano
Tools
- Stand Mixer Russel Hobbs
- Baking Pan for 12" round pizza
Steps
Prepare the dough:
Pour the two flours, the licoli, oil, and water into the stand mixer bowl and start at low speed, then gradually increase the speed. Just a few minutes are enough for the dough to be combined.
Cover the bowl with plastic wrap or a lid and let the dough rise. For this dough, I proceeded as follows: I left it at room temperature for 6 hours then put it in the fridge for 10 hours, then when I took it out of the fridge I immediately started preparing the rolls with cold dough.
Half hour before removing the dough from the fridge prepare the tomato sauce and mozzarella:
Cut the mozzarella into pieces and leave it in a colander, or on a plate positioned at an incline, for about half an hour. This way it will lose excess liquid.
☝ This is a useful operation, to prevent excess liquid from forming inside the roll.
Cook the tomato puree (optional step, but recommended) in a pan with half a clove of garlic, a teaspoon of oil and a pinch of oregano for about 15 minutes, just long enough to reduce it so it’s not too liquid (depending on the type of puree used).
Form the stuffed rolls:
With floured hands take small portions of leavened dough, flatten them on the palm of your hand, place a piece of mozzarella on the dough and, if desired, a scant teaspoon of tomato sauce (in this case it is better that it is cold or at most lukewarm, not hot).
☝ Important: as mentioned, I prepared this recipe twice with two different fillings. The fundamental difference between the two consists in the size of the rolls: the version with tomato sauce inside requires the making of larger rolls otherwise the sauce can hinder the proper closure of the rolls. For smaller rolls, I recommend using only mozzarella in the filling (and then covering them with the sauce).
In the two photos below the difference in size between the two types of roll is clearly visible:
Close the rolls forming balls and arrange them on a baking sheet covered with parchment paper.
Distribute the tomato and one or more pieces of mozzarella over each ball.
👉 If desired, and to personal taste, you can use a larger quantity of sauce so that each roll is more moist, and two mozzarellas instead of one (in such cases calculate that cooking times may vary).
Finish with a pinch of oregano and also (but it’s optional) a drizzle of oil, then finish with a sprinkle of grated Parmesan.
Bake in the oven at 400°F for 20 minutes for small rolls and 25-30 minutes for larger rolls.
Salt-Free Tips
 I am very satisfied with this recipe because it is totally low-sodium, made without adding salt, from the dough to the seasoning. The only salt contribution is given by the 10 g of Parmesan and the mozzarella, just one mozzarella for filling and browning.
▪️ Salt in 10 g of Parmesan: 0.38 g
▪️ Salt in 1 mozzarella (125 g): 1.65 g
If you are interested in reducing or eliminating salt, always remember to:
▫ Decrease the salt gradually, the palate must get used to it slowly and should not notice the progressive reduction.
▫ Use spices. Chili pepper, black pepper, curry, nutmeg, cinnamon, cloves, cumin…
▫ Use aromatic herbs. Basil, parsley, oregano, thyme, sage, marjoram, rosemary, mint…
▫ Use seeds. Sesame, pine nuts, almonds, walnuts…
▫ Use spicy vegetables or fruits. Garlic, onion, lemon, orange…
▫ Use my salt-free vegetable granules
▫ Prefer fresh foods.
▫ Avoid cooking in water, prefer cooking methods that do not disperse flavors (grill, foil, steam, microwave)
▫ Avoid bringing the salt shaker to the table!
▫ Occasionally allow yourself a break from the rules. It’s good for the mood and helps to persevere.
If you don’t want, or cannot, give up on salt:
▫ You can still try my recipes by salting according to your habits.
Follow me!
In my newWhatsApp channel and, hear hear, now I am also on Instagram! 😀 On my Facebook page, on my Pinterest boards, in my group Catia’s group, in the kitchen and beyond and if you feel like it… subscribe to my Newsletter
〰 〰 〰 〰
I wish all fathers to have a great holiday 💛 and I leave you with the recipes of my colleagues from the Team. Try them all!
Carla Emilia: Lamb Chops with Lemon and Mint
Daniela: Muffins with Apricots, Blueberries and Almonds
Elena: Mixed Grilled Meats with Arugula
Milena: Risotto with Dried Mushrooms and Raspadura
Serena: Quick Polenta
