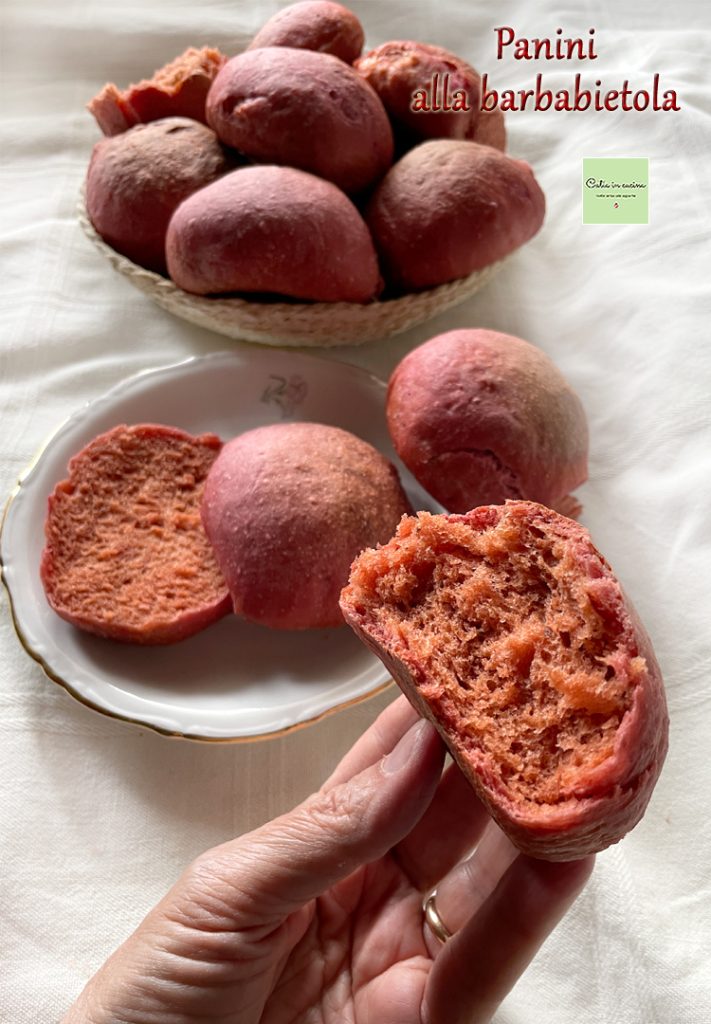
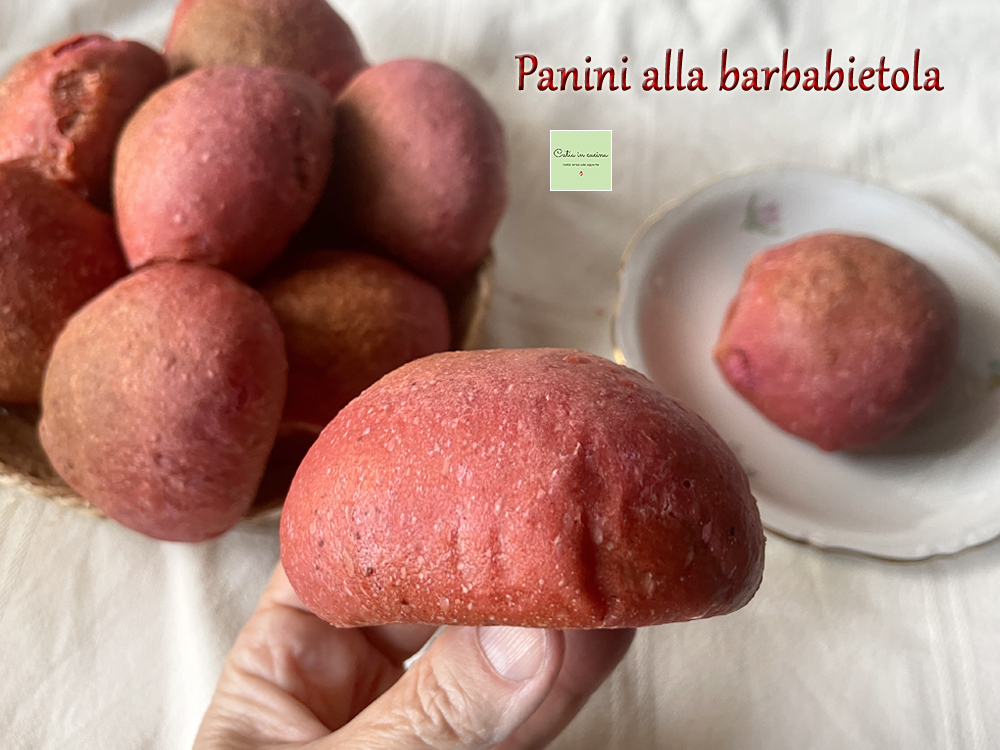
When with the Light and Tasty group we planned to cook recipes with beetroot, I immediately decided that I would make buns. A great opportunity to finally replicate those beautiful beet buns with a beautiful pink color whose photos I often saw circulating online.
Since I’m great at complicating my life 🤪 instead of clicking on those photos and doing some research, I decided to go with my instincts and started kneading with the simple idea that it would be enough to add pureed beetroot to a regular leavened dough.
But it seems that’s not how it’s done. 😂 Moreover, I don’t even learn from my mistakes! I had the same light-hearted approach when making saffron bread, when I had to repeat the recipe several times because the first dough wasn’t yellow at all.
Two days ago, after baking my first beet buns and discovering that the pink color they had when raw had vanished… oh noooo!, how come??? 😅 …I had to muster a bit of patience and insight that I hadn’t had before and did my research. And now pink buns hold no secrets for me. 😀 Not that there are any amazing secrets behind them, actually!
I’ll explain everything with two questions and two answers:
Why does the color of the beetroot disappear during cooking? Because the pigment (betanin) is heat-sensitive, so it degrades with heat.
And what can be done to prevent the pink color of beetroot bread from fading during cooking? Three things:
1) acidify the dough (the pigment holds up in an acidic environment) by adding lemon juice or vinegar or yogurt or kefir to the pureed beetroot or directly into the dough;
2) bake at not too high temperatures, do not exceed 350–375°F;
3) use dehydrated beet powder as it withstands heat better. Use it alone or in addition to fresh beetroot.
I only put the first two points into practice because finding dehydrated beetroot at the spur of the moment was not easy for me 🤭 but I assure you they were two absolutely sufficient steps. The buns came out beautifully colored, and in the process, I’ll show you the differences between the first and second batches, both before and after baking.
Are you ready then?
〰 〰 〰
Below are the links to my other recipes with red beetroot, which we all commonly call red turnip even though we perfectly know they are not the same vegetable (for those who don’t know, I’ll explain in the Q&A section 😉😊).
👇
- Difficulty: Easy
- Cost: Inexpensive
- Rest time: 16 Hours
- Preparation time: 20 Minutes
- Portions: 9
- Cooking methods: Oven
- Cuisine: Italian
- Seasonality: All seasons
Ingredients
- 480 g all-purpose flour
- 150 g liquid sourdough starter
- 200 g red beets, cooked, boiled
- 2 teaspoons lemon juice
- 100 ml water
- 2 teaspoons extra virgin olive oil
- milk (for brushing)
Tools
- Bowl
- Immersion Blender
- Parchment Paper
- Baking Tray
Steps
Cut the beetroot into small pieces and place it in the immersion blender cup.
Add 2 teaspoons of lemon juice and blend until you get a puree.
Pour the refreshed and active liquid sourdough starter into a large bowl.
👉 I kneaded by hand, but you can use a stand mixer (of course, in this case, the bowl will be that of the mixer).
Pour the beet puree into the sourdough starter and mix.
Pour the water.
👉 For the water, it’s useful to use the glass in which you blended the beetroot to recover any residue.
Add the flour.
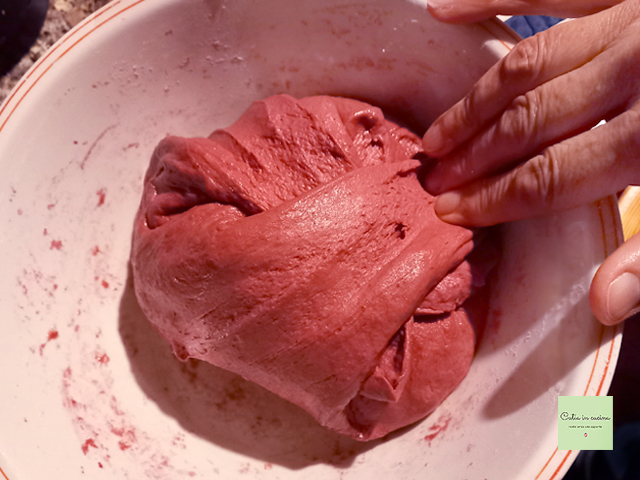
Knead until you obtain a well-mixed dough.
👉 Knead gently, the dough is soft and slightly sticky. It may be helpful to grease or flour your hands during kneading; in any case, after forming the dough ball, it’s good to grease the bowl and the surface of the dough (a couple of teaspoons of oil are sufficient).
Place the bowl in a sheltered place (in the turned-off oven or inside the microwave).
In the first two hours of rising, it is useful to do two or three sets of folds (every 30 minutes).
Let the dough rise at room temperature for several hours until almost doubled.
Then you can proceed to shape the buns. Or you can place the dough in the fridge for a few hours (to mature it or simply because it’s evening, and you want to bake the buns the next day).
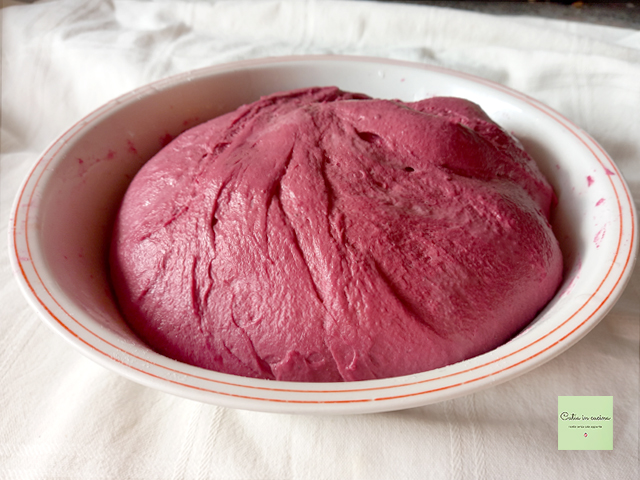
I put it in the fridge for 8 hours, and here’s the dough just taken out of the fridge:
(Small note: in the photos, the pink color of the dough seems to vary, but these differences are due to ambient light, photos taken during the day near a window, and those taken in the evening in my kitchen produced different shades. I have to say, pink and red colors are a bit tricky, it can happen even when photographing with different devices).
Divide the dough into 9-10 buns (I got 9 about 3.5 oz each).
Place them on a baking tray covered with parchment paper.
Brush the buns with a little milk and let them rise for about 1 hour (2 hours if the dough is cold from the fridge).
Cover the buns with a lid not in contact – a tray or container with high edges is fine – or place the tray in the off oven or microwave.
Bake the buns in the oven at 375°F for about 25 minutes.
☝ Remember not to exceed 400°F.
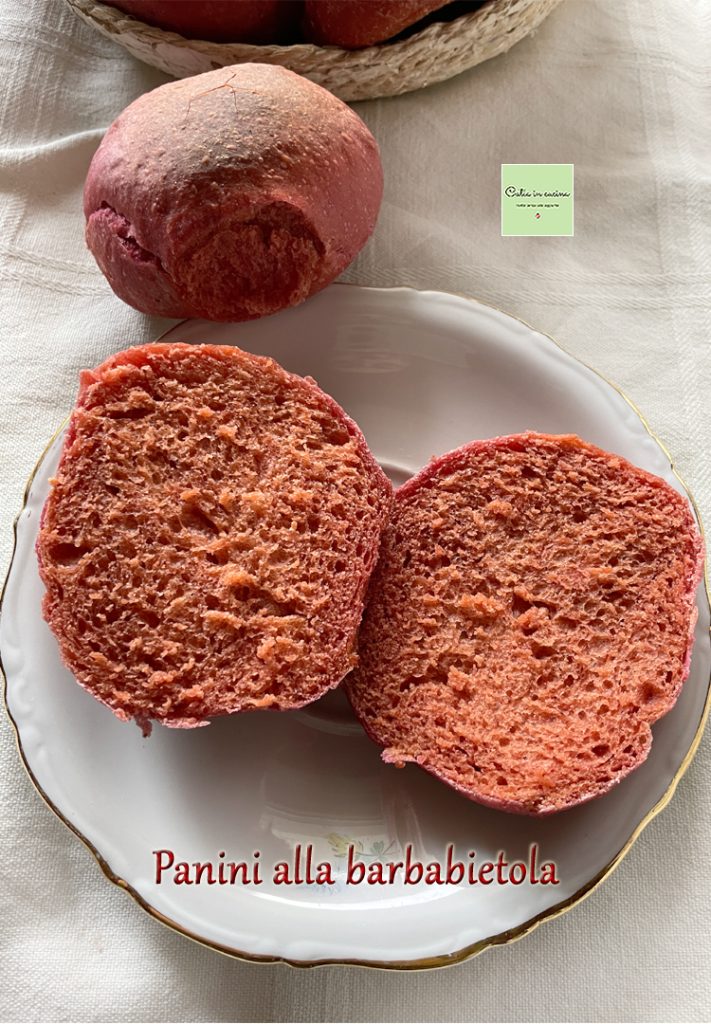
As you can clearly see from the following photo, the browning that usually looks nice on ‘bread-colored bread,’ in these pink buns creates a color contrast not exactly from a glossy magazine, so I recommend monitoring the baking a little better than I did 😃 or make slightly smaller buns (10-11 buns instead of 9) to reduce the cooking time by a few minutes.
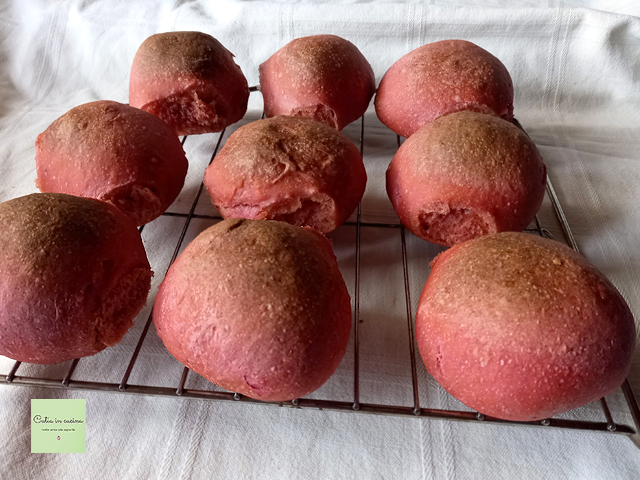
In any case, looking at them from the right side… they’re beautiful! 🤩
Both outside,
and inside:
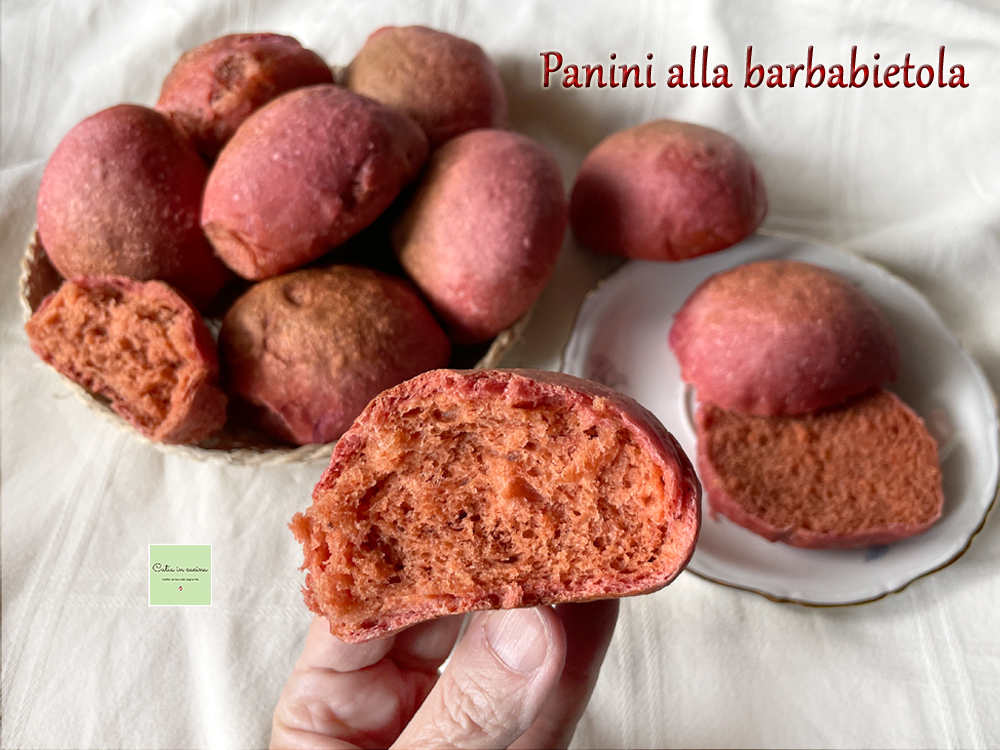
The beet buns are soft buns, with a tender and slightly sweet crumb.
They are excellent toasted as well, both for breakfast with butter and jam, and at meals as crunchy bread.
And they can be used as hamburger buns.
Now, as promised in the introduction, I’ll show you two photos of the first version of the beet buns, the one without the addition of the two teaspoons of lemon juice.
Before baking, the dough is light pink, after baking the pink disappeared and turned into a color… dark bread golden. 😃
Salt-Free Tips
![]() As with all my leavened products, these beet buns are without added salt. 😊
As with all my leavened products, these beet buns are without added salt. 😊
If you are interested in reducing or eliminating salt, always remember to:
▫ Gradually decrease the salt, your palate must adapt slowly and should not notice the progressive reduction.
▫ Use spices. Chili, pepper, curry, nutmeg, cinnamon, cloves, cumin…
▫ Use aromatic herbs. Basil, parsley, oregano, thyme, sage, marjoram, rosemary, mint…
▫ Use seeds. Sesame, pine nuts, almonds, walnuts…
▫ Use spicy vegetables or fruits. Garlic, onion, lemon, orange…
▫ Use my salt-free vegetable granules and gomasio.
▫ Prefer fresh foods.
▫ Avoid cooking in water, prefer cooking methods that do not disperse flavors (grill, parchment, steam, microwave)
▫ Avoid bringing the salt shaker to the table!
▫ Sometimes indulge in a break from the rule. It’s good for the mood and helps to persevere.
If you do not want, or cannot, give up salt:
▫ You can still try my recipes by salting according to your habits.
Follow me!
In the WhatsApp channel and on Instagram, on the Facebook page, in Pinterest, in my two groups: The group of Catia, in the kitchen and beyond and Exactly what I was looking for! and if you want… subscribe to my Newsletter
In the WhatsApp channel and on Instagram, on the Facebook page, in Pinterest, in my two groups: The group of Catia, in the kitchen and beyond and Exactly what I was looking for! and if you want… subscribe to my Newsletter
Light and Tasty:
And here are the recipes with beetroot from my colleagues in the Light and Tasty Team:
Claudia: Smoothie with beetroot and banana
Daniela: Bruschetta with beetroot and goat robiola
Elena: Beetroot carpaccio
Milena: Hummus with red beetroot and crunchy vegetables
Claudia: Smoothie with beetroot and banana
Daniela: Bruschetta with beetroot and goat robiola
Elena: Beetroot carpaccio
Milena: Hummus with red beetroot and crunchy vegetables
FAQ (Questions and Answers)
Are red turnips and red beetroots the same vegetable?
No, they are two different vegetables belonging to two different botanical families: the beetroot (bieta vulgaris) belongs to the Amaranthaceae (or Chenopodiaceae) family, whereas the turnip is a cruciferous (Brassicaceae, the cabbage family).
Despite this, they are often confused in common usage, and in particular, the more widespread red beetroot is called red turnip. Usually sold precooked and vacuum-packed, beetroot is widely used in cooking, while turnip is a bit less widespread in large distribution but can be more easily found in greengrocers.What are the main differences, and what are the similarities, between red turnip and red beetroot?
They are both tubers, but while the turnip is white with pink streaks that fade during cooking, the beetroot is red and maintains its color when cooked.
They are similar in nutritional values, though with different contents. Beetroot is a source of vitamins A, C, and B group, provides many fibers, minerals, especially potassium and iron, and has antioxidant, depurative, remineralizing, and digestive properties and is considered a superfood. Turnip provides vitamins A and C and minerals but with milder content. Nonetheless, it is diuretic and low in calories and equally excellent in cooking.
