For two days in a row, I prepared this simple dough leavened with licoli, my licoli of which I am super proud 😀
It’s a dough that requires no folds or refrigeration, which turned out so soft on the first use when I made tray pizza, that I immediately wanted to try it again the next day.
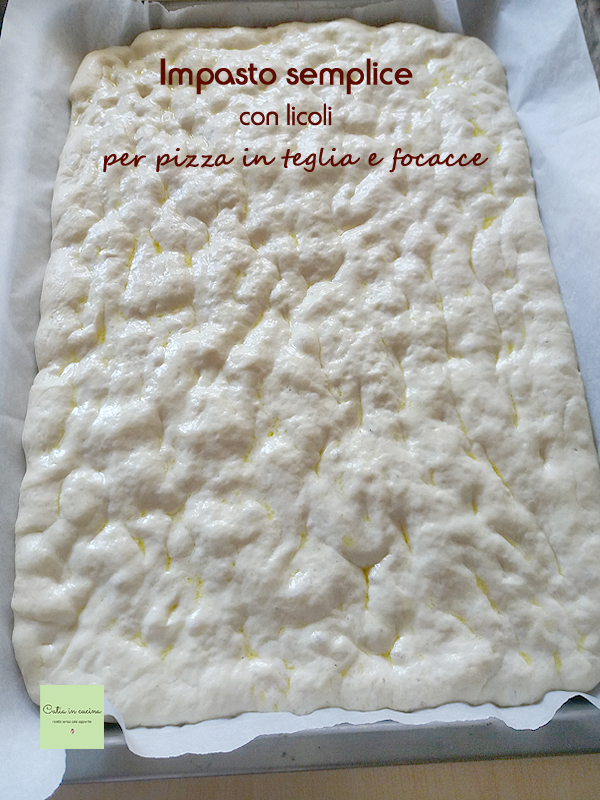
And the beautiful (yes, really beautiful!!) decorated focaccia that I made with this very simple dough met expectations: super soft!
Oh, I know, now I’ve left you wondering! What to try first? The pizza or the focaccia? 😀
No problem, while the dough rises, you have a few hours to think about it! For now, the thing to do right away is…
…read the recipe! 😀
and then immediately check the pantry: do you have everything? Good! Then we can start!
〰 〰 〰
Below I leave you the link of: the article dedicated to my Licoli, the beer dough, and some ideas for pizza toppings. 😉 Have fun! 👇
- Difficulty: Easy
- Cost: Economical
- Rest time: 8 Hours
- Preparation time: 10 Minutes
- Portions: 8 pieces
- Cooking methods: Oven
- Cuisine: Italian
- Seasonality: All seasons
Ingredients
- 10.6 oz Type 0 Flour
- 10.6 oz Re-milled Durum Wheat Semolina
- 5.3 oz Liquid Sourdough (Licoli)
- 4.4 oz Milk Kefir (or plain yogurt)
- 8.8 oz Water
- 1 tablespoon Extra Virgin Olive Oil (for the bath)
- 2 tablespoons Water (for the bath)
Tools
- Stand Mixer Russell Hobbs
- Baking Sheet
- Parchment Paper
Preparation
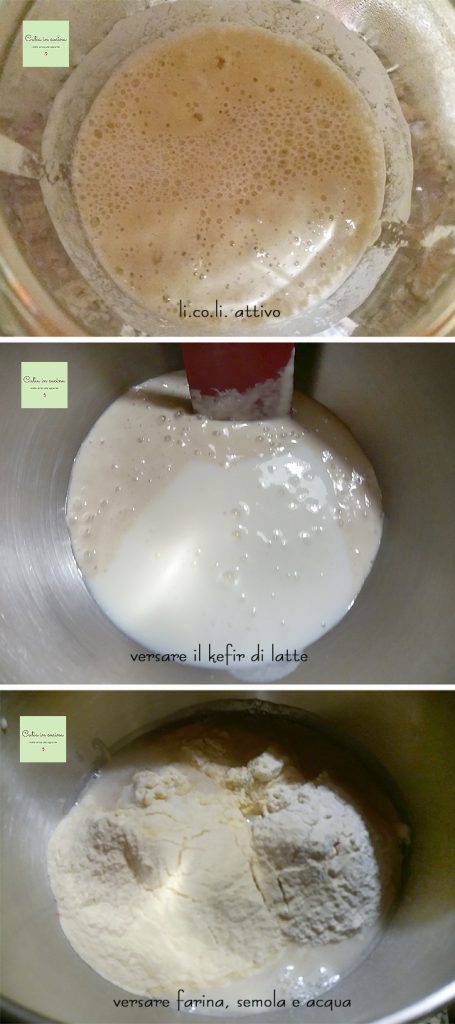
Pour into the bowl of the stand mixer (or into a large bowl if you prefer to knead by hand) the licoli, water, kefir (or, if kefir is unavailable, plain yogurt), flour, and semolina.
Since each flour has a different absorption, it may be helpful not to pour in all the water but to start with 200-220 grams, then add the remaining water little by little during kneading.
If the licoli needs a refresh, to obtain the 150 grams needed for the recipe, take 50 grams and refresh it with 50 grams of water and 50 of flour.
The freshly refreshed licoli should be left in a closed jar at room temperature, and you’ll need to wait 3-4 hours before using it. This way, it will be well active.
If the licoli stored in the fridge is active (for example, refreshed the day before), it is sufficient to remove it from the fridge and leave it at room temperature for at least an hour before using it so it can reactivate.
Start the stand mixer at low speed with the dough hook. Let it work for a few minutes until the dough is elastic.
As mentioned in the previous note, add little water at a time until using all 8.8 oz of water (or even a bit more if the dough ‘takes it’, depending on the flour used; in my case, the consistency was perfect with 8.8 oz).

Cover the bowl with plastic wrap (to be honest, I simply covered it with a plate, but it is generally recommended to use plastic wrap to make sure the dough is not exposed to drafts) and let the dough rise at room temperature for about 8 hours.
Remember that at this time when I am writing – and when I prepared my simple dough – it is April. Room temperature should always be considered a very indicative parameter, as it is not a perfect figure due to variations. But not everyone has a proofing chamber, or not everyone can occupy the oven with the light on for all the hours needed for rising, so to determine the correct rising ‘at room temperature’ it is good to consider the hours indicated in recipes (including mine 😉) as only indicative and to simply check that the dough doubles. In summer, it will probably take a couple of hours less.
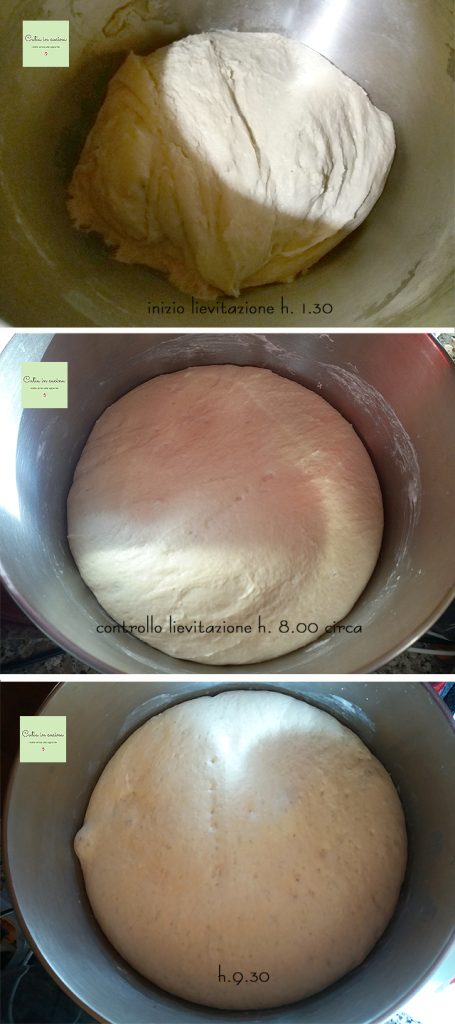
After 8 hours (I kneaded at 1:30 AM and let it rise until 9:30 AM), turn the dough onto the baking sheet lined with parchment paper.
Moisten the surface with a little oil and 2-3 tablespoons of water.
Stretch the dough with your fingertips, covering the entire baking sheet.

Place the baking sheet in the turned-off oven to rest for a couple of hours. Without covering it, since the water and oil bath is enough to keep the dough soft and prevent it from drying out.
After the two hours – however, I advise you to take a look after an hour because if it’s warm, even an hour might be enough – turn on the oven and…
…bake! 😀
If you decide on a tray pizza… read my recipe with olives and capers –> HERE is the recipe
If you prefer a focaccia… try decorating it with vegetables… as I tell you HERE 😉
Enjoy!
Salt-Free Tips
 No, don’t be surprised, it’s not a mistake, the salt in the ingredients isn’t missing, it wasn’t forgotten. 🙂 If you’ve landed here by chance, you may not yet know that this is a no-added-salt blog. If you want to add it, go ahead, it’s not forbidden 😀 but if I’ve piqued your curiosity, I’ll leave you the link to this article of mine where I explain why we cook without salt at home. And if you want to try… start by reducing it just a bit! maybe following some of my tips listed below:
If you are interested in reducing or eliminating salt, always remember to:
– Decrease salt gradually, the palate must get used to it slowly and shouldn’t notice the progressive reduction.
– Use spices. Chilli, pepper, curry, nutmeg, cinnamon, cloves, cumin…
– Use aromatic herbs. Basil, parsley, oregano, thyme, sage, marjoram, rosemary, mint…
– Use seeds. Sesame, pine nuts, almonds, walnuts…
– Use spicy vegetables or fruits. Garlic, onion, lemon, orange…
– Use my salt-free vegetable granulate
– Prefer fresh foods.
– Avoid cooking in water, prefer cooking methods that do not disperse flavors (grill, foil, steam, microwave)
– Avoid bringing a salt shaker to the table!
– Occasionally indulge in a rule break. It improves mood and helps perseverance.
If you don’t want, or can’t, give up salt:
You can still try my recipes by salting according to your habits.
Follow me!
On my new WhatsApp channel and on Instagram. On my Facebook page and on Pinterest boards. Join my groups: The group of Catia, in the kitchen and beyond and Just what I was looking for! and if you like… subscribe to my Newsletter
