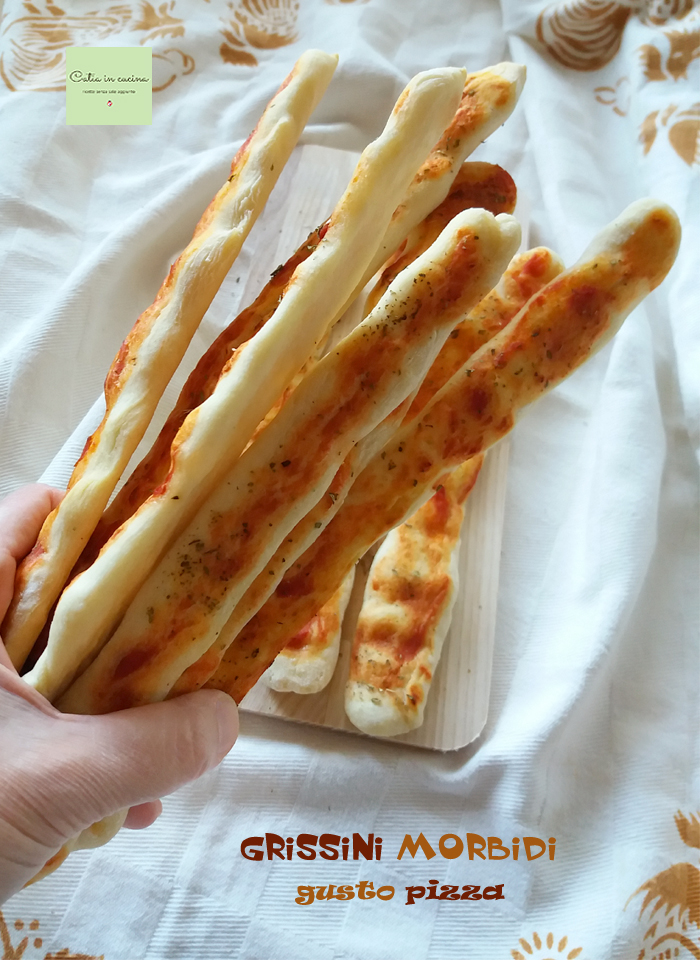
A while ago, someone asked me for the recipe for these soft pizza-flavored breadsticks and today, finally, just a tiny bit delayed… erm… about a year later… here it is!
These soft pizza-flavored breadsticks are so delicious that you can’t stop eating them.
You can use your favorite pizza dough to make them, if you have one that you regularly use for your pizzas, that’s perfect. This time, I quickly kneaded some water, flour, and a sourdough discard that barely had three bubbles but worked just fine, the dough might have taken a bit longer to rise, but it turned out beautifully. 🙂 A perfect dough for breadsticks or little focaccias, certainly not for large leavened products, but it’s always the simplest things, the ones you don’t expect much from, that give me the most satisfaction. Does this happen to you too?
☝ If you want to try making these soft breadsticks with different base doughs, here are some ideas:
- Difficulty: Easy
- Cost: Very Cheap
- Rest time: 6 Hours
- Preparation time: 10 Minutes
- Portions: 19 pieces
- Cooking methods: Oven
- Cuisine: Italian
- Seasonality: All Seasons
- Energy 119.83 (Kcal)
- Carbohydrates 23.70 (g) of which sugars 0.48 (g)
- Proteins 3.87 (g)
- Fat 1.52 (g) of which saturated 0.23 (g)of which unsaturated 0.22 (g)
- Fibers 0.90 (g)
- Sodium 50.87 (mg)
Indicative values for a portion of 40 g processed in an automated way starting from the nutritional information available on the CREA* and FoodData Central** databases. It is not food and / or nutritional advice.
* CREATES Food and Nutrition Research Center: https://www.crea.gov.it/alimenti-e-nutrizione https://www.alimentinutrizione.it ** U.S. Department of Agriculture, Agricultural Research Service. FoodData Central, 2019. https://fdc.nal.usda.gov
Ingredients for about 18-20 pieces
- 4 cups all-purpose flour
- 3/4 cup liquid sourdough starter (discard)
- 1 cup water
- 1 tbsp extra virgin olive oil
- 1 tsp extra virgin olive oil (for the bowl)
- 1/2 cup tomato sauce
- 1 tbsp extra virgin olive oil
- to taste oregano
Tools
- Stand Mixer Russell Hobbs
- Baking Tray extendable
Preparation
Pour the flour, sourdough starter, and water into the bowl of the stand mixer. Attach the dough hook and start at low speed (speed 1 or 2). When the ingredients have combined, you can increase the speed to 3.
Continue kneading until the dough is smooth and elastic (with my stand mixer, it takes no more than 10 minutes), then transfer it to a bowl greased with a teaspoon of oil.
Place it in a sheltered spot (I always put it in the microwave, but the oven, turned off of course, works too) and let it rise until doubled. My dough doubled in 6 hours.
The doubling time can vary as it depends on room temperature and the vitality of the sourdough starter (or rather, the low vitality of the discard).
In the first two hours of rising, I recommend doing Stretch and Fold folds 3-4 times (every 30-45 minutes)
If you don’t know what Stretch & Fold folds are (also known as S&F) you can refer back – click HERE – to my autolysis bread recipe where you can see photos of the folds. It’s a much simpler operation than it might seem, don’t be scared 😉 The purpose is to make the dough elastic and incorporate air: you need to take a portion of dough with your fingertips, stretch it upwards, and then fold it over the dough itself.
When the dough has doubled, cover the bowl with a lid or plastic wrap, and place it in the fridge for a few hours (I did for 8 hours).
The purpose of resting in the fridge is to mature the dough and make it more digestible.
Or to slow down the rising if, like me, you always knead in the afternoon and the dough rises at midnight: in this case, it’s better to go to sleep and postpone baking until the next day! 😀
If you want, you can proceed to shaping and baking after doubling.
After removing the dough from the fridge, it’s good to leave it at room temperature for 1-2 hours to acclimatize.
Depending on room temperature, I recommend not extending beyond 2 hours to prevent over-proofing.
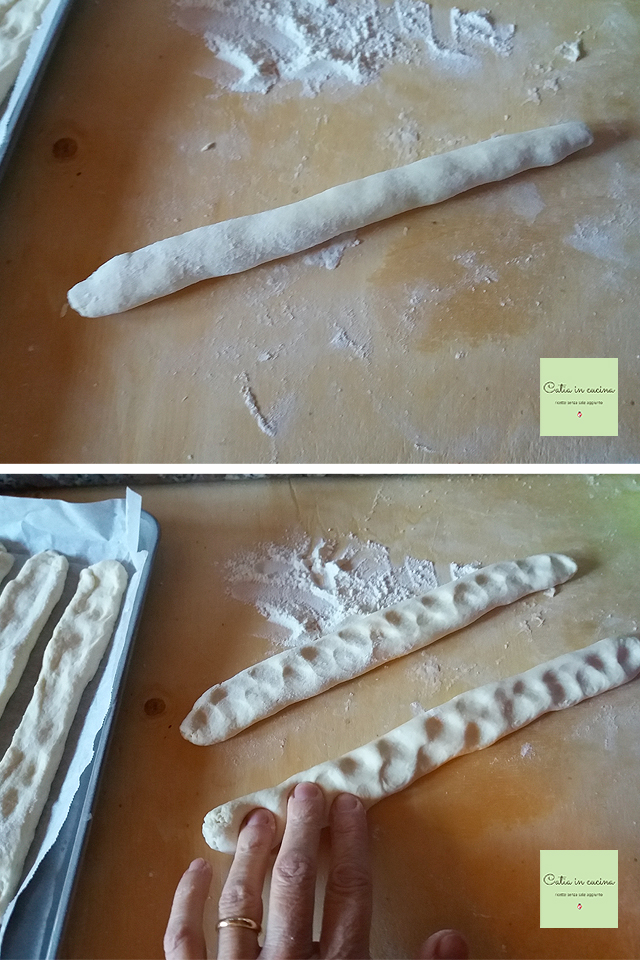
Proceed with shaping the breadsticks, a very simple operation: take a portion of dough, roll it on a floured surface, shape the breadstick, then gently flatten it with your fingertips.
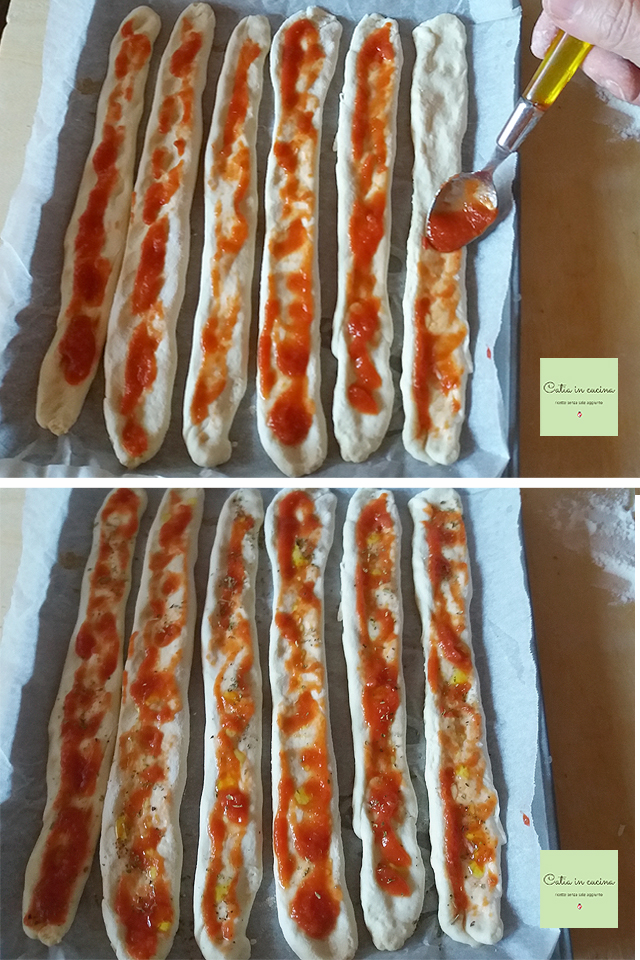
Spread the tomato sauce. A heaping teaspoon per breadstick is sufficient.
Add a sprinkle of oregano and a drizzle of oil.
The oil is optional; I’ve tried them both with and without, and we liked them both ways, although my preference is for the version with extra virgin olive oil. The oil can be omitted if adding cheese.
Bake at 430 degrees Fahrenheit.
Baking time: 15-20 minutes (depending on thickness). Optionally, according to your oven, you can lower it to 390 degrees Fahrenheit after 10 minutes.

Once you start, you can’t stop! 🤩

Tips without Salt
 As you know, I cook without salt and for this reason, this recipe is completely without added salt in the dough or filling.
But this is a basic recipe, suitable for many variations and many “flavoring possibilities”. Just by enriching the filling with cheeses, olives, and capers, or even better with a few strips of ham, the daily salt quota is practically reached. For this reason, it’s advisable to avoid adding salt because almost all the foods we commonly use contain salt. Those who cannot use products that contain salt can flavor these pizza-flavored breadsticks using natural products that are of great help in a low-sodium diet: first of all, the majestic fresh minced garlic, and then (not second, but of equal nobility) chili pepper. 🙂 But you can also get creative with other foods, for example, by adding chopped walnuts or almonds, making a mix of aromatic herbs, or, why not, using gomasio.
If you are interested in reducing or eliminating salt, always remember to:
▫ Reduce salt gradually; the palate needs to get used to it slowly and shouldn’t notice the progressive reduction.
▫ Use spices. Chili, pepper, curry, nutmeg, cinnamon, cloves, cumin…
▫ Use aromatic herbs. Basil, parsley, oregano, thyme, sage, marjoram, rosemary, mint…
▫ Use seeds. Sesame, pine nuts, almonds, walnuts…
▫ Use spicy vegetables or fruits. Garlic, onion, lemon, orange…
▫ Use my vegetable granules without salt
▫ Prefer fresh foods.
▫ Avoid cooking in water; prefer cooking methods that retain flavors (grill, foil, steam, microwave)
▫ Avoid bringing the saltshaker to the table!
▫ Sometimes allow yourself to break the rule. It’s good for your mood and helps you persevere.
If you don’t want to, or can’t, give up salt:
▫ You can still try my recipes by salting according to your habits.
Follow Me!
In my new WhatsApp channel and, hear ye! I’m now also on Instagram! 😀
On my Facebook page, on my Pinterest boards, in my two groups: Catia’s Group, in the Kitchen and Beyond and Just What I Was Looking For! And if you like… subscribe to my Newsletter
Also:
Check out my review of the Russel Hobbs 23480-56 Stand Mixer
