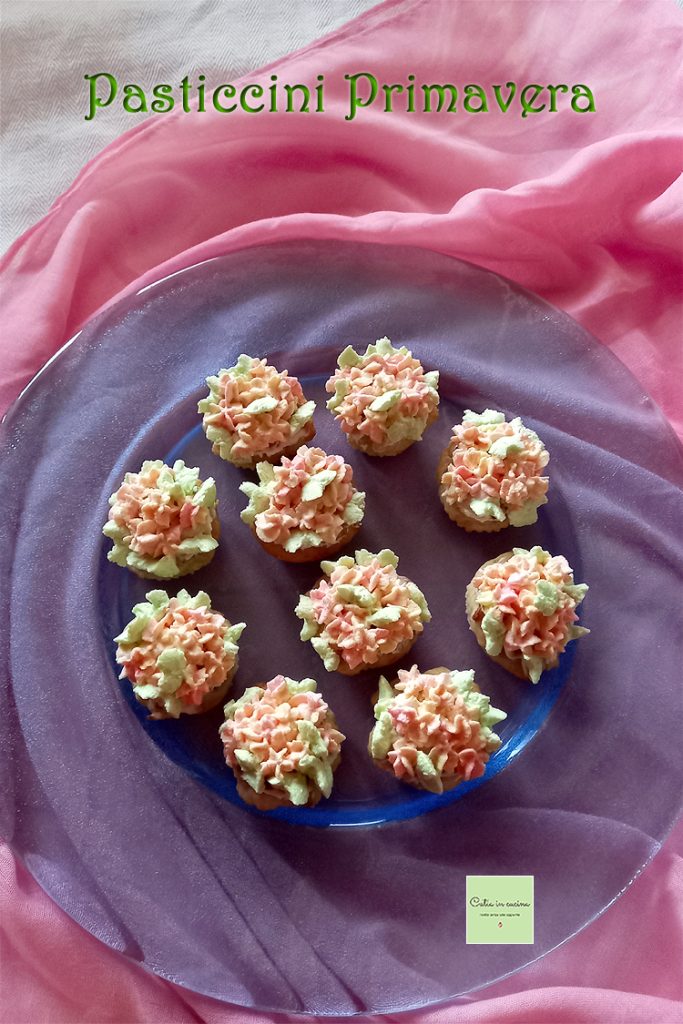
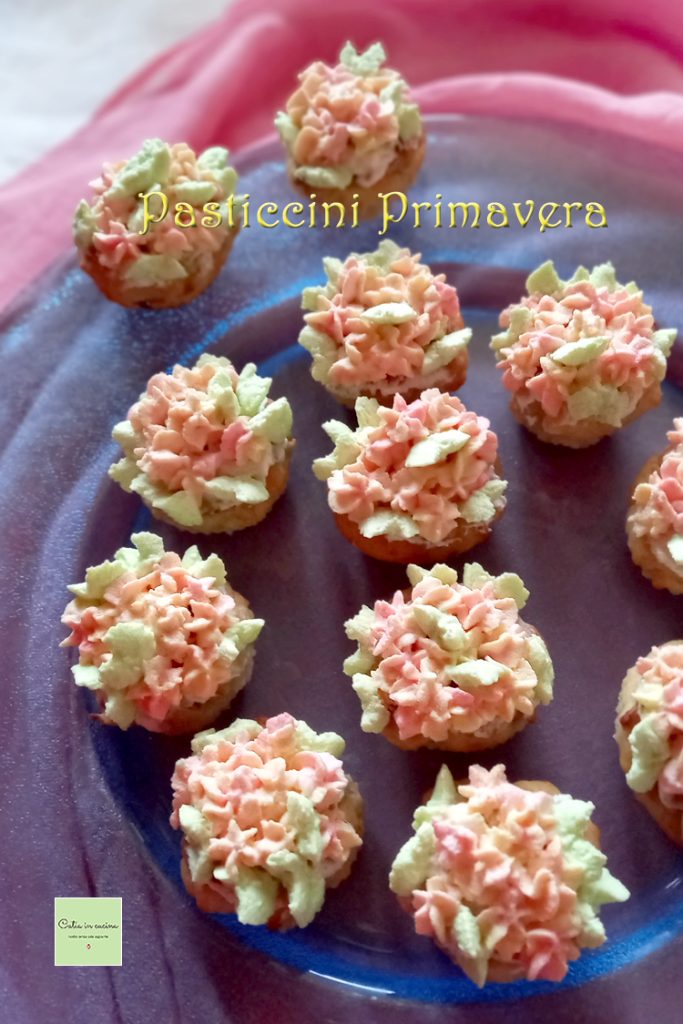
Good morning! Happy Monday! Happy first day of spring! Today I have a recipe for you that is just right, and couldn’t be more right, and you just have to try it because it was a huge success here at home. 😊 I’ll show them to you right away, they are the Spring Pastries that I made a few days ago for my mom’s birthday.
And I’m proposing them for the Light and Tasty column, for a topic that is definitely on theme today: “Let’s celebrate spring!”. Yes, this year the vernal equinox falls exactly today! 🌸
They are simply mini muffins or mini donuts, decorated with colored cream puffs, a floral decoration with soft, spring-like colors.
It’s true that sometimes it takes little. I just needed to find the right color, and the right leaf, to transform fruit donuts, like the ones I often make for breakfast, without eggs, with very little sugar, into real pastries that amazed everyone (myself first! 🤭).
The delicate colors of this decoration instinctively reminded me of Mother’s Day. In this case, it was a birthday, but I think they are also perfect for a grandmother’s or a little girl’s party. And since when I was making them they reminded me a bit of peach blossoms, they are the right color to celebrate the first day of spring, and soon they could also be the right color for an Easter treat, don’t you think?
Easter is just around the corner, and these spring pastries are already planned for Easter Day! Also because…
…well, just this morning my mom said with a determined air: “You must make them again!”. And I… oh, I can’t disobey her! 😄
🌸 Other floral ideas here on the blog:
- Difficulty: Medium
- Cost: Economical
- Rest time: 30 Minutes
- Preparation time: 1 Hour
- Portions: 24 pastries
- Cooking methods: Oven
- Cuisine: Italian
- Seasonality: All seasons
Ingredients
- 1.5 cups all-purpose flour
- 0.16 cup potato starch
- 2 tbsp corn oil
- 0.5 cup milk kefir
- 2 tbsp sugar
- 3 oz banana (ripe)
- 2.5 oz apple
- 1.75 oz pear
- 1 tsp baking powder
- Half lemon (juice and zest)
- 0.85 cup fresh whipping cream
- as needed food coloring
Tools
- Pastry bag with nozzles
- Mold silicone mini muffin mold
Steps
Peel and mash the (ripe) banana with a fork.
Peel the apple and pear and cut them into pieces.
👉 This recipe could also be categorized as recycling, since it involves a banana that is ‘overripe’ (very ripe with blackened skin) and two leftover pieces of half-eaten apple and pear. I recommend sticking to the quantity of fruit I used, as it turned out to be the optimal amount for these mini muffins.
Pour in the sugar.
Add the juice of half a lemon and its grated zest.
Chop some grapes from grapes in grappa and add them to the fruit, along with two tablespoons of grappa from the jar.
☝ Of course, if you don’t have homemade jarred grapes, you can use other spirit-soaked fruit or some raisins softened in two tablespoons of grappa or another liquor (to be used later).
Mix.
Cover the bowl with a plate and let it sit for a while, until the sugar dissolves, and the apple and pear soften a bit. There should also be a little juice formed.
Add the kefir (or yogurt) and the oil.
Add the flour and potato starch (or cornstarch if you prefer) and the baking powder (sifted).
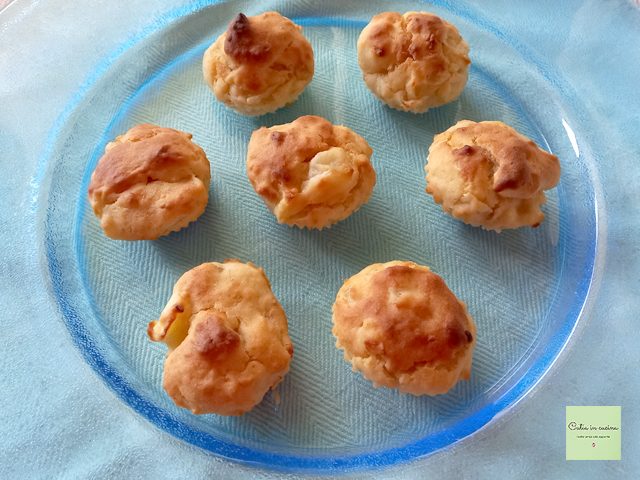
Once the mixture is ready, spoon it into small paper cups.
☝ Important: I didn’t have any mini muffin molds, so this time I adapted by using paper cups placed inside silicone cups (they are the smallest I have, but as you can see from the photo, they are too big for the size I wanted to achieve). Now that I’ve made this attempt, I recommend against using paper cups: the mixture is too soft and not greasy at all, so the paper cups stick (and removing them from the pastries after baking was a bit complicated for me). If you don’t have small molds, you can make larger muffins, that’s fine too: you’ll get 12 medium-sized muffins instead of 24 miniatures. In the end, the pastries will be bigger but equally beautiful, and good. (If needed, I’ve indicated a couple of mini muffin molds in the Tools)..

Bake the mini muffins at 356 degrees Fahrenheit for 20 minutes (if small, or 25 minutes if large).
☝ But as always, I recommend adjusting the baking time to your oven.
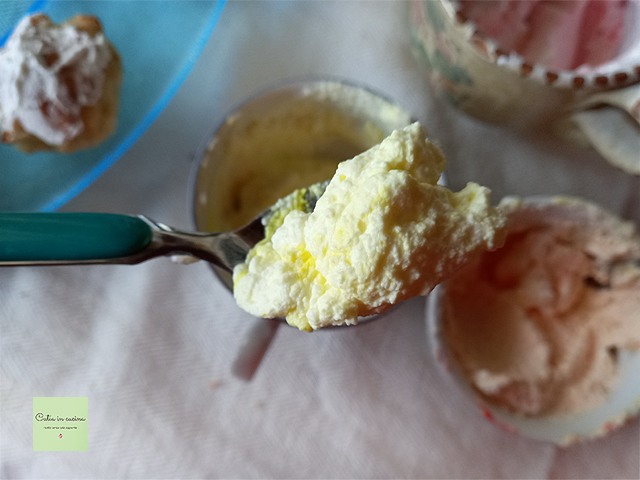
Let them cool down, and in the meantime, prepare the colored cream for decoration.
Whip the cream using an electric whisk or mixer.
☝ Since the cream will be colored with liquid food coloring, it’s good to use a few tricks to ensure that the cream is well-whipped and doesn’t lose consistency: 1) Keep the cream in the fridge until the last moment, 2) Put the container (in which the cream will be whipped) in the freezer for a few minutes before using, 3) Whip part of the cream (the one to be colored yellow and pink) and leave in the fridge (to whip later) the part of the cream that will be colored green.
Once the cream is whipped, divide it into two or three cups and color it yellow and pink (I also ended up with an unexpected salmon color 😃) or other colors to your taste, adding a few drops of food coloring to each cup.
Gently stir the cream with a teaspoon to distribute the coloring.
👉 The liquid food colorings I used (you can find them in the ingredient link) are three vials in the three primary colors, so mixing them allows you to get all the desired colors. With one warning: it’s good to use a minimal amount to avoid adding too much liquid to the whipped cream, which could deflate. When coloring whipped cream, it’s best to aim for soft colors, adding too much coloring can compromise the structure of the cream (and thus the decoration).
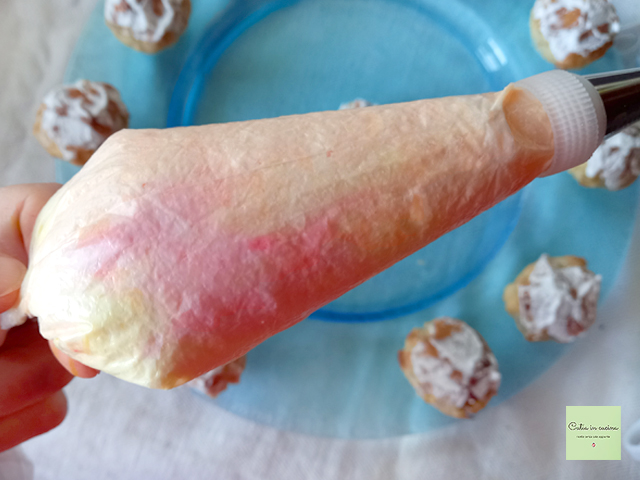
Fill a pastry bag with the colored cream, spooning it into the bag (preferably attaching it to the walls) to ensure that the three colors remain separate.
👉 The goal is to achieve cream puffs with streaked colors.
Decorate the mini muffins by covering the surface with colored puffs.
👉 Before starting this operation, I brushed a small amount of cream on the surface of the donuts as a base for the puffs.
Once the puff operation is complete, put all the freshly decorated pastries in the fridge (so the cream decoration stays fresh while proceeding with the remaining steps).
Proceed immediately to whip the cream that will be used to make the leaves, and that should be colored green (using a few drops of yellow and blue coloring).

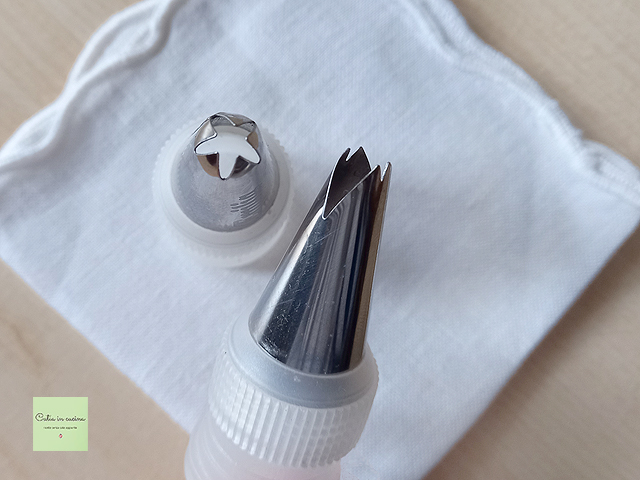
Creating this floral decoration is very simple: For the cream puffs, just use a standard star nozzle, while for the leaves, you need a special nozzle, which I show you in the following photo, usually included in the set of nozzles for pastry bags (like the kit I mentioned in the Tools).
The leaves aim to complete the decoration and make it more scenic, but not only: with the leaves, you can fill the small empty spaces between one puff and another, or cover any decoration imperfections. 😉
As always, my decorations aren’t perfect, and the photos show it, but for me, that’s the beauty 😊 the beauty of trying to achieve the best you can, even with homemade methods and basic manual skills (like mine).
And then… if we get imperfect spring pastries who cares!, we’ll eat them all right away!! Ohhh yeah!
Follow me!
In my WhatsApp channel and on Instagram, on the Facebook page, in Pinterest and in my two groups: Il gruppo di Catia, in cucina e oltre and Proprio quello che stavo cercando! and if you like… subscribe to my Newsletter.
In my WhatsApp channel and on Instagram, on the Facebook page, in Pinterest and in my two groups: Il gruppo di Catia, in cucina e oltre and Proprio quello che stavo cercando! and if you like… subscribe to my Newsletter.
Greetings and I’ll leave you with the company of other spring recipes from the Light and Tasty Team 🌸
Carla Emilia: Savory tart with zucchini and peas
Daniela: Spring pizzoccheri
Elena: Baked vegetables with tomini
Milena: Tart with redcurrants and lemon cream
Serena: Spring couscous
Carla Emilia: Savory tart with zucchini and peas
Daniela: Spring pizzoccheri
Elena: Baked vegetables with tomini
Milena: Tart with redcurrants and lemon cream
Serena: Spring couscous
