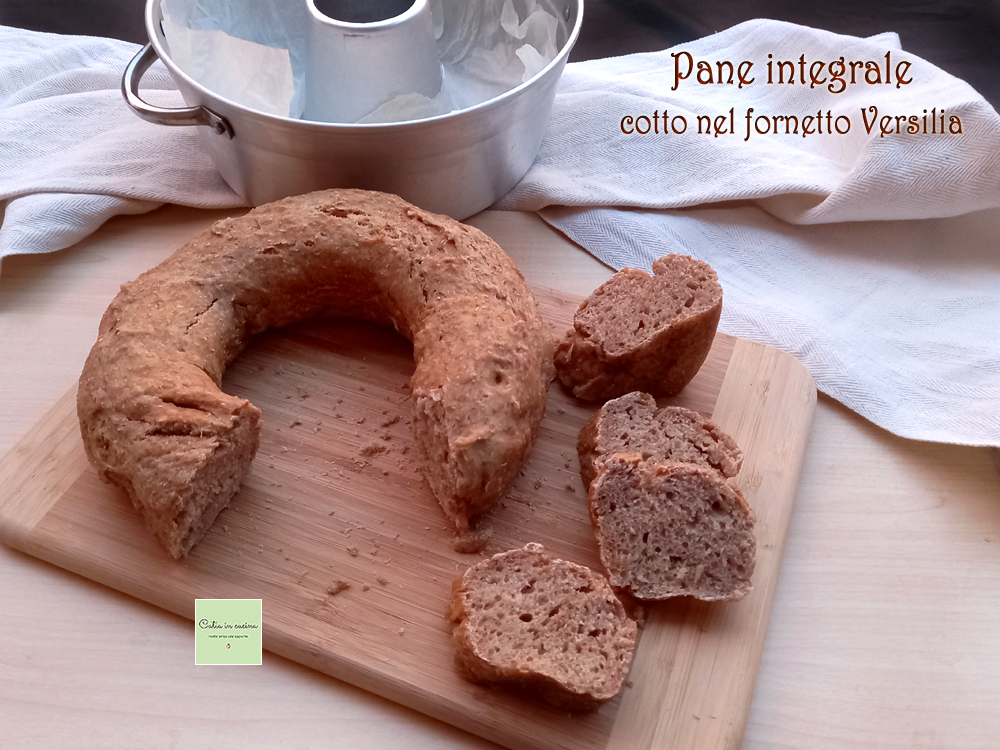
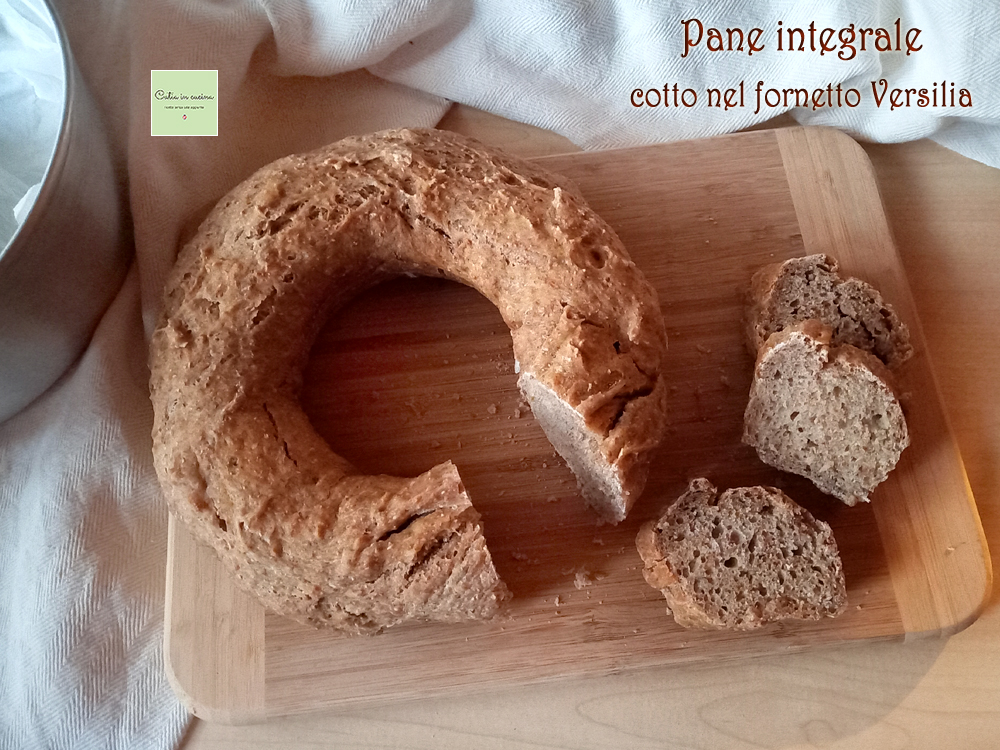
Finally I made up my mind, I inaugurated it! I baked a ‘ring’ of whole wheat bread in the Versilia oven, and it turned out well! 😃
Those who follow me on Facebook probably remember some of my posts where I confessed to owning a Versilia oven but not having the courage to use it. I bought it years ago, in fact, while preparing to write this recipe, I discovered the exact date thanks to trusty Amazon (“You last purchased this item on July 18, 2017” 😂). After remaining in the box for a couple of years, I later moved it to the kitchen shelf, and finally even placed it above the Sfornatutto, just so I could have it in front of my eyes every day. But still, I couldn’t decide. Occasionally, I’d wash it, dry it, and put it back. Basically, it stayed brand new for 7 years, never used until a week ago.
I don’t know why I suddenly got the urge to use it. Well, yes, let’s say that the fact that the door seal of the Sfornatutto broke… yes, maybe that played a role! 😂 Having to choose between using the Versilia or emptying the large oven of all the clutter it contains (the large oven is more useful to me as a storage than as an oven!), I realized that the Versilia oven was the preferable option!
I had a great experience, I didn’t face any of the issues I imagined, like the possibility of burns. In fact, by placing it on the smallest burner, the cooking time was longer than expected and, far from burning, it seemed to cook a bit too slowly. For now, I’ve only tried baking whole wheat bread, twice, and both times the cooking time was similar and, indeed, maybe a bit too long, but with a little experience, I’m sure I’ll be able to understand all the secrets of this old-fashioned oven and optimize the cooking times. So, expect more recipes! 😃
With this my first whole wheat bread in the Versilia oven, I participate in the Light and Tasty Monday column, today dedicated to whole recipes.
Are you already rolling up your sleeves?
⚛ ⚛ ⚛
Other whole breads and doughs already present on the blog: 👇
- Difficulty: Medium
- Cost: Economical
- Rest time: 8 Hours
- Preparation time: 15 Minutes
- Portions: slices: 20
- Cooking methods: Stovetop
- Cuisine: Italian
- Seasonality: All seasons
- Energy 88.05 (Kcal)
- Carbohydrates 16.23 (g) of which sugars 0.41 (g)
- Proteins 2.90 (g)
- Fat 1.34 (g) of which saturated 0.14 (g)of which unsaturated 0.86 (g)
- Fibers 1.41 (g)
- Sodium 35.75 (mg)
Indicative values for a portion of 32 g processed in an automated way starting from the nutritional information available on the CREA* and FoodData Central** databases. It is not food and / or nutritional advice.
* CREATES Food and Nutrition Research Center: https://www.crea.gov.it/alimenti-e-nutrizione https://www.alimentinutrizione.it ** U.S. Department of Agriculture, Agricultural Research Service. FoodData Central, 2019. https://fdc.nal.usda.gov
Ingredients
- 2 1/2 cups whole wheat flour
- 3/4 cup all-purpose flour
- 2/3 cup liquid sourdough starter
- 7 oz water
- 4 tbsps corn oil
Tools
- Versilia Oven
- Bowl
- Baking paper
Steps
In a large bowl, pour the two flours, the refreshed and active liquid sourdough starter, water, and oil.
Mix and knead quickly by hand.
Let the dough rise until doubled (mine took about 6 hours), then cover the bowl and place in the fridge until the next day (I did 12 hours).
Line the Versilia oven with baking paper.
👉 To make it stick better, the baking paper can be dampened and squeezed.
Remove the bowl from the fridge.
Transfer the risen dough (still cold from the fridge) into the oven.
👉 I prepared this whole wheat bread twice, proceeding in two different ways: the first time I shaped the dough into a long form and laid it around the central hole, joining the two ends; the second time I divided the dough into 10 balls and placed them close together.
Before starting cooking, let the dough re-activate at room temperature for about an hour.

Before starting cooking, place the flame diffuser (provided) on the burner. Make sure you have placed it with the concave side facing up.
Pour a few tablespoons of water into the concave part of the flame diffuser.
👉 This trick allows for a more even heat distribution.
(In the following photo, the water is there, although not very visible 😂).
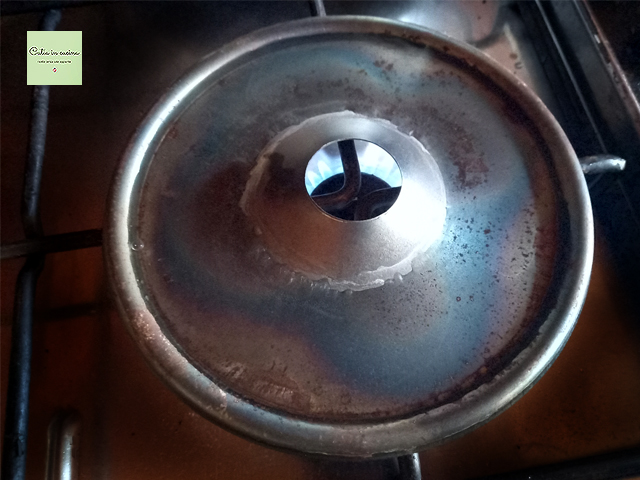
Turn on the stove and heat the flame diffuser for about half a minute.
Close the Versilia oven with the lid.
Place the oven on the flame diffuser and start cooking with high heat for the first 5 minutes, then lower the flame to minimum.
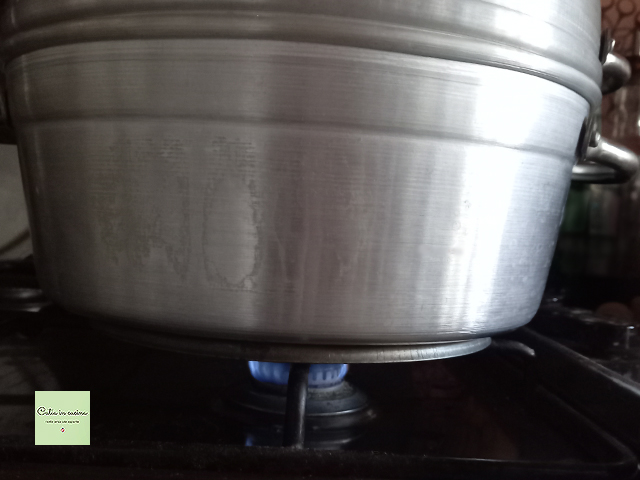
Continue cooking with the heat on low for 3 hours.
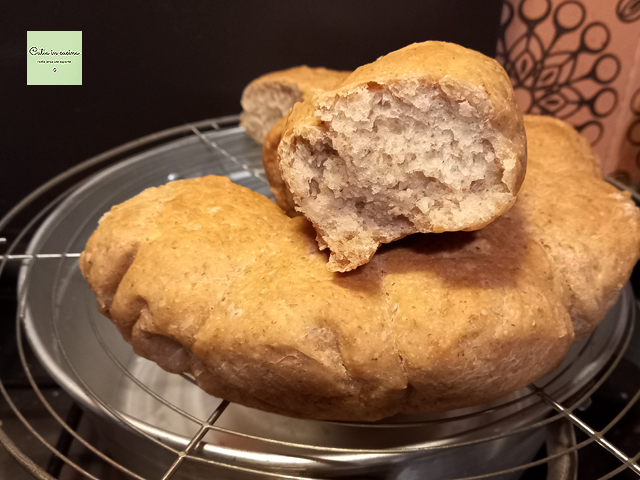
After a couple of hours, I opened the lid and, using the baking paper, lifted the bread to check the baking of the base (be careful not to burn yourself as the bread is very hot). Finding it undercooked, I placed it back in the oven, closed the lid, and continued cooking on low heat for another hour.
👉 I don’t know if by doing so I violated any official rules about using the Versilia oven, for instance, I wondered if the lid can be opened when baking bread (unlike when baking cakes), but in the end, the bread cooked well both times, so I would say it can be done.
It’s true it didn’t rise much, it remained a bit low, but it turned out well cooked, with soft crumb and crispy crust. And therefore, I am very satisfied with this first trial with the Versilia oven. 😊
☝ Note on cooking time: maybe 3 hours is a lot, I think a bread like this can be cooked in shorter times, but as I said in the introduction, this is my first recipe with the Versilia oven, so I still need some more trials to fully understand the characteristics of this tool, which is a simple pot, it has no buttons or knobs 😃 but only requires a minimum of experience in adjusting the flame.
Salt-Free Tips
 Like all my homemade bread, this whole wheat bread baked in the Versilia oven is salt-free.
If you are interested in reducing or eliminating salt, always remember to:
▫ Decrease salt gradually, the palate needs to get used to it slowly and shouldn’t notice the progressive reduction.
▫ Use spices. Chili, pepper, curry, nutmeg, cinnamon, cloves, cumin…
▫ Use aromatic herbs. Basil, parsley, oregano, thyme, sage, marjoram, rosemary, mint…
▫ Use seeds. Sesame seeds, pine nuts, almonds, walnuts…
▫ Use spicy vegetables or fruit. Garlic, onion, lemon, orange…
▫ Use my salt-free vegetable granules and gomasio.
▫ Prefer fresh foods.
▫ Avoid cooking in water, prefer cooking methods that do not disperse flavors (grill, foil, steam, microwave)
▫ Avoid bringing the salt shaker to the table!
▫ Occasionally allow yourself a break from the rule. It is good for morale and helps to persevere.
If you don’t want to, or can’t, give up salt:
▫ You can still try my recipes by salting according to your habits.
Follow me!
On my new WhatsApp channel and on Instagram, on the Facebook page, in Pinterest and in my two groups: Catia’s group, in the kitchen and beyond and Exactly what I was looking for! and if you want… subscribe to my Newsletter.
Other Light and Tasty Recipes:
What whole recipes did my colleagues from the Light and Tasty Team cook?
Carla Emilia: Whole Wheat Couscous Ligurian Style
Claudia: Whole Wheat Risotto with Mushrooms and Robiola
Daniela: Whole Wheat Biscuits with Honey and Cinnamon
Elena: Buns with Multigrain Flour, Sunflower Seeds, and Sesame Seeds
Milena: Cakes with Whole Wheat Flour and Dried Plums
