The quick no-knead bread is a very simple recipe, perfect for those who want to make homemade bread quickly using yeast. To make it, you only need the basic ingredients: flour, water, yeast, and salt.
It’s a medium hydration dough and you won’t need a stand mixer to knead it. Instead, just a bowl, a spoon, and some patience are enough to get a delicious result that will leave everyone amazed.
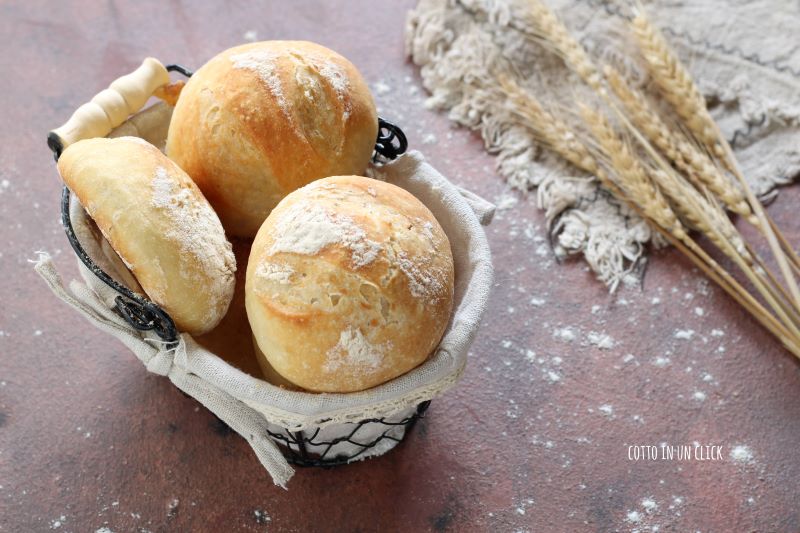
The result will be super crispy on the outside and soft inside, perfect to fill with your favorite cold cuts and cheeses. Generally, the times to make bread are much longer and more complex. I wanted to try my version by making it more practical and faster.
In this recipe, I will guide you step by step in creating your rolls, from creating the leavened dough to baking. By following the instructions carefully, you’ll get perfect buns to enjoy on any occasion! They’re so good that not a single bite has been left at my house! Are you curious? Read the recipe because the quick no-knead bread will be ready in a click!
If you’re looking for other bread recipes, also read:
- Difficulty: Easy
- Cost: Very economical
- Rest time: 2 Hours 30 Minutes
- Preparation time: 30 Minutes
- Portions: 10 rolls
- Cooking methods: Oven
- Cuisine: Italian
- Seasonality: All seasons
- Energy 135.15 (Kcal)
- Carbohydrates 30.10 (g) of which sugars 0.42 (g)
- Proteins 4.07 (g)
- Fat 0.81 (g) of which saturated 0.18 (g)of which unsaturated 0.59 (g)
- Fibers 5.34 (g)
- Sodium 387.58 (mg)
Indicative values for a portion of 49 g processed in an automated way starting from the nutritional information available on the CREA* and FoodData Central** databases. It is not food and / or nutritional advice.
* CREATES Food and Nutrition Research Center: https://www.crea.gov.it/alimenti-e-nutrizione https://www.alimentinutrizione.it ** U.S. Department of Agriculture, Agricultural Research Service. FoodData Central, 2019. https://fdc.nal.usda.gov
Ingredients
- 3 1/4 cups flour (w 260)
- 1 1/8 cups water (at room temperature)
- 3/4 tsp fresh yeast
- 2 tsp salt
- semolina flour (as needed for the work surface)
Tools
- Bowl
- Spoon
- 2 Baking sheets
- Parchment paper
Steps
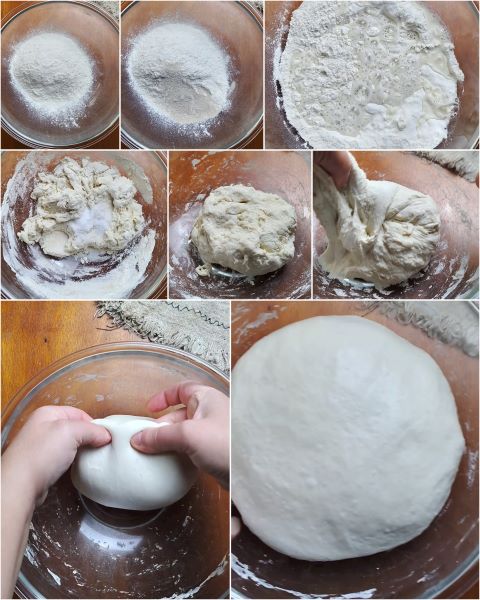
First, prepare the dough. Place the flour, yeast, and room temperature water in a bowl. Start mixing with a spoon until the water absorbs the flour.
At this point, add the salt and continue to mix with a spoon or even with your hands if you prefer. You’ll get a sticky, messy dough. That’s perfectly fine because the gluten network hasn’t formed yet. Cover the bowl with plastic wrap and let it rest for 30 minutes.
After the resting time, take the bowl again and start the first round of folds by gently pulling a flap of dough and folding it toward the center. Turn the bowl halfway and repeat the operation. Rotate the bowl a quarter turn and do the same operation again: take a flap of dough and fold it towards the center. Now turn the bowl again for another quarter turn and repeat the same operation.
You’ve done the first round of folds. Cover the bowl again and let it rest for 20 minutes. Repeat the same round of folds 2 more times, always spacing them 20 minutes apart.
You’ll see that as you do the rounds of folds, the gluten network will start to form and the dough will begin to become smooth. The folds are a fundamental step to incorporate air and give structure to the gluten network. It takes some time and patience, but you’ll be rewarded with rolls that are crispy on the outside and soft on the inside.
After finishing the 3 rounds of folds, cover the bowl again with plastic wrap and let it rise for 2 hours, or until doubled.
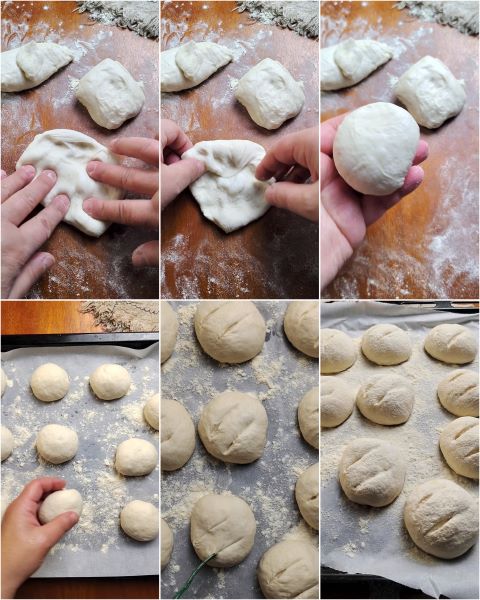
After the rising time, take the bowl and transfer the dough onto a floured work surface with semolina flour. Then divide the dough into 10 pieces of 50 g each.
Flatten them slightly with your hands and bring the edges towards the center. Then form balls with the palm of your hands, close the edges well, and transfer them onto a baking sheet covered with parchment paper and lightly floured again with semolina flour.
Cover the tray with plastic wrap or a kitchen towel and let the rolls rise again for another 30 minutes. Then take the rolls and make two deep cuts of at least 1 cm with a very sharp knife.
Add a bit of flour and spray some water on the surface of the rolls to create steam during baking. This step will allow your bread to form a nice crispy crust. Then cover with another inverted baking sheet, which should not touch the rolls. The edges should match the tray underneath.
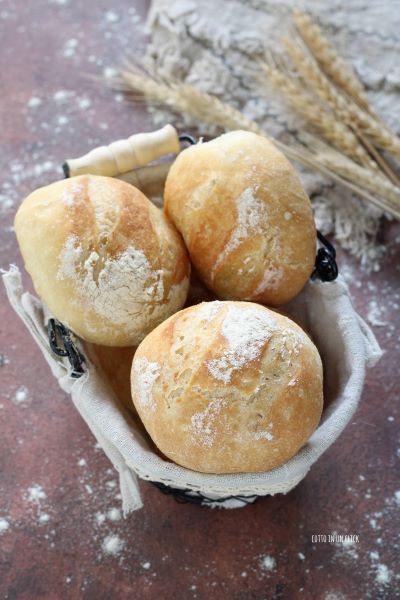
Bake the rolls in a preheated oven at 230°C (446°F) with static function for 20 minutes, placing them at the bottom of the oven. Then remove the baking sheet you had placed above, lower the temperature to 200°C (392°F) and continue baking for another 20 minutes, or until the surface is golden brown.
Remove the rolls from the oven and let them cool before filling them with the cold cuts and cheeses you prefer.
Variations and Tips for Quick No-Knead Bread
When I prepare these doughs, I always use semolina flour for the work surface. Unlike all-purpose flour, semolina flour is less absorbent.
I recommend making them in large quantities, so you can freeze them and have them ready anytime.
This content also contains one or more affiliate links, where I might earn a small commission at no additional cost to you.
FAQs for Quick No-Knead Bread
What is the best flour for making bread?
The flour for this type of preparation should have at least 12/13% protein content. You’ll find this information on the package where the nutritional values are listed.
Why doesn’t the bread rise?
It could be that the dough wasn’t worked enough, or the yeast has expired.
Why is the bread dense?
It can be due to the rising time. Bread requires adequate rising time to develop a light and airy structure.