There is nothing more comforting than the scent of freshly baked cocoa dipping cookies filling the house. This version, prepared with type 1 flour and brown sugar, is meant for those who love authentic flavors and textures that can soak up hot milk without falling apart right away. Making these cocoa shortbread cookies is a breeze: the dough is ready in a few minutes and doesn’t need to rest in the fridge, a real time-saver for your homemade breakfast! Follow my steps to get crispy, fragrant cookies perfect for dunking!
If you’re looking for more cookie ideas try the 3-ingredient soft almond cookies, canestrelli, lemon shortcrust cookies or the jam-filled big cookies.
Find what suits you among all my SWEETS!
Follow my FACEBOOK page for daily kitchen inspiration!
OTHER BREAKFAST SWEETS
- Difficulty: Easy
- Cost: Budget-friendly
- Preparation time: 10 Minutes
- Cooking time: 15 Minutes
- Portions: 8 Servings
- Cooking methods: Oven
- Cuisine: Italian
- Seasonality: All year round
Ingredients for your cocoa dipping cookies
- 2 1/2 cups type 1 flour
- 1/3 cup unsweetened cocoa powder
- 1/2 cup brown sugar
- 1 egg
- 1/3 cup extra virgin olive oil
- 1/3 cup oat milk (you may need a little more)
- 2 tsp baking powder
- 1 pinch salt
Steps to prepare the cocoa dipping cookies
Start by taking a large bowl and add the type 1 flour, the sifted unsweetened cocoa powder (to avoid lumps) and the baking powder. Add the brown sugar and a pinch of salt, then mix well with a spoon or a whisk. This “dry mix” step is essential to evenly distribute the cocoa and the leavening agent, ensuring your cocoa cookies have a uniform color and rise consistently in the oven.
Make a well in the center of the dry ingredients and add the egg, the extra virgin olive oil and the oat milk. Begin to work the ingredients with a fork, gradually incorporating the flour from the edges. When the mixture starts to become firmer, transfer it to the work surface and knead it by hand for a few minutes. The goal is to obtain a smooth, elastic, non-sticky dough. Thanks to the oil and oat milk, the dough will be ready to shape right away without needing to rest in the fridge — a real time-saver for your homemade breakfast!
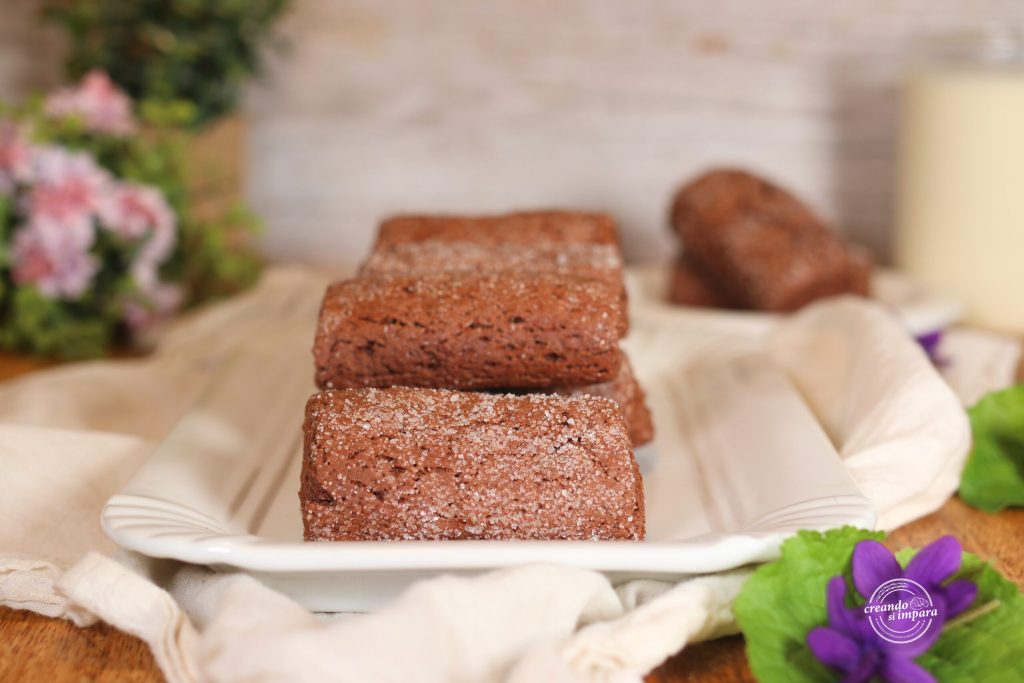
Take pieces of dough and shape them into long little cylinders, about the thickness of two fingers. Prepare a small plate with brown sugar and roll each cylinder in it, pressing lightly so the grains adhere well to the surface. This step will create that delicious, characteristic sugary crust while baking. Once ready, cut the cylinders into pieces about 2″ (5–6 cm) long to get the classic grandma-style dipping cookies, ready to dive into a cup.
Place the cookies on a baking sheet lined with parchment paper, spacing them slightly apart. Bake in a conventional oven at 356°F for about 15 minutes. Don’t leave them in too long: when you take them out they will still feel slightly soft to the touch, but that’s normal. As they cool, the rustic cocoa cookies will reach their ideal texture, becoming crisp and perfect for dunking. Let them rest on a rack before tasting or storing.
Tips for a perfect result
Milk amount: Add the oat milk with care. Start with about 1/3 cup (80 ml) and add the remaining 1 tablespoon + 1 teaspoon (20 ml) only if you see the flour is struggling to come together. Less-refined flours like type 1 can vary in absorption depending on the humidity of the environment.
Quality oil: Choose a mild extra virgin olive oil. If the oil is too strong, its flavor can overpower the cocoa. Oil is the secret to making these healthier cookies that keep well for a long time without using butter.
Sugar on the surface: If you want an even more “sparkling” effect, you can use white granulated sugar for the outside decoration — it will stand out more against the dark color of the unsweetened cocoa.
Tasty variations you can try
Orange touch: Grate the zest of an organic orange into the dough during the liquid ingredients stage. The combination of cocoa and orange is a classic that will turn your breakfast cookies into a wonderfully fragrant dessert.
Chocolate chips: For a more indulgent version, add 1 1/2 oz (about 40 g) of dark chocolate chips to the dough. You’ll get dipping cookies with a slightly melting center in every bite.
Hazelnut flour: Replace 1 oz (about 30 g) of type 1 flour with hazelnut flour. The nuts will enhance the cocoa flavor, recalling the taste of a famous chocolate spread in cookie form.
Storage and suggestions
In a tin: These cookies keep well for about 10–12 days if stored in a tin box or an airtight glass jar. They will retain the ideal crispness for dunking.
Gift idea: Being dry and sturdy, they’re perfect to pack in clear bags with a pretty ribbon and give to friends for tea or a special breakfast.
Best dunking pairing: Try these cocoa cookies with warm almond milk or barley coffee. Their porous structure will absorb the liquid without breaking, giving a nutritious and balanced breakfast.
Now it’s your turn!
Cocoa dipping cookies prove that simplicity pays off. Few healthy ingredients, quick preparation and the result is a daily treat that beats any industrial product.
Are you a serial dunker or do you prefer to nibble cookies as they are? Do you like the plant-milk version or do you prefer regular milk? Tell me in the comments — I can’t wait to know if these cocoa shortbread cookies will become your family’s new favorites!
FAQ (Questions & Answers)
Can I use whole wheat flour?
Yes, you can replace type 1 flour with whole wheat flour. In that case, be sure to add the full about 1/3 cup + 1 tbsp (100 ml) of oat milk, because the fibers absorb more liquid.
Why did my cookies turn out too hard?
They were probably overbaked. Cocoa cookies shouldn’t darken too much in the oven (and it’s hard to tell with cocoa), so follow the 15 minutes at 356°F carefully.
Can I omit the egg?
In this recipe the egg acts as a binder. If you want an egg-free version, you’ll need to rebalance the liquids by increasing the oat milk and possibly adding a pinch of starch to help the structure.