The bar croissants with simple lamination are amazing, I’ve wanted to try this for a while, but the classic lamination was too much work. I was looking for a simpler method, so I tried the disc lamination, made several attempts to achieve what I consider an excellent result, and even my mother-in-law liked them, so you know they are good! Now, let’s get our hands dirty and try these croissants! At the end of the article, you will also find the step-by-step photos!

- Difficulty: Medium
- Cost: Cheap
- Rest time: 20 Hours
- Preparation time: 30 Minutes
- Portions: 16 croissants
- Cooking methods: Electric oven
- Cuisine: Italian
- Seasonality: All seasons
Ingredients for the dough
- 16.23 oz Manitoba Flour
- 3.53 oz All-purpose Flour
- 3 Eggs (small)
- 3.53 oz Sugar
- 0.14 oz Dry Yeast (or 0.25 oz fresh)
- 3.53 oz Milk
- 3.17 oz Water
- 5.29 oz Soft Butter
- 3.53 oz Melted Butter
- 2.47 oz Sugar
Tools
- Bowl
- Plastic Wrap
- Kitchen Scale
- Parchment Paper
- Pastry Cutter
- Baking Tray
- Work Surface
- Rolling Pin
- Stand Mixer
- Brush
Preparation of Bar Croissants with Simple Lamination
Whether you use a stand mixer or your hands to knead, use the ingredients in the following order: in the stand mixer bowl: insert the water, milk, eggs, flours, butter, sugar, and yeast.
Run the stand mixer at speed 2 for 10 minutes until the dough is well combined (if kneading by hand, it will take a bit longer but will be just as good!).
Once the dough is ready, combined and smooth, make it into a ball, place it in a bowl (preferably glass), cover with plastic wrap, and leave in the fridge overnight. I kneaded the dough after dinner.
The next morning, take out the dough and let it sit at room temperature for at least 2 hours.
After 2 hours, work the dough on the work surface, dividing it into 6 equal parts.
Shape each part of the dough into a ball, place the 6 balls to rise on a baking tray covered with plastic wrap, and let rise in the turned-off oven until tripled in size.
Once the 6 dough balls have tripled, take them and roll them out thinly to about the same diameter.
Place a disc in front of you, brush with melted butter and sprinkle with sugar, place another disc on top, and continue with melted butter and sugar until placing the last disc (on top of the last disc you don’t put butter or sugar).
Now use the rolling pin to press down and expand the stack of dough discs, bringing everything to a thickness of about half a centimeter.
Cut 16 triangles with a cutter (this makes medium-sized croissants), roll from the wide part to the tip, and place the croissants on a baking tray with parchment paper.
Place the tray (or trays depending on how many you make) with the croissants to rise in the turned-off oven until they triple in size.
Once the croissants have tripled in size, remove them from the oven, turn it on and heat it to 356°F (static oven) and when it reaches temperature, brush the croissants with a bit of melted butter (leftover from the lamination) and sprinkle with sugar (also leftover from the lamination) and bake, cook for 30 minutes.
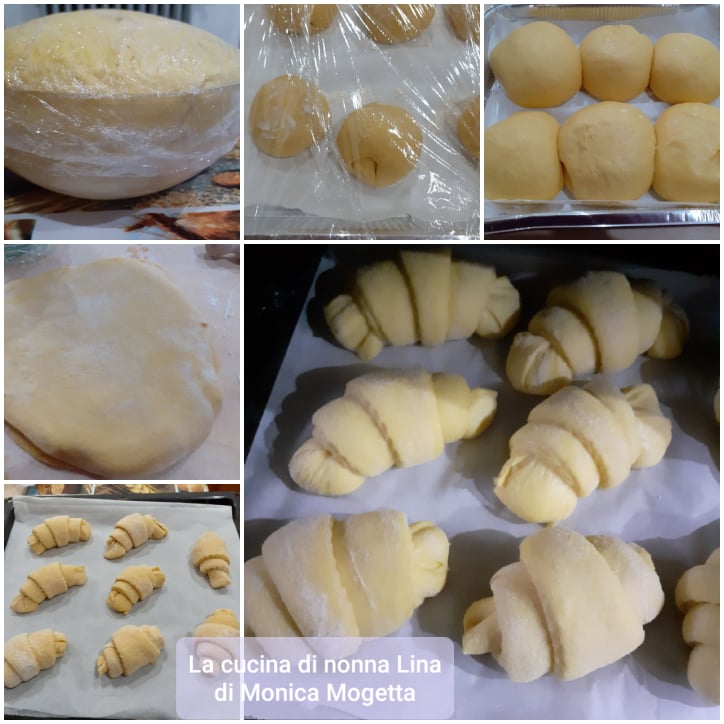
Here are the step-by-step photos up to just before baking: the dough in the bowl after a night in the fridge, the formed balls, the risen balls, the rolled-out discs with butter and sugar between layers, the croissants set to rise, and the croissants tripled in size and ready to bake.
The inside of the croissants.

You can fill the croissants either before or after baking. Before baking, you can brush with milk or beaten egg instead of butter. They stay soft for days, but if you want to keep them longer, you can freeze them once baked and cooled. I recommend baking only one tray at a time.
