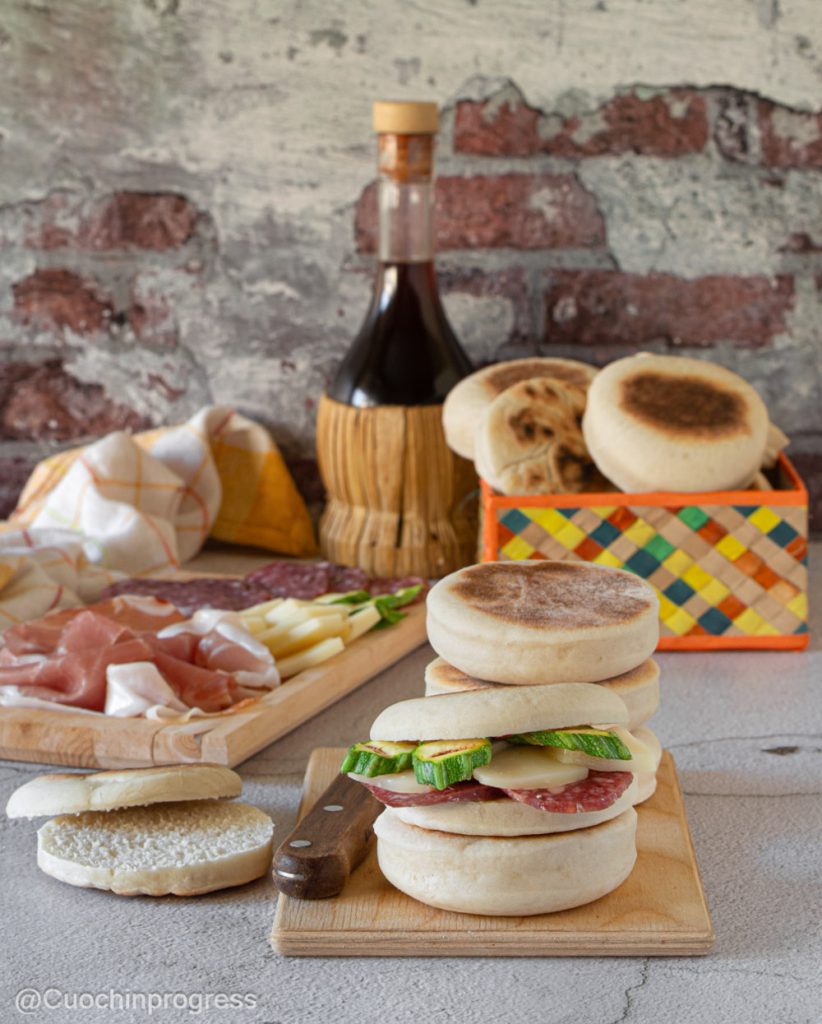
The TIGELLE are one of the most loved symbols of Emilian cuisine, especially from the province of Modena. These small discs of leavened bread are crispy on the outside and soft on the inside, and contain all the warmth of old farmhouse tables.
They were once baked between terracotta plates called tigelle (from which the name comes), stacked one on top of another and cooked directly over the fire.
Today they are prepared on special cast-iron tigelliere or nonstick pans, but the spirit remains the same: simple bread made with few ingredients that becomes extraordinary when filled.
Tigelle are versatile and lend themselves to a thousand pairings: from the classic beaten lard with garlic and rosemary (cunza), to cured meats, fresh cheeses like squacquerone, vegetarian fillings or even sweet versions.
Serving tigelle means rediscovering the pleasure of being together, sharing genuine tastes and childhood memories. They are perfect for a rustic dinner, a creative appetizer or an unusual savory snack.
You might also like:
- Difficulty: Very easy
- Cost: Very economical
- Rest time: 1 Hour 30 Minutes
- Preparation time: 15 Minutes
- Cooking time: 10 Minutes
- Portions: 14 pieces
- Cooking methods: Griddle
- Cuisine: Italian
- Seasonality: All seasons
- Energy 145.50 (Kcal)
- Carbohydrates 26.26 (g) of which sugars 1.96 (g)
- Proteins 4.83 (g)
- Fat 2.88 (g) of which saturated 1.22 (g)of which unsaturated 1.55 (g)
- Fibers 1.09 (g)
- Sodium 277.78 (mg)
Indicative values for a portion of 53 g processed in an automated way starting from the nutritional information available on the CREA* and FoodData Central** databases. It is not food and / or nutritional advice.
* CREATES Food and Nutrition Research Center: https://www.crea.gov.it/alimenti-e-nutrizione https://www.alimentinutrizione.it ** U.S. Department of Agriculture, Agricultural Research Service. FoodData Central, 2019. https://fdc.nal.usda.gov
Ingredients
- 4 cups type 0 flour
- 9.5 fl oz milk (or half milk and half water)
- 3 tsp fresh (compressed) baker's yeast
- 1 tsp sugar
- 2 tbsp lard (or 2 tablespoons extra-virgin olive oil)
- 1 2/3 tsp salt
You will need for the tigelle
- 1 Bowl
- 1 Griddle
- 1 Cling film
- 1 Round cutter 3 1/8 in
- 1 Work surface
- 1 Rolling pin
Tigelle preparation
In a bowl or in the stand mixer, dissolve the yeast in warm milk with the sugar. Add the flour and the lard and mix the ingredients for 10 minutes.
If you use a stand mixer, perform this step with the dough hook.
Finally add the salt and knead until you obtain a smooth and elastic dough ball. This will take about 10 minutes.
Cover the dough with cling film and let it rise for about 1 hour and a half, or until doubled in size, in a turned-off oven with the light on.Once the dough has doubled in volume, roll it out on a lightly floured work surface to about 0.2 in (5 mm) thickness. Cut out discs about 3 1/8 in (8 cm) in diameter using a round cutter or a glass.
Cook the tigelle over low heat on a traditional tigelliera, a nonstick skillet or a hot griddle for about 2-3 minutes per side, until golden.
Once your tigelle are ready, serve them in the classic way, with the cunza (beaten lard with garlic and rosemary) and Parmigiano, or with cured meats, squacquerone, pesto, cheese spreads, grilled vegetables.
You can also enjoy them sweet, with honey or hazelnut spread.
Storage
At room temperature
Cooked tigelle can be stored in a food bag or an airtight container for 1-2 days.
To keep them soft, you can wrap them in a clean cotton cloth once cooled.
In the fridge
If filled, it is advisable to store them in the refrigerator, well wrapped in cling film or in a container, for up to 2 days.
Reheat them in a pan or in the oven before serving to restore the dough’s aroma.
In the freezer
Tigelle freeze very well once cooked. Let them cool completely, then freeze them in a freezer bag, separating them with parchment paper if you want to keep them individual.
They last up to 2 months.
To enjoy them, simply heat them directly from frozen in a pan or oven for a few minutes: they will come back fragrant as if just made.