Want the Ultimate Oven-Baked Pork Belly with Ultra-Crispy Crackling of 2025?
Here’s How!
Are you looking for the perfect recipe for oven-baked pork belly boasting incredibly crispy crackling, the kind that “crunches” with every bite, and juicy, tender meat?
If you’ve typed “how to make crispy pork belly” or “secrets to perfect crackling,” your search is finally over!
This is the definitive and updated 2025 guide you’ve been waiting for.
Forget forever the disappointment of chewy crackling or dry meat.
With our step-by-step oven-baked pork belly recipe, we’ll reveal all foolproof tricks to achieve chef-worthy results, right in your kitchen.
You’ll learn:
The secrets to impeccable pork belly preparation (crucial for crispiness!).
How to create an aromatic rub that enhances your meat’s flavor.
The slow-cooking technique followed by thermal shock that ensures golden and spectacularly crispy crackling.
This is not just a simple recipe but a real journey to master the art of oven-baked pork belly with crispy crackling.
Get ready to impress everyone with a dish that will become the undisputed star of your table.
Discover right away how to transform 4.4 lbs of pork belly into a masterpiece of flavor and crispiness!
- Chinese Braised Pork Belly, Hongshao Rou: The Recipe You Must Try
- How to Cook Zucchini in a Different Way: Easy, Quick, and Flavorful Recipe
- Florentine Steak (T-bone) of Bavarian Simmenthal: Perfect Stove Top Cooking!
- Flat Iron Steak Recipe: Secrets for Ideal Cooking
- Smash Burger 2025: The Definitive Recipe for a Crisp and Juicy Homemade Result
- Difficulty: Very Easy
- Cost: Economical
- Rest time: 10 Minutes
- Preparation time: 20 Minutes
- Portions: 8 People
- Cooking methods: Slow Cooking, Oven
- Cuisine: Italian
- Seasonality: All Seasons, Spring, Summer
- Energy 1,072.67 (Kcal)
- Carbohydrates 1.10 (g) of which sugars 0.01 (g)
- Proteins 66.46 (g)
- Fat 89.20 (g) of which saturated 32.38 (g)of which unsaturated 57.17 (g)
- Fibers 0.65 (g)
- Sodium 5,734.90 (mg)
Indicative values for a portion of 190 g processed in an automated way starting from the nutritional information available on the CREA* and FoodData Central** databases. It is not food and / or nutritional advice.
* CREATES Food and Nutrition Research Center: https://www.crea.gov.it/alimenti-e-nutrizione https://www.alimentinutrizione.it ** U.S. Department of Agriculture, Agricultural Research Service. FoodData Central, 2019. https://fdc.nal.usda.gov
Ingredients
- 4.4 lbs pork belly
- 4 teaspoons coarse salt
- 3 tablespoons smoked paprika
- 30 leaves sage
- 6 sprigs rosemary (Fresh)
- 1 tablespoon black pepper (Generous)
- 3 tablespoons vinegar
- 1 teaspoon salt
Tools
- 1 Cutting Board Freshmagis
- 1 Bowl Pyrex
- 1 Knife Axer
- 1
Steps
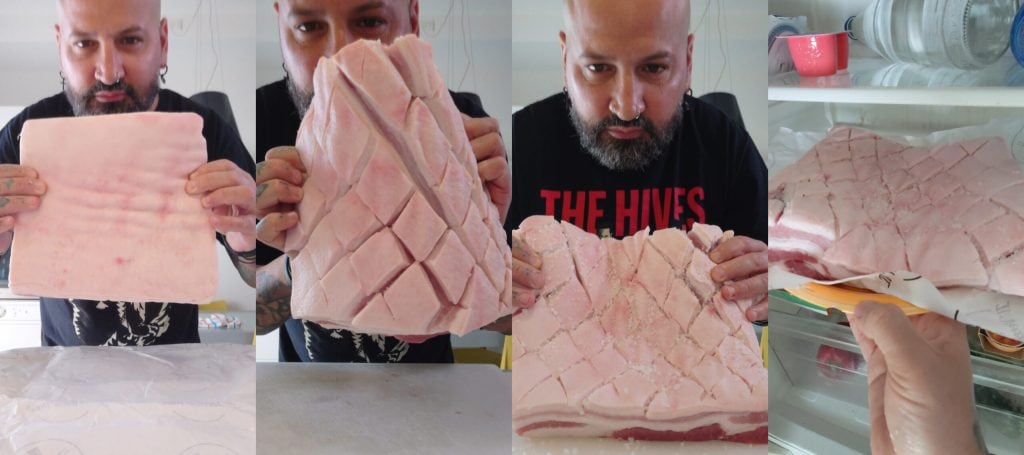
Begin transforming your pork belly the day before.
Take the pork belly and, with a very sharp knife or a cutter, score the skin creating a diamond or square pattern, with cuts about half an inch deep.
Why this step?
Scoring allows heat to penetrate better, helps the fat melt more easily during cooking, and most importantly, is the secret to creating those magnificent crispy bubbles on the surface.
Then, generously sprinkle the scored skin with coarse salt. Slightly massage it to help it penetrate. Now, the crucial step: place the pork belly uncovered in the fridge, skin-side up, for at least 8-12 hours.
Why the fridge rest?
The salt and the dry fridge environment will draw moisture from the skin, dehydrating it.
A drier skin is the number one guarantee for spectacular crispiness and to avoid a chewy effect.
This is the first, fundamental step towards perfection.
Final Drying and Application of Aromatic Rub for a Unique Flavor.
On the day of cooking, remove the pork belly from the refrigerator. You’ll notice the skin appears drier.
Remove any excess coarse salt and, importantly, meticulously pat the entire surface of the skin with kitchen paper towels.
The drier it is, the better!
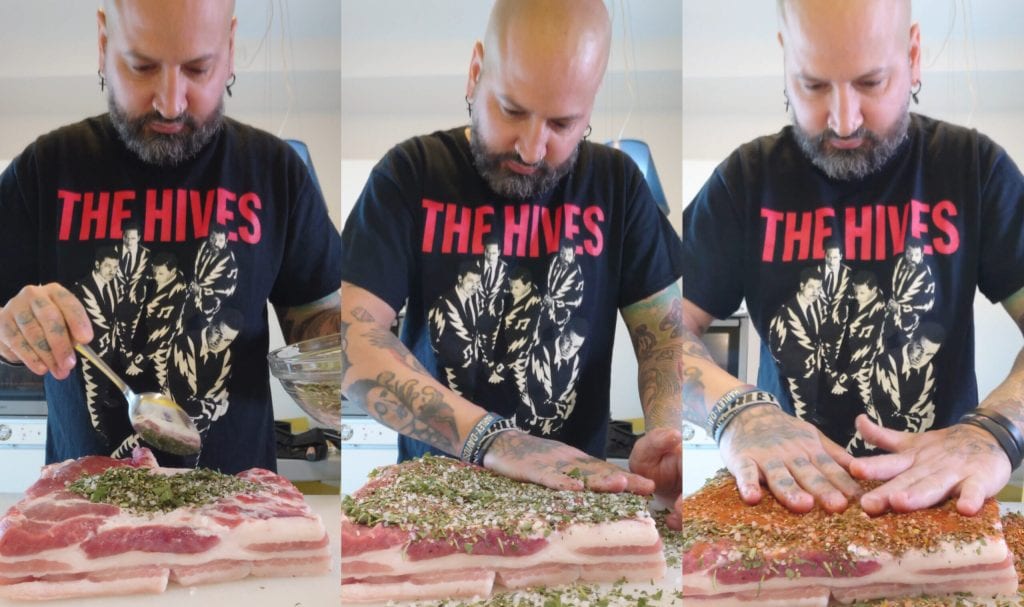
While the skin dries further in the air for a few minutes, prepare your aromatic rub by mixing all the spices (coarse salt, smoked paprika, chopped fresh sage, and rosemary, black pepper).Now, generously sprinkle the rub ONLY on the meat side of the pork belly (the sides and the base), avoiding the skin to keep it as dry as possible.
Vigorously massage the rub onto the meat to make it adhere well and deeply flavor it.
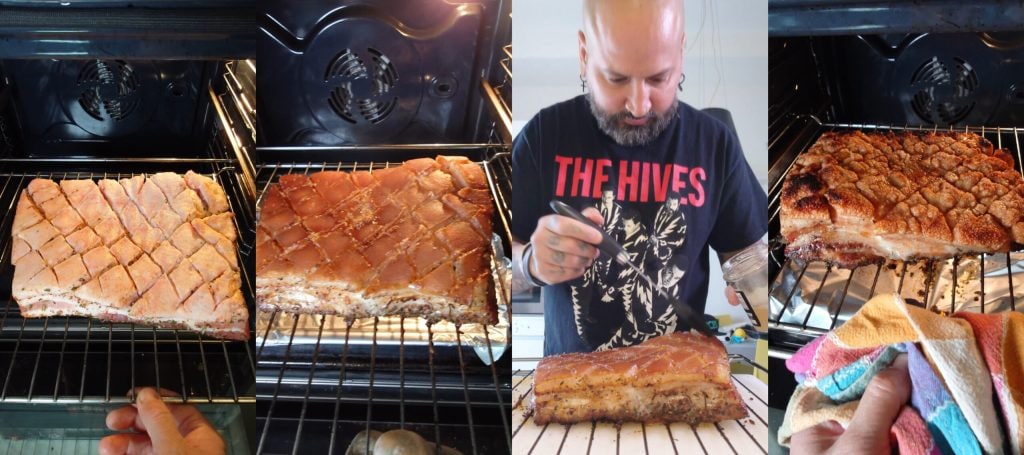
Finally, place the pork belly on an oven rack, which in turn is placed over a tray (to collect the fats), with the skin always facing up.
Why the rack?
It allows optimal circulation of hot air around the entire pork belly, ensuring even cooking and helping the skin to dry out further.
Slow Cooking and the “Magic Touch” for Supreme Crispiness.
Preheat the static oven to 300°F. Slowly roast your pork belly for about 3 hours.
Why slow cooking?
This stage is essential to make the meat incredibly tender and juicy, gradually melting the internal fat without drying the fibers.
After 3 hours, remove the pork belly from the oven. The meat will be tender, but the skin requires the “final treatment.”Pat the skin again with paper towels to remove any trace of moisture or surface fat.
Now prepare a solution with 2-3 tablespoons of white wine vinegar (or apple cider) and 1 tablespoon of fine salt.
Lightly brush this mixture onto the dry skin.
Why vinegar and salt?
The vinegar, with its acidity, helps further dehydrate the skin’s surface and break proteins, promoting the creation of ultra-crispy bubbles; the salt contributes to flavor and crispiness.
Now raise the oven temperature to the maximum, ideally 480°F static (or 445-465°F fan-assisted, if you prefer, but with more attention).
Put the pork belly back in the oven for the thermal shock phase.
Roast for about 3-10 minutes.
MAXIMUM CAUTION: during this phase, the skin can go from golden to burnt in an instant!
Watch it closely and don’t walk away.
The exact time depends on your oven; the skin should puff up, become golden, and incredibly crispy.
The Deserved Rest and Perfect Cutting of Your Pork Belly Masterpiece.
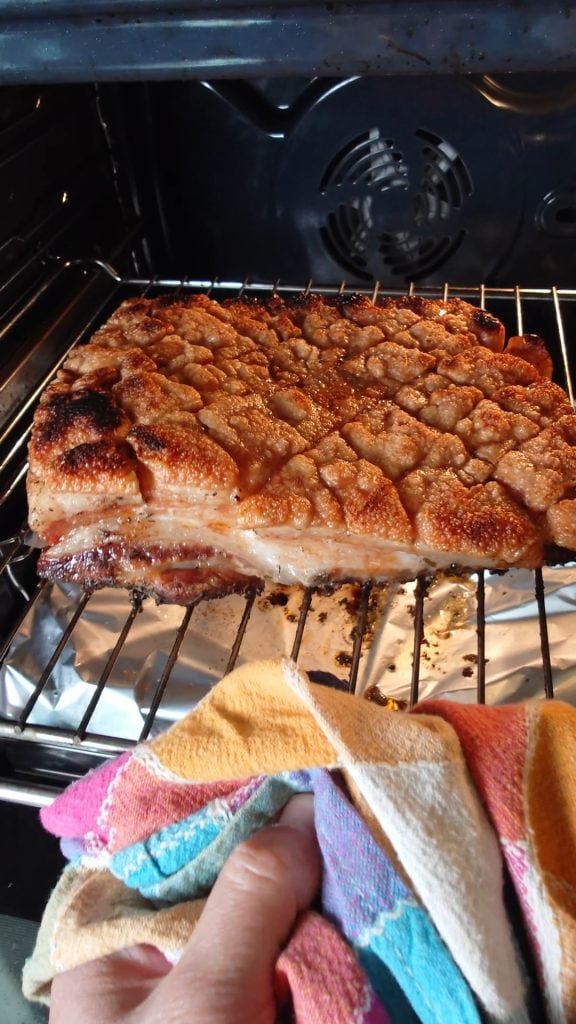
Once the skin has reached an intense golden color and a crunchiness to die for, immediately remove the pork belly from the oven.
Resist the temptation to cut it immediately!
Let it rest on a cutting board for at least 10-15 minutes.
Why the rest?
This step is crucial: it allows the internal juices of the meat, which have moved towards the center during cooking, to redistribute evenly.
The result will be much juicier and tenderer meat when cut.
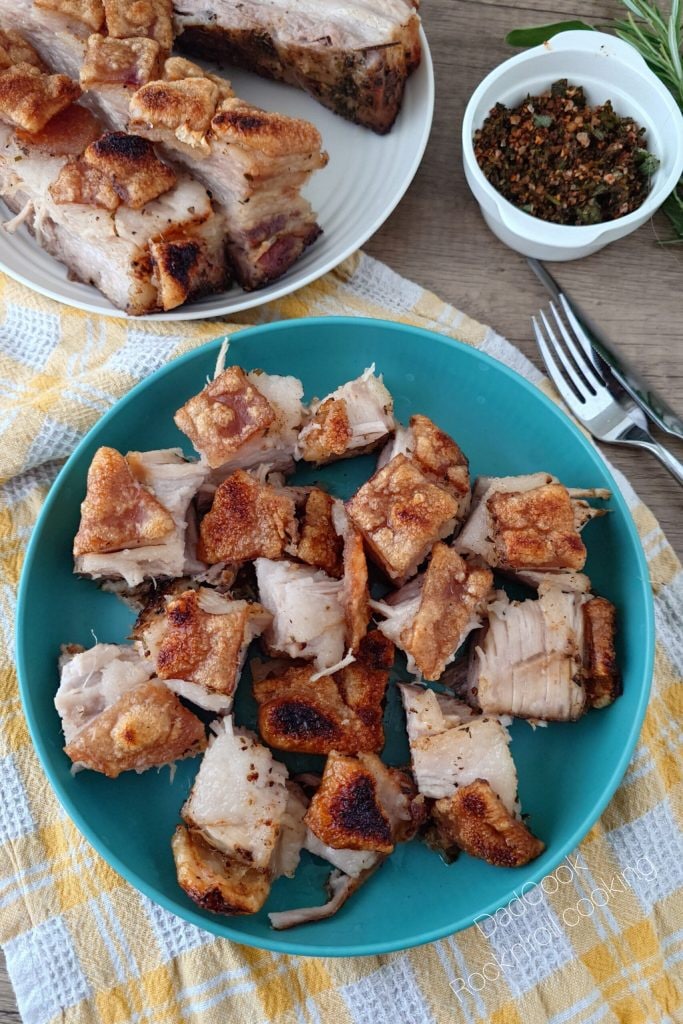
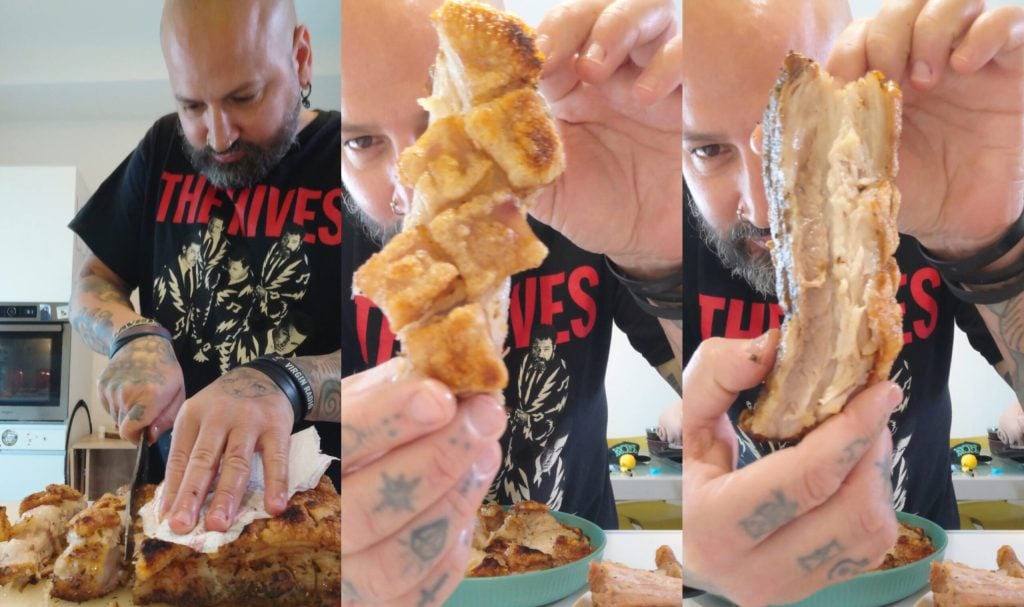
After resting, proceed to cut it. Use a very sharp knife or a robust serrated knife.
Start by decisively scoring the crispy skin, then sink into the tender meat.
You can cut it into strips about 0.6-0.8 inches thick, or into cubes, depending on your preference.
Get ready to hear the heavenly sound of the crackling breaking!
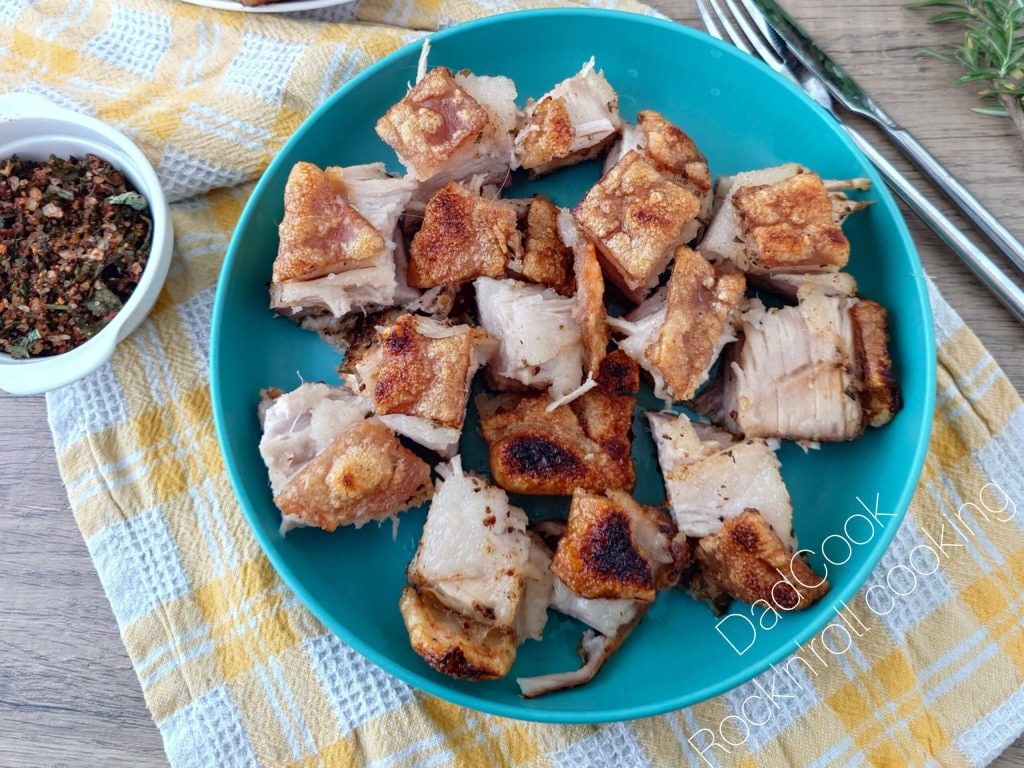
Spectacular Plating and Heavenly Tasting of Your Pork Belly.
It’s the moment of triumph!
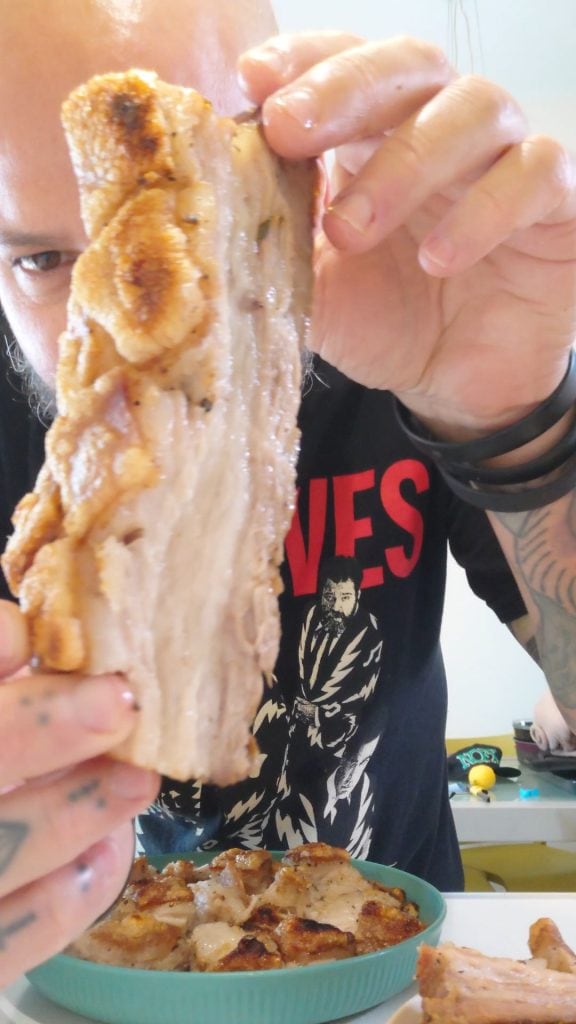
Arrange your perfect oven-baked pork belly slices on a warm serving plate or directly on individual plates.
The golden and ultra-crispy crackling will be the undisputed star, with its inviting amber color and irregular bubbles.
Accompany it with your favorite sides – roasted potatoes, a fresh salad to cut the fat, grilled vegetables, or a gentle puree.
Before tasting, enjoy the intense aroma and spectacular view.
Then, at the first bite, let yourself be conquered by the contrast between the extreme crispiness of the crackling and the tenderness of the meat.
This oven-baked pork belly, prepared by following every secret, is not just a dish but a true gastronomic experience.
Enjoy the tasting!
Perfect Crispy Pork Belly: Storage, Expert Tips, Variations and Notes
Have you prepared your incredible oven-baked pork belly with ultra-crispy crackling and now want to know how to manage it or customize it further?
Here’s everything you need to know to make the most of this recipe and become a true pork belly wizard!
Smart Storage of Leftover Pork Belly:
Your cooked pork belly is a treasure, even the next day!
Here’s how to store it:
In the Fridge: Leftovers keep excellently for 3-4 days.
Wrap the meat part well with plastic wrap or place it in an airtight container to preserve its juiciness. For the crispy crackling, it would be ideal to separate it and store it in a slightly open container or wrapped in kitchen paper, to try to maintain its crispness (although a bit will be lost).
In the Freezer:
Want to enjoy it later? Portion the pork belly, wrap it carefully (plastic wrap + foil or freezer bags) and label. It will keep best for 2-3 months. Thaw slowly in the fridge.
Reheating for Maximum Yield: The traditional oven (355-390°F) or air fryer are your best allies for reheating pork belly, especially to try reviving the crispiness of the crackling. A few minutes and it will be delicious again. Avoid the microwave if you care about the crackling!Expert Tips for Top Pork Belly:Small precautions, big difference in the final result of your perfect pork belly:
Dry is Better: The key to “glass” effect crackling is dryness. Pat, pat, pat the skin before and during preparation!
The drier it is, the more it will pop.
Quality of Raw Material: Start with fresh pork belly of excellent quality, with a good balance between fat and meat.
The final flavor will benefit enormously. Hidden Treasure:
Rendered Fat: Don’t discard the precious fat that melts during cooking! Strain and keep it: it’s an exceptional seasoning for roasting potatoes, vegetables, or flavoring other preparations.
Sharp Blade: To score the skin and to cut the cooked pork belly without crumbling it, a very sharp knife is indispensable.
Delicious Variations:
Customize Your Crispy Pork Belly!
Make your oven-baked pork belly recipe unique with these ideas:
Creative Rubs:
Modify the base rub! Add a pinch of chili powder for a lively touch, crushed fennel seeds for a classic aroma, or a Chinese “Five Spice” mix for an exotic journey.
Sweet Overtones:
Try a light glaze on the meat side (not on the crackling!) in the last 30 minutes of slow cooking: honey and mustard, maple syrup and a hint of bourbon, or a balsamic vinegar reduction.
Be careful not to burn it!
Mediterranean Aromas: Besides sage and rosemary, experiment with fresh thyme or oregano in your rub for an even more Italian character.
Important Notes to Remember:
Some last reminders for error-free oven-baked pork belly:
Know Your Oven: Cooking times, especially for the final crispiness phase, can vary. Trust your eyes more than the timer and watch closely.
Handle with Care: Melted fat is extremely hot. Take utmost care when handling the tray. Let the fat cool before transferring or disposing of it.
Your Taste Rules: Salt and spice quantities are indicative. Feel free to adapt the seasoning to your personal preferences to create your perfect pork belly.
With these tips, your adventure with oven-baked pork belly will always be a smashing success!
Perfect Oven-Baked Pork Belly: Answers to Your Most Common Questions (FAQ)
Do you still have doubts about how to achieve oven-baked pork belly with ultra-crispy crackling? We have collected the most frequently asked questions to help you reach perfection and solve every uncertainty!
Why doesn’t my crackling ever get really crispy?
The main cause of a non-crispy crackling is almost always residual moisture.
For textbook crispiness, it is crucial: Thoroughly drying the skin at every preparation stage.
Using coarse salt during the fridge rest to thoroughly dehydrate the crackling.
Finishing with a high-temperature thermal shock (as indicated in the recipe, 445-480°F).
These steps are the secret to saying goodbye to soggy crackling!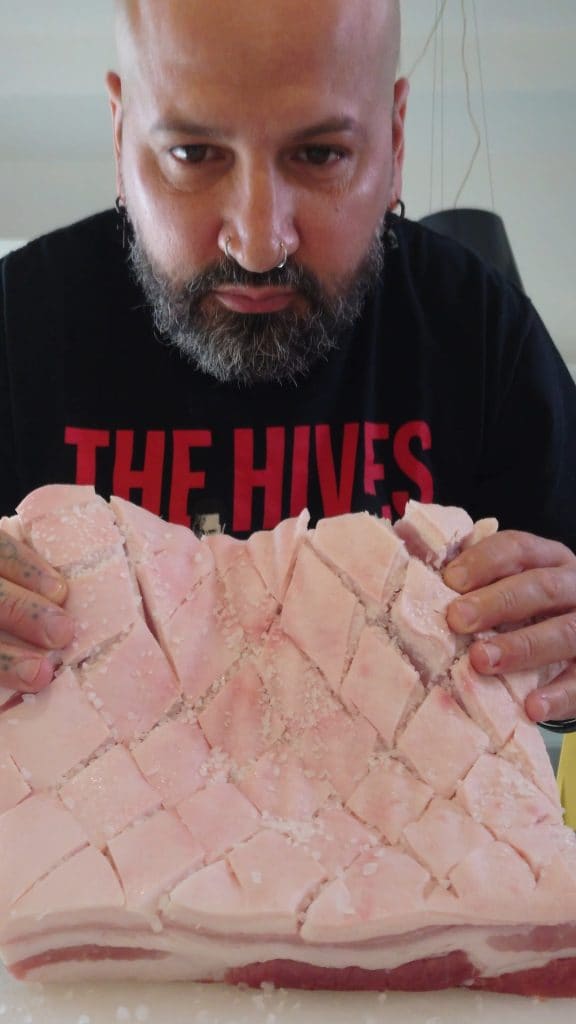
Is it really necessary to score the crackling? What happens if I skip this step?
Yes, scoring the crackling is a highly recommended step and makes a big difference.
The cuts are not just aesthetic:
They help the subcutaneous fat melt more easily and flow out.
Allow the salt to penetrate better for drying.
Create more surface exposed to direct heat, facilitating a more uniform and spectacular crispiness, with typical “bubbles.”
Without scoring, the crackling may puff less controlled and be less crispy in some areas.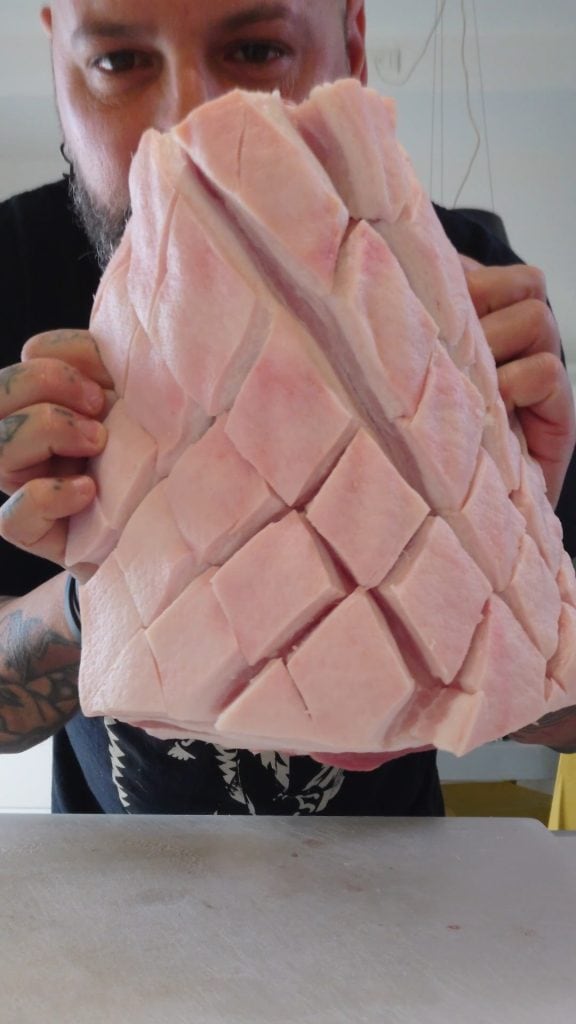
How long before should I salt the crackling for fridge drying?
To achieve the best results in terms of drying and future crispiness, the crackling should be salted (as described in the preparation) and left uncovered in the fridge for a minimum of 12 hours, ideally for 24 hours.
This period allows the salt to effectively extract moisture, which is the number one enemy of perfectly crispy crackling.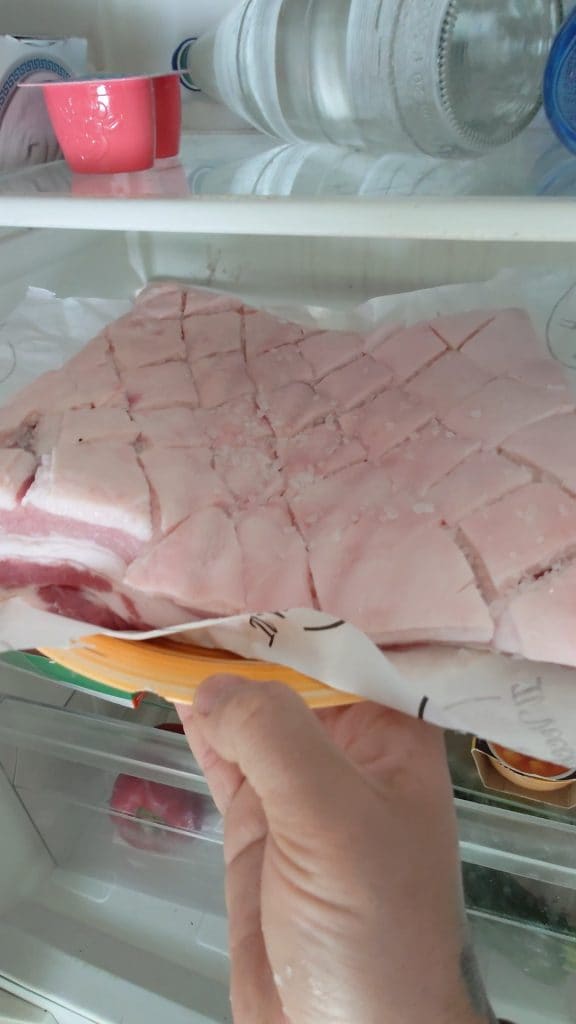
My oven struggles to reach 250°C. How can I achieve the final crispiness phase?
If your oven can’t reach 480°F or you’re wary of such a high temperature, don’t despair!
You can still achieve great crispy crackling:
Set the oven to the highest temperature it can stably reach (e.g., 390°F or 425°F). It may take a few more minutes to achieve the desired crispiness, so watch carefully.
An alternative is to use the oven grill function for the final minutes.
Move the pork belly closer to the grill (but not too close!) and check visually every 30-60 seconds, as the crackling can go from golden to burnt very quickly under the intense heat of the grill.