A new dessert for Women’s Day, the Mimosa Cake with pastry cream and chocolate. A new and exquisite take on this famous cake, this time filled with a delicate vanilla-flavored pastry cream, and lots of dark chocolate chips .
This time, I propose a slightly more classic version of the mimosa cake, certainly simpler and lighter, yet equally delicious! Each bite is an explosion of taste and pleasure, a warm embrace of sweetness and creaminess.
I also recommend these other delicious desserts for Women’s Day, and beyond:
- Difficulty: Easy
- Cost: Inexpensive
- Preparation time: 30 Minutes
- Portions: 6-8
- Cooking methods: Oven
- Cuisine: Italian
Ingredients for Mimosa Cake with Pastry Cream and Chocolate
- 6 Eggs
- 1 cup g Sugar
- 1 1/3 cups g Flour
- 1 packet Vanillin
- 4 Eggs
- 1/2 cup g Sugar
- 1/3 cup g Flour
- 2 cups ml Milk
- 1 Vanilla bean
- Butter
- 1/2 cup g Dark chocolate chips
Preparation of Mimosa Cake with Pastry Cream and Chocolate
First, prepare the sponge cake base.
In a bowl, beat the egg yolks with the sugar until you obtain a light and frothy mixture (1). Separately, beat the egg whites to stiff peaks (2) and then fold them into the egg cream (3).
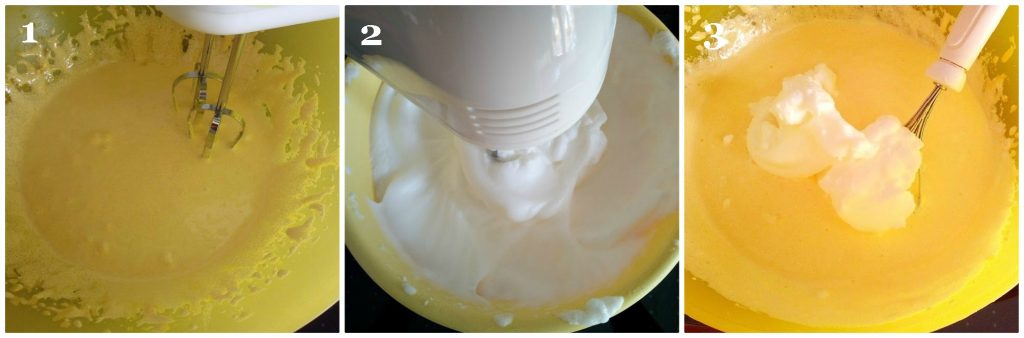
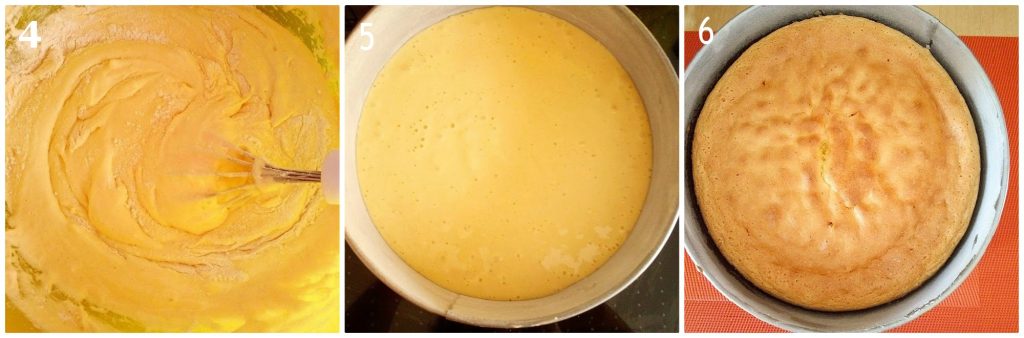
Now add the sifted flour and the packet of vanillin (4).
Mix the ingredients well, being careful to do so with a constant motion from bottom to top.
Finally, pour the mixture into a well-buttered and floured cake pan (5) and bake at 350°F for 30 minutes.
Remove from the oven and let cool (6)
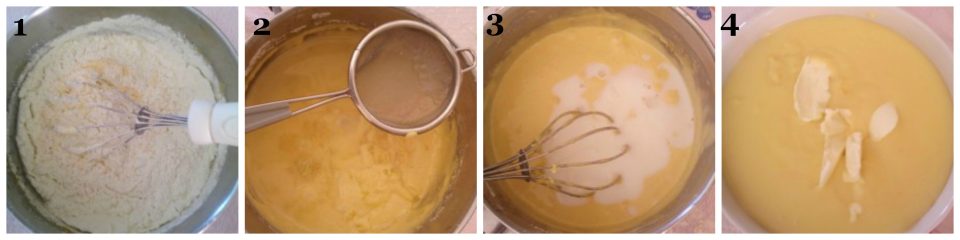
Pour the milk into a saucepan with the vanilla bean and bring to a boil. Remove the vanilla bean.
Separately, beat the egg yolks with sifted sugar until they are well-whipped (1).
Add the sifted flour (to avoid lumps) and mix well (2). Slowly pour in the boiling milk, stirring constantly (3).
Then, put the cream on the heat and, always stirring, bring it to a boil.
Immediately remove the pastry cream from the heat and add a little butter (4). Let the pastry cream cool before using it.
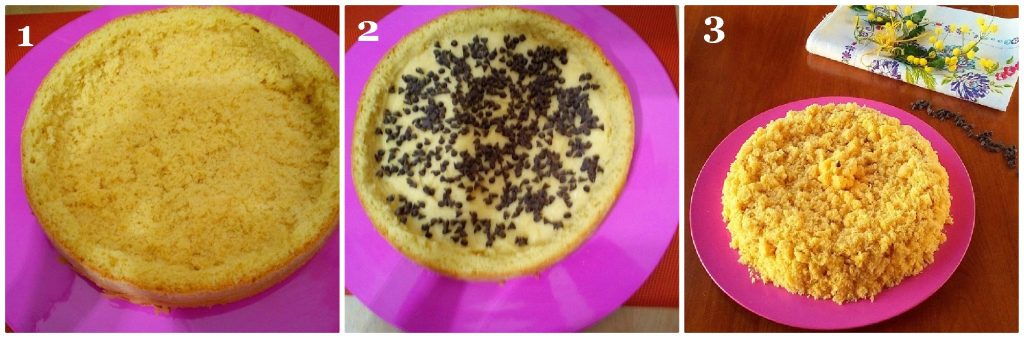
Now it’s time to assemble the cake.
Cut off the top of the sponge cake and set it aside. Hollow out the inside of the cake base using the tip of a knife and your hands (1), to create a disc that you will cut into very small cubes to recreate the crumbs that will be the mimosa flowers.
Lightly soak the base and the underside of the cake lid with a syrup made from water and sugar, previously heated.
Then, fill the cake base with the pastry cream and chocolate chips (2) and close with the lid. Use a spatula to cover the cake with the remaining pastry cream and decorate it with the mimosa crumbs (3).
Your Mimosa Cake with Pastry Cream and Chocolate is ready! Place it in the fridge, possibly under a glass dome, until serving time.
Storage of Mimosa Cake with Cream and Chocolate
Store the cake in the refrigerator, covered with plastic wrap or in an airtight container, to maximize freshness. Consume within 2-3 days.
Related Recipes
Puff Pastry Flowers with Pistachio Cream
Mille-feuille with Lemon Cream and White Chocolate
Chocolate, Cinnamon and Blackberry Cake
FAQ
Is it possible to customize the cake with other ingredients?
Absolutely! You can enrich the cake with fresh fruit, chocolate shavings, or decorations of your choice to make it even more special.
Can I serve Mimosa Cake also for outdoor events or in summer?
The Mimosa Cake with Pastry Cream and Chocolate is delicious for any occasion, but it’s important to remember that the pastry cream might be sensitive to heat. If you’re serving the cake in a warm environment, make sure to keep it refrigerated until it’s time to serve, to ensure the freshness and consistency of the cream.