Easter Nest Cookies in Whipped Shortcrust — Easy Recipe. If there’s a dessert that immediately feels festive, it’s these little colorful nests.
For Easter I decided to make them cheerful with a chocolate center and lots of little colored eggs: they’ll make a great impression on your table!
Whipped shortcrust is one of those preparations that can seem intimidating, but I assure you that by following a few simple tips you’ll get cookies so tender they melt in your mouth.
For Easter I decided to make them cheerful with a chocolate center and lots of little colored eggs: they’ll make a great impression on your table!
To decorate these Easter Nest Cookies in Whipped Shortcrust — Easy Recipe, I had some exceptional little pastry chefs: my nephews! We had a lot of fun in the kitchen: they carefully chose the colors of the eggs and enthusiastically scattered the colored sprinkles.
Seeing their joy creating these small masterpieces made everything more magical. It’s a recipe that warms the heart, perfect to prepare together with loved ones, because besides the deliciousness of the shortcrust that melts in your mouth, you’ll keep the memory of an afternoon spent laughing among flour and chocolate.
These Easter nests are so dramatic and delicious that they are perfect for gifting. Once the chocolate has fully set (let them rest at room temperature for at least a couple of hours), you can package them in:
Clear food bags: Close them with a raffia ribbon or a little chick-yellow bow.
The secret to success? A little patience with the butter and the trick of chilling the shaped cookies to keep the ridges perfect. Roll up your sleeves and let’s begin!

- Difficulty: Medium
- Cost: Budget
- Rest time: 30 Minutes
- Preparation time: 30 Minutes
- Cooking time: 13 Minutes
- Portions: 28Pezzi
- Cooking methods: Electric oven
- Cuisine: Italian
- Seasonality: Easter, All seasons
- Energy 94.01 (Kcal)
- Carbohydrates 10.02 (g) of which sugars 4.73 (g)
- Proteins 1.24 (g)
- Fat 5.56 (g) of which saturated 3.42 (g)of which unsaturated 1.92 (g)
- Fibers 0.59 (g)
- Sodium 41.69 (mg)
Indicative values for a portion of 20 g processed in an automated way starting from the nutritional information available on the CREA* and FoodData Central** databases. It is not food and / or nutritional advice.
* CREATES Food and Nutrition Research Center: https://www.crea.gov.it/alimenti-e-nutrizione https://www.alimentinutrizione.it ** U.S. Department of Agriculture, Agricultural Research Service. FoodData Central, 2019. https://fdc.nal.usda.gov
Ingredients
Easter Nest Cookies in Whipped Shortcrust — Easy Recipe
- 1 1/2 cups all-purpose flour
- 9 tbsp unsalted butter (Make sure to take it out of the fridge in advance! (about 4.6 oz))
- 2.5 oz powdered sugar
- 1 egg (about 2 oz (55 g), room temperature)
- baking powder (1 level teaspoon)
- 1 packet vanillin (vanilla powder)
- 1 pinch salt
- as needed lemon (grated zest from yellow part only!)
- 1 bar 70% dark chocolate (about 3.5 oz (100 g))
- as needed colored sprinkles
- 1 package chocolate candies (we need these because they look like little colored eggs)
Tools
- Parchment paper
- Baking sheet
- Piping bag
- Stand mixer
- Kitchen scale
Steps
Easter Nest Cookies in Whipped Shortcrust — Easy Recipe
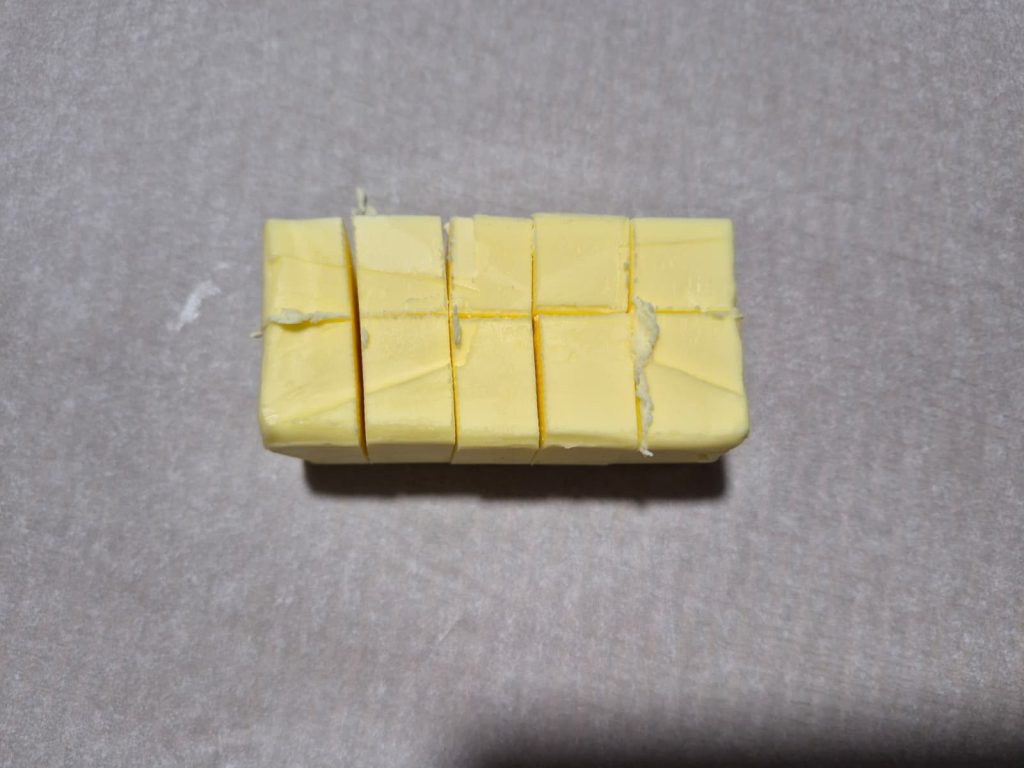
For a perfect whipped shortcrust, the butter must be at softened (spreadable) consistency.
Take it out of the refrigerator at least 2 hours before.
Weigh it immediately, cut into pieces and place it on a sheet of parchment paper.
Fold it up and let it soften at room temperature.
This step is the guarantee of a silky dough that’s easy to work with.
Put the softened butter in a bowl and start creaming it with electric beaters for a few minutes. It needs to incorporate air.
Add the powdered sugar in 2 or 3 additions, together with the pinch of salt.
Continue whipping until you get a light, frothy and almost “cloud-like” mixture. If you prefer, you can use the stand mixer with the paddle attachment.
In a small bowl, lightly beat the egg with a fork. Add it to the butter-sugar mixture one tablespoon at a time, making sure the dough has fully absorbed it before adding more.
Sift the flour and gently fold it into the mixture with a spatula, using upward movements so as not to deflate it.
Transfer the mixture into a piping bag fitted with a star tip.
On a baking sheet lined with parchment paper, pipe small circles (or closed “S” shapes) leaving a slight hollow in the center.
(Use a star tip about 1 cm. Fill the bag with only half of the dough (or even less) at a time. Keep the rest of the dough covered in a bowl in a cool corner of the kitchen.)
Make the nests directly on the baking sheet. As soon as the first half of the mixture is finished, refill the bag and continue with the rest. This will ensure perfectly shaped cookies from the first to the last!Place the baking sheet in the refrigerator for 25–30 minutes. This “sets” the butter and ensures the piping ridges remain visible during baking.
Bake at 356°F (conventional oven) for about 12–15 minutes, or until the edges are slightly golden.
Once out of the oven, let them cool completely on the baking sheet because they are very fragile while warm.
Melt the chocolate in a bain-marie.
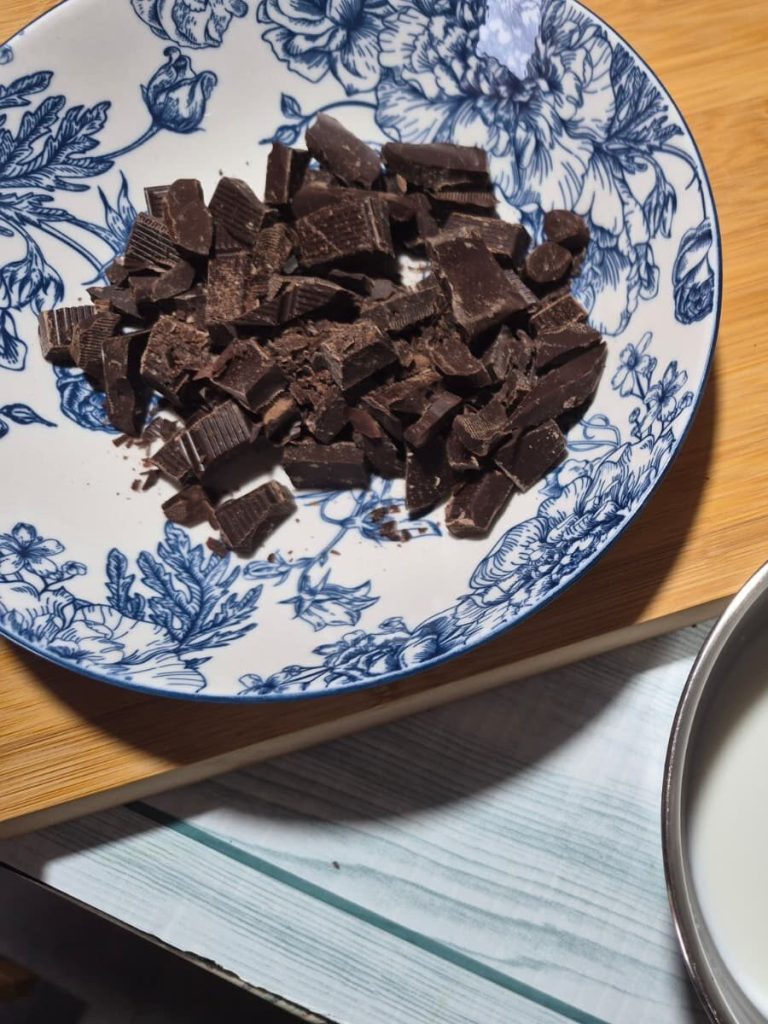
Dip the top of the cookie into the chocolate (or use a teaspoon to fill the center).
Place them to dry on a rack — some chocolate will certainly drip.

Immediately add the sprinkles and position 2–3 colored eggs in the center before the chocolate solidifies.

Wishing you a Happy Easter.

Tips
Do not chill the dough before shaping the cookies: it would become too hard and impossible to pipe. Resting should always be done after forming the shapes on the baking sheet!
Tips for whipped shortcrust
Whipped shortcrust is not an ordinary roll-out pastry; it’s a “living” dough that relies on the balance between fat and air.
The butter must be spreadable. If you heat it in the microwave and it becomes shiny or liquid, the dough will never whip and the cookies will turn out hard. It should have the consistency of a spreadable cream: soft, but matte.
Don’t rush the first phase. Properly whipping the butter with the powdered sugar incorporates micro-bubbles of air. It is this air that, expanding in the oven, will make the cookie crumbly and light without needing too much leavening.
If you add a cold egg straight from the fridge to the butter cream, the fat will separate (the mixture will look “curdled”). Make sure the egg is at room temperature to create a perfect and silky emulsion.
Once you add the flour, work the dough only long enough to incorporate it. If you overwork the dough at this stage, gluten will develop and the cookie will become elastic and chewy instead of tender.
After piping the nests on the baking sheet, chilling in the refrigerator for 30 minutes is the real professional secret. This “sets” the butter: when the cookie enters the hot oven, the outer surface cooks quickly maintaining the star-tip ridges, preventing the nest from collapsing and becoming flat.
Warning
Avoid preparing this whipped shortcrust if the kitchen is at 86°F. Heat is the enemy of whipped shortcrust: if you feel the dough becoming too shiny or soft in the piping bag, stop and put everything in a cool place for a few minutes.
Storage
The best place for your nests is a classic tin box. Line the bottom with a sheet of parchment paper and arrange them carefully. The tin keeps humidity constant and the cookies will stay crisp as just baked for 10–12 days.
Alternatively, airtight plastic containers work well too, provided they are clean and free of odors (the shortcrust absorbs surrounding smells!).
Store them in a cool, dry place away from heat sources (no shelves above the oven or near radiators!). If the kitchen is very warm, better to keep them in a pantry in a cooler room.
FAQ (Questions & Answers)
Can I make them with cocoa?
All-purpose flour: Reduce to 160 g (about 1 1/4 cups).
Unsweetened cocoa powder: Add 25 g (about 1/4 cup) of high-quality cocoa.
Powdered sugar: Increase to 80 g (about 2/3 cup) because cocoa is bitter and needs a touch more sweetness.
Sift together: It’s essential to sift the cocoa together with the flour and baking powder. Cocoa tends to clump and would ruin the piped star-tip effect.
Flavor: Replace the lemon with grated orange zest. The cocoa-orange pairing is a timeless classic that will make your nests even more special.
Decoration: Fill the center of the nest with melted white chocolate. The color contrast between the dark cookie and the white center will make the colored eggs really pop!
