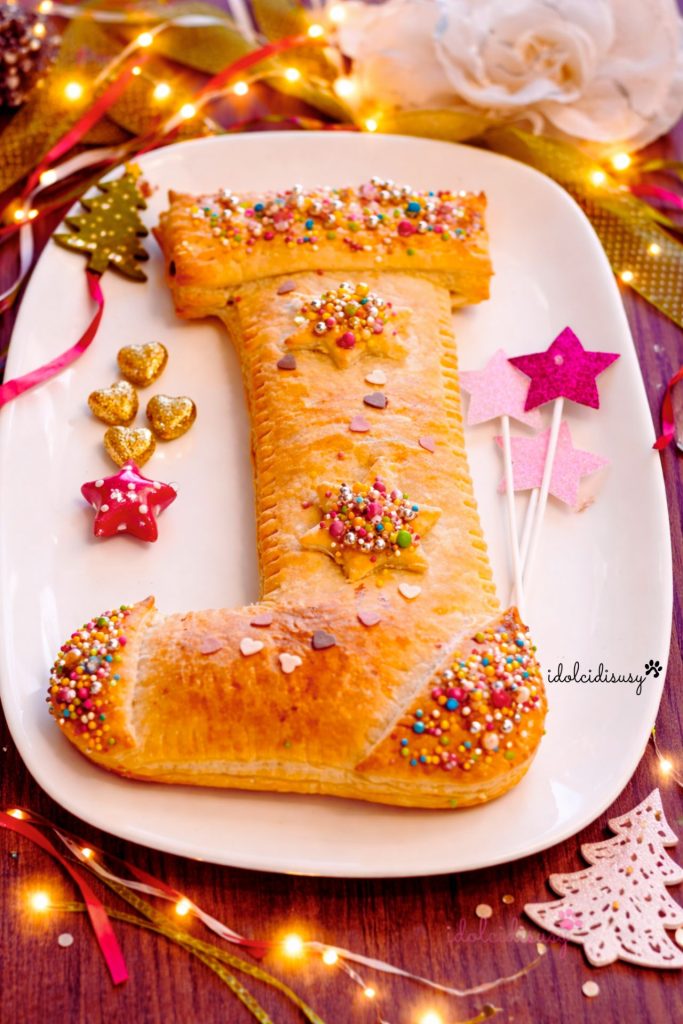
Isn’t my Puff Pastry Befana Stocking beautiful?
It’s one of those desserts that instantly feels festive just by looking at it.
Delicious, because the filling is all Nutella®, cute and fun, because it has the shape of the Befana’s stocking. A very simple recipe, with just two ingredients: puff pastry and Nutella®. The colorful sprinkles make it even more cheerful, perfect for celebrating Epiphany.
It’s so easy that even children can make it, just like the Befanini cookies. After all, the Befana is their holiday, and this dessert is perfect to make together, without stress and with lots of satisfaction.
Just draw the outline of the stocking on an A4 sheet, cut it out, place it on the pastry, and in a few steps, you have a perfect stocking. You can also choose a different jam for the filling, but with Nutella, you can never go wrong.
Have I piqued your curiosity?
Let’s prepare it together then.
Happy Befana to everyone ❣️
I also leave you:
- Difficulty: Very Easy
- Cost: Very Cheap
- Preparation time: 10 Minutes
- Portions: 6
- Cooking methods: Electric Oven
- Cuisine: Italian
- Seasonality: Christmas, Epiphany
- Energy 198.95 (Kcal)
- Carbohydrates 16.42 (g) of which sugars 0.45 (g)
- Proteins 2.64 (g)
- Fat 13.67 (g) of which saturated 1.99 (g)of which unsaturated 10.99 (g)
- Fibers 0.54 (g)
- Sodium 89.92 (mg)
Indicative values for a portion of 100 g processed in an automated way starting from the nutritional information available on the CREA* and FoodData Central** databases. It is not food and / or nutritional advice.
* CREATES Food and Nutrition Research Center: https://www.crea.gov.it/alimenti-e-nutrizione https://www.alimentinutrizione.it ** U.S. Department of Agriculture, Agricultural Research Service. FoodData Central, 2019. https://fdc.nal.usda.gov
Ingredients for the Puff Pastry Befana Stocking
- 2 sheets puff pastry (rectangular)
- to taste Nutella®
- 1 egg white (beaten)
- to taste colorful sprinkles
Tools
- Knife
- Baking Tray
Prepare the Puff Pastry Befana Stocking
I draw the shape of the stocking on an A4 sheet. After a few tries, I got it right: I could have printed it from the internet, but I preferred to have fun with the drawing. Once satisfied with the shape, I cut it out and set it aside.
I unroll a sheet of puff pastry directly onto the baking tray, using its parchment paper. I place the stocking template on top and, with a knife, carefully cut along the edges to get the perfect shape.
Then I spread the Nutella, leaving the edges free, so it’s easier to seal the stocking without the filling coming out.I also cut the other sheet of puff pastry and place it on top, closing the stocking. I seal all the edges well with the tines of a fork, so the filling stays inside during baking.
With the pastry scraps, I have fun creating decorations: two stars, the top edge of the stocking, and patches for the toe and heel. I gently apply them on top of the stocking, pressing lightly to make them stick.
I beat an egg white and use it to brush the stars, patches, and edge. I finish with colorful sprinkles, making the stocking even more cheerful and festive.
I put the tray in the freezer for about ten minutes, then bake in a static oven at 355°F for about 18–20 minutes, until the stocking is nicely golden.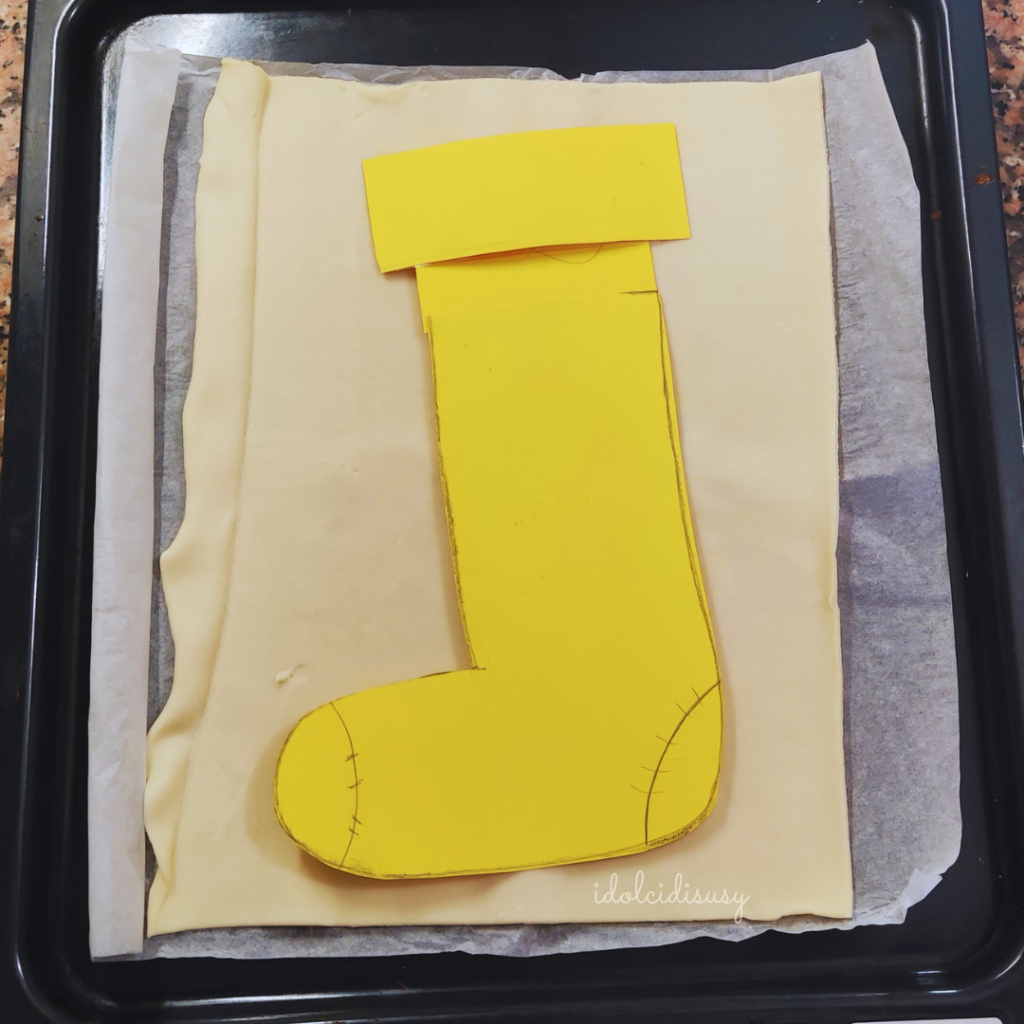
After the baking time, I remove the stocking from the oven and let it cool on a rack. Once cool, I gently transfer it to a serving plate, and it’s ready to be served.
Storage and Tips
The Puff Pastry Befana Stocking keeps at room temperature for 1 day, covered with a cake dome or wrapped in plastic wrap, preferably in a cool and dry place. It remains good the next day, although the pastry may lose some of its crispness.
For a perfect result, it’s important to seal the edges well with the fork and not overfill, so the Nutella won’t come out during baking. Freezing before baking helps maintain the well-defined shape of the stocking.
If you want to change things up, you can replace the Nutella with a thick jam or spreadable hazelnut cream. For an even more indulgent effect, you can add a sprinkle of powdered sugar only after the stocking has completely cooled.