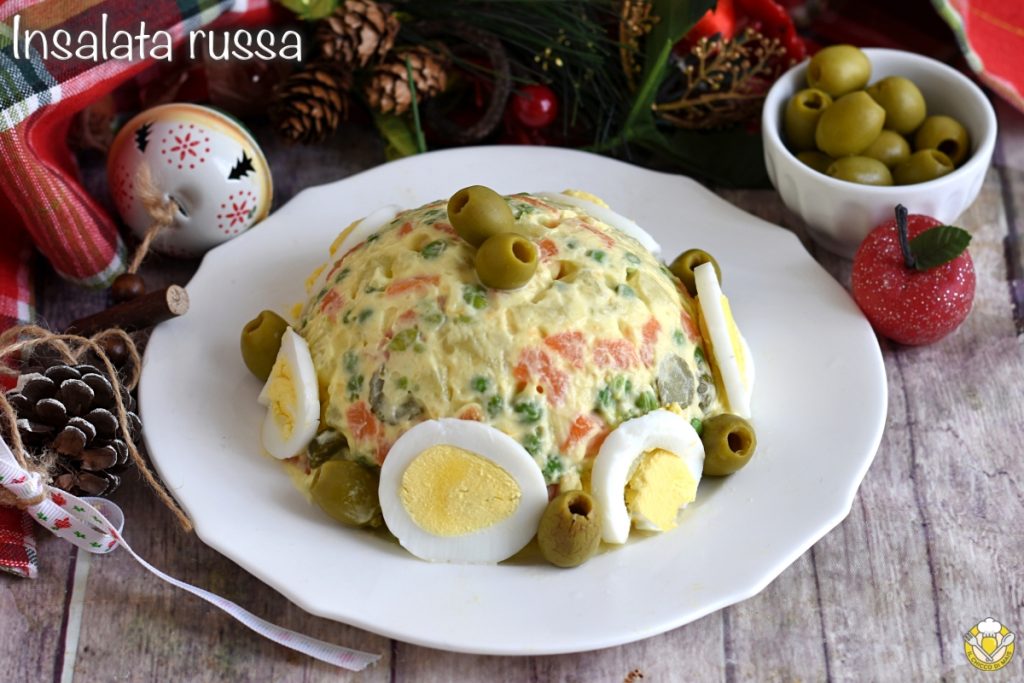
Some love it, some hate it, but the classic Russian salad remains a staple dish on the festive table. Perfect as a Christmas appetizer or served in practical single portions for New Year’s Eve appetizers and buffets, the homemade Russian salad always wins for its creaminess, ease of preparation, and scenic appearance.
The original recipe of Russian salad eaten in Italy involves a few simple ingredients – potatoes, carrots, peas, pickles, and mayonnaise – but precisely for this reason, it leaves room for creativity when it comes to presentation. I decorated it with hard-boiled eggs, but you can enhance it with capers, anchovies, pickled vegetables, cherry tomatoes, or other creative garnishes (on my blog you will also find 5 easy ways to serve Russian salad).
For those looking for lighter variants or alternatives, Russian salad is a real wildcard: there is indeed a light version without mayonnaise and eggs, ideal for those wanting a less caloric appetizer, and a rich tuna Russian salad, perfect to serve as a fish appetizer for Christmas Eve.
From my experience, the classic Russian salad is the typical dish that divides guests: some can’t do without it, and others snub it…but when prepared at home with fresh ingredients, it becomes a real delicacy, very different from the ready-made one.
Curiosity: Russian salad is widespread in many countries, but with different names. In Russia, it’s called “French salad,” in Germany “Italian salad,” in France even “Piedmontese salad”…almost no one wants to claim its origin!
You might also be interested in:
- Difficulty: Very easy
- Cost: Very cheap
- Rest time: 2 Hours
- Preparation time: 30 Minutes
- Portions: 8People
- Cooking methods: Boiling
- Cuisine: Italian
- Seasonality: Christmas
- Energy 127.15 (Kcal)
- Carbohydrates 19.32 (g) of which sugars 2.75 (g)
- Proteins 4.36 (g)
- Fat 3.98 (g) of which saturated 0.65 (g)of which unsaturated 0.56 (g)
- Fibers 3.53 (g)
- Sodium 324.24 (mg)
Indicative values for a portion of 125 g processed in an automated way starting from the nutritional information available on the CREA* and FoodData Central** databases. It is not food and / or nutritional advice.
* CREATES Food and Nutrition Research Center: https://www.crea.gov.it/alimenti-e-nutrizione https://www.alimentinutrizione.it ** U.S. Department of Agriculture, Agricultural Research Service. FoodData Central, 2019. https://fdc.nal.usda.gov
Ingredients for about 2 lbs of Russian salad (6-8 people)
If you are celiac, check that the mayonnaise label says “gluten-free.”
- 14 oz potatoes
- 5.3 oz carrots
- 7 oz frozen peas
- 3.5 oz pickles (or mushrooms in oil)
- to taste mayonnaise (about 6.3 oz)
- 2 tbsp extra virgin olive oil
- 1 pinch salt
- to taste pepper
- 1 tbsp vinegar
- 1 egg (hard-boiled, for decoration)
- to taste green olives (for decoration)
Tools
- 1 Cutting Board
- 1 Knife
- 1 Bowl
- 1 Pot
- 1 Ladle slotted
- 1 Strainer
- Plastic Wrap
- 1 Egg Slicer
How to prepare classic Russian salad according to the traditional Italian recipe
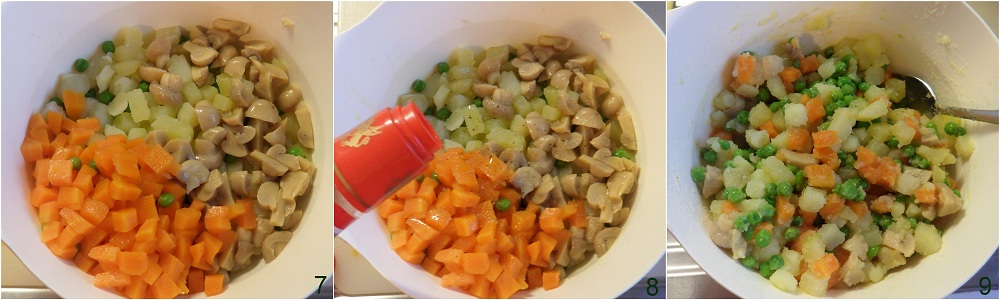
To prepare Russian salad, you need to cut and cook the vegetables, which should be boiled (or steamed) separately to avoid them breaking apart, ensuring they do not overcook. Peel the potatoes and cut them into cubes about 1/5 inch (1). Scrape the carrots and cut them into cubes of the same size (2). In a large pot, bring plenty of salted water to a boil and cook the potatoes for 7-8 minutes, then drain them with a slotted spoon (3).

Let them cool in a strainer (4), so they lose excess water. Then cook the peas for 5-6 minutes (5) and the carrots for 4-5 minutes. Let all the vegetables cool in a colander. Meanwhile, cut the pickles into slices or the mushrooms into four parts, so they are roughly the same size as the other vegetables (6).

When the vegetables are completely cold, gather them in a bowl along with the pickles (7), season with a pinch of salt, a grind of pepper, a couple of tablespoons of oil, and the vinegar (8). Mix gently so as not to break the vegetables (9).
At this point, gradually add the mayonnaise (10), gently mixing to blend it with the other ingredients (11). If it’s very thick, you can add another tablespoon of oil. At this point, decide how to serve your Russian salad: you can leave it in a bowl, put it in single-serving cups, or choose a more scenic presentation by forming a sort of dome: in this case, line a bowl with a sheet of plastic wrap or foil (12).
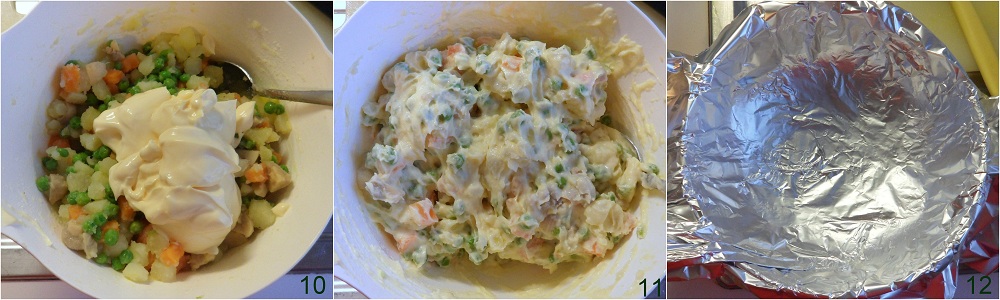
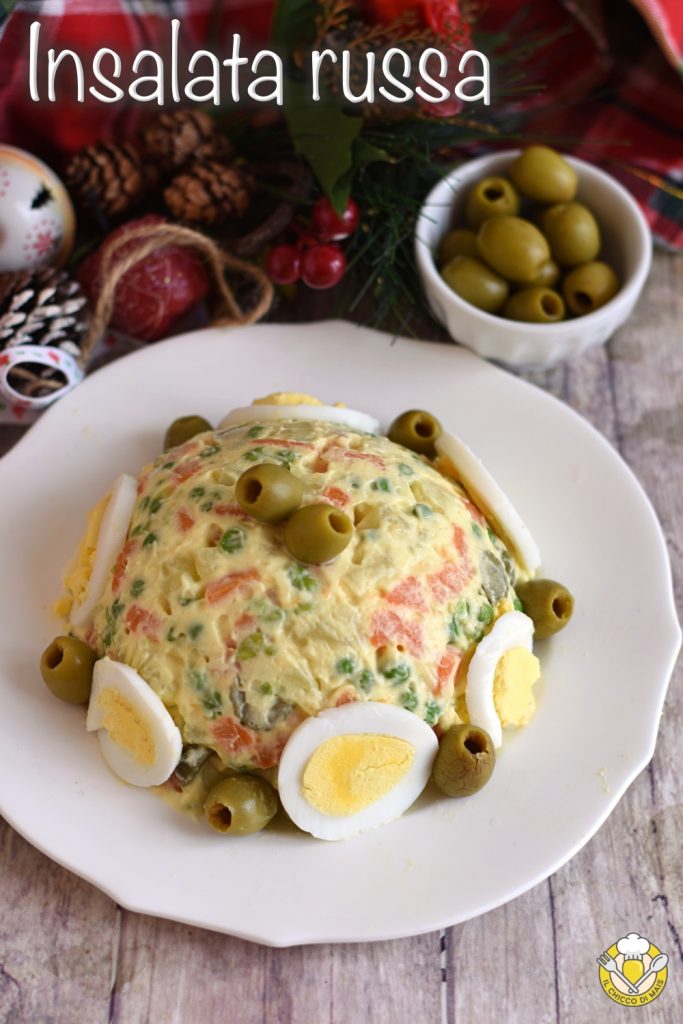
Pour in the Russian salad, pressing gently to compact it (13). Cover the bowl and let it rest in the refrigerator for at least two hours. When ready to serve, invert the bowl onto the serving plate and remove the plastic wrap or foil (14). Finally, decorate with slices of hard-boiled eggs, cut with an egg slicer, which you can arrange on the lower part of the dome (15) interspersed with green olives. I don’t add extra mayonnaise for decoration, fearing it would become overly cloying.

Serve the Russian salad as a cold appetizer, for Christmas, New Year, or other festive occasions.
Storage
If you used industrial mayonnaise, you can store the Russian salad in the refrigerator for 2-3 days. If you used homemade mayonnaise, the salad should be consumed within 24 hours.
Tips and Variants
The amount of mayonnaise to use varies greatly depending on taste, but if you want to form a dome that holds its shape well, the mixture should be quite compact.