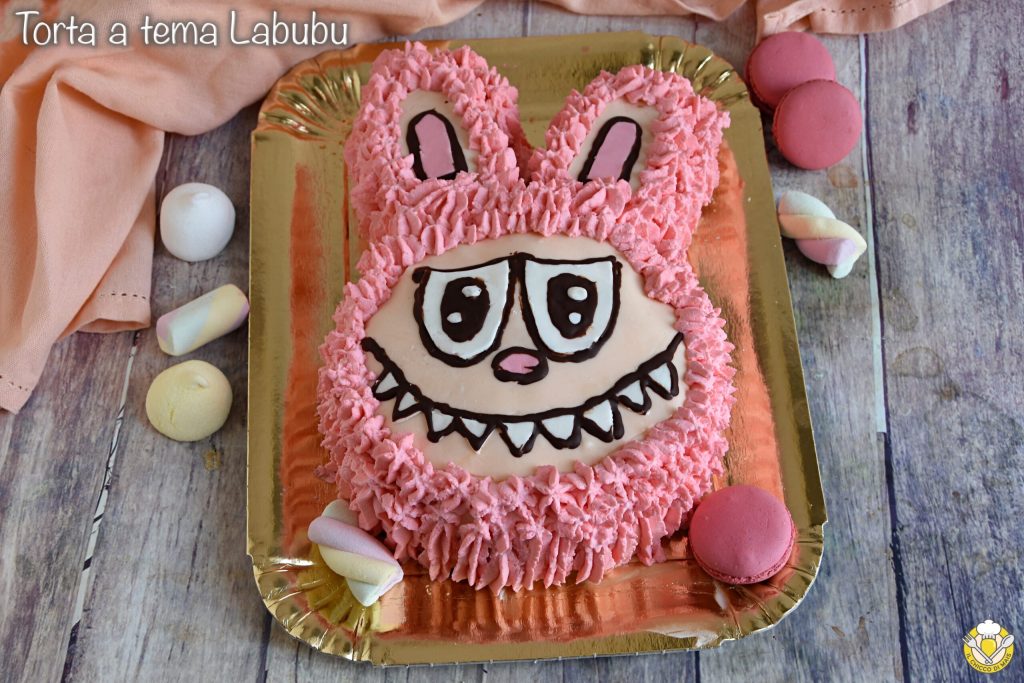
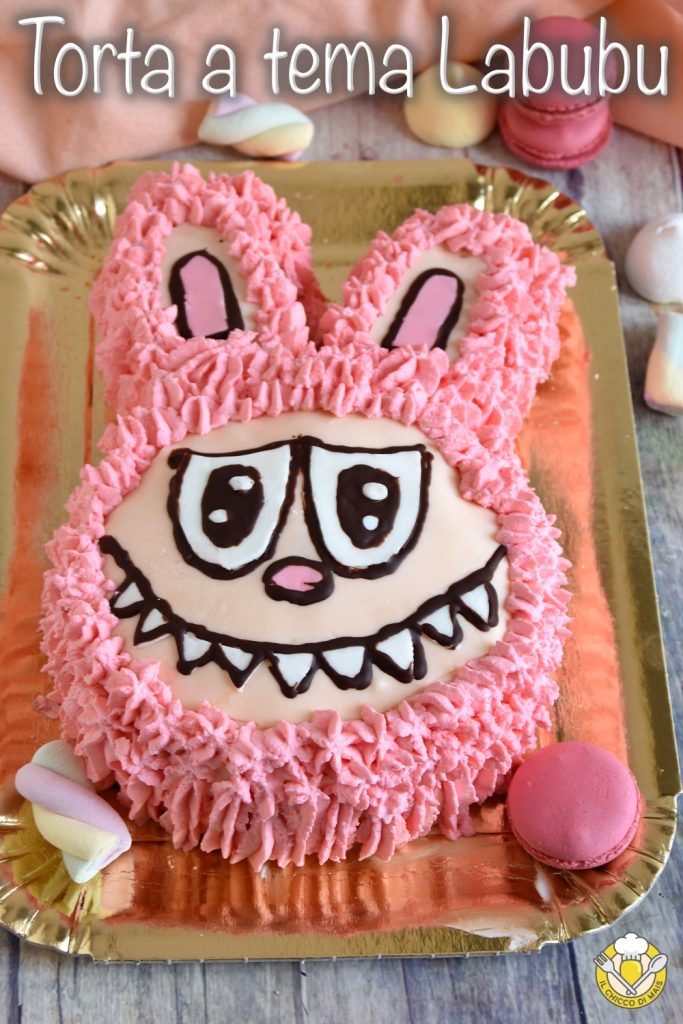
If the Labubu craze has hit your home, the funny puppets loved by children, this Labubu-themed cake without mold will be the perfect surprise for a birthday party. No special molds needed: with a round mold and a loaf pan, you can easily shape your Labubu’s face. The homemade Labubu cake recipe is simple and accessible to everyone: it only requires a few hours of work, but it will be ready to enjoy in a morning.
You choose the base of the cake: I used a version of the 7 jar yogurt cake, but the classic sponge cake — or chocolate one — or the molly cake are all fine. For the filling, I chose Nutella and mascarpone frosting, which I then colored pink and used with a piping bag to recreate Labubu’s “fur”. As an alternative to frosting, you can opt for camy cream, namelaka cream or whipped cream (as long as it’s very firm). Finally, for the face, I modeled eyes and mouth with sugar paste and defined the details with melted chocolate.
The recipe I will show you is very detailed, and for this reason, I divided it into steps: so you can scroll from the base preparation, to the choice of filling, or directly to the decoration phase of the Labubu cake.
With a bit of creativity and the right tools, you will get a scenic and delicious homemade Labubu cake, perfect for surprising the kids without the need for special molds.
You might also be interested in:
- Difficulty: Medium
- Cost: Economical
- Preparation time: 1 Hour 30 Minutes
- Portions: 10 People
- Cooking methods: Oven
- Cuisine: International
- Seasonality: All seasons
- Energy 710.97 (Kcal)
- Carbohydrates 55.85 (g) of which sugars 30.24 (g)
- Proteins 7.65 (g)
- Fat 53.40 (g) of which saturated 21.63 (g)of which unsaturated 6.96 (g)
- Fibers 1.66 (g)
- Sodium 99.29 (mg)
Indicative values for a portion of 200 g processed in an automated way starting from the nutritional information available on the CREA* and FoodData Central** databases. It is not food and / or nutritional advice.
* CREATES Food and Nutrition Research Center: https://www.crea.gov.it/alimenti-e-nutrizione https://www.alimentinutrizione.it ** U.S. Department of Agriculture, Agricultural Research Service. FoodData Central, 2019. https://fdc.nal.usda.gov
Ingredients for a Labubu-themed cake of about 4.4 lbs
If you are celiac, you can use fine rice flour instead of all-purpose flour (same weight). However, make sure that the following ingredients have the “gluten-free” label: rice flour, potato starch, baking powder, vanillin, icing sugar, gel food coloring, sugar paste, dark chocolate.
- 3 eggs (medium)
- 1 1/4 cups all-purpose flour (or gluten-free rice flour)
- 6 tbsps potato starch
- 1/3 cup sunflower oil
- 1 tbsp baking powder (one packet)
- 1 packet vanillin
- 1 pinch salt
- 2 3/4 cups mascarpone
- 1 1/3 cups heavy cream (unsweetened)
- 1 cup vanilla powdered sugar
- 1/2 cup Nutella®
- to taste food coloring (red gel)
- 2 1/2 oz sugar paste (about)
- to taste food coloring (orange gel)
- to taste food coloring (fuchsia or red gel)
- 1.8 oz 70% dark chocolate
Tools
- 2 Bowls
- Electric mixers
- 1 Springform pan 7 inches diameter
- 1 Loaf pan 4×8 inches approximately
- 1 Tray 10×12 inches approximately
- 1 Mat silicone
- 1 Rolling pin
- 1 decorative pen
- 2 Piping bag with smooth and star nozzle
- 1 Spatula
How to make a homemade Labubu-themed cake step by step
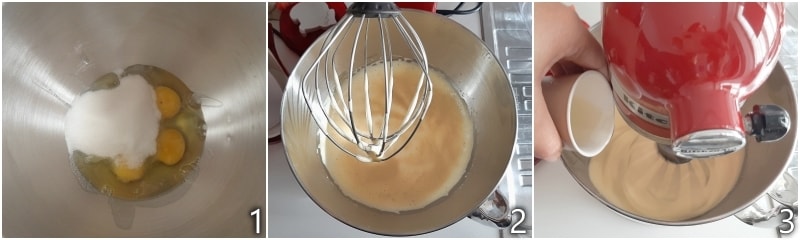
As I mentioned, for the Labubu cake base I used the 7 jar cake recipe, but if you prefer, you can use a different base. However, consider that the batter will be divided between a round 7-inch mold and a loaf pan 4×8; overall, consider the amount for a 9-inch cake. Crack the eggs into a bowl or the bowl of a stand mixer and add a pinch of salt and the sugar (1). Beat them with the electric mixers for about 5 minutes until you get a fluffy and frothy mixture (2). Then slowly add the oil, while continuing with the electric mixers (3).
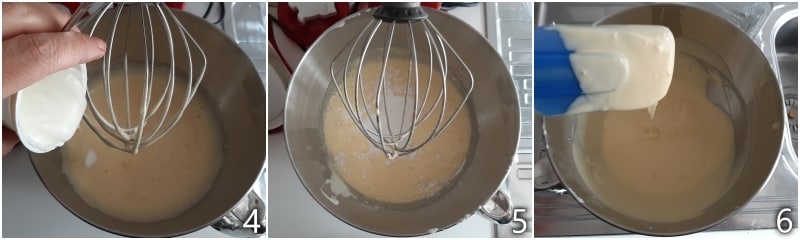
Once you have incorporated the oil, add the yogurt (4) and continue mixing until it is well combined with the batter. Then sift the flour into the bowl along with the starch, baking powder, and vanillin (5). Continue to work the batter with the mixers to incorporate the flour. You should get a smooth, fluid, and homogeneous mixture (6).
Line a 7 inches round mold and a 4×8 loaf pan with parchment paper (if you are using disposable, there’s no need to line it as you can cut it to remove the cake). Pour 1/3 of the batter into the loaf pan and the remaining into the round mold (7), leveling them well with a spatula. Bake them together in a preheated oven at 350°F (static) for 40 minutes, always doing the toothpick test before removing them. When both cakes are perfectly cooked, remove them and let them cool completely before removing them from the mold (8). For convenience, you can prepare these bases the day before.
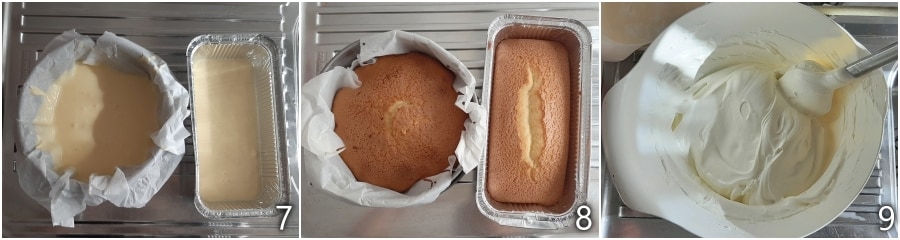
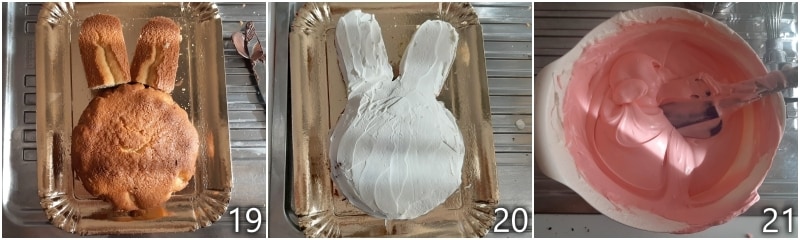
Prepare the mascarpone frosting following the procedure indicated here. For now, leave it white (9). When the bases are cool, you can assemble them to shape Labubu’s face: gently remove the loaf from its mold and cut it in half (10). With a knife, cut an ear from each half, rounding the edges well (11-12).
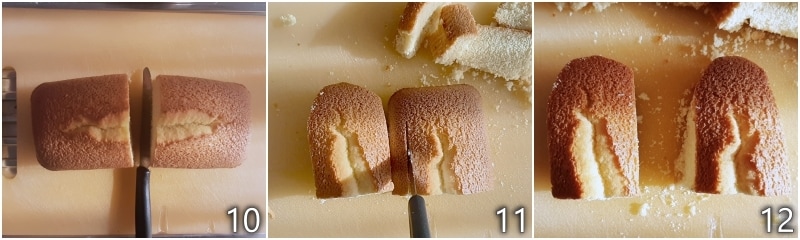
Open each ear in half (13) so you can fill it. Also, open the round cake in half (14). Place all the elements of the Labubu cake on a rectangular tray that can comfortably hold the cake, attaching the ears to the face (15).
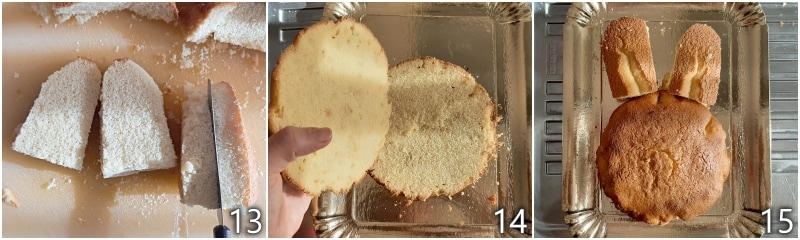
Set aside the top halves of the face and ears. Now, if you want, you can soak the bases with one of the many alcoholic or non-alcoholic syrups found here. My daughter doesn’t like them, so I didn’t do it. Spread a layer of Nutella on the bases (16). Place about a third of the mascarpone frosting in a piping bag with a flat nozzle (or simply cut the tip of a disposable piping bag) and in circular motions fill the round base (17) and also the ears (18).
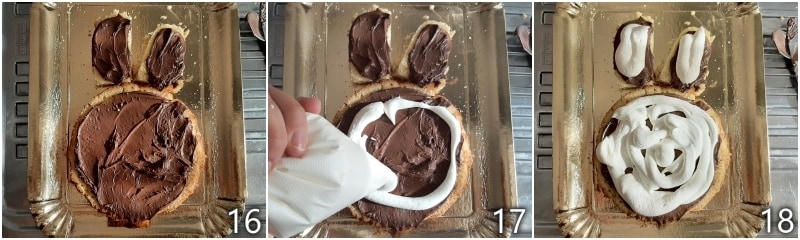
Cover with the upper parts (19) and press slightly to compact them. Spread a little more mascarpone frosting on the surface and edges of the cake, leveling it well with a spatula (20). Add a little pink coloring or very little red to the remaining frosting and gently mix with a spatula until you get a homogeneous pastel pink mixture (21). Put the cake and frosting in the fridge for the time needed to make the sugar paste decorations.
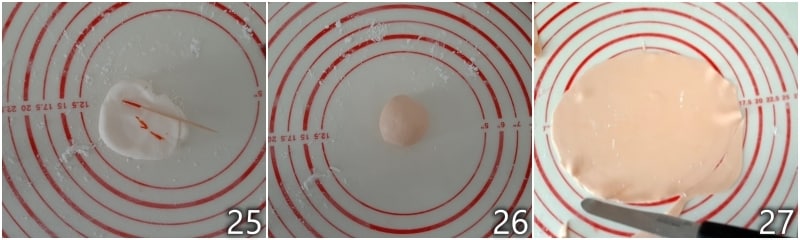
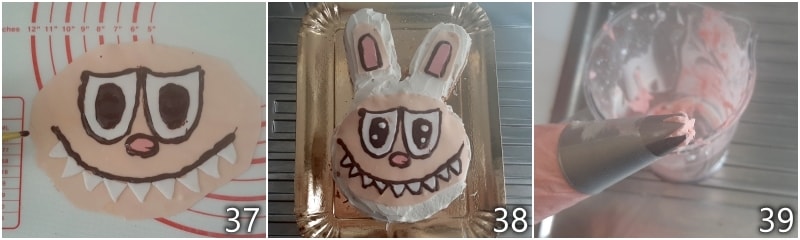
To make the face, eyes, nose, etc. of your Labubu-themed cake, you will need about 2.5 oz of white sugar paste. You can make it at home or buy it already made, I found one with the “gluten-free” label at the supermarket! Take a piece and start softening it with your hands, then with a rolling pin roll it out into a thin layer on a silicone mat or on a sheet of parchment paper. If you have difficulty because it’s sticky, you can use a bit of powdered sugar. With a knife or scissors, cut out the eyes (22). To guide yourself with shape and size, you can print a drawing from the internet and use it as a model (23). Also, make 9 small triangles that will be the teeth (24).

Re-knead the leftover scraps and color them with a tiny bit of orange gel coloring (25). I do not recommend squeezing it directly from the tube, too much would come out: use a toothpick to slightly “stain” the sugar paste. You should not achieve an intense orange, but a color similar to skin pink (26). Roll it out into a thin disk and cut out an oval, always using the drawing as a model to guide the size: it will be the face (27).
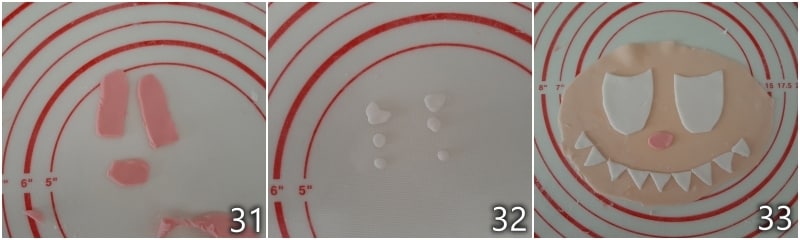
Re-knead the scraps, roll them out again, and cut out two elongated shapes that will be the inside of the ears (28). Take a small piece of white sugar paste and color it with a bit of fuchsia coloring or with a very tiny bit of red coloring (29). Knead with your hands until you get a nice bright pink color (30).

Roll it out into a thin disk and cut out a small oval (it will be the nose) and two small elongated pieces, which will be the ear details (31). Finally, with small pieces of white sugar paste, form the highlights of the pupils (32). At this point, I recommend assembling Labubu’s face separately and then positioning it on the cake: this way, if you make a mistake and have to do it all over again, you won’t have ruined the cake: prepare a small cup of water and with a brush or your fingertip, slightly moisten the back of the eyes, then position them on the face. Do the same with the teeth, forming a curved line (33).
Don’t over-moisten the sugar paste, just a tiny bit of water is enough to make it stick. Position the dark pink part of the ears on the lighter one (34). Melt the dark chocolate in a bain-marie (35). To trace the thinnest lines, use a decorating pen with a very thin nozzle (36) or a cone made of parchment paper.
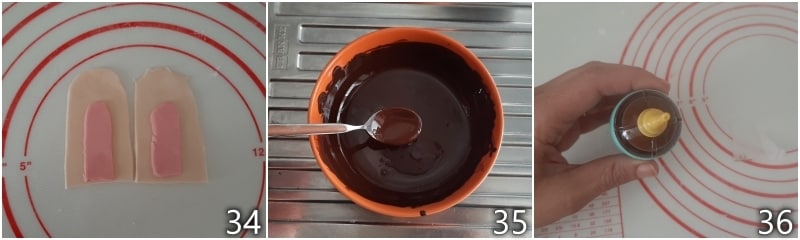
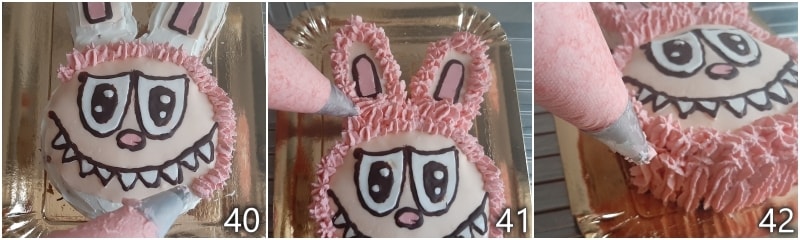
With the melted dark chocolate, draw the pupils inside the eyes and trace all the outlines: the mouth (37), the outlines of the teeth and nose, and also the outlines of the ears. Position the white dots inside the pupils that simulate the shine of the eyes. Let the chocolate dry and harden well, then position the face and ears on the cake, making them adhere well (38). Put the pink frosting in a piping bag with a star nozzle not too wide (39).
Distribute small tufts of frosting along the entire edge of the face to simulate fur (40). Continue on the head and the edges of the ears (41), making sure to cover the edges of the sugar paste. Finally, also cover the edges of the cake with tufts made vertically, moving the piping bag from the bottom up (42).
Your homemade Labubu-themed cake is ready! As with all cakes of this type, if you can let it rest in the fridge for 3-4 hours, it will be tastier.
Storage
You can store the Labubu cake in the refrigerator for 2-3 days in a cake box. Take it out 15 minutes before serving.
Tips and Variations
In this recipe, I was mainly interested in showing you how to decorate a Labubu-themed cake: the base and filling are just an idea, as mentioned, you can customize the cake to your liking.
For the base, classic sponge cake, chocolate sponge cake, molly cake, a classic chocolate cake, a chiffon cake are good options…
Instead of Nutella, you can use classic custard or chocolate custard, chantilly cream, jam, coconut cream, mandarin cream…
Instead of mascarpone frosting, you can use namelaka cream or camy cream, both perfect for coloring with gel colorants; or simple whipped cream, which can be colored the same way.