Making Bread with LICOLI at home is always a great magic for me: few ingredients, a bit of patience, to bring that aroma into the house that fills the heart and evokes distant memories…
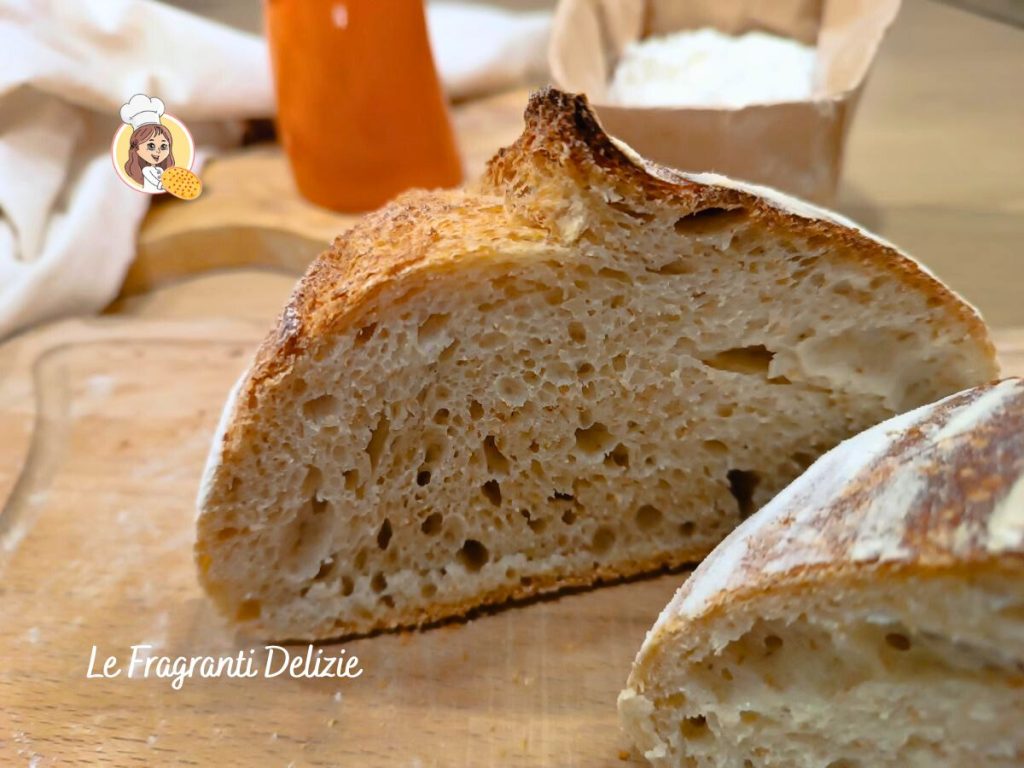
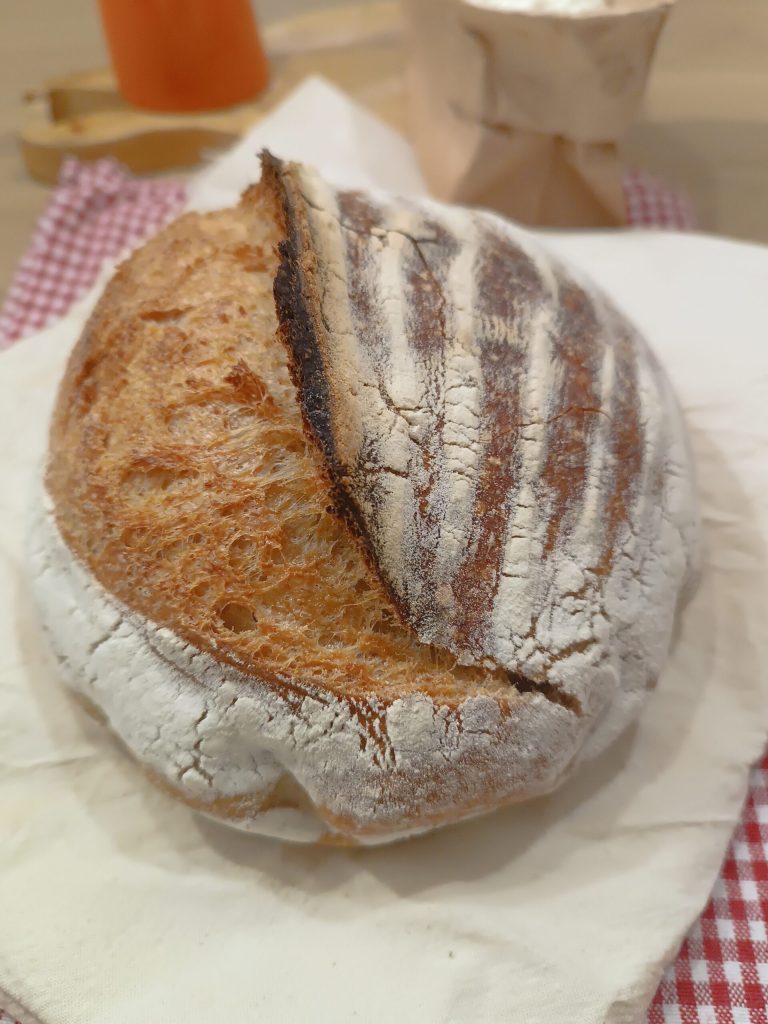
The LICOLI, liquid sourdough, gives the bread a unique lightness, a crispy crust, and a soft crumb with well-defined bubbles.
In this recipe, I explain how to make artisanal bread accessible to everyone, with practical tips on proofing times, hydration, lamination, folds, and managing the LICOLI.
Perfect for making excellent bruschetta, crostini, or simply enjoying hot with a drizzle of good olive oil: a fragrant delight to try.
Follow the aroma… the recipe continues!
Make sure to run and read the “SPECIAL: Guide to the Best Stand Mixers”
You might also be interested in:
- Difficulty: Medium
- Cost: Very economical
- Rest time: 21 Hours
- Preparation time: 1 Hour
- Portions: 2Pieces
- Cooking methods: Oven
- Cuisine: Italian
- Seasonality: All seasons
- Energy 1,000.20 (Kcal)
- Carbohydrates 201.86 (g) of which sugars 3.93 (g)
- Proteins 38.63 (g)
- Fat 3.21 (g) of which saturated 0.00 (g)of which unsaturated 0.00 (g)
- Fibers 7.36 (g)
- Sodium 2,681.78 (mg)
Indicative values for a portion of 1,000 g processed in an automated way starting from the nutritional information available on the CREA* and FoodData Central** databases. It is not food and / or nutritional advice.
* CREATES Food and Nutrition Research Center: https://www.crea.gov.it/alimenti-e-nutrizione https://www.alimentinutrizione.it ** U.S. Department of Agriculture, Agricultural Research Service. FoodData Central, 2019. https://fdc.nal.usda.gov
Ingredients
- 5.3 oz sourdough (liquid culture refreshed)
- 3 1/2 cups Manitoba flour (or flour with a strength W 350)
- 2/3 cup whole wheat flour (soft wheat)
- 1 2/3 cups water
- 2 tsp salt
Tools
- 1 Proofing Basket proofing baskets
- 1 Dough Cutter dough cutter and scraper
- 1 Stand Mixer
Preparation
For the LICOLI
To refresh the liquid sourdough (li.co.li) and make it active, take 50 g of li.co.li (the excess, the leftover in the container can be discarded or used to make recipes that do not require leavening, such as rosemary breadsticks). Put it in the stand mixer or a bowl and add equal weight of water (50 g) at a temperature of about 99-100 °F, and equal weight of flour (50 g). Then knead until incorporated. Place in a graduated container or glass jar and let rise until the li.co.li has reached one and a half times its initial volume according to the Pagani method (for example, if the refreshed li.co.li in the jar has a height of 5 cm, it will be ready for use when it has reached the height of 7.5 cm). Generally, a healthy sourdough rises in about 3 hours at a temperature of 72°F).
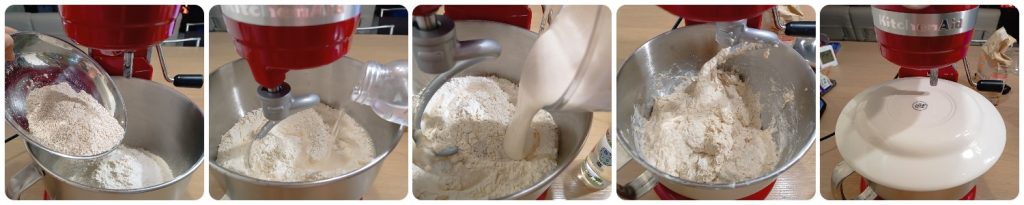
For the bread – 1st step autolysis
In the bowl of the stand mixer add the two flours, the water (leaving some aside to add later with the salt), and the refreshed sourdough (150 g), then mix with the hook at low speed just until the water is absorbed. The dough should be coarse. Cover and let it rest for about an hour in winter and half an hour in summer.
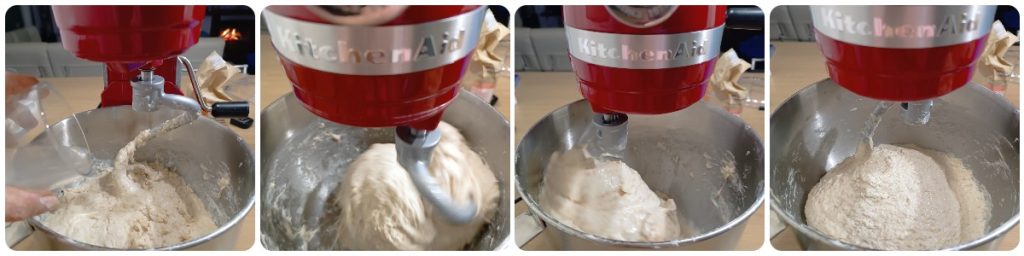
After the necessary time for autolysis, add the remaining water with the salt and start the stand mixer at low/medium speed kneading with the hook until the dough becomes soft and elastic. Cover again and let it rest for about 30 minutes.
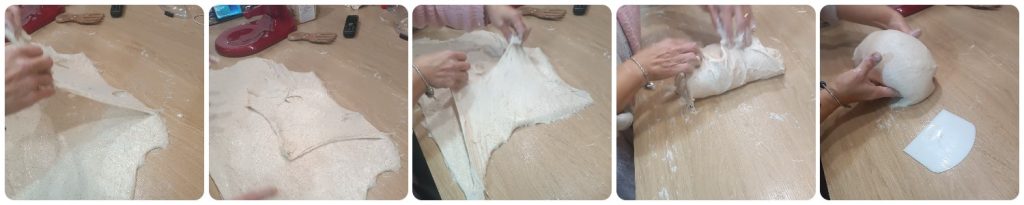
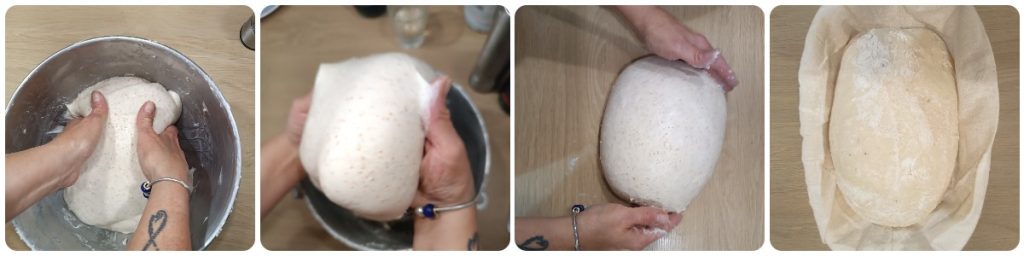
After the time has passed, transfer the dough on a floured surface, wet your hands, and stretch it as much as you can trying to form a rectangle (dough lamination). Take one outer side of the rectangle and bring it to the center of the dough. Do the same with the other corners. Roll the dough on itself, form a dough ball, and place it back in the bowl. Cover and let it rest for about 45 minutes.
Fold the dough two times at intervals of 30-40 minutes. Then proceed to shape the dough by dusting it with plenty of flour, closing it well, and trying to handle it carefully to avoid letting the air trapped inside the bread escape. Place it in the well-floured proofing basket, cover it with a cloth, and let it rest in the fridge for about 14-16 hours.
The next day preheat the oven to 482 °F in static mode and place a cast iron pot with the lid if you have one. If not, don’t worry, your bread will still be good.
While the oven reaches temperature, sprinkle the bread with a little flour, then gently flip it over on a sheet of parchment paper, removing the excess flour. Make a deep cut with the blade from one end to the other.
When the oven has reached temperature, transfer the bread into the pot being very careful as it will be very hot! To make this operation easier, lift it with the outer edges of the parchment paper and place it in the pot or on a baking sheet, cover it with the lid, and cook for 15 minutes. After the time is up, lower the oven’s temperature to 428 °F for another 35 minutes without the lid. When it has reached the right color, remove it from the oven. Before cutting and enjoying the bread, wait for it to cool, it will take at least a couple of hours. The wait will definitely be worth it and will prevent the bread from being ruined.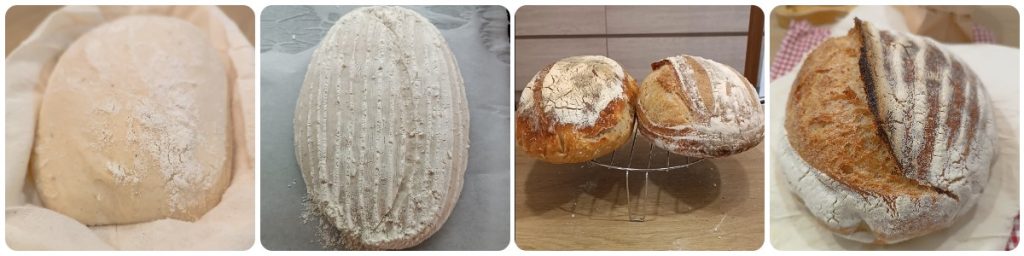
Silvana’s Tips
Use quality flour: it helps to support high hydration.
If the dough is too soft, add an extra rest between the folds.
The crust will stay crunchy longer by letting the bread cool on a rack.
For a wider crumb structure, prefer a long and gentle rising.
Don’t forget… Follow me on my social pages, on Instagram by clicking HERE and on Facebook click HERE and also on Pinterest HERE. Go back to the HOME
