Today I present to you the recipe for making a beautiful and delicious birthday cake with sponge cake, cream, and pineapple.
If there’s one thing that fills me with joy and satisfaction, it’s making birthday cakes to celebrate friends and family!
They are certainly not quick preparations, but in the end, when you have your creation in front of you, the emotion will be immense!
I know what you’re already thinking! “Making a birthday cake at home is difficult“! “I’m not able, I prefer to buy it“! “One must be really skilled to make a birthday cake at home“!
I can’t say that making a birthday cake is as simple as making a bundt cake, but I assure you it’s not impossible nor too difficult not to try!
You too can make a birthday cake that will make the guest of honor happy, just follow my advice 😉
I chose to offer you a cake perfect for any season but also for any occasion or holiday, not just birthdays!
The base of this cake is made with the classic sponge cake (WITHOUT YEAST mind you), filled with a delicate custard enriched with pieces of pineapple.
I decorated the surface with sponge cake crumbs, almost reminiscent of a mimosa cake though different from the classic version (filled with diplomat cream). Finally, I enriched our birthday cake with dollops of cream and colorful sugar balls and it’s instantly a party!
In this article, we’ll follow step by step the preparation of this birthday cake. We’ll start with the cream, then move on to the sponge cake, and finish with the soak, essential for a cake that’s sure to be a success.
Follow all my advice and you’ll leave the birthday person speechless! Read to the end, you’ll find a small gift for you ❤️
By the way, read here all my tips for making a perfect sponge cake without yeast.
Now let’s see together how to make a birthday cake!
Other recipes that might tempt you!
- Difficulty: Medium
- Cost: Medium
- Rest time: 6 Hours
- Portions: about 14 people
- Cooking methods: Stovetop, Electric Oven
- Cuisine: Italian
- Seasonality: All seasons
Ingredients
- 1 l whole milk (fresh)
- 6 egg yolks (from medium eggs)
- 230 sugar
- 3/4 cup cornstarch
- 1 lemon (zest grated)
- 8 eggs (medium whole)
- 1 1/4 cup sugar
- 2 cup all-purpose flour
- 2 1/8 cup water
- 1 oz alchermes
- 1 oz limoncello
- 1 lemon (juice + zest)
- 2 tbsp sugar
- 8 oz pineapple, canned (canned)
- as needed sugar pearls (colored)
Tools
- Bowls
- Mixer
- Spatula
- Hand Whisk
- Sieve
- Baking Pans
- Saucepan
- Grater
Steps
First, let’s think about the cream that will need to cool for about 4 hours.
Wash a lemon thoroughly under water, preferably organic, and grate all the zest, half will go into the milk, and half into the eggs.
To make my cream even more fragrant and with an intense lemon flavor, I don’t use the peel but directly the grated zest.
If you prefer, you can use the whole zest (to place in the milk) and remove it before the cream thickens.
Place a non-stick saucepan on the stove, pour the fresh whole milk inside and add half of the grated lemon zest.
Turn the heat to low and leave it. In a bowl, bring together the medium egg yolks.
Add the sugar and beat vigorously with a hand whisk or if you prefer with an electric mixer.
Add the other half of the grated zest and mix until you get a nice light and creamy mixture.
Now add the cornstarch (or all-purpose flour) and mix very well.
At this point, it may seem that the mixture has become too “thick“! Don’t worry, it’s all normal 😉
Temper with a ladle of milk (not boiling) taken directly from the saucepan and stir quickly with the whisk.
Then pour all the rest of the milk over the egg mixture, mix, and then pour it again into the saucepan.
Reposition the saucepan on the stove and cook the mixture for about 10 minutes until the cream thickens, stirring CONTINUOUSLY.
As soon as the cream hits a boil (starts puffing like a volcano) turn off the stove and pour it into a glass or ceramic container, preferably NOT plastic.
Just give it a stir with a hand whisk and then cover it with cling film in contact, making sure not to create air bubbles.
Cool the cream first at room temperature for about 4 hours before using it.
Once cold, place about 800 grams of cream in one bowl, the rest in a smaller one, the latter will be used for decoration.
Since not everyone has the same time to dedicate to cooking, I’ll leave you a useful tip.
Prepare the custard, the soak, and the sponge cake the night before. The next day you only need to fill and decorate the cake!
To be able to decorate the cake with crumbs, I made two sponge cakes with two 9-inch pans since I didn’t have a larger one.
Each sponge cake was then divided into two disks of 3/4 inch each, three I used for the cake and one for decoration.
If you prefer, you can make one single sponge cake with 4 layers, one of which you’ll use to make crumbs.
Just pour all the obtained mixture into a 11-inch pan (bake for about 35-40).
Beat the whole eggs (at room temperature) with sugar until you get a light mixture tripled in volume.
This is the key phase to determine a perfectly made sponge cake without needing to use yeast, banned from the traditional recipe.
Whipping eggs and sugar for a long time helps incorporate lots of air which will make the sponge cake very tall but above all super soft.
In total, you should work the mixture for about 15-20 minutes, with the help of a stand mixer or an electric mixer.
After this time, you will have obtained a mixture so puffy that if you have mistakenly taken a bowl that is too small, you risk it spilling over the edges!
So don’t forget that the bowl where you’re going to whip the eggs and sugar must be able to contain a mixture tripled in volume.
We’ve reached another crucial point for making our birthday cake! The addition of the flour!
Whether it’s cornstarch, all-purpose flour, or potato starch, what’s important is to add the powders little by little and mix gently from bottom to top.
Before adding more flour, you must have perfectly incorporated the previous one without forming lumps.
IMPORTANT: this operation must be done by hand without an electric whisk to prevent it from deflating.
Once all the flour is incorporated, divide the batter exactly in half and pour it into two 9-inch pans (please, respect the size) buttered and floured.
If your oven cannot host two pans at the same time, you will need to halve the doses and make the second sponge cake after baking the first, or make just one with 4 layers.
Bake the two sponge cakes for about 30 minutes at 338°F, preheated static oven.
NEVER OPEN the oven before 30 minutes, otherwise the sponge cake will deflate! After the time, do the toothpick test.
When they are cooked, take the pans out of the oven, let the sponge cakes cool, then remove them from the molds and place them on a rack.
We are already halfway through! We need the soak to make your cake irresistibly delicious!
I love alcoholic soak, but at the end of the article, you’ll also find the non-alcoholic version.
In a saucepan pour water, Alchermes, Limoncello, the zest of a well-washed lemon, juice of half a lemon, and two tablespoons of sugar.
Turn on the stove and bring to a boil. Then turn off and let cool completely. Strain before using.
Here we are! All the longest preparations have been completed, now comes the most fun and creative part!
Take the pineapple slices, cut them into small pieces and put them in a sieve to drain from their juice.
Necessary clarification about the pineapple I used!
Usually, when I make cakes with pineapple, I always use the canned one.
This time I wanted to try using fresh pineapple, but I risked it not being sweet enough.
Therefore, if you want to be more assured, choose canned pineapple cut into slices.
Don’t throw away the preservation juice because at the end I’ll reveal how you can use it!
Leave one slice (or more) of pineapple aside for the final decoration.
Take the cream (the 800-gram bowl) and work it for just a few seconds with an electric whisk to restore its creaminess.
Leave the remaining cream in the fridge.
Add the pineapple pieces to the cream and mix with a spatula! The filling is ready!
Take a nice serving plate where you can construct your cake.
Place the first sponge cake disk on the plate, moisten it on the surface and along the edges (WITHOUT OVERDOING IT).
Generously fill the first layer with custard and pineapple.
LIGHTLY moisten on the surface the second disk (you can help yourself with the back of a spoon or a special dispenser).
Carefully without breaking it, flip the just-moistened sponge cake onto the cake, placing the moistened part on the cream.
In front of your eyes, you will therefore have the dry layer that you need to moisten (always without overdoing it).
Fill again with cream and pineapple and finally moisten both sides of the last layer as well.
A smart tip: place the inner (more beautiful) part of the third disk facing up, always after lightly moistening both sides!
At this point, you can choose whether to decorate the cake immediately and serve it or place it in the fridge and embellish it the next day.
Then proceed to decoration. Coat the perimeter and surface with a little remaining cream, using a spatula.
You don’t have to be precise in this step, just “dab” the cake a bit to make the crumbs adhere.
With the leftover cream, fill a piping bag, you will need it for the final dollops.
Take the last sponge cake and crumble it with your hands. If you prefer larger crumbs, you can cut it with a knife.
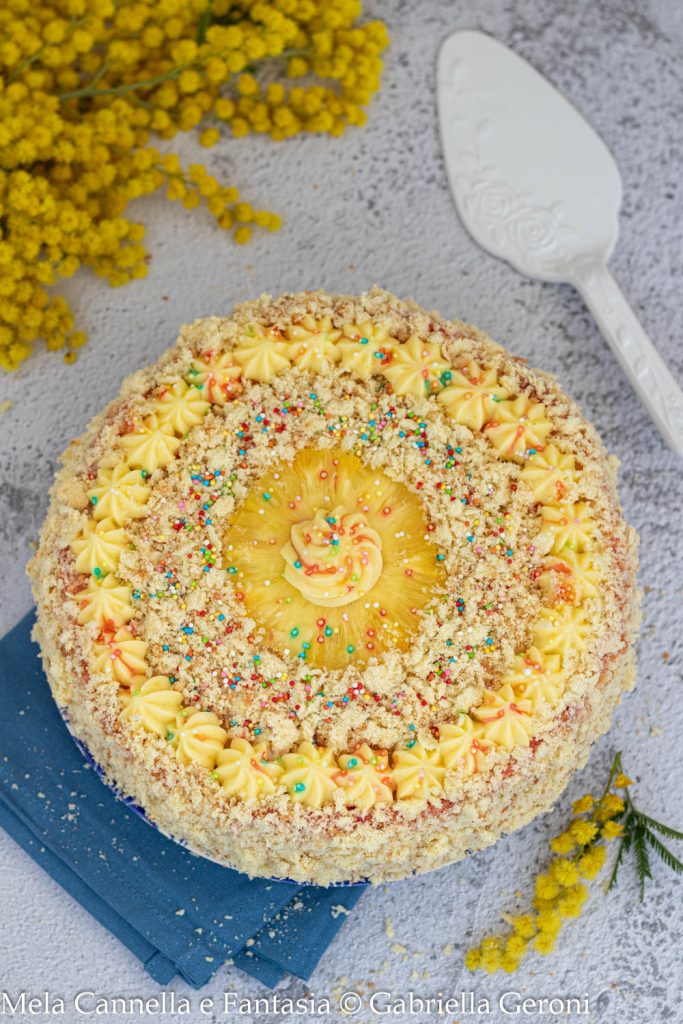
Place the pineapple slice set aside in the center of the cake. With the piping bag, make cream dollops all around.
Use the crumbs to coat the cake all around and a bit on the surface. Sprinkle colorful sugar here and there to dress it up for the party!
And finally (“it was about time“, you’ll say!!) the homemade birthday cake with a sponge cake base and cream and pineapple filling is ready!
Majestic, colorful, fragrant, and above all beautiful!
After all this work, don’t hold back! Congratulate yourself because you will have prepared a super birthday cake!
I hope I have guided you in the best way possible in this preparation and have been helpful in making your most beautiful birthday cake!
I would love to read your comments if you made this cake!
I leave you possible variations and other useful tips below. Until next time!
Article protected by copyright © – Gabriella Geroni © All Rights Reserved
FAQ (Frequently Asked Questions)
With which fruit can I replace pineapple?
You can make this birthday fruit cake using the fruit you like best, also based on seasonality! It’s great with strawberries, or with blueberries or raspberries, peaches, or kiwi.
How can I make a non-alcoholic soak?
For a lighter version suitable for children, you can use the pineapple juice contained within the canned pineapple. You can dilute it with water and lemon juice.
Or you can simply use water, lemon juice, and sugar that you will boil as described above and then let cool.Instead of sponge cake crumbs, how can I decorate the cake?
If you prefer a different decoration for your cake, you can make one single sponge cake with three layers and once you have finished filling the cake, you can cover it entirely with whipped cream (whipped with electric whisks) making many dollops with the help of a piping bag.
SPONGE CAKE DOSES FOR THREE LAYERS (about 12 people):
9.5-INCH PAN
6 WHOLE EGGS
180 G SUGAR
180 G ALL-PURPOSE FLOUR
For baking: same oven temperature (as indicated above) for a about 35 minutes.
I’ll leave you my handy table where you can read the Sponge Cake Doses, so you can adjust next time in choosing the pan.How long does a filled birthday cake last?
Birthday cakes filled with various creams should be stored in the fridge and last for about three to four days.
To avoid unnecessary waste, we can also freeze it (I always do!).
In this case, I recommend cutting the leftover cake into slices, placing them in an airtight container, and separating each slice with parchment paper sheets.
This way, it will be very easy to defrost only the slices you want to consume and continue to store the others in the freezer for a maximum of three months.