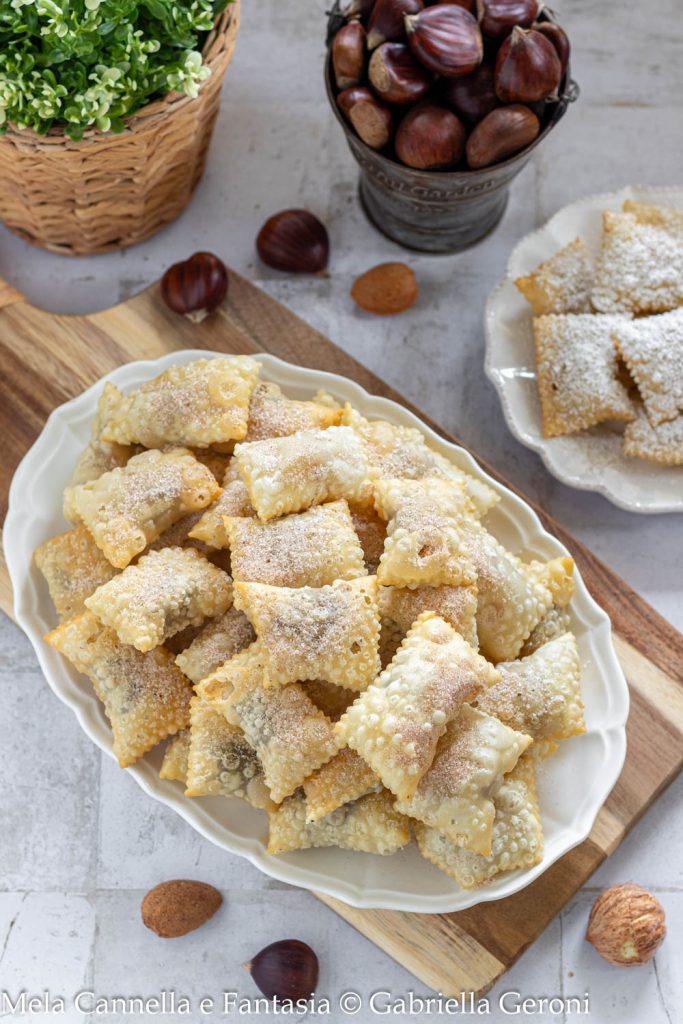
Presenting to you the Caggiunitt Teramani, an ancient Abruzzo sweet with a unique and unforgettable taste!
In Italian, they call them “calcionetti” or “caggionetti” from Abruzzo, however, the dialect name of this treat cannot be Italianized, they must be called caggiunitt and nothing else!!
With great emotion and pride, I am finally able to present to you one of the most beloved sweets from my land, Abruzzo. I say finally because creating an article dedicated to such an ancient sweet is no simple task!
This year, after much time, I’ve managed to take the right amount of time to dedicate to this preparation, to explain it meticulously and make it accessible even to those who are not from Abruzzo.
I’ve also made the video recipe that I hope to attach here soon. Don’t worry, though, in this article you will find the step-by-step photos that will make your work much easier.
I am originally from the province of Teramo, and those who follow me will have already had the chance to discover some gastronomic specialties of Teramo.
In dialect, depending on the area, we know this sweet as caggiunitt, caggiunett, caviciun, caviciunette, cavicione.
The Caggiunitt Teramani are small pastries made from extremely friable dough based on only flour, oil, and wine, making the pastry crunchy and full of small bubbles.
Inside, they are filled with a truly delicious filling made of chestnuts, specifically Marroni. This is the version prepared in the Teramo area.
In other parts of Abruzzo, two other types of fillings can be found. There’s the version that uses cooked must, which was heated and combined with honey, almonds, lots of cinnamon, and boiled chickpeas instead of chestnuts.
In the past, dried chickpeas were soaked the night before to then be boiled and sieved until they became a purée. Today, some people even use canned ones to speed up the process.
The third version widespread in Abruzzo is the one using our Montepulciano grape jam (the “scrucchiate“) which is usually used to make bocconotti. It is combined with almonds, honey, cinnamon, and chopped chocolate or, in other variations, added to the chickpea-based filling.
The version we prepare in Teramo is composed like this. To the chestnuts, which should be boiled and then sieved first, dark chocolate, almonds, cinnamon, candied citron, Rum, sugar (or honey), orange, and lemon zest, and a bit of coffee are added.
All these ingredients are mixed until a delicious, soft, and really fragrant filling is created.
With the dough rolled out to perfection so it becomes almost transparent, small ravioli stuffed with the filling are made.
They are then closed and finally EXCLUSIVELY FRIED. The caggiunett are not baked, only fried, make no mistake!
They are light, beautiful to look at, fragrant, and so good that if you taste one, you have to hide them, or they disappear even before you’ve finished making them!
For an Abruzzese, Christmas has a wonderful scent of goodness. Even after years, they perfectly remember the scent of those simple and genuine Christmas sweets that marked their childhood.
Among these, the caggiunitt hold a significant place. Our grandmothers used to start frying hundreds and hundreds of calcionetti a week before Christmas. They stored them on cardboard trays, lined with bread paper or paper towels.
They were usually hidden to prevent them from not making it to the festive tables! In fact, they are so delicious that it’s really impossible, and I’m not just saying it, to taste one and stop there.
No! Lu caggiunett is a unique temptation! You try one, and you have to tie your hands, or in no time, you’ll have finished eating an entire tray!
I’ll just tell you that to make this recipe, I fried 140 caggiunitti, and they were gone in 3 days!!
I think I’ve talked enough! I leave you to the somewhat long and possibly even a bit challenging preparation of these fried chestnut sweets, a typical Abruzzese specialty.
Remember, traditions are beautiful and remain so if passed down. Let us defend ancient recipes and teach them to future generations.
It’s better to lose a day of time in the kitchen to savor a product with a magical taste rather than wasting it on frivolous and valueless things!
Before starting, I’ll leave you with some other typical Teramo recipes that I absolutely recommend trying!
I almost forgot, read until the end, you’ll find useful tips for executing this recipe and a little gift ❤️🩷❣️
- Difficulty: Medium
- Cost: Medium
- Rest time: 1 Day
- Portions: about 130 pieces
- Cooking methods: Boiling, Frying
- Cuisine: Italian
- Seasonality: Christmas, Autumn, Winter
Ingredients
- 1 kg marroni (weight with skin, chestnuts are also fine. Or 1 kg chickpeas; or 500 g chickpeas and 500 g marroni/chestnuts)
- 200 g peeled almonds (toasted and chopped)
- 200 g dark chocolate (or 100 g chocolate and 100 g unsweetened cocoa powder)
- 2 teaspoons ground cinnamon
- 100 g candied citron
- 1 orange (grated zest)
- 1 lemon (grated zest)
- 80 g rum (of excellent quality)
- 30 g coffee (no sugar needed)
- 30 g water (from chestnut cooking)
- 500 g sugar (or 250 g sugar and 250 g honey or 500 g honey)
- 850 g all-purpose flour (about + q.b. for the pastry board)
- 300 g white wine (or dry sparkling wine)
- 150 g olive oil (no seed oil)
- peanut oil
- granulated sugar
- ground cinnamon
Tools
- Casserole
- Bowls
- Food mill
- Pasta machine
- Chopper
- Pastry board
- Thermometer
- Skimmer
- Pastry cutter
Steps
To make the Caggiunett Teramani, it takes two days as the filling, as well as the dough, need to rest in the fridge.
Therefore, organize your time so preparing them will be easier.
Let’s start with the chestnut-based filling. As I mentioned in the introduction, there are three types of “caggionetti” fillings from Abruzzo.
In the province of Teramo, my province, the main ingredient of the filling is chestnut, specifically Marroni.
Chieti and Pescara fill them with chickpeas while L’Aquila also uses scrucchiata, which is Montepulciano grape jam.
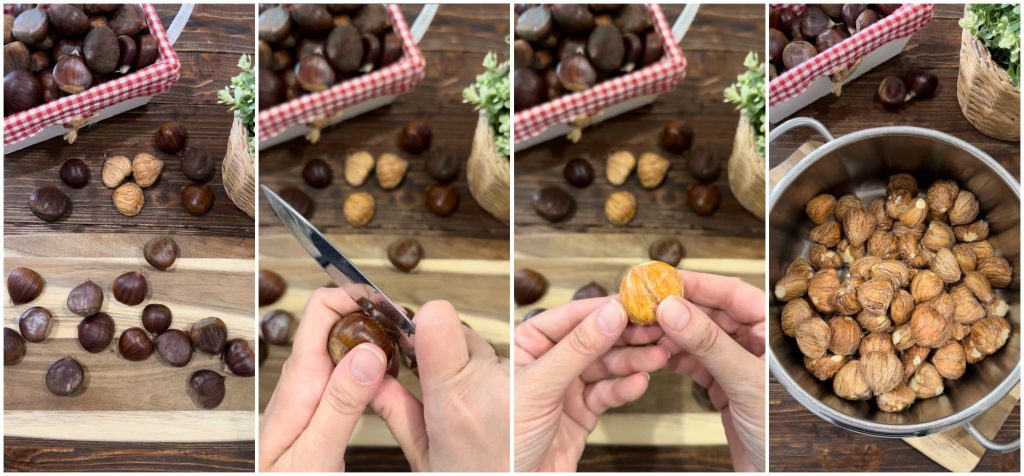
Today we prepare the Teramo version, so first we need to score all the chestnuts and remove the skin because they will be boiled.
This is what the traditional recipe requires, so no chestnuts baked in the oven, on the grill, or in a pan, just boiled.
Arm yourself with patience because this is the most tedious part! Once you have peeled the skin off all the chestnuts, they should be placed in a high-sided casserole full of cold water.
In the meantime, get ahead by peeling the almonds and toasting them in the oven (340°F static until golden) or in a pan. Then you will need to finely chop them in a mixer.
Place the chestnuts on the stove over medium heat, once it reaches a boil, count about 20-25 minutes. The cooking time also varies depending on the size of the chestnuts.
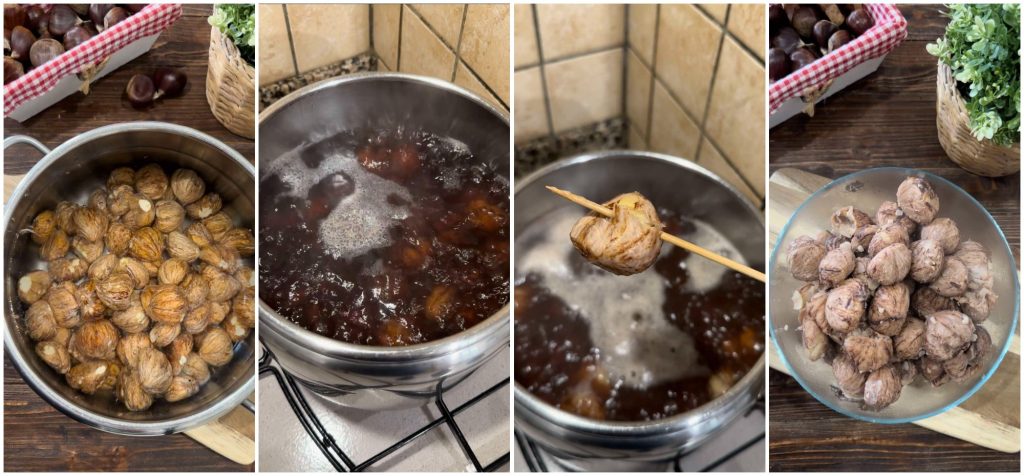
Checking if they are cooked is very simple, just pierce them with a toothpick, and if they are soft, they are ready!
At that point, there will be another somewhat unpleasant step!
Drain the chestnuts but set aside a couple of glasses of cooking water, I’ll explain why later!
We need to peel the chestnuts immediately while they are still hot otherwise if you let them cool, you won’t be able to peel them!
I’ve lost the sensitivity in my fingertips (just kidding!), and I do it with bare hands! If you prefer, protect your fingers with gloves, and if you can, get someone to help you, it will be much faster.
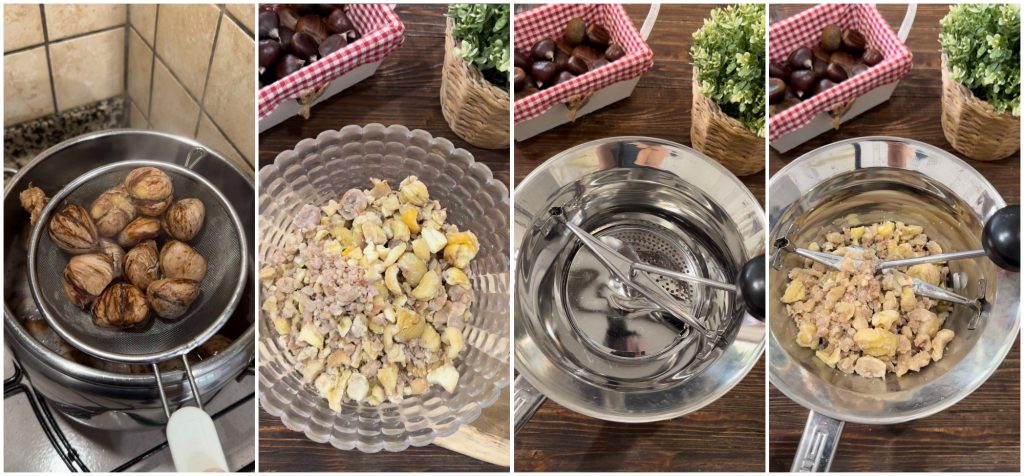
Once all the chestnuts are peeled, you will need to reduce them to a purée using a sieve or food mill.
In reality, this step is also a bit unpleasant because it requires some arm strength, but believe me, it’s worth it!
Inside the food mill, you should add a few chestnuts at a time; otherwise, you won’t be able to work properly.
For practicality, place the sieve over a nice big bowl so the chestnuts reduced to “flour” go directly into it.
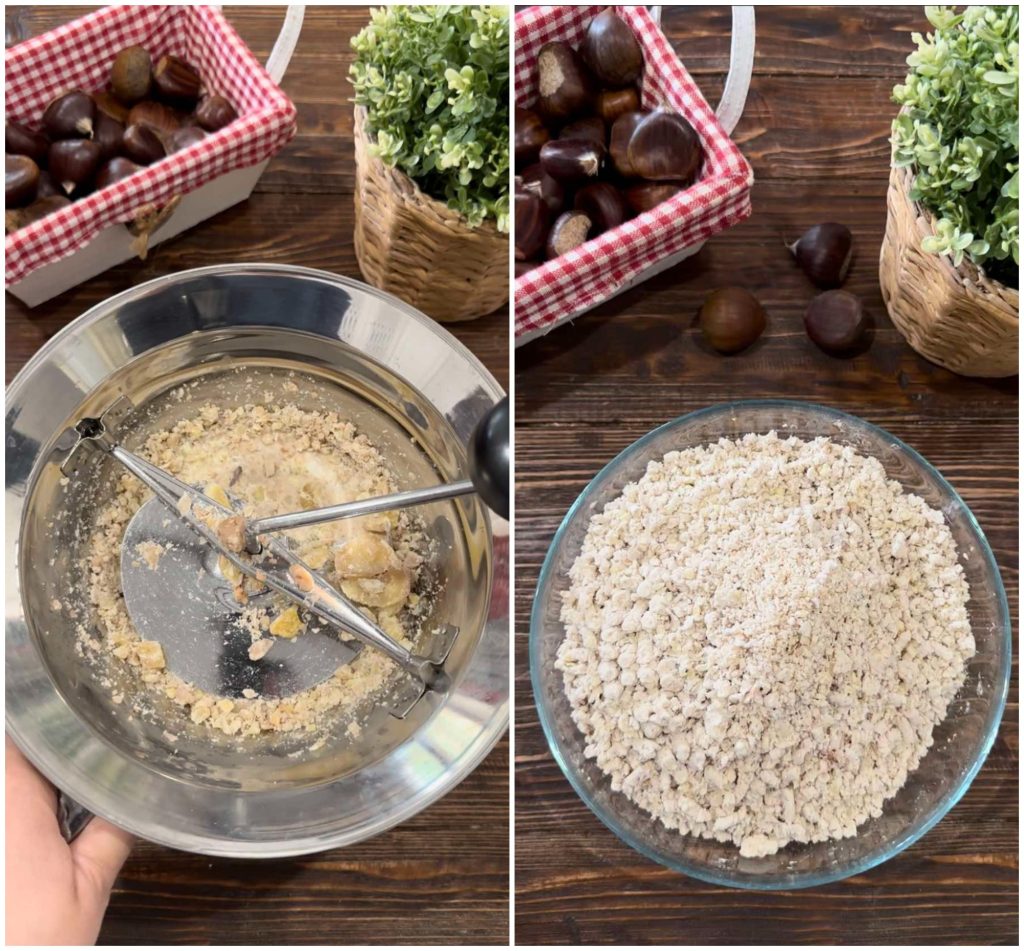
Once you have passed all the chestnuts, preparing the filling will be very quick.
In a large container, add the peeled, toasted, and chopped almonds, the dark chocolate chopped with a knife or in a mixer, and the chestnut purée.
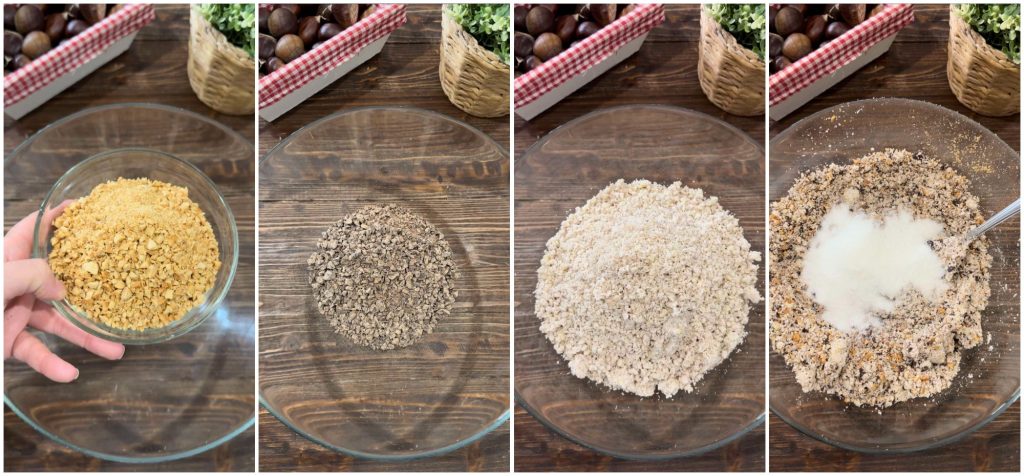
Then add the sugar (I used half sugar and half honey, but all sugar is fine too) and the candied citron cut into tiny cubes (I didn’t use it because no one at home likes it, but the original recipe includes it).
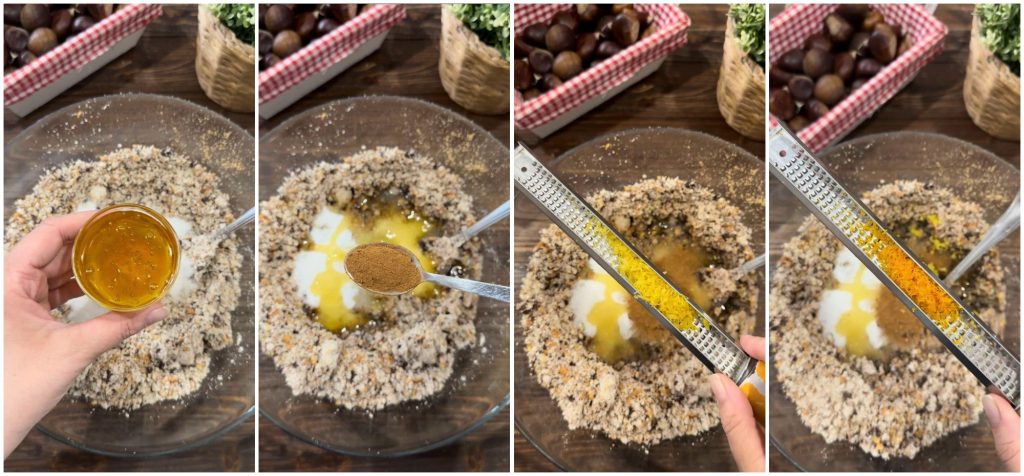
Grate into the mixture lemon zest, orange zest (make sure they are organic and always well washed), and add the ground cinnamon.
Usually, when I write my recipes, I always leave the possibility to replace the ingredients I use, but in this case, I won’t because it wouldn’t make sense.
This is a traditional recipe, an ancient recipe that, if you want to try, you have to follow to the letter; otherwise, the result won’t be the same!
Finally, pour in the previously brewed unsweetened coffee, the Rum, and the chestnut cooking water.
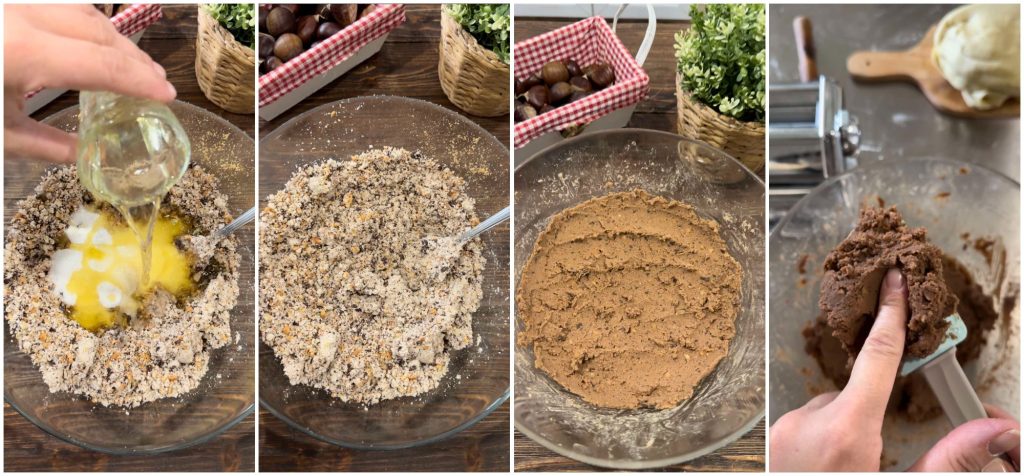
At this point, start mixing, first with a ladle and then directly with your hands because you need to obtain a homogeneous soft and creamy mixture.
Some use a chopper or kitchen robot to chop everything together, but I recommend this only if you make a reduced dose; otherwise, it won’t all fit in the mixer!!
Once you have mixed well, you can cover the filling with food wrap and let it rest overnight in the fridge.
I recommend tasting it anyway to check the level of sweetness and, if necessary, adjust it a bit!
If the filling turned out too dry or too soft, read to the end for my tips.
Here too, there are at least two, or maybe even 3, versions for preparing the dough, but the original one is this and involves using only 3 ingredients: oil, flour, and wine, NO EGGS and no water.
Proceed by pouring the flour into a bowl, then olive oil and dry white wine. Mix with your hands first inside the bowl and then turning everything onto a pastry board.
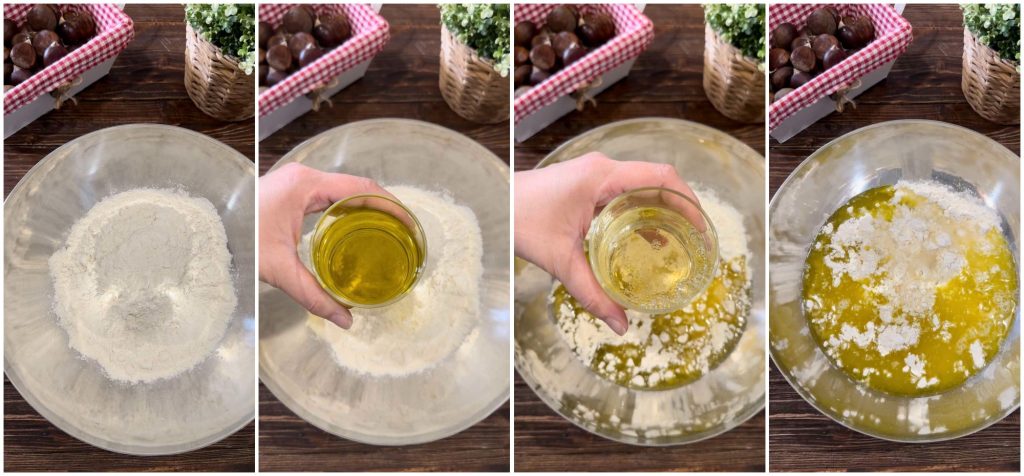
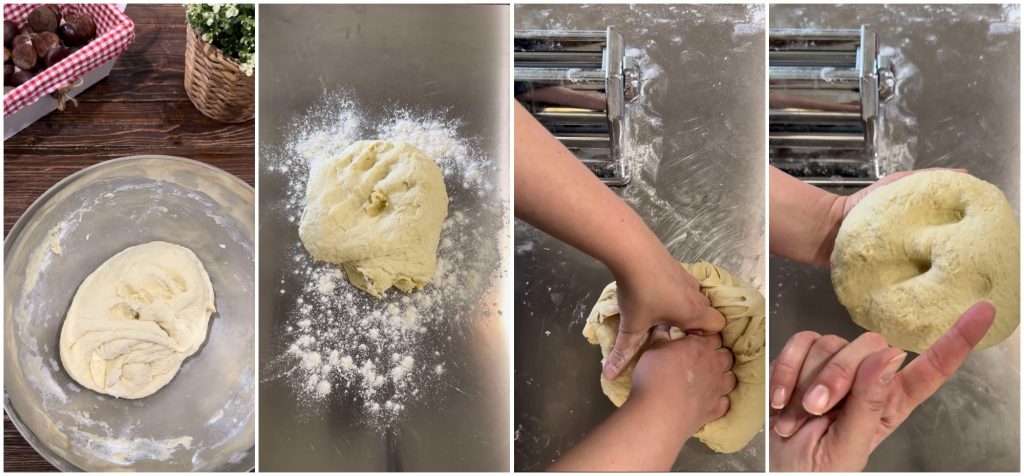
Work until you get a nice soft dough that is not sticky but still elastic. Cover with plastic wrap or place in an airtight container and let rest in the fridge for at least a couple of hours.
If you decide to prepare the dough along with the filling, you can leave it in the fridge overnight and proceed the next day.
In case you keep it in the fridge overnight, before starting, take out the dough and let it sit at room temperature, about an hour.
Do I absolutely have to let the dough rest? Yes! If you want the Abruzzo caviciuni to be full of bubbles and have a crisp crust, the dough absolutely must rest.
I’ve personally tested frying the calcionetti immediately without resting the dough, and the result was not what you see in the photo. Very few bubbles and the crust did not puff well. So, please, NECESSARY REST 😉
Now things are getting more interesting!
We need to roll out the dough with the help of a pasta machine or a pasta roller if you have one, or, but this is advisable ONLY if you are really skilled, you can roll it by hand with a rolling pin.
So take the dough, cut it into slices for convenience, and cover them with a cloth so they don’t dry out.
Roll out the first slice with the rolling pin just to thin it out a bit before passing it through the pasta machine (start with the larger numbers and work your way down to number 2 or even number 1).
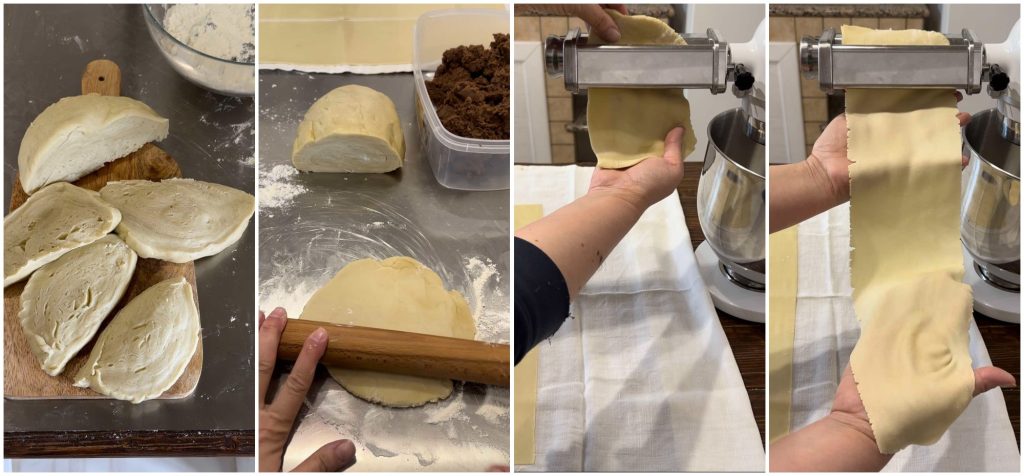
To prevent the dough from sticking to the rollers of the pasta machine, dust it lightly with flour.
To be considered perfect, the sheet of caggiunitt from Abruzzo must be so thin that it appears practically transparent.
Lay out some white kitchen towels on a table, preferably linen, where you will place the sheets as you pass them through the machine.
A note, make sure the kitchen towel (which in our dialect we call sparone) doesn’t smell like detergents; otherwise, it will be absorbed by the sweets).
It’s not necessary to dust the sheets with flour again once they are through the roller; just lay them on the clean and dry cloth.
Continue rolling out all the sheets until the dough is used up.
At this point, take the bowl with the filling that you have left out of the fridge to settle (about 30 minutes before proceeding with the filling).
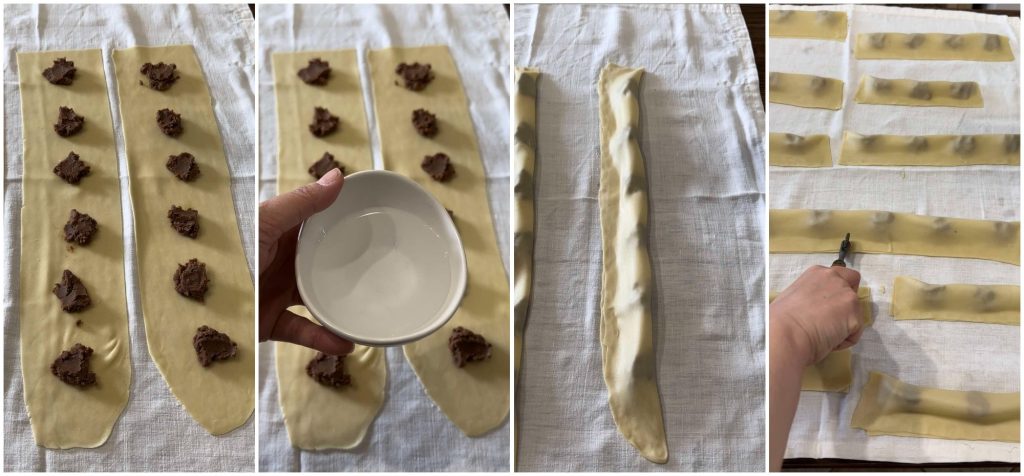
With the help of two teaspoons, scoop a bit of filling and make many little mounds along the sheet, spacing them apart, so you can then fold the sheet and form the ravioli.
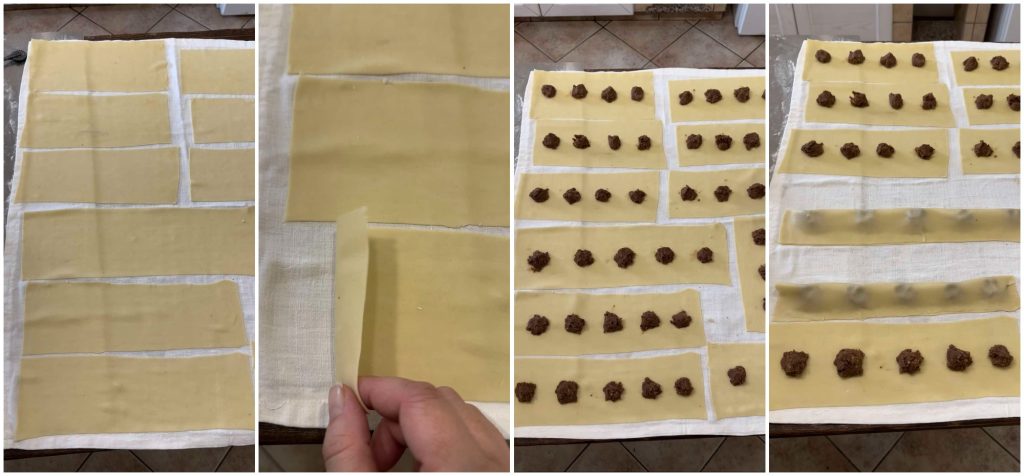
The caggionetti are good if they are well filled, but you shouldn’t overdo it! Not too little, not too much! Judge by eye!
Once you have made all these mounds of filling, moisten the sheet along the entire perimeter with a little water, without overdoing it.
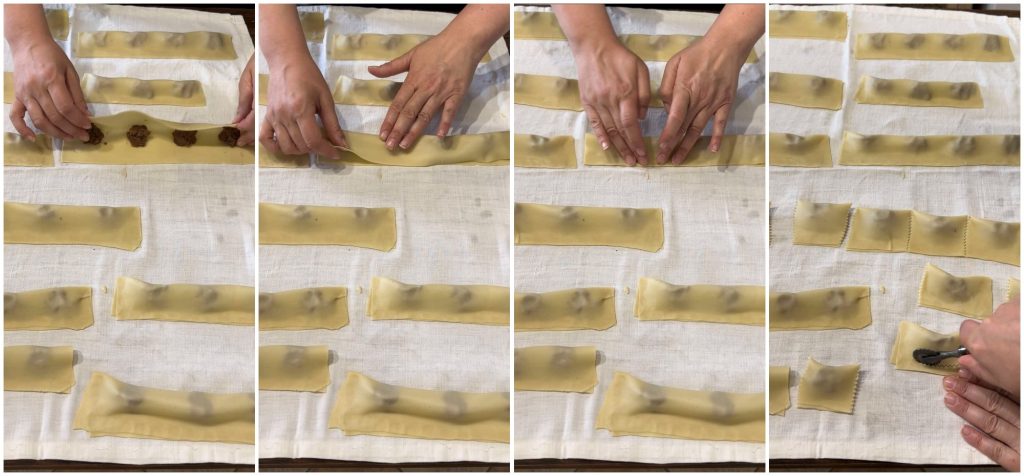
Water is crucial; it will act as a glue when closing the sheet and will prevent the ravioli from opening during cooking. Now lift the sheet and fold it over itself.
Here, you need to pay maximum attention to NOT do one thing: you must not, as you do when making ravioli, remove the air that forms when you fold the sheet.
When making ravioli, as my mom taught me, you press with your index finger between one raviolo and another to release the air.
In this case, you absolutely must not do it; otherwise, the calgionetti will not puff during cooking. So, please, do not touch the sheet if you see it puffing!
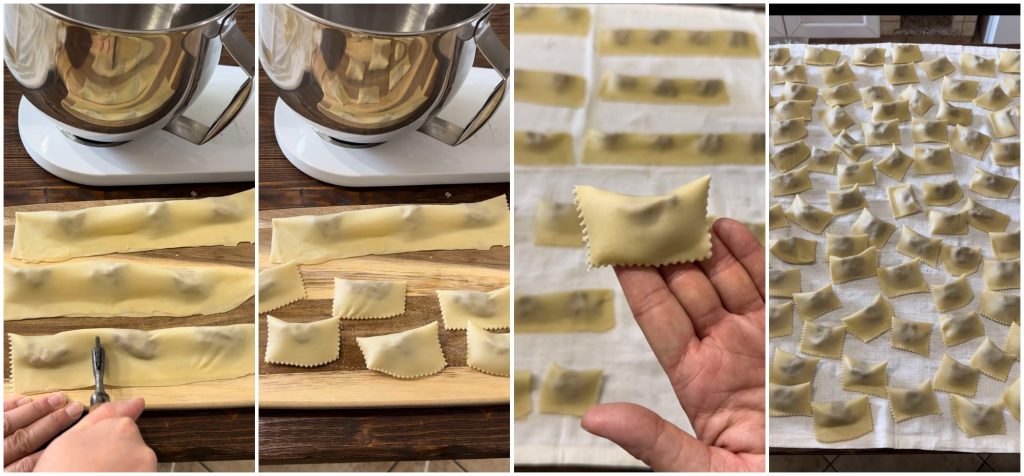
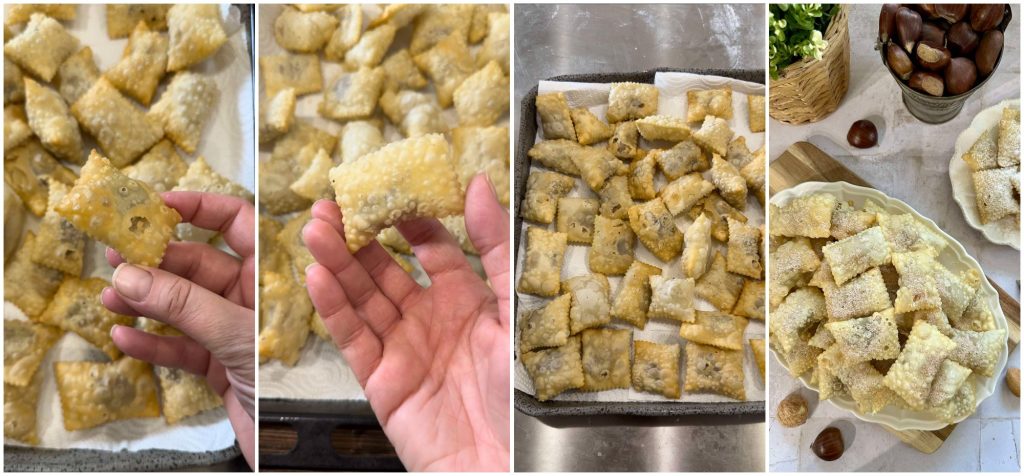
Once closed, you will form your chestnut ravioli! You need a pasta cutter, more precisely a ravioli cutter, and once cut, leave them on the kitchen towels. Do not cover them because the weight of the cloth could make them deflate.
Another important thing: the cut with the pasta cutter must necessarily be made from the side where the sheet joins and not from the other (see photo)
Continue in the same exact way until you have rolled out all the sheets, filled them, closed them, and then cut them with the pasta cutter.
Once finished, you can admire in front of you a wonderful sight! Dozens and dozens of beautiful caggiunitt waiting to be fried to blossom in their full glory!
Therefore, take a pan and pour plenty of seed oil inside.
As with all types of frying, I recommend using small, high-sided casseroles. Insert only a few pieces inside so you can better control the cooking.Another distinctive feature for a calcionetto to be considered perfect is the light color of the dough, so much so that you can see the filling inside.
That indicates that the frying was done expertly! If they are too dark, they were cooked too long, or the oil was dirty and not changed often.
Also, as I have already mentioned, to consider the frying perfect, you need to respect these simple yet precious tips!
The first general rule is that the temperature of the oil should be between 320°F and 356°F before dipping the food inside.
In the past, there were no practical tools like those we have today, and you relied on experience.
In the case of frying, they used to put a small piece of dough (or a piece of bread crumb or a toothpick) in the hot oil, and if it sizzled, it meant it was ready!
Today, fortunately, we can use more professional tools with which it is really hard to go wrong, like the food thermometer.
If you have one at home, use it, and when the temperature reaches 338°F, you can fry!
No less important is the quality and quantity of oil used for frying.
As for the type of oil, it is preferable to use peanut oil for a lighter fry.Regarding the amount of oil to use, the only thing to remember is to ABUNDANT! Better too much than too little 😉
At this point, once the temperature is reached, dip a few pieces inside and let them fry without touching.
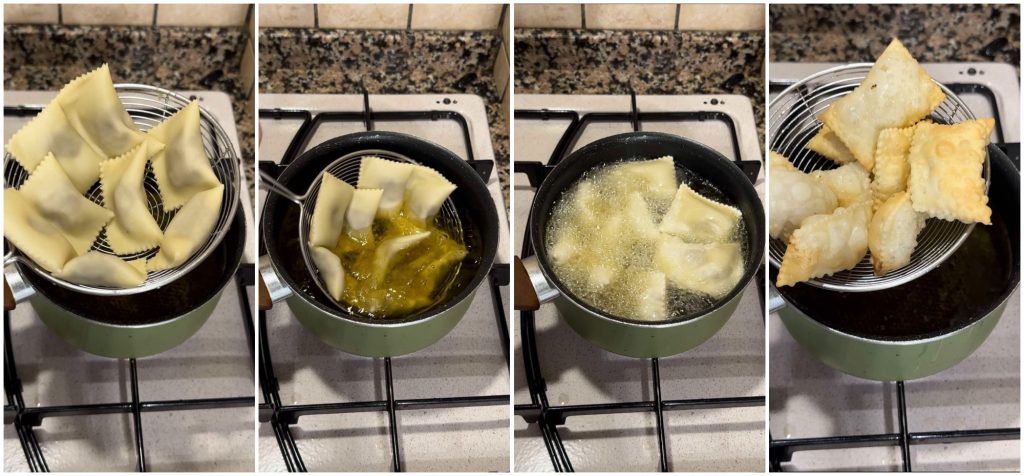
When they have risen to the surface and you see them full of bubbles, they are ready to be taken out.
They must remain light, so as soon as you see they start to slightly color, remove them immediately and put them on absorbent paper to dry the oil.
Proceed in the same way until you fry them all, changing the oil when necessary.
A clever tip to dip the caggiunitt all at once without splashing oil: take the skimmer and place the ravioli inside until covering the surface (always remember not to overdo the number of ravioli to cook at once).
Dip the skimmer in the boiling oil, letting the ravioli slide in, and then remove it. This way, it will be faster and you won’t risk burning yourself or breaking the caggionetti while picking them up.
Once finished cooking, the effort made so far will be amply rewarded by that feeling of happiness, pride, and emotion you will feel looking at the masterpiece you have created!
Wonderful pillows of friable dough, light, transparent, and full of bubbles that inside show a generous filling, with an enveloping taste and aromatic scent.
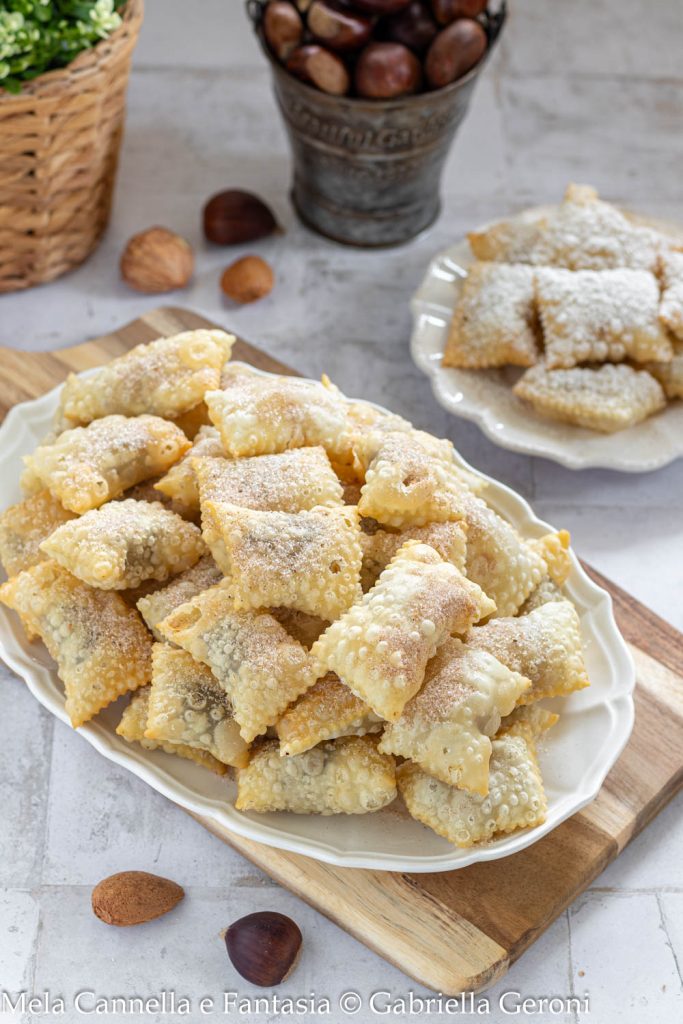
Once ready, the caggiunett can be decorated in two ways, the most traditional involves the use of granulated sugar mixed with ground cinnamon and sprinkled on the sweets.
Others, but it seems to be more of a modern custom, use powdered sugar. For this reason, in the photo, in the background, I included a small sample of cavicioni with powdered sugar! So we satisfy everyone!
I hope you liked this long, complex, ancient, and special Abruzzo recipe. This is my family’s recipe.
Everyone has secrets, variations, habits, which they carry with them for generations. Let’s learn to accept and respect this aspect of ancient recipes as well.
Recipes handed down in the family represent a precious treasure trove of teachings that, instead of ending in oblivion, continue on their journey with much love, towards future generations.
I hope I’ve made you want to try making this really delicious Abruzzo sweet! If you need any advice, feel free to leave a comment, I’ll be happy to help you.
Please, let me know if you try them and if you make these sweets with another version, I’d be glad to read yours in the comments to try it perhaps on another occasion.
Come back soon to visit me! Until next time and happy holidays!
Article protected by copyright © – Gabriella Geroni © All rights reserved
P.s. Of course, you can halve or double the dose according to your needs.
The photos here are my property and are absolutely not modifiable nor usable on other blogs/websites, as they are protected by copyright law n. 633 of 22/04/1941.
Also, in respect of my work, it is forbidden to copy and paste my texts for other purposes.
FAQ
How long do the caggiunitti last?
If you want to enjoy them fresh and still crispy, they should be consumed within a couple of days. Their characteristic is to have a light and friable crust that becomes soft over the days. To be honest, caggionetti are great even a week later, but if you ask me when it’s best to enjoy them, I’d say definitely when freshly made.
Being a sweet that requires a lot of time and work, our grandmothers used to prepare them in large quantities days and days before the holidays and stored them safely even for more than 10 days.
You can also choose to freeze them raw. Once filled and cut, you can put them in airtight containers and store them in the freezer. When needed, you’ll thaw only the pieces you need and fry them without thawing.
Or, as many do, but I personally have never tried, they are frozen once fried. According to those who have tried, once frozen (provided only fresh and not already frozen ingredients are used), they are left to thaw at room temperature and heated just for a moment in the pan. They seem like just fried, but I should experiment because I’ve never tried it!How to store the caggionetti?
In the past, caggionetti were stored inside wicker baskets lined with bread paper to absorb excess oil. After cooking, they were covered with the traditional “sparone“, a simple white, clean, and dry linen kitchen towel.
I don’t like citron, can I avoid putting it?
Yes, certainly, even I don’t use it because no one at home likes it, but tradition includes it, so I listed it in the ingredients!
Can I freeze the caggionetti?
Never done it! Being a fried sweet with a friable consistency, I’m not sure if it will have the same texture once thawed. Some have tried freezing them, but I can’t say. Some even freeze the calcionetti raw, meaning once filled and cut, they are placed in airtight containers and then frozen. When you want to enjoy them, you drop them into the hot oil and fry them.
I haven’t personally tried this type of storage, but I do freeze the filling, so I can make them at my leisure and enjoy them all year round. We can also freeze chestnuts once boiled and peeled (thus raw) and use them later for the filling preparation.Why did the caggionetti open during cooking?
If you followed all my tips to the letter, it surely won’t happen! However, it might happen if you haven’t sealed the ravioli well by slightly wetting the sheet with some water. It’s also important to apply the right pressure on the sheet with the pasta cutter to prevent them from opening during cooking.
This can also happen to those who follow “recipes by eye” where the Rum dose is not specified. In fact, if the latter is used in excessive quantities, it causes the caggionetti to pop in the hot oil (it’s also dangerous, so be careful to stick to the doses!)I have some dough left for the crust, how can I use it
If you have leftover dough for the crust, just like you can do with the filling, you can freeze it and make calcionetti when you feel like it. Or, after thawing it during the carnival period, you can roll out the dough and make frappe that you will fry and then cover with powdered sugar or honey; they are delicious!
My filling is too soft, how can I fix it?
This can happen because weighing the chestnuts with the skin, once boiled and sieved, the weight might vary. In this case, don’t panic, you can adjust the consistency of the filling by adding some chopped almonds, dark chocolate, cocoa powder, and more passed chestnuts if you have made them in abundance. Or you can use precooked chickpeas and blend them. In this case, they should be washed well, put in a pan over low heat to let them dry just a bit, flavored with a tablespoon of honey and lemon, and orange zest. Then they should be blended and added to the other ingredients.
The same thing if the filling is too dry. In this case, you can add a little at a time more chestnut cooking water (or half water and half coffee. No more Rum, the indicated amount is right).I have some filling left, how can I use it?
If you have leftover filling, no problem! I usually freeze it to then prepare caggiunitti throughout the year when I crave them! Or, if you prefer, you can use it to fill cookies or pies.
Can I use already peeled almonds?
Sure, using already peeled ones will definitely save you some time. You will still need to toast them in a pan or oven/air fryer.