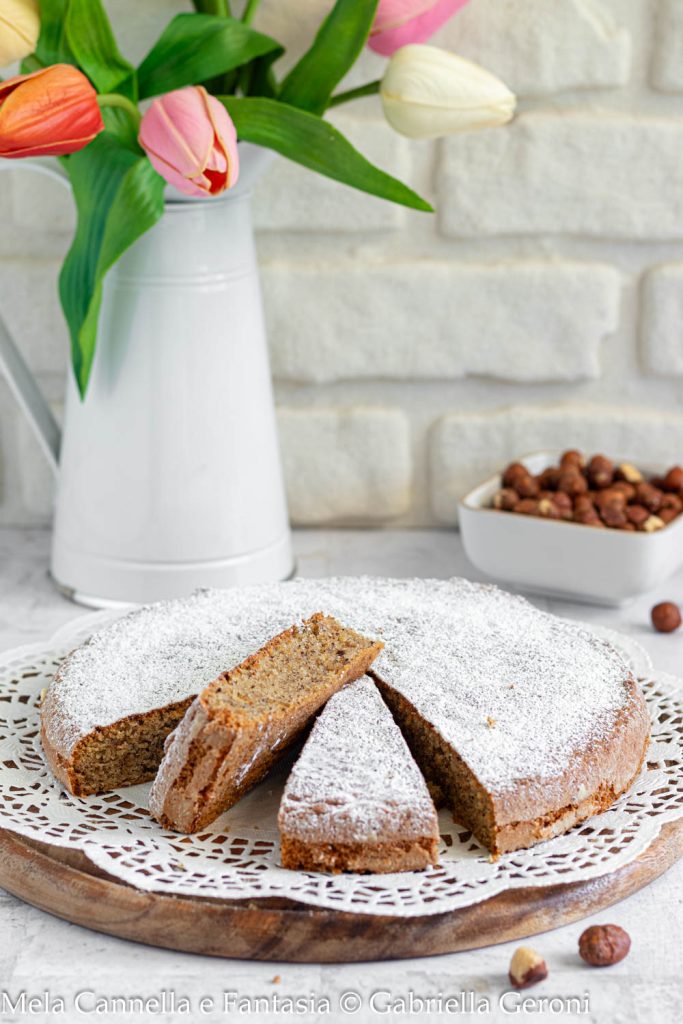
Have you ever tasted a hazelnut cake made with only 3 ingredients?! Yes, you heard right, only three ingredients are needed to prepare this soft, fragrant, and delicious hazelnut cake!
I couldn’t believe it myself, but here I am giving you a recipe that is as simple as it is delicious and is bound to win you over!
The hazelnut cake is a perfect pantry dessert for any occasion. A nice slice accompanied by a cup of milk (or coffee) will give you a great start to your day.
It’s also excellent as a snack or at the end of a meal, enriched with whipped cream, jams, or spreads.
Besides being very quick to prepare, this cake is perfect for those with intolerances. It’s gluten-free, yeast-free, and lactose-free. To make this hazelnut cake you’ll only need eggs, sugar, and hazelnuts.
It might be more appropriate to call it the “cake of without” considering the few ingredients needed to make it!
It’s soft, moist, fragrant, and delicious. Obviously, you have to be a hazelnut lover, otherwise, this might not be the dessert for you! Or maybe it is!
By the end of this article, find out, if necessary, how to substitute hazelnuts if you can’t eat them or don’t like them.
Please read to the end, you’ll find useful tips for making this recipe and a little gift for you ❤️
If you’re a nut lover like me, here are some other truly delicious recipes that I recommend trying!
- Cost: Economical
- Preparation time: 15 Minutes
- Portions: about 6-8 people
- Cooking methods: Electric oven, Instant pot
- Cuisine: Italian
- Seasonality: All seasons
Ingredients
- 4 eggs (medium, whole)
- 6 oz sugar (white or brown)
- 7 oz hazelnut flour (or whole roasted hazelnuts to grind with a mixer)
Tools
- 2 Bowls
- Mixer
- Spatula
- Cake Pan
- Parchment Paper
- Sieve
Steps
To make this hazelnut cake, you must first separate the yolks from the whites and place them in two separate bowls.
Add the sugar (white or brown) to the yolks and use an electric mixer to thoroughly combine the two ingredients until you get a nice cream.
At this point, add the hazelnut flour to this cream, which you can easily buy ready-made at the supermarket.
If you have whole hazelnuts in your pantry, you can use them, but you will need to grind them into flour with the help of a mixer.
Once the hazelnut flour is combined with the yolk and sugar mixture, mix well with a spatula until you get a thick and compact mixture.
Don’t worry, this is the consistency you should achieve 😉
Separately, beat the egg whites until stiff peaks form using a clean and dry electric mixer.
Add a few drops of lemon juice to the egg whites instead of the usual pinch of salt; they will become firm and frothy to perfection.
Once the whites are whipped, add them gradually to the other mixture and gently fold them in with a spatula.
If at first you find it “difficult” to fold in the egg whites, as you add them it will become easier. In the end, you will have a nice smooth batter.
At this point, pour everything into a greased (or oiled) and floured cake pan or one lined with parchment paper.
You will need to bake the hazelnut cake in a preheated static oven at 350°F for about 30 minutes (340°F for about 25 minutes with convection mode).
Alternatively, you can bake the hazelnut cake in an air fryer at 155°C for about 25 minutes.
As always, I like to point out that each oven has a different baking process, so times are approximately variable.
It’s important to always check with the famous toothpick test. After thirty minutes of baking, gently touch the surface of the cake.
If it feels firm to the touch, proceed with the toothpick. If it comes out clean, the cake is ready; otherwise, continue for another 5-10 minutes if necessary.
Once cooked, remove from the oven, let it cool, remove the mold, and place it on a rack to dry out any retained moisture.
Before serving, sprinkle with powdered sugar, and finally, you can enjoy this super soft and fragrant hazelnut cake.
I hope I made your mouth water! Try it yourself; it’s delicious! And if you’d like, come back and visit me soon!
Article protected by copyright © – Gabriella Geroni © All Rights Reserved
FAQ
I don’t like hazelnuts! How can I substitute them?
Whenever I have to guess the questions that might arise in the minds of those on the other side of the screen, I get anxious! One question I struggle to answer is about the substitution of the main ingredient! Not because I don’t know what to answer but because changing the main ingredient means altering the final result.
In this case, hazelnuts are the undisputed stars of this dessert. They give the cake a taste and aroma that couldn’t be replicated with other ingredients.
“Therefore, those who don’t like hazelnuts (or are intolerant) wouldn’t even consider this recipe“!! (that’s what I tend to think!). In reality, some people are still intrigued by the idea of making a cake with three ingredients but absolutely cannot digest the idea of hazelnuts!
At this point, I can tell you “don’t despair”!! If you really don’t want to try with hazelnuts, you can use pistachios, walnuts, or almonds! (please appreciate this rhyme I made for you!).
Being a nut-based cake, it can be made using other types of nuts (always ground into flour). Obviously, for the sake of accuracy, taste and color will change depending on the nuts used. Soon I will try it myself in all the other versions 😋How long does this hazelnut cake keep?
It keeps for several days if well covered. I usually use a cake dome where I store cakes, pies, muffins, cookies, etc. You can find it in any housewares store or online.
If you prefer, you can cover it with a food bag.
Or, to avoid unnecessary waste, we can also freeze it. In this case, as always, I recommend first slicing it and then storing it in an airtight container. Also, don’t forget to separate the slices with small pieces of parchment paper, or you’ll be forced to defrost them in a block.
For defrosting, just leave the slices out, at room temperature, for about half an hour, at most an hour.Why did the cake turn out flat?
Being a yeast-free dessert, its characteristic is precisely to be a flat cake. If visually you like tall cakes, you can follow this trick!
Use 18 cm pans (maximum 20 cm), this way you will get a taller but also narrower cake, smaller than the one you see in the photo.
If you prefer it wide and flat, 22-24 cm is the ideal size, anything larger would be really too, too flat 😉Can I add baking powder to make it taller?
I don’t recommend it! I personally tried the version with baking powder, but the aftertaste, which was both bitter and spicy, wasn’t pleasant. Also, even though I used baking powder, the cake didn’t rise significantly in height.
Therefore, I absolutely recommend the version indicated here, without baking powder. To make it taller, just use an 18-20 cm pan.Can I fill this hazelnut cake?
Of course! Once baked and cooled, you can enjoy it naturally with all its hazelnut goodness! Or cut it in half and fill it in 1000 ways!
Perhaps it doesn’t even need to be said, but one of the most fitting fillings is with hazelnut cream (I won’t mention brands, as it’s unnecessary!).
It’s also great with mascarpone cream, pistachio cream, Chantilly cream, chocolate custard, jams (apricots, raspberries, red fruits, orange).